
1.Oauth2
OAuth 2.0授权框架支持第三方支持访问有限的HTTP服务,通过在资源所有者和HTTP服务之间进行一个批准交互来代表资源者去访问这些资源,或者通过允许第三方应用程序以自己的名义获取访问权限。
为了方便理解,可以想象OAuth2.0就是在用户资源和第三方应用之间的一个中间层,它把资源和第三方应用隔开,使得第三方应用无法直接访问资源,从而起到保护资源的作用。
为了访问这种受保护的资源,第三方应用(客户端)在访问的时候需要提供凭证。即,需要告诉OAuth2.0你是谁你要做什么。
用户可以将用户名和密码告诉第三方应用,让第三方应用直接以你的名义去访问,也可以授权第三方应用去访问。
例如,微信公众平台开发,在微信公众平台开发过程中当我们访问某个页面,页面可能弹出一个提示框应用需要获取我们的个人信息问是否允许,点确认其实就是授权第三方应用获取我们在微信公众平台的个人信息,这里微信网页授权就是使用的OAuth2.0。
-
第三方应用程序(Third-party application): 又称之为客户端(client),我们自己开发的各种客户端,对我们自己的项目来说,QQ、微信、支付宝等是第三方应用程序。
-
HTTP 服务提供商(HTTP service): 我们开发的项目以及 QQ、微信、支付宝、钉钉等都可以称之为“服务提供商”。
-
资源所有者(Resource Owner): 又称之为用户(user),拥有账号密码的人。
-
用户代理(User Agent): 用来访问资源,比如浏览器,代替用户去访问这些资源。
-
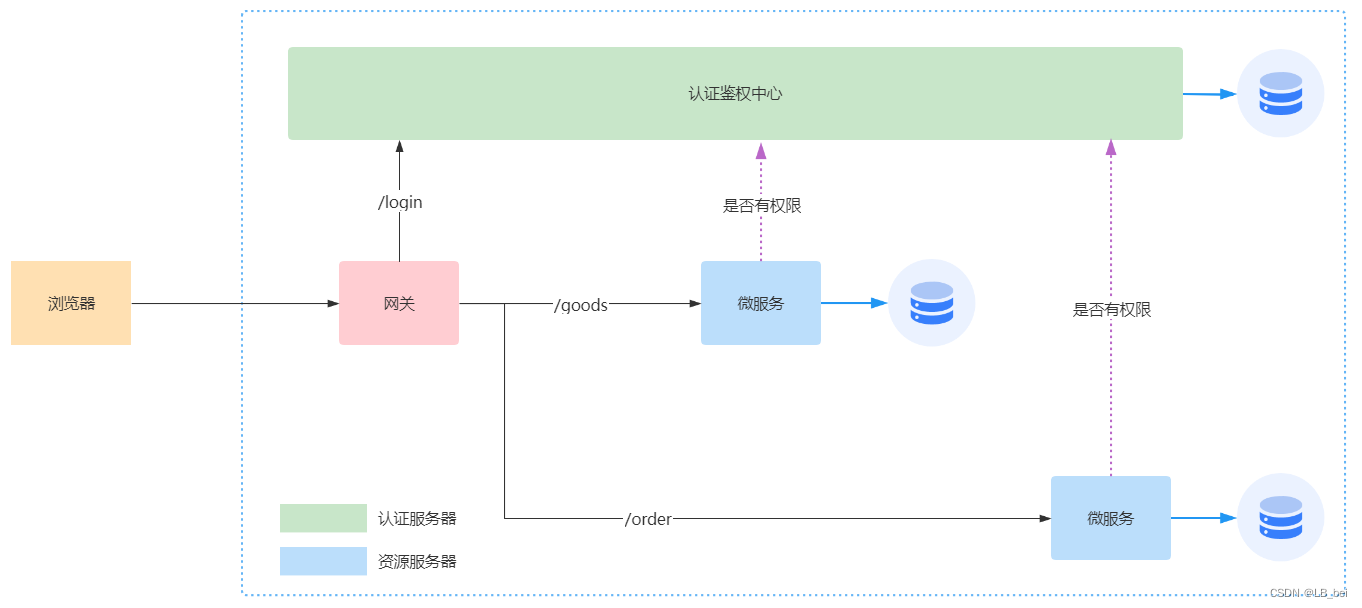
认证服务器(Authorization server): 即服务提供商专门用来处理认证的服务器,主要就是实现登录、授权功能。
-
资源服务器(Resource server): 即服务提供商存放用户生成的资源的服务器,比如电商中的商品模块、订单模块等,是用来处理具体业务的服务器。
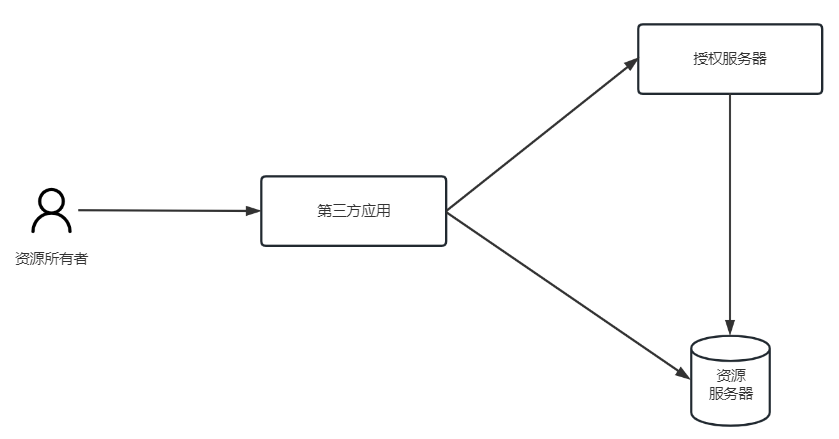
OAuth2.0协议流程描述了四种角色之间的交互过程,如下图所示。
简单说,OAuth 就是一种授权机制。数据的所有者告诉系统,同意授权第三方应用进入系统,获取这些数据。系统从而产生一个短期的进入令牌(token),用来代替密码,供第三方应用使用。
令牌(token)与密码(password)的作用是一样的,都可以进入系统,但是有三点差异。
-
令牌是短期的,到期会自动失效,用户自己无法修改。密码一般长期有效,用户不修改,就不会发生变化。
-
令牌可以被数据所有者撤销,会立即失效。
-
令牌有权限范围(scope),对于网络服务来说,只读令牌就比读写令牌更安全。密码一般是完整权限。
上面这些设计,保证了令牌既可以让第三方应用获得权限,同时又随时可控,不会危及系统安全。这就是 OAuth 2.0 的优点。
注意,只要知道了令牌,就能进入系统。系统一般不会再次确认身份,所以令牌必须保密,泄漏令牌与泄漏密码的后果是一样的。 这也是为什么令牌的有效期,一般都设置得很短的原因。
1.1 开放平台
开放平台(Open Platform)在软件行业和网络中,开放平台是指软件系统通过公开其应用程序编程接口(API)或函数(function)来使外部的程序可以增加该软件系统的功能或使用该软件系统的资源,而不需要更改该软件系统的源代码。
在互联网时代,把网站的服务封装成一系列计算机易识别的数据接口开放出去,供第三方开发者使用,这种行为就叫做Open API,提供开放API的平台本身就被称为开放平台。
第一种是技术性的开放,例如百度、腾讯、阿里巴巴等,例如阿里可以提供标准化的应用软件,但是数百万形形色色的卖家对于个性化要求的软件,并不是一个公司的力量可以满足的,所以就把这些需求开放给众多的第三方开发者的方式。再例如google的基于Linux平台的开源手机操作系统就被认为会很快打败Nokia塞班系统。这一种技术性开放平台虽然目前来看跟B2C企业的开放平台关系不大,但是也能从一定程度上说明开放平台是互联网企业的趋势。
第二种开放平台是指软件系统通过公开其应用程序编程接口(API)或函数(function)来使外部的程序可以增加该软件系统的功能或使用该软件系统的资源,而不需要更改该软件系统的源代码。B2C企业开放平台又包含两种形式,A:淘宝商城、日本乐天这种纯平台的模式,即自己不碰商品的进销存,全部由入驻商家来做;B:美国亚马逊、当当网、京东商城这种“自营+联营”的模式。
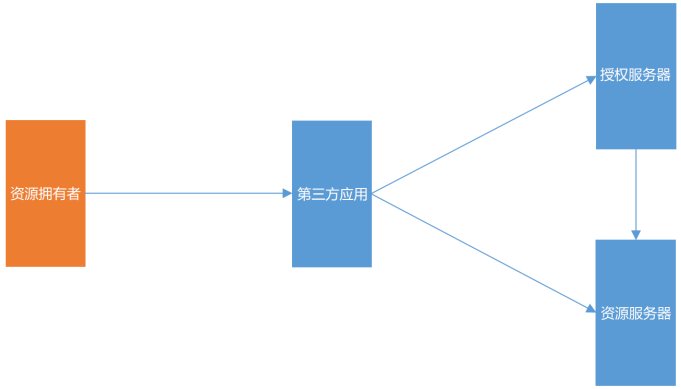
1.2 开放平台交互模型
三个角色:
-
资源拥有者:用户
-
客户端:各种app、浏览器
-
服务提供方:包含两个角色
认证服务器
资源服务器
1.2.1 认证服务器
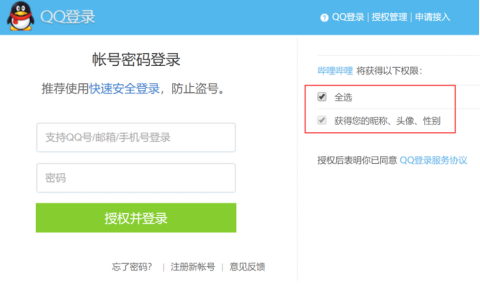
认证服务器负责对用户进行认证,并授权给客户端权限。一般的认证都是通过对账号密码进行验证实现,而难点在于怎么进行授权。比如我们使用第三方登录 "哔哩哔哩",可以看到如使用 QQ 登录的授权页面上有 "哔哩哔哩将获取以下权限" 的字样以及权限信息

认证服务器需要知道请求授权的客户端的身份以及该客户端请求的权限。常见的做法是为每一个客户端预先分配一个 id,并给每个 id 对应一个名称以及权限信息。这些信息可以写在认证服务器上的配置文件里,今后客户端每次打开授权页面的时候,客户端需要将该id发送到认证服务器,0Auth2.0就可以用来自动给客户端分配id,同时完成配置文件的自动更新。
1.3 OAuth2 开放平台
开放平台是由 OAuth2.0 协议发展而来的一个产品,它的作用是让客户端自己去这上面进行注册、申请,通过之后系统自动分配 客户端id ,并完成配置的自动更新。
客户端要完成申请,通常需要申请人填写客户端程序的类型(Web、App、微信小程序、支付宝小程序等等)、企业信息、营业执照、法人信息以及想要获取权限等信息,申请需要得到得到服务提供上的审核通过之后,开发平台才会自动分配一个客户端id给客户端。
在通过审核之后,第三方应用在进行认证时,就会想需要获取到的权限信息展示到页面上,例如哔哩哔哩获取QQ权限。授权成功之后认证服务器需要把产生的 access_token 发送给客户端,客户端才能访问具体的资源(头像、性别之类的),大致过程如下:
-
让客户端在开放平台提交申请时候,填写一个 网址,例如:www.baidu.com,此网址主要用来获取认证码。
-
当有用户授权成功之后,认证服务器将页面重定向到这个网址,并将生成的 access_token拼接到该网址后面,例如:www.baidu.com?access_token=123
-
客户端接收到access_token,之后客户端就可以拿着这个token去获取需要的数据了
1.3.1 令牌
传统项目向服务端请求数据,服务端需要频繁的去数据库查询用户名和密码并进行对比,判断用户名和密码正确与否,并作出相应提示,这样效率非常低下,怎么提高效率呢?Token便应运而生。
Token是服务端生成的一串字符串,以作客户端进行请求的一个令牌,当第一次登录后,服务器生成一个Token便将此Token返回给客户端,以后客户端只需带上这个Token前来请求数据即可,无需再次带上用户名和密码。减轻服务器的压力,减少频繁的查询数据库,使服务器更加健壮。
1.3.2 Access Token
Access Token 是客户端访问资源服务器的令牌。拥有这个令牌代表着得到用户的授权,即具备了访问资源的权限。同时这个授权应该是临时的,只能在一定期限内使用。主要原因是因为Access Token 在使用的过程中很有可能会泄露,被不法分子利用获取我们的数据。所以Access Token应该只能在某个期限内使用,这样可以降低因 Access Token 泄露而带来的风险。
1.4 认证模式
OAuth2.0中定义了四种授权模式:
-
authorization code 授权码模式
-
implicit 简化模式
-
resource owner password credentials 密码模式
-
client credentials 客户端模式
常见模式:授权码、密码模式
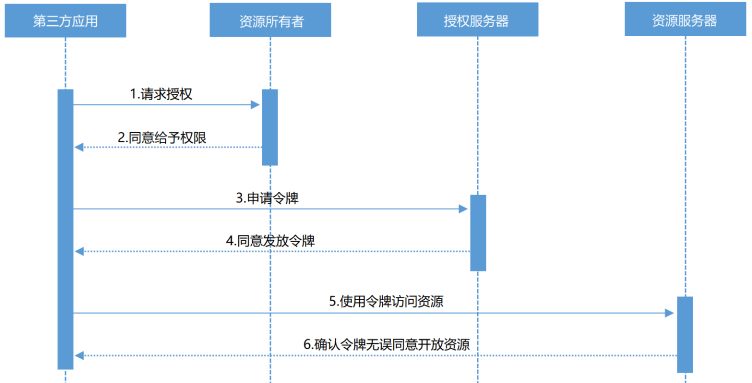
1.4.1 授权码模式
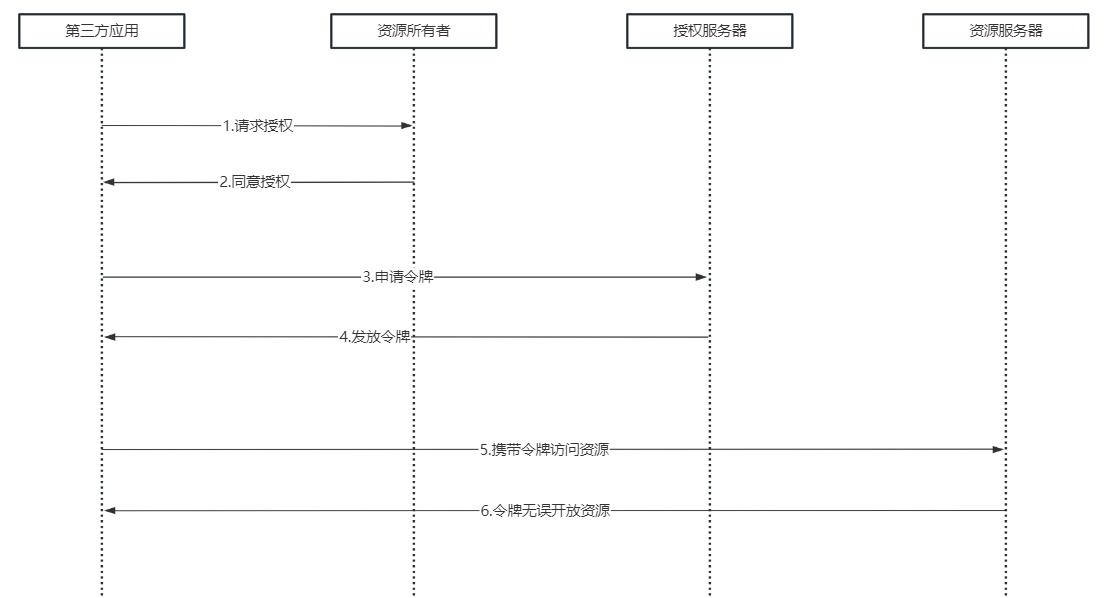
授权码模式(authorization code)是功能最完整、流程最严密的授权模式,code保证了token的安全性,即使code被拦截,由于没有secret,也是无法通过code获得token的。
角色行为与功能
-
资源所有者
只需要允许或拒绝第三方应用获得授权
-
第三方应用
申请成为资源服务器的第三方应用
获取资源服务器提供的资源
-
授权服务器
提供授权许可code、令牌token等
-
资源服务器
提供给第三方应用开放资源的接口
时序图
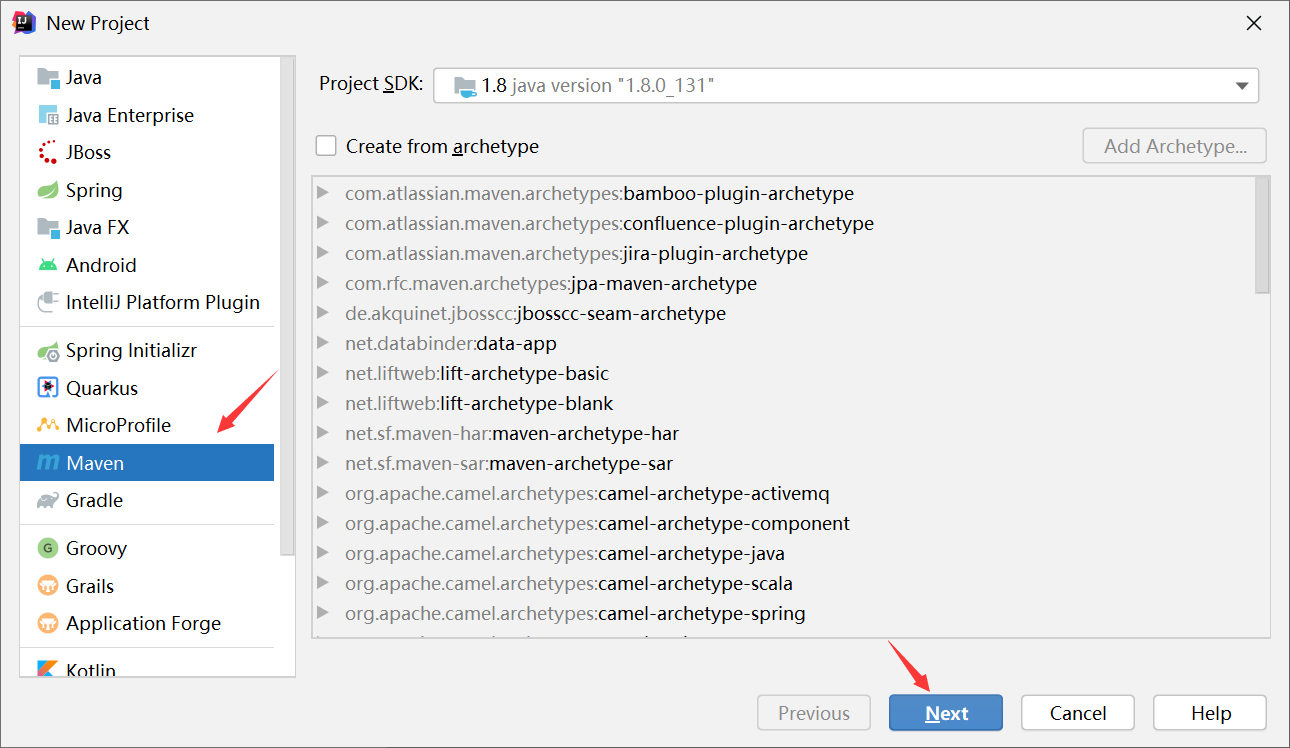
环境搭建
创建父项目
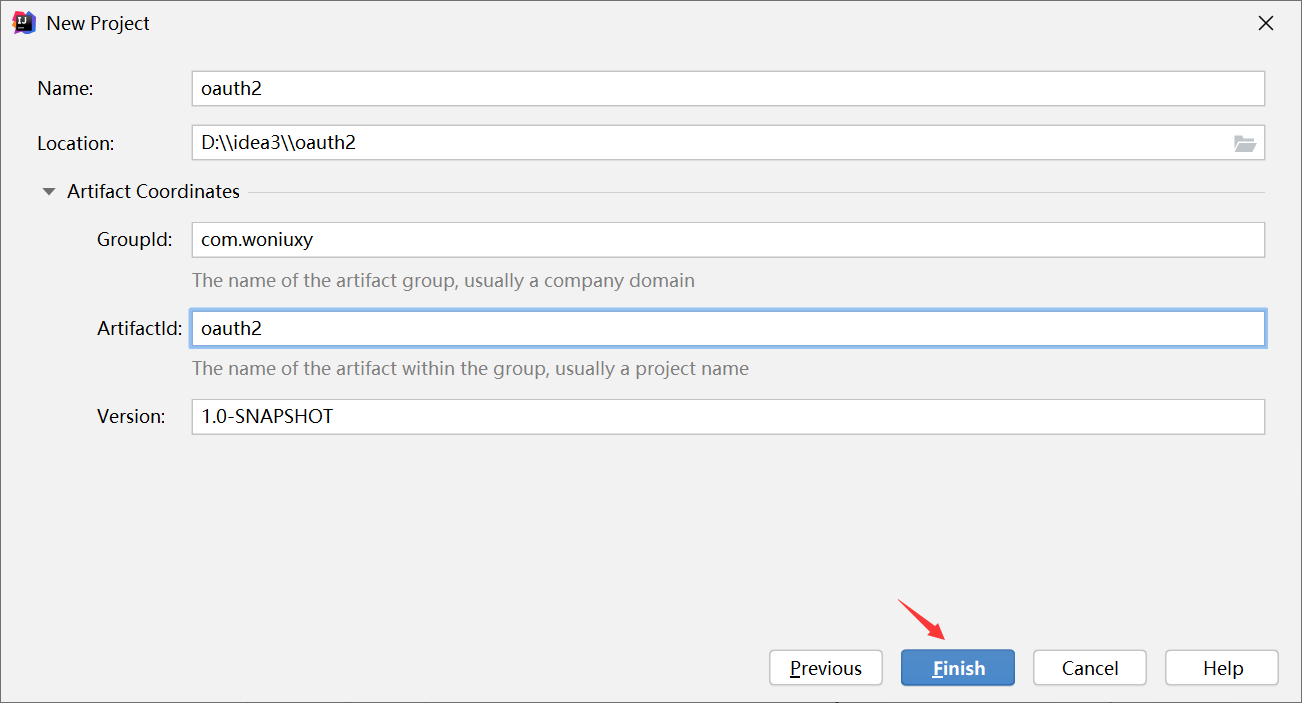
指定打包方式为pom
<?xml version="1.0" encoding="UTF-8"?>
<project xmlns="http://maven.apache.org/POM/4.0.0"
         xmlns:xsi="http://www.w3.org/2001/XMLSchema-instance"
         xsi:schemaLocation="http://maven.apache.org/POM/4.0.0 http://maven.apache.org/xsd/maven-4.0.0.xsd">
    <modelVersion>4.0.0</modelVersion>

    <groupId>com.woniuxy</groupId>
    <artifactId>oauth2</artifactId>
    <version>1.0-SNAPSHOT</version>
    <packaging>pom</packaging>
</project>
创建auth-server认证服务器模块
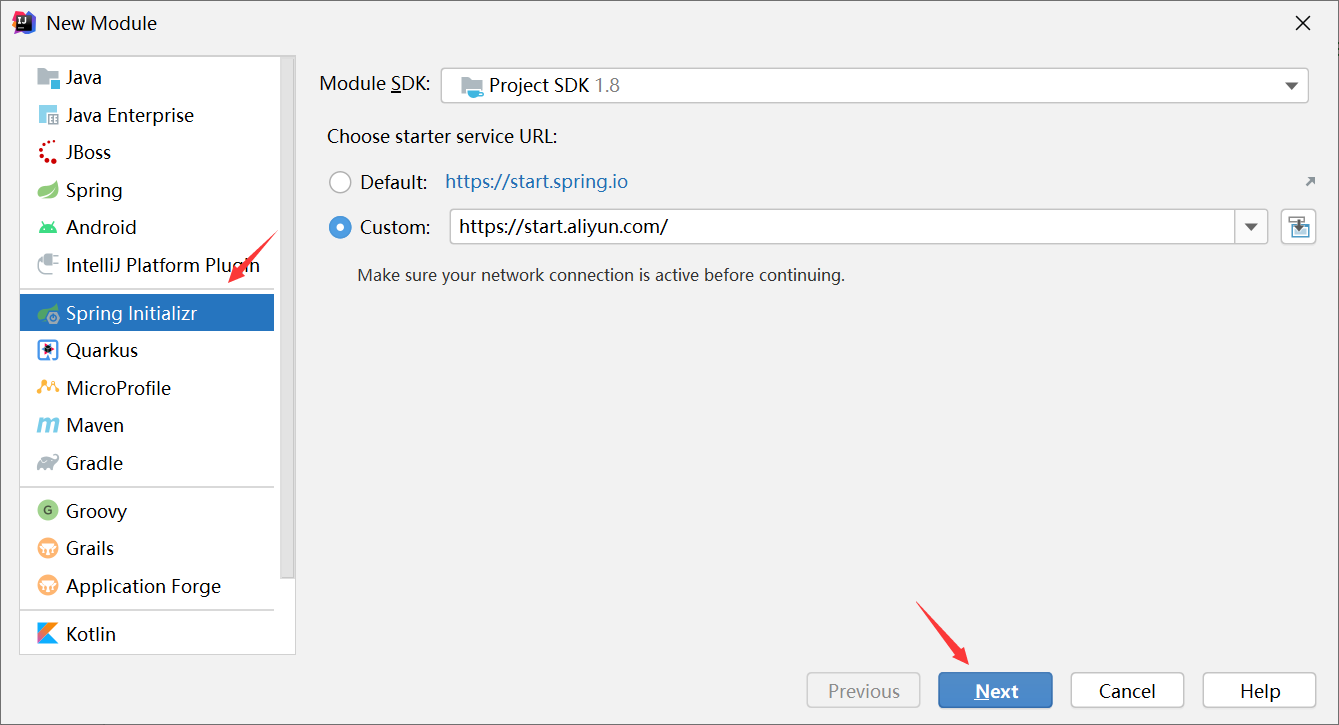

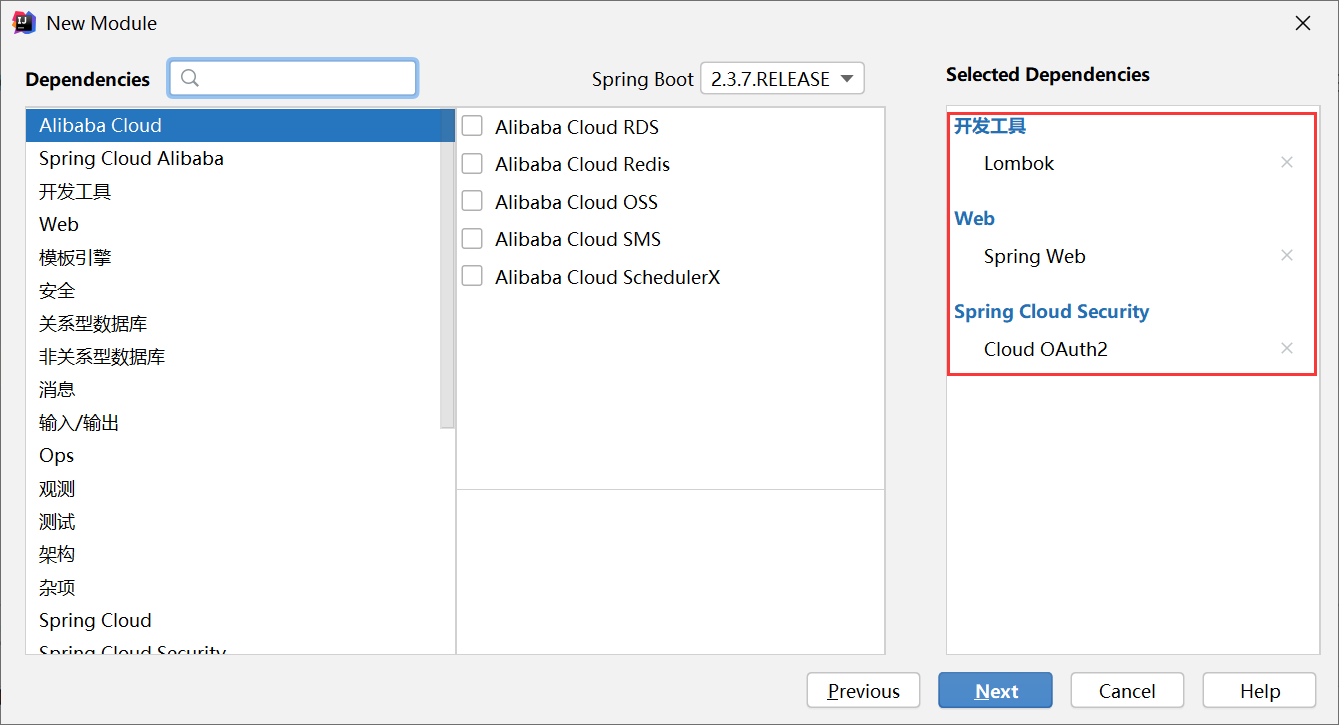
导入依赖
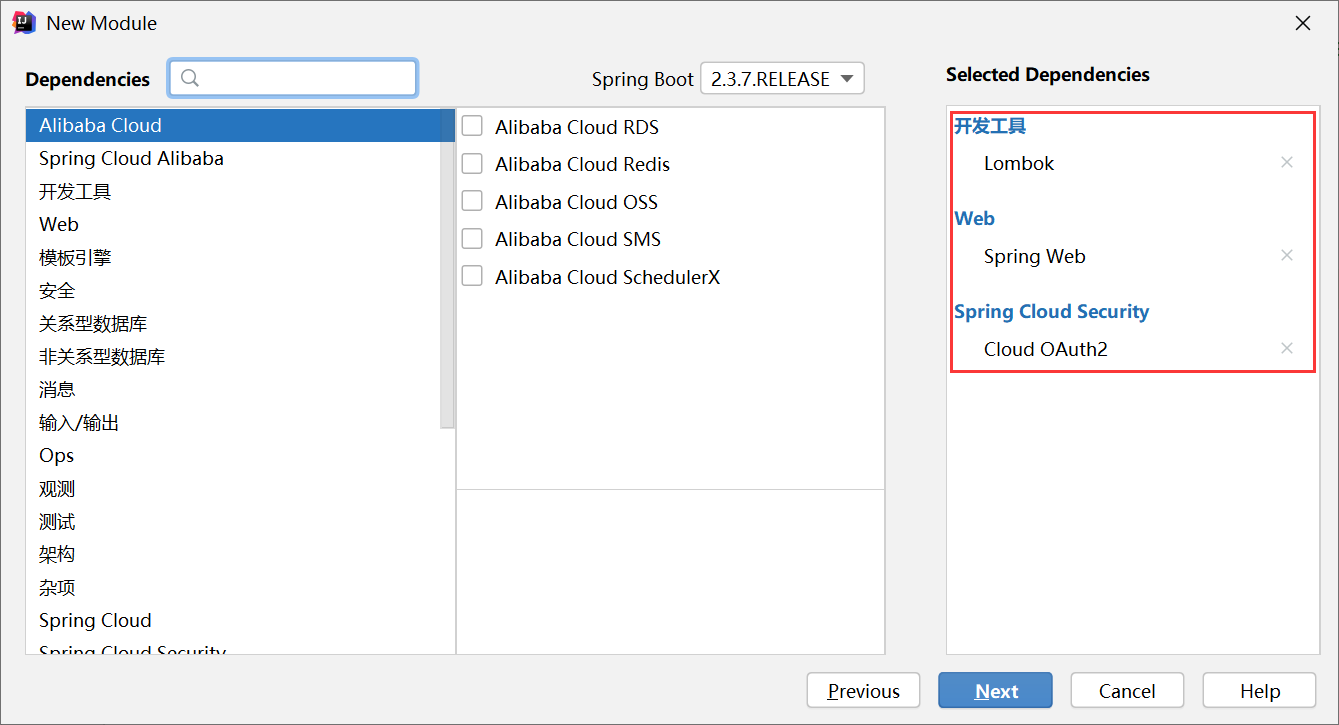
导入依赖版本如下
<properties>
    <java.version>1.8</java.version>
    <project.build.sourceEncoding>UTF-8</project.build.sourceEncoding>
    <project.reporting.outputEncoding>UTF-8</project.reporting.outputEncoding>
    <spring-boot.version>2.3.7.RELEASE</spring-boot.version>
    <spring-cloud-alibaba.version>2.2.2.RELEASE</spring-cloud-alibaba.version>
</properties>
oauth2依赖
<dependency>
    <groupId>org.springframework.cloud</groupId>
    <artifactId>spring-cloud-starter-oauth2</artifactId>
    <version>2.2.4.RELEASE</version>
</dependency>
创建用户信息配置类
import org.springframework.context.annotation.Bean;
import org.springframework.context.annotation.Configuration;
import org.springframework.security.config.annotation.authentication.builders.AuthenticationManagerBuilder;
import org.springframework.security.config.annotation.method.configuration.EnableGlobalMethodSecurity;
import org.springframework.security.config.annotation.web.configuration.EnableWebSecurity;
import org.springframework.security.config.annotation.web.configuration.WebSecurityConfigurerAdapter;
import org.springframework.security.crypto.bcrypt.BCryptPasswordEncoder;

@Configuration
@EnableWebSecurity
public class WebSecurityConfiguration extends WebSecurityConfigurerAdapter{

	//密码编码器
	@Bean
	public BCryptPasswordEncoder passwordEncoder() {
		return new BCryptPasswordEncoder();
	}

    // 基于内存的用户信息
	@Override
	protected void configure(AuthenticationManagerBuilder auth) throws Exception {
		auth
			.inMemoryAuthentication()	//内存认证
			.withUser("zhangsan")		//用户名
			.password(passwordEncoder().encode("123"))	//密码
			.authorities("ROLE_ADMIN");	//角色
	}
}
创建客户端配置类,配置客户端信息
import org.springframework.context.annotation.Configuration;
import org.springframework.security.crypto.bcrypt.BCryptPasswordEncoder;
import org.springframework.security.oauth2.config.annotation.configurers.ClientDetailsServiceConfigurer;
import org.springframework.security.oauth2.config.annotation.web.configuration.AuthorizationServerConfigurerAdapter;
import org.springframework.security.oauth2.config.annotation.web.configuration.EnableAuthorizationServer;

import javax.annotation.Resource;

@Configuration
@EnableAuthorizationServer
public class AuthorizationServerConfiguration extends AuthorizationServerConfigurerAdapter{

	@Resource
	private BCryptPasswordEncoder passwordEncoder;

	@Override
	public void configure(ClientDetailsServiceConfigurer clients) throws Exception {
		//配置客户端
		clients
			.inMemory()		//内存方式
			.withClient("client")	//客户端名字
			.secret(passwordEncoder.encode("secret"))	//客户端秘钥
			.authorizedGrantTypes("authorization_code")//授权类型
			.scopes("all")	//授权范围
			.redirectUris("http://www.baidu.com");	//回调网址,携带授权码
	}
}
在application.yml文件中配置以下信息
server:
  port: 8000
spring:
  application:
    name: oauth
启动项目进行登录
localhost:8000/login
进入登录页面,输入账号:zhangsan,密码:123进行登录

登录成功之后向服务器发送请求获取授权码,在地址栏上输入以下内容回车
http://localhost:8080/oauth/authorize?client_id=client&response_type=code可以看到一个授权页面,询问用户是否进行授权
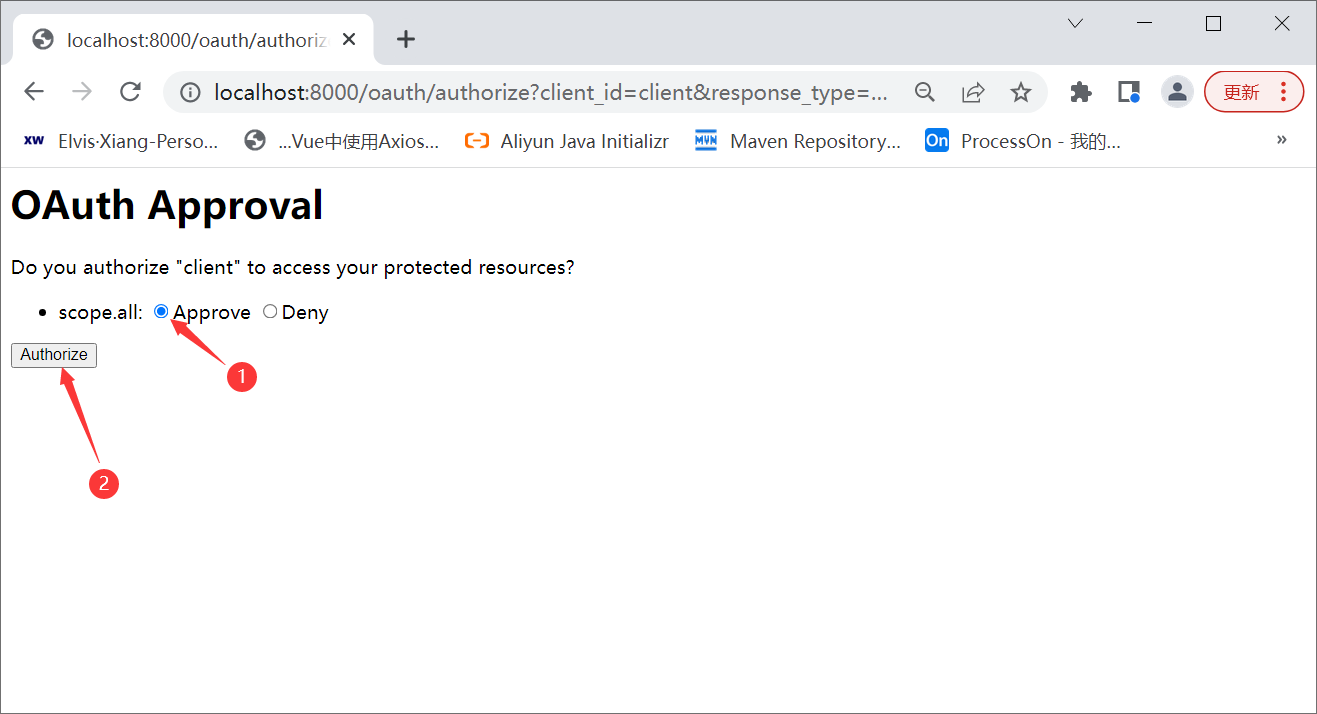
授权成功之后会重定向到AuthorizationServerConfiguration配置类中指定的地址,并以参数的方式携带授权码
通过postman发送请求向服务器获取token
地址栏填写:http://client:secret@localhost:8000/oauth/token
填写客户端账号密码
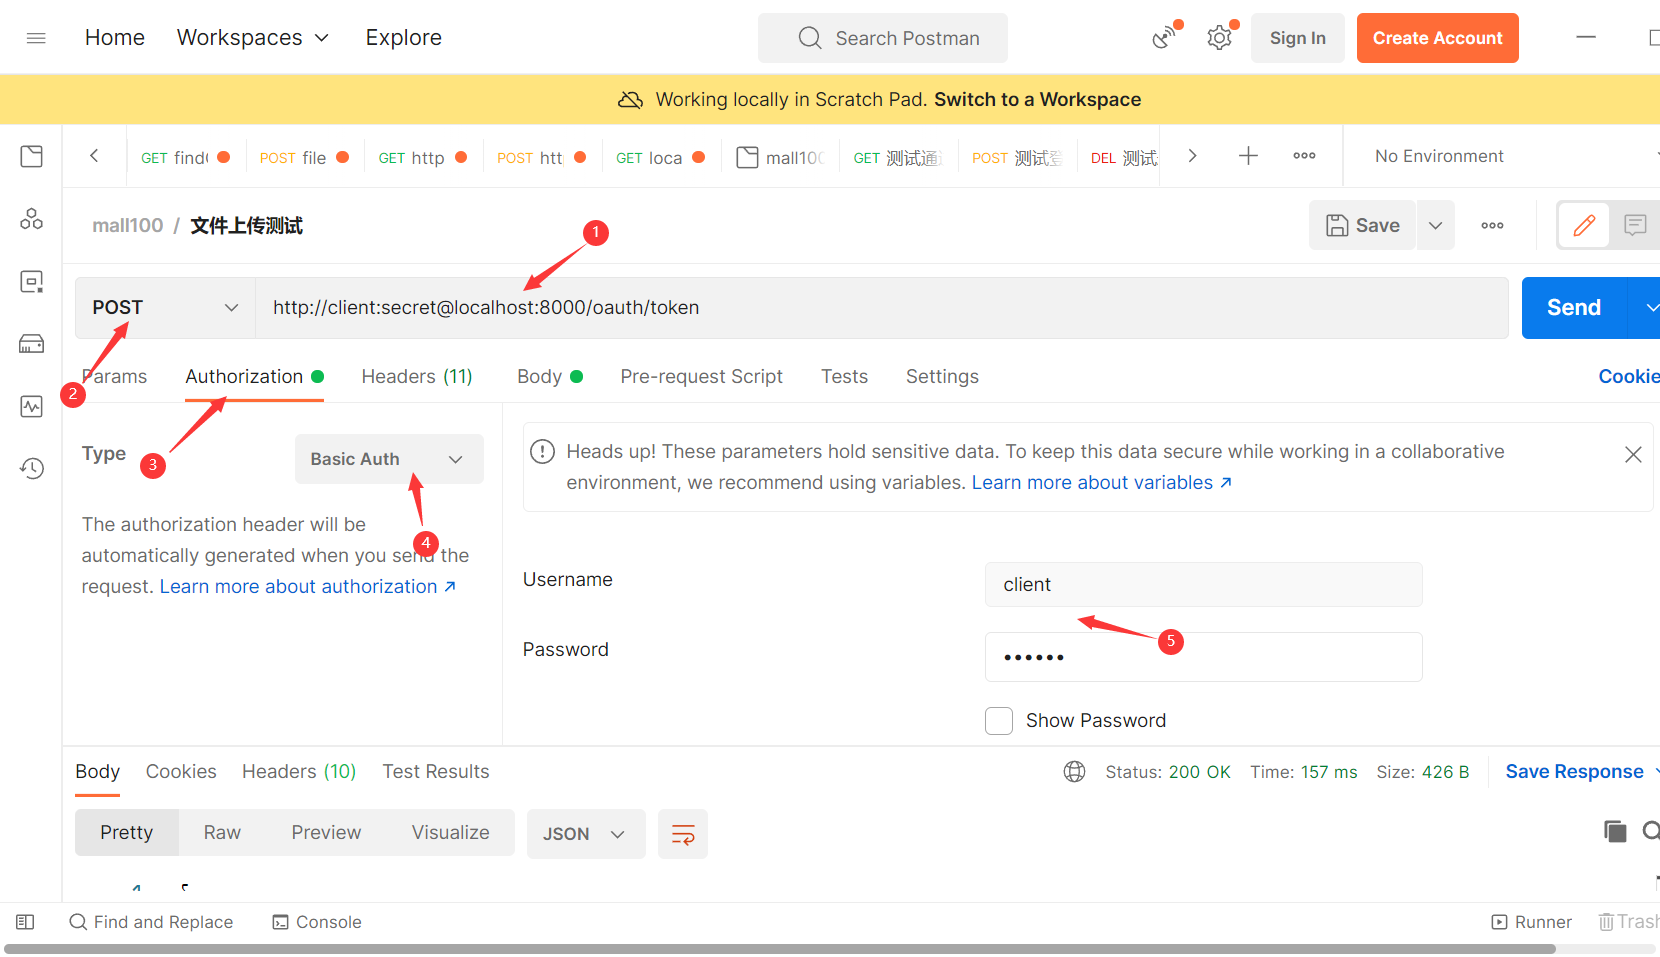
填写授权类型、授权码,发送请求
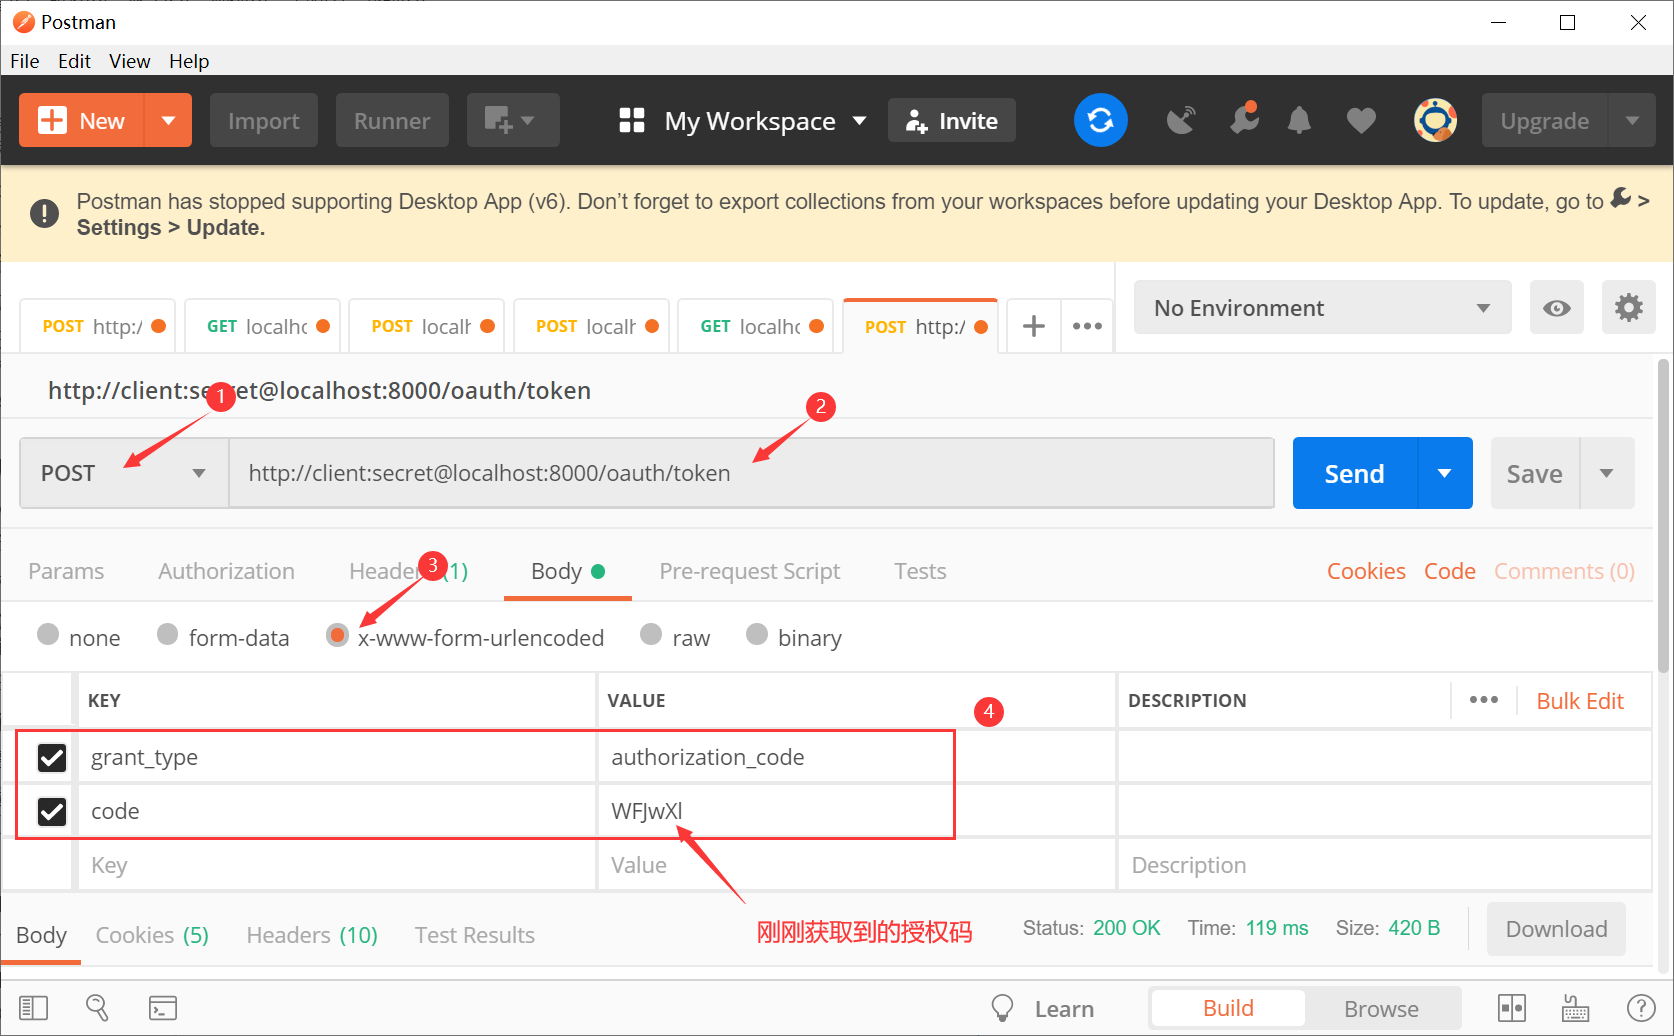
成功之后在postman上可以看到以下信息
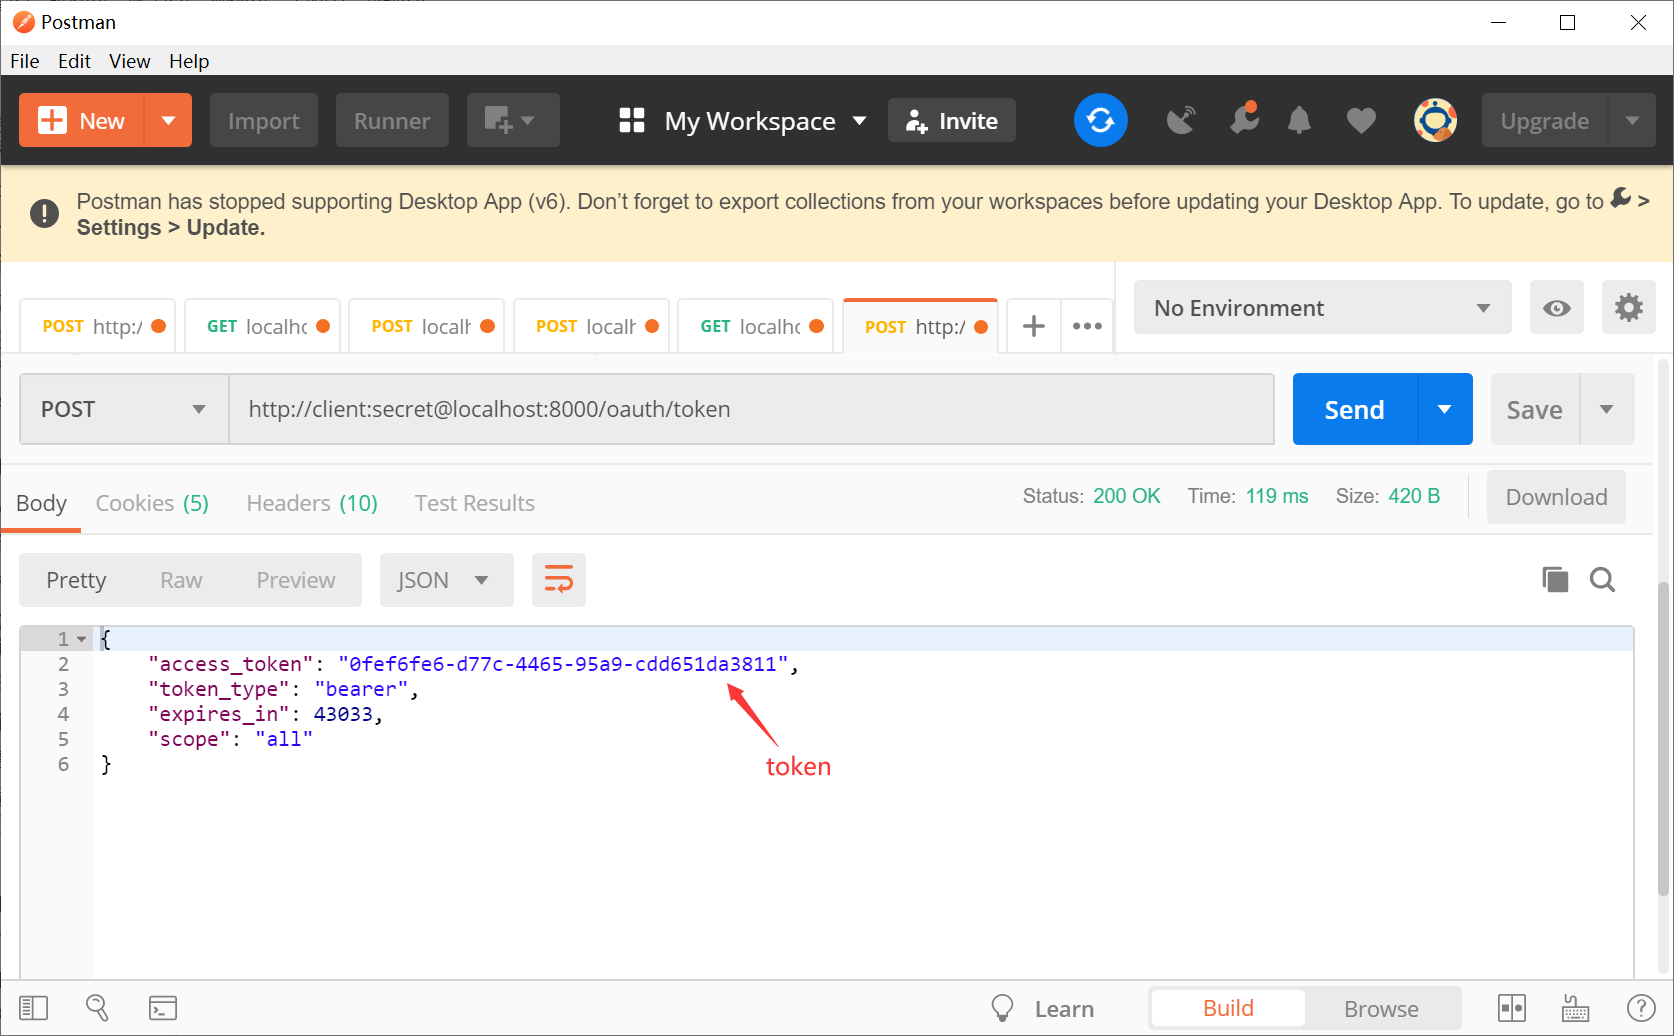
表示成功
注意:每个授权码只能使用一次
1.4.2 密码模式
密码模式(Resource Owner Password Credentials Grant)中,用户向客户端提供自己的用户名和密码。客户端使用这些信息,向"服务商提供商"索要授权。
在这种模式中,用户必须把自己的密码给客户端,但是客户端不得储存密码。这通常用在用户对客户端高度信任的情况下,比如客户端是操作系统的一部分,或者由一个著名公司出品。而认证服务器只有在其他授权模式无法执行的情况下,才能考虑使用这种模式。
修改AuthorizationServerConfiguration配置类,添加密码模式
@Override
public void configure(ClientDetailsServiceConfigurer clients) throws Exception {
//配置客户端
clients
.inMemory()
.withClient("client")
.secret(passwordEncoder.encode("secret"))
.authorizedGrantTypes("authorization_code","password") //添加密码授权模式
.scopes("all") //授权范围
.redirectUris("http://www.woniuxy.com");
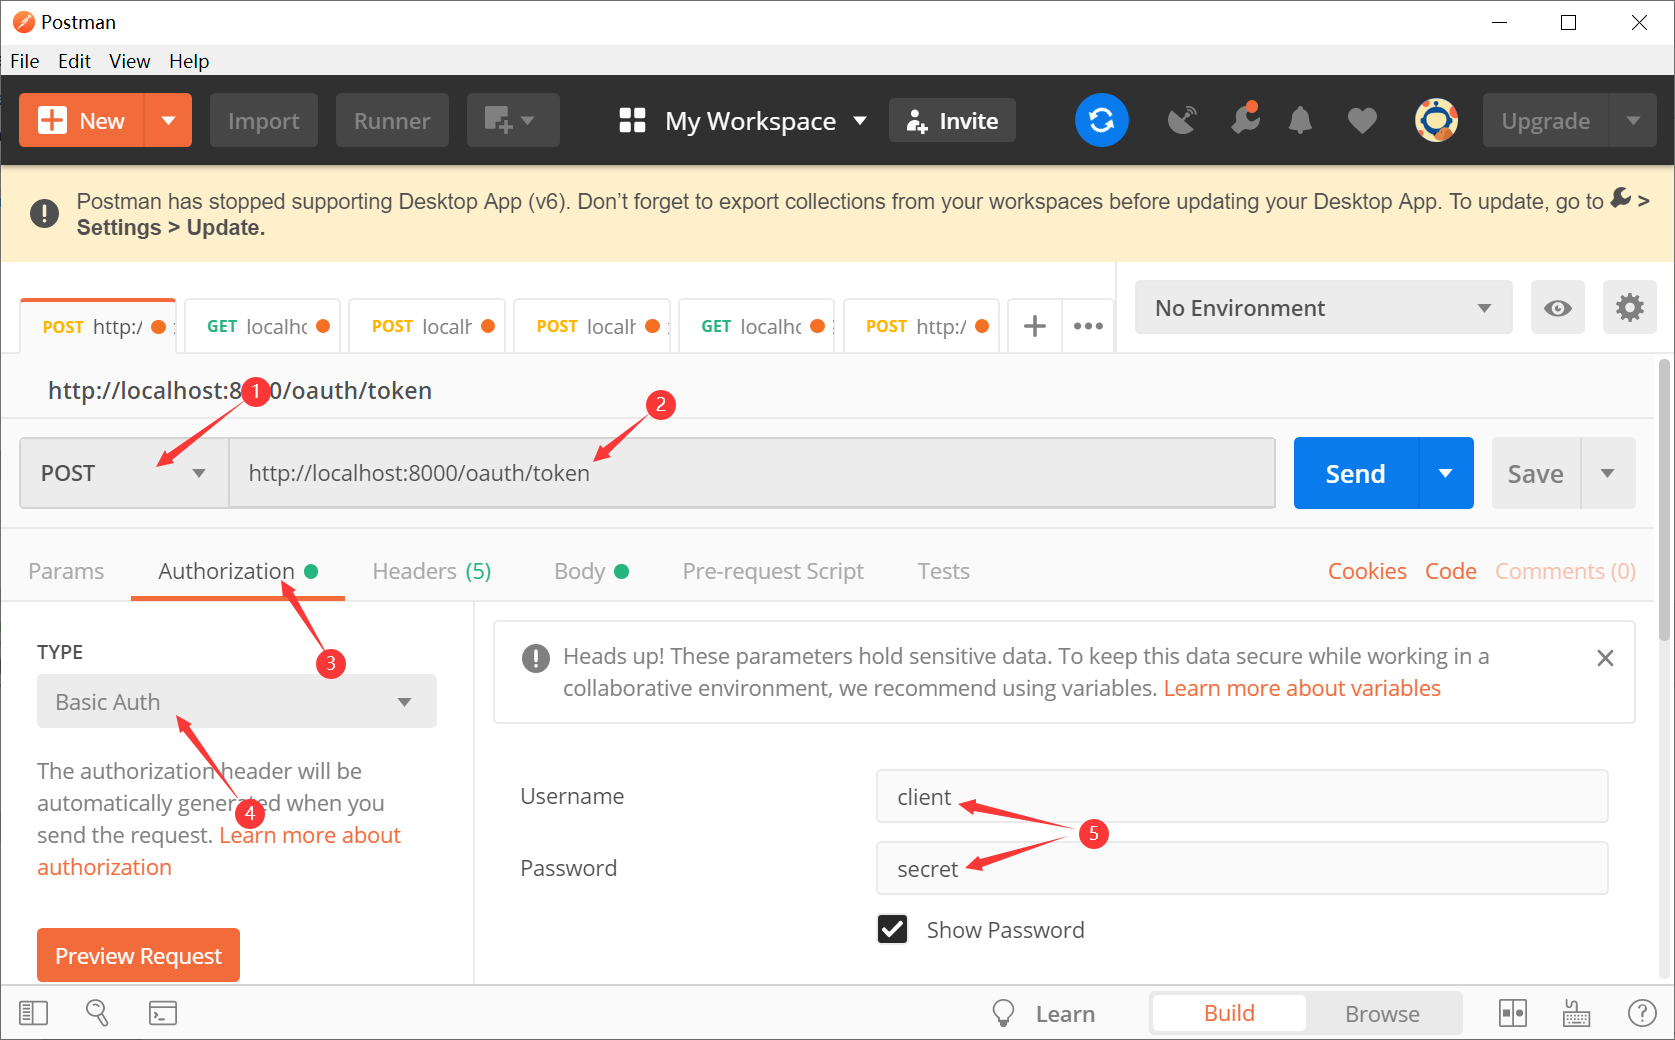
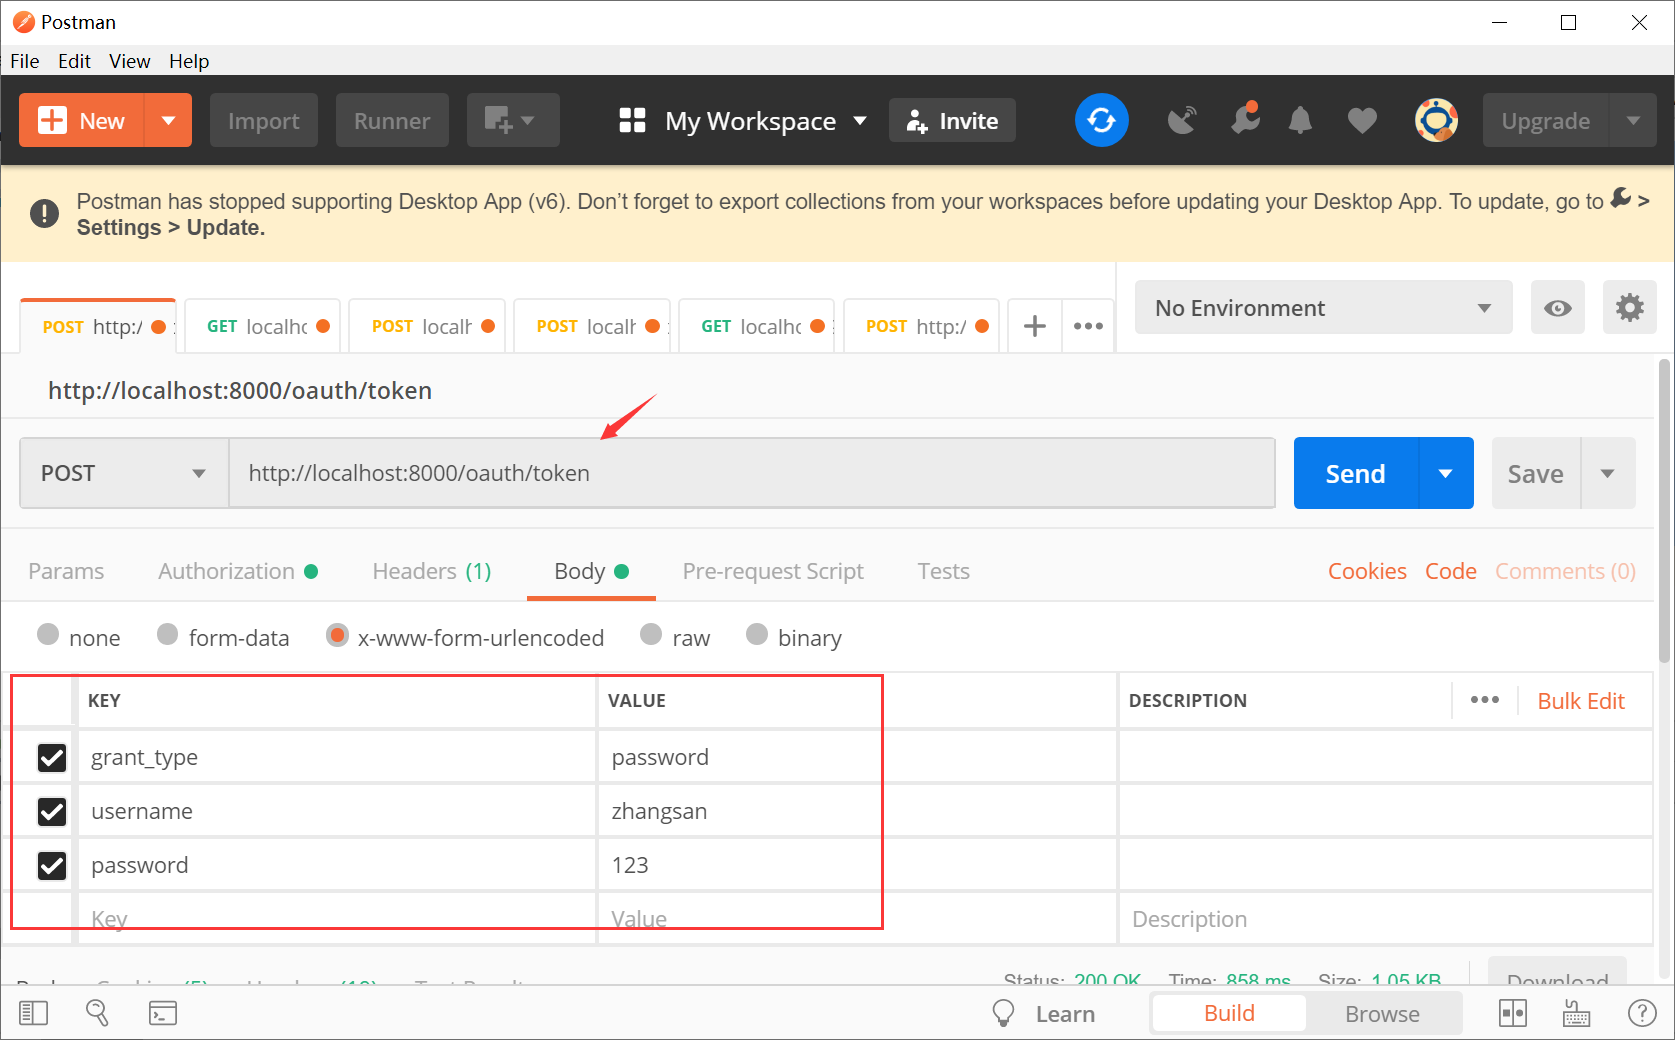
}在postman中新开一个请求,地址栏中填写:http://localhost:8080/oauth/token
密码授权模式要求以请求头的方式提交客户端账号密码,并且需要对账号密码进行base64加密,因此选择Authorization选项卡,设置TYPE为"Basic Auth",并填写客户端账号密码
在请求体中设置授权类型、用户账号密码参数
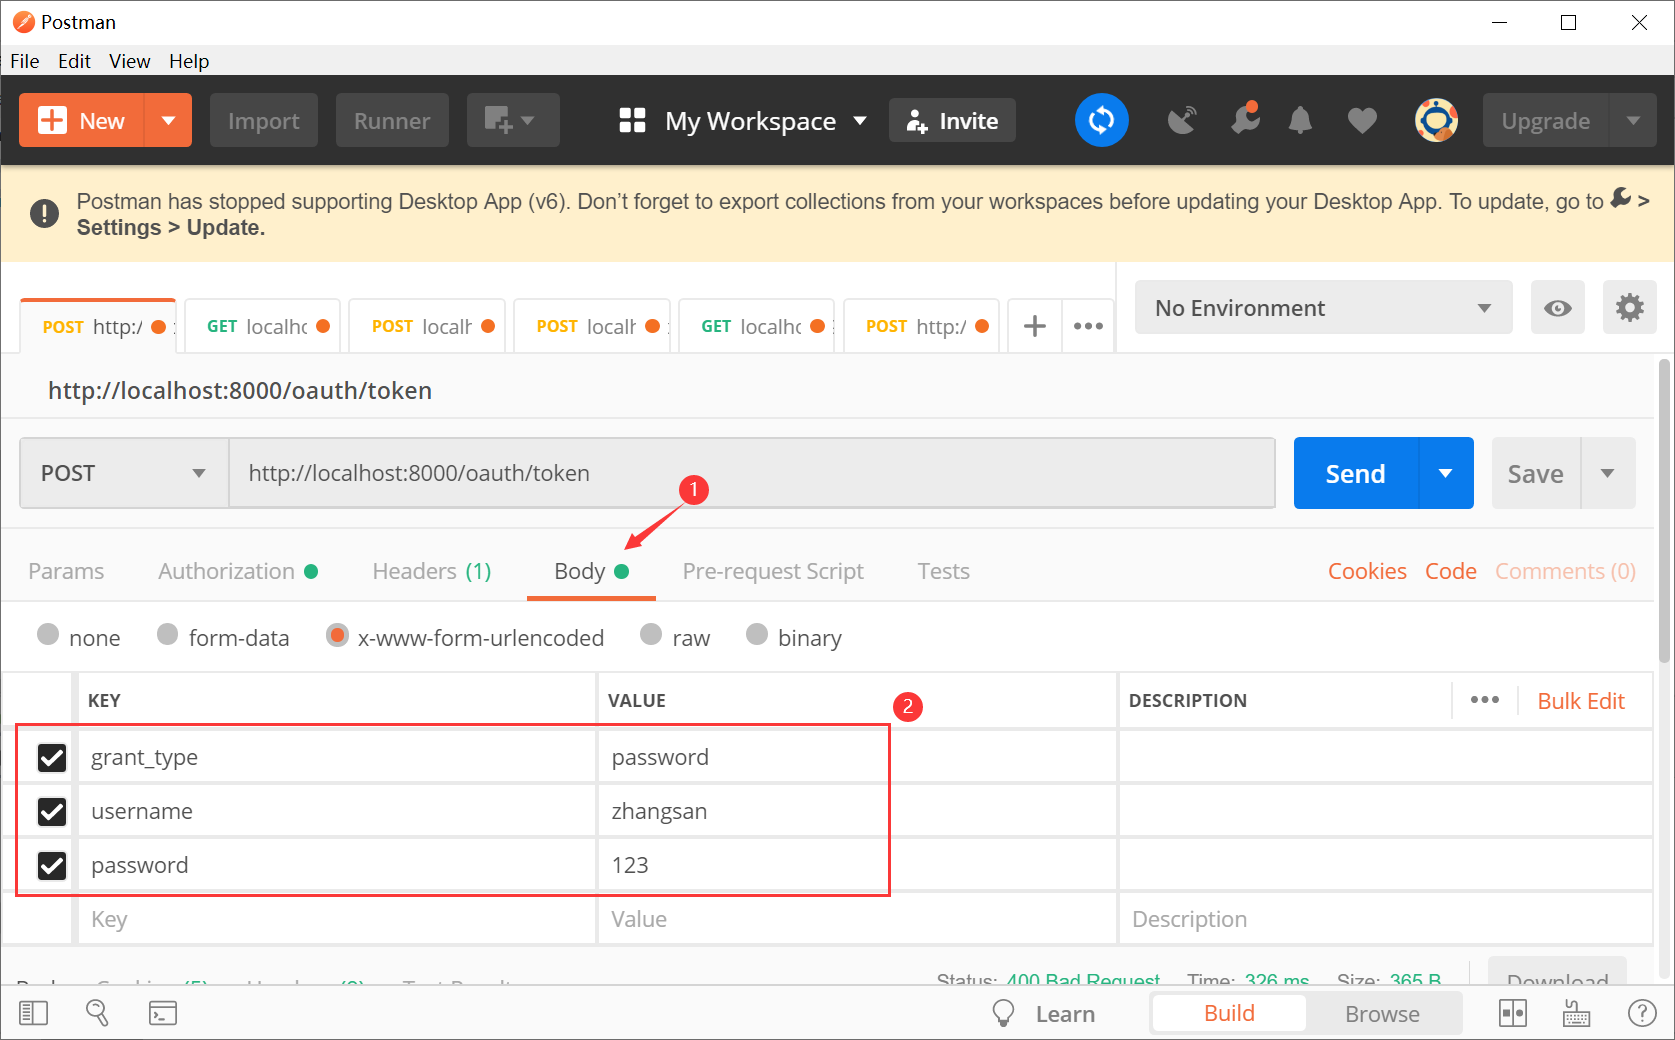
发送请求测试

可以发现此时并不支持密码模式,即使在AuthorizationServerConfiguration配置类中指定了密码模式。
原因是此时代码中缺少对密码模式的支持,在oauth2中需要添加AuthenticationManager对象对密码模式进行支持。
在WebSecurityConfiguration配置类中配置 AuthenticationManager
// 配置 AuthenticationManager(密码模式需要该对象进行账号密码校验)
@Bean
@Override
public AuthenticationManager authenticationManagerBean() throws Exception {
    return super.authenticationManagerBean();
}
在AuthorizationServerConfiguration类中注入AuthenticationManager,并重写以下方法
// 认证管理器
@Autowired
private AuthenticationManager authenticationManager;
//配置使用的 AuthenticationManager 实现用户认证的功能
@Override
public void configure(AuthorizationServerEndpointsConfigurer endpoints) throws Exception {
endpoints.authenticationManager(authenticationManager);
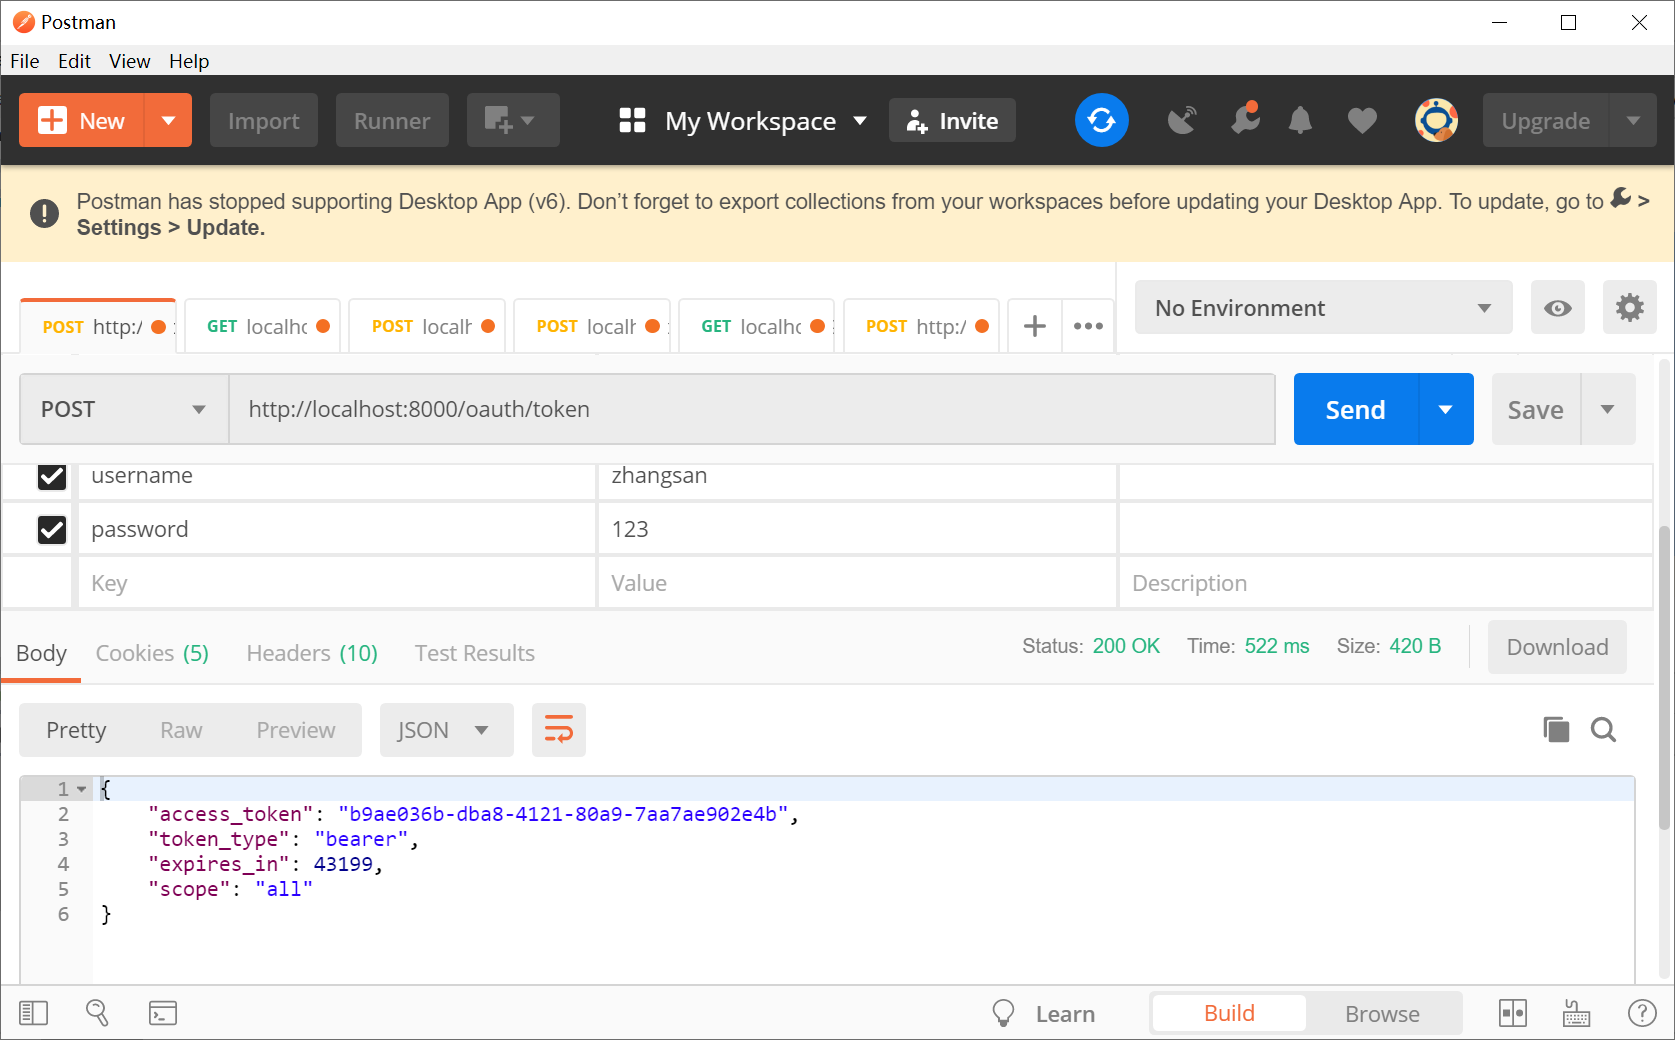
}重启项目再次发送请求获取token
整合JWT
导入了oauth2依赖就自动导入的JWT相关依赖,因此不用单独导入JWT,只需要进行设置就行
创建TokenConfiguration配置类
import org.springframework.context.annotation.Bean;
import org.springframework.context.annotation.Configuration;
import org.springframework.security.oauth2.provider.token.TokenStore;
import org.springframework.security.oauth2.provider.token.store.JwtAccessTokenConverter;
import org.springframework.security.oauth2.provider.token.store.JwtTokenStore;

@Configuration
public class TokenConfiguration {
    // 密码
    private static String SIGNING_KEY="www.woniuxy.com";

    // token转换器
    @Bean
    public JwtAccessTokenConverter accessTokenConverter() {
        JwtAccessTokenConverter jwtAccessTokenConverter =
            new JwtAccessTokenConverter();
        jwtAccessTokenConverter.setSigningKey(SIGNING_KEY);
        return jwtAccessTokenConverter;
    }

    // 令牌存储策略:jwt方式
    @Bean
    public TokenStore tokenStore(){
        return new JwtTokenStore(accessTokenConverter());
    }
}
在AuthorizationServerConfiguration配置类中注入相关对象
@Resource
private TokenStore tokenStore;

@Resource
private JwtAccessTokenConverter jwtAccessTokenConverter;

@Resource
private ClientDetailsService clientDetailsService;
在AuthorizationServerConfiguration配置类中编写token服务方法,该方法主要用来设置
private AuthorizationServerTokenServices tokenServices(){
    // 创建服务对象
    DefaultTokenServices services = new DefaultTokenServices();
    // 设置客户端详情服务
    services.setClientDetailsService(clientDetailsService);
    // 支持刷新令牌
    services.setSupportRefreshToken(true);
    // 不重复使用refreshtoken,每次刷新之后只能用新的refreshtoken才能继续刷新
	services.setReuseRefreshToken(false);
    // 设置令牌存储策略
    services.setTokenStore(tokenStore);

    // 设置令牌增强
    TokenEnhancerChain tokenEnhancerChain = new TokenEnhancerChain();
    tokenEnhancerChain.setTokenEnhancers(Arrays.asList(jwtAccessTokenConverter));
    services.setTokenEnhancer(tokenEnhancerChain);

    // 设置令牌过期时间
    services.setAccessTokenValiditySeconds(600);
    services.setRefreshTokenValiditySeconds(6000);

    return services;
}
修改configure(AuthorizationServerEndpointsConfigurer endpoints)方法,添加token服务
//配置使用的 AuthenticationManager 实现用户认证的功能
@Override
public void configure(AuthorizationServerEndpointsConfigurer endpoints) throws Exception {
endpoints
.authenticationManager(authenticationManager) // 认证管理器
.tokenServices(tokenServices()); // 配置token服务
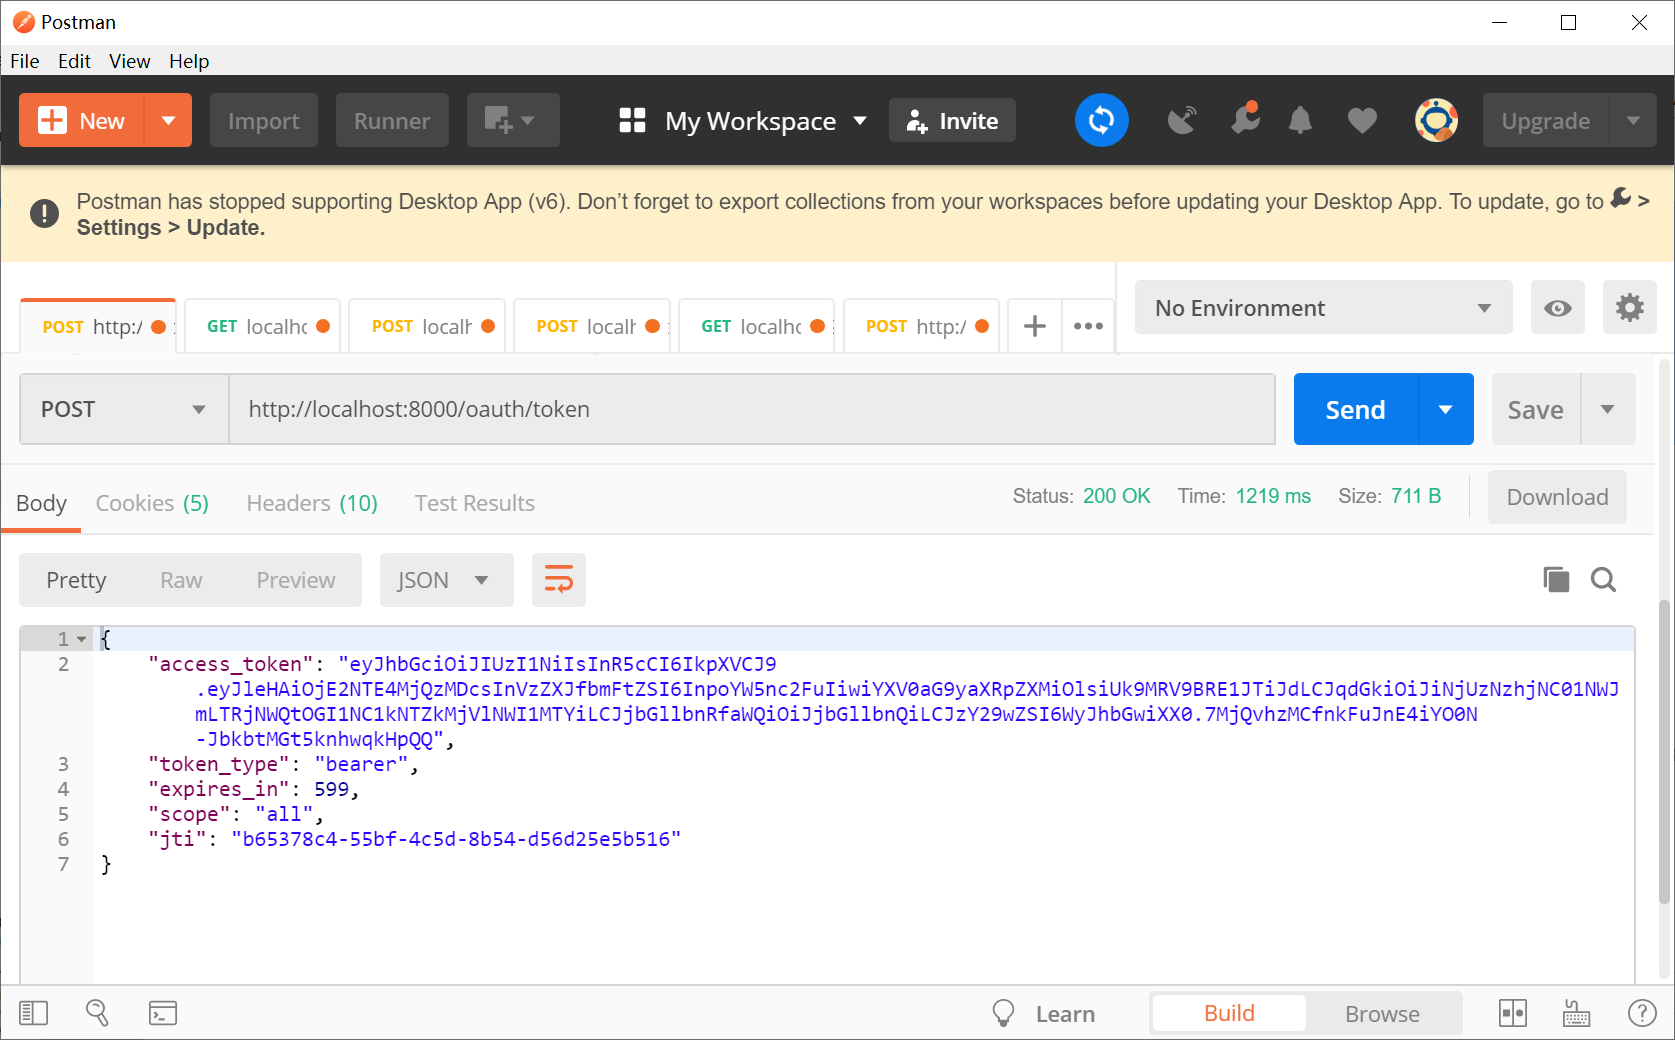
}重启项目发送请求获取token
如果想要获取到refreshtoken,可以修改AuthorizationServerConfiguration配置类,添加refresh_token授权方式
@Override
public void configure(ClientDetailsServiceConfigurer clients) throws Exception {
//配置客户端
clients
.inMemory()
.withClient("client")
.secret(passwordEncoder.encode("secret"))
.authorizedGrantTypes("authorization_code","password","refresh_token")
.scopes("all")
.redirectUris("http://www.woniuxy.com");
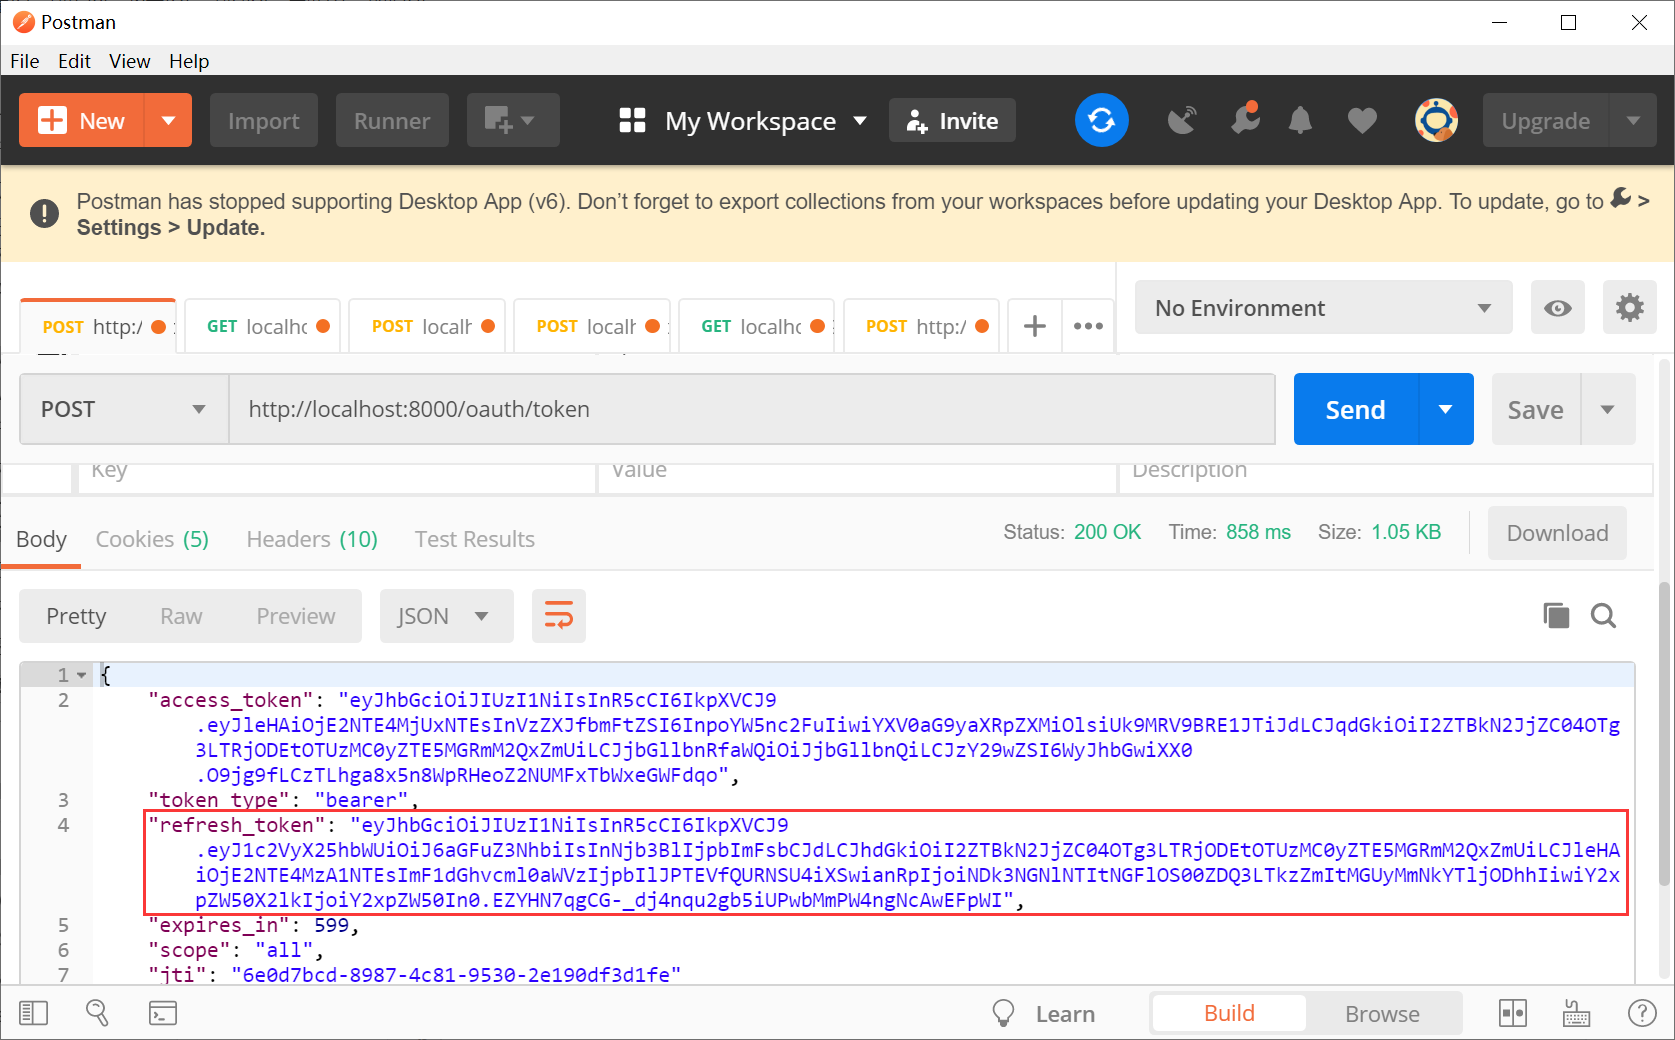
}重启项目测试
整合数据库(user)
建表SQL
create database sc default character set=utf8;

DROP TABLE IF EXISTS `perms`;
CREATE TABLE `perms` (
  `id` int(11) DEFAULT NULL,
  `name` varchar(20) DEFAULT NULL
) ENGINE=InnoDB DEFAULT CHARSET=utf8;

INSERT INTO `perms` VALUES (3001,'user:add'),(3002,'user:del'),(3003,'user:find'),(3004,'user:update'),(3005,'goods:add'),(3006,'goods:find'),(3007,'goods:del'),(3008,'goods:update');

DROP TABLE IF EXISTS `role`;
CREATE TABLE `role` (
  `id` int(11) DEFAULT NULL,
  `name` varchar(20) DEFAULT NULL
) ENGINE=InnoDB DEFAULT CHARSET=utf8;

INSERT INTO `role` VALUES (2001,'ROLE_ADMIN'),(2002,'ROLE_USER');


DROP TABLE IF EXISTS `role_perms`;
CREATE TABLE `role_perms` (
  `rid` int(11) DEFAULT NULL,
  `pid` int(11) DEFAULT NULL
) ENGINE=InnoDB DEFAULT CHARSET=utf8;

INSERT INTO `role_perms` VALUES (2001,3001),(2001,3003),(2001,3004),(2002,3005),(2002,3006),(2002,3007),(2002,3008);

DROP TABLE IF EXISTS `user`;
CREATE TABLE `user` (
  `id` int(11) DEFAULT NULL,
  `username` varchar(20) DEFAULT NULL,
  `password` varchar(64) DEFAULT NULL
) ENGINE=InnoDB DEFAULT CHARSET=utf8;

INSERT INTO `user` VALUES (1001,'zhangsan','$2a$10$pINVnd8.cXScFXCxI2x4cem4fOexA2J5TNY/Mx2CjN6mJuYGBNG0m'),(1002,'wangwu','wangwu');

DROP TABLE IF EXISTS `user_role`;
CREATE TABLE `user_role` (
  `uid` int(11) DEFAULT NULL,
  `rid` int(11) DEFAULT NULL
) ENGINE=InnoDB DEFAULT CHARSET=utf8;

INSERT INTO `user_role` VALUES (1001,2001),(1002,2002),(1003,2002);
auth-server的pom.xml中引入mybatis
<!--mybatis-->
<dependency>
    <groupId>org.mybatis.spring.boot</groupId>
    <artifactId>mybatis-spring-boot-starter</artifactId>
    <version>2.1.4</version>
</dependency>
在application.yml中配置mybatis参数
mybatis:
  type-aliases-package: com.woniuxy.authserver.entity
mapper-locations: classpath:/mapper/*.xml创建Perms、Role、User实体类,注意:实体类必须实现序列化接口,不然运行过程中可能会报Failed to find access token for token错误
import lombok.Data;

@Data
public class Perms implements Serializable {
    private static final long serialVersionUID = 1L;
    private int id;
    private String name;
}
import lombok.Data;
import java.util.List;
@Data
public class Role implements Serializable {
private static final long serialVersionUID = 1L;
private int id;
private String name;
private List<Perms> perms;
}import lombok.AllArgsConstructor;
import lombok.Data;
import lombok.NoArgsConstructor;
import lombok.extern.slf4j.Slf4j;
import org.springframework.security.core.GrantedAuthority;
import org.springframework.security.core.authority.SimpleGrantedAuthority;
import org.springframework.security.core.userdetails.UserDetails;
import java.io.Serializable;
import java.util.ArrayList;
import java.util.Collection;
import java.util.List;
@Slf4j
@Data
@NoArgsConstructor
@AllArgsConstructor
public class User implements UserDetails, Serializable {
private static final long serialVersionUID = 1L;
private int id;
private String username;
private String password;
private List<Role> roles;
// 返回当前用户的所有角色、权限信息
@Override
public Collection<? extends GrantedAuthority> getAuthorities() {
log.debug("获取用户角色权限信息");
// 新建集合
List<GrantedAuthority> grantedAuthorities = new ArrayList<>();
// 遍历role
for(Role role : this.roles){
// 放入角色信息
grantedAuthorities.add(new SimpleGrantedAuthority(role.getName()));
// 遍历当前角色的所有权限信息
for(Perms perms : role.getPerms()){
grantedAuthorities.add(new SimpleGrantedAuthority(perms.getName()));
}
}
log.debug(grantedAuthorities.toString());
return grantedAuthorities;
}
// 获取用户名
@Override
public String getUsername() {
return this.username;
}
// 账号是否过期 true表示未过期 false表示过期
@Override
public boolean isAccountNonExpired() {
return true;
}
// 账号是否被锁定 true表示未锁定 false表示锁定
@Override
public boolean isAccountNonLocked() {
return true;
}
// 凭证是否过期 true表示未过期 false表示过期
@Override
public boolean isCredentialsNonExpired() {
return true;
}
// 用户是否被禁用 true表示未禁用 false表示禁用
@Override
public boolean isEnabled() {
return true;
}
}创建UerMapper接口
import com.woniuxy.springsecurity.entity.User;
import org.apache.ibatis.annotations.Mapper;
@Mapper
public interface UserMapper {
public User findByName(String username);
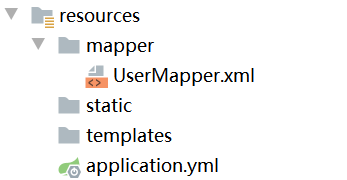
}在resources目录下创建mapper文件夹,并在该文件夹下创建Mapper文件
<?xml version="1.0" encoding="UTF-8" ?>
<!DOCTYPE mapper PUBLIC "-//mybatis.org//DTD Mapper 3.0//EN" "http://mybatis.org/dtd/mybatis-3-mapper.dtd" >
<mapper namespace="com.woniuxy.authserver.mapper.UserMapper" >
    <select id="findByName" resultMap="user_map">
        select * from user where username = #{username}
    </select>

    <resultMap id="user_map" type="User">
        <id column="id" property="id"></id>
        <result column="username" property="username"></result>
        <result column="password" property="password"></result>

        <collection property="roles" ofType="Role" column="id" select="findRolesByUid"></collection>
    </resultMap>

    <select id="findRolesByUid" resultMap="role_map">
        select r.id,r.name from user_role ur,role r where ur.rid = r.id and ur.uid = #{id}
    </select>
    <resultMap id="role_map" type="Role">
        <id column="id" property="id"></id>
        <result column="name" property="name"></result>

        <collection property="perms" ofType="Perms" column="id" select="findPermsByRid"></collection>
    </resultMap>

    <select id="findPermsByRid" resultType="Perms">
        select p.id,p.name from role_perms rp,perms p where rp.pid = p.id and rp.rid = #{rid}
    </select>
</mapper>
创建CustomUserDetailsServiceImpl类实现UserDetailsService接口
import com.woniuxy.authserver.entity.User;
import com.woniuxy.authserver.mapper.UserMapper;
import org.springframework.security.core.userdetails.UserDetails;
import org.springframework.security.core.userdetails.UserDetailsService;
import org.springframework.security.core.userdetails.UsernameNotFoundException;
import org.springframework.stereotype.Service;

import javax.annotation.Resource;

@Service
public class CustomUserDetailsServiceImpl implements UserDetailsService {
    @Resource
    private UserMapper userMapper;

    @Override
    public UserDetails loadUserByUsername(String username) throws UsernameNotFoundException {
        //1.查询用户
        User user = userMapper.findByName(username);

        //2.判断
        if (user == null) throw new UsernameNotFoundException("用户不存在");

        //3.返回用户信息
        return user;
    }
}
在配置类WebSecurityConfiguration中注入UserDetailsService对象,并修改configure(AuthenticationManagerBuilder auth)反方指定用户信息从数据库中获取
@Resource
private UserDetailsService userDetailsService;

@Override
protected void configure(AuthenticationManagerBuilder auth) throws Exception {
    //auth
        //.inMemoryAuthentication()	//内存认证
        //.withUser("zhangsan")		//用户名
        //.password(passwordEncoder().encode("123"))	//密码
        //.authorities("ROLE_ADMIN");	//角色
    auth.userDetailsService(userDetailsService).passwordEncoder(passwordEncoder());
}
重启auth-server服务,进行认证
封装用户id
在生成token时可以将用户id封装到token中,以便后期使用
修改TokenConfiguration类中的accessTokenConverter()方法,在创建转换器时重写enhance方法
// token转换器
@Bean
public JwtAccessTokenConverter accessTokenConverter() {
    JwtAccessTokenConverter jwtAccessTokenConverter =
        new JwtAccessTokenConverter(){
        @Override
        public OAuth2AccessToken enhance(OAuth2AccessToken accessToken, OAuth2Authentication authentication) {
            final Map<String,Object> map = new HashMap<>();
            // 从认证对象中得到用户信息
            User user = (User) authentication.getUserAuthentication().getPrincipal();
            // 将用户id放到token中
            map.put("uid", user.getId());
            ((DefaultOAuth2AccessToken)accessToken).setAdditionalInformation(map);
            // 返回
            return super.enhance(accessToken, authentication);
        }
    };
    jwtAccessTokenConverter.setSigningKey(SIGNING_KEY);
    return jwtAccessTokenConverter;
}
利用postman进行测试
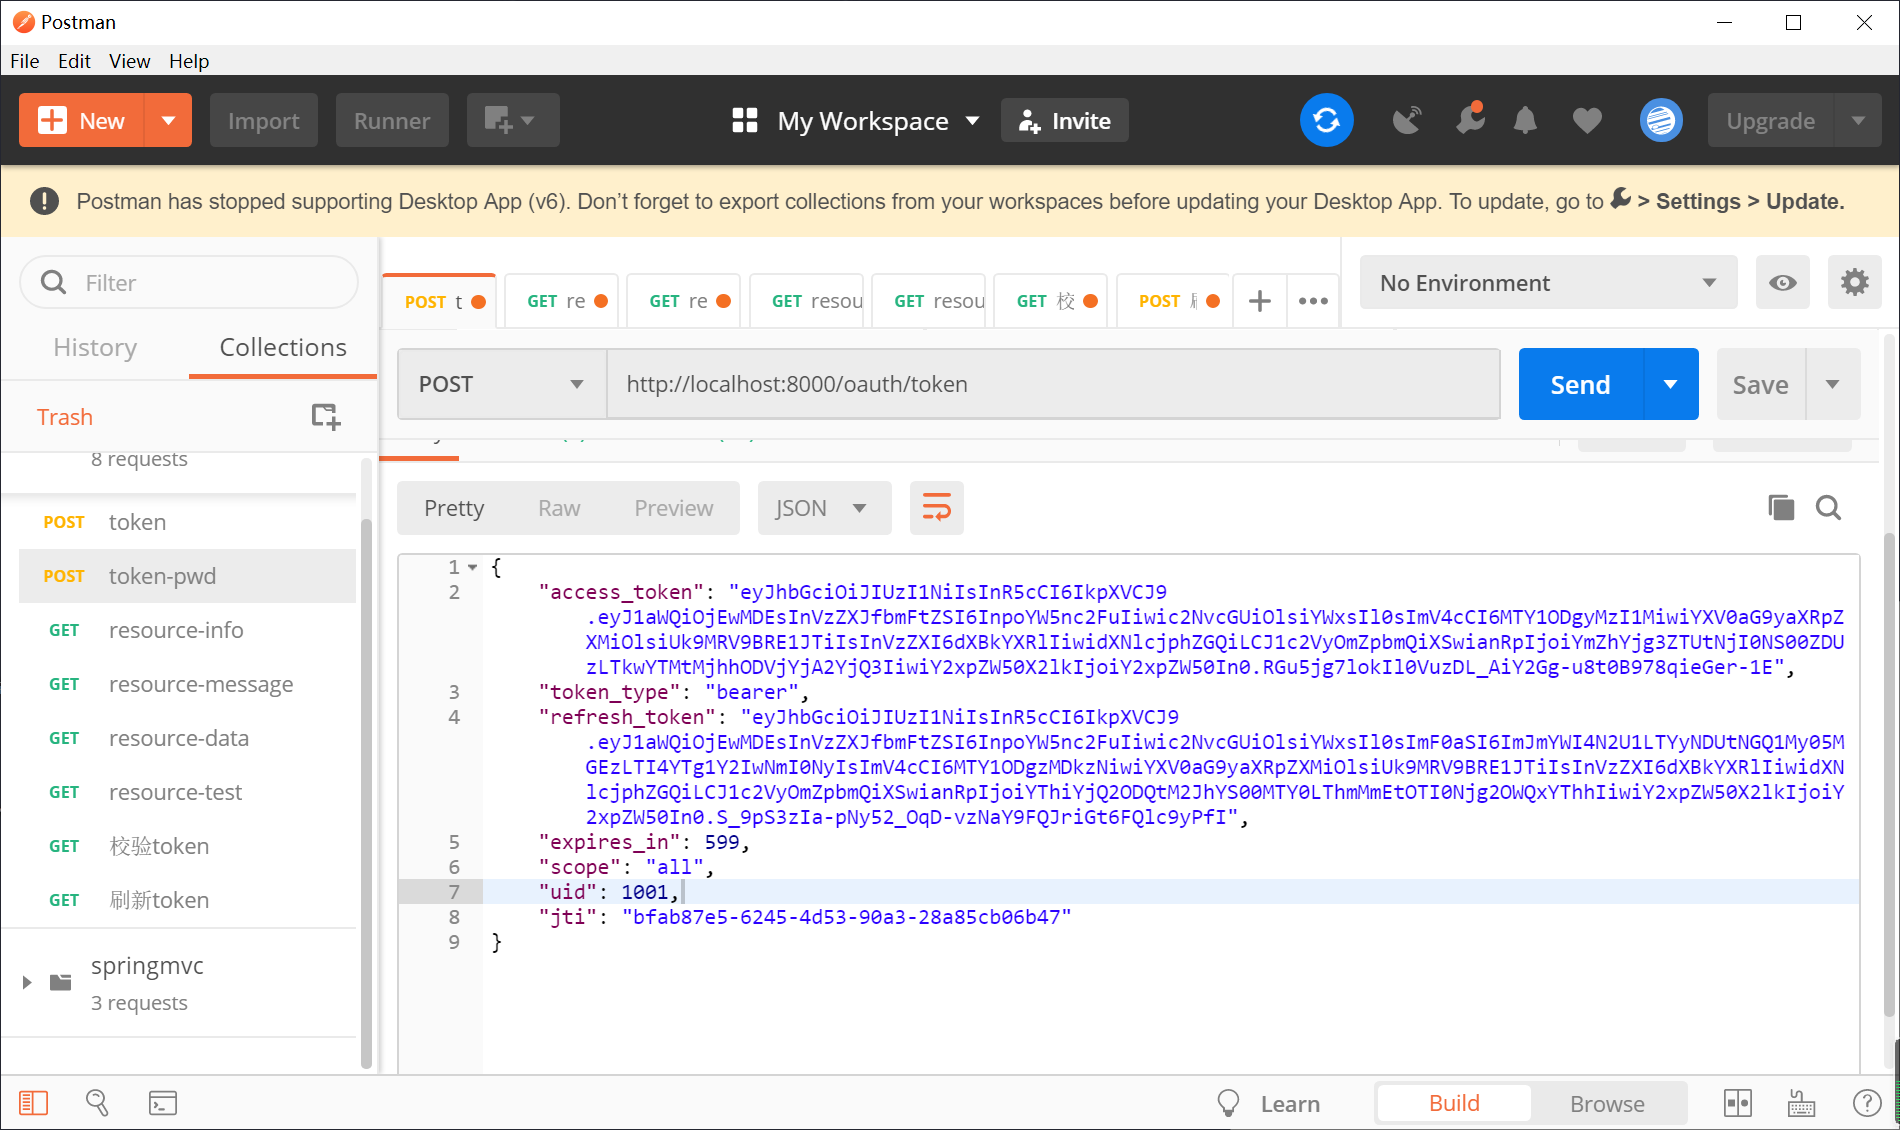
返回的结果中可以看到用户id,token中也包含了用户id
检验token是否过期
在org.springframework.security.oauth2.provider.endpoint.CheckTokenEndpoint类中定义了校验token的接口/oauth/check_token,该接口可以用来校验token是否合法、是否过期、是否是伪造的
@RequestMapping(value = "/oauth/check_token")
@ResponseBody
public Map<String, ?> checkToken(@RequestParam("token") String value) {

    OAuth2AccessToken token = resourceServerTokenServices.readAccessToken(value);
    if (token == null) {
        throw new InvalidTokenException("Token was not recognised");
    }

    if (token.isExpired()) {
        throw new InvalidTokenException("Token has expired");
    }

    OAuth2Authentication authentication = resourceServerTokenServices.loadAuthentication(token.getValue());

    Map<String, Object> response = (Map<String, Object>)accessTokenConverter.convertAccessToken(token, authentication);

    // gh-1070
    response.put("active", true);	// Always true if token exists and not expired

    return response;
}
只是该接口oauth2默认情况下是不对外公开的,如果要使用该接口那就必须手动配置开启,在AuthorizationServerConfiguration配置类中重写以下方法
//设置 /oauth/check_token 端点,通过认证后可访问。
//该端点对应 CheckTokenEndpoint类,用于校验访问令牌的有效性。
//在客户端访问资源服务器时,会在请求中带上访问令牌。
//在资源服务器收到客户端的请求时,会使用请求中的访问令牌,找授权服务器确认该访问令牌的有效性。
@Override
public void configure(AuthorizationServerSecurityConfigurer oauthServer) throws Exception {
    // 默认是denyAll():拒绝所有
    oauthServer.checkTokenAccess("permitAll()");
}
checkTokenAccess常用值有三种:
-
denyAll():拒绝所有请求,不开放该接口
-
isAuthenticated():只对完成认证之后的请求开放
-
permitAll():对所有请求开放
测试:登录成功之后在Postman中发送请求进行测试
接口url:http://localhost:8080/oauth/check_token
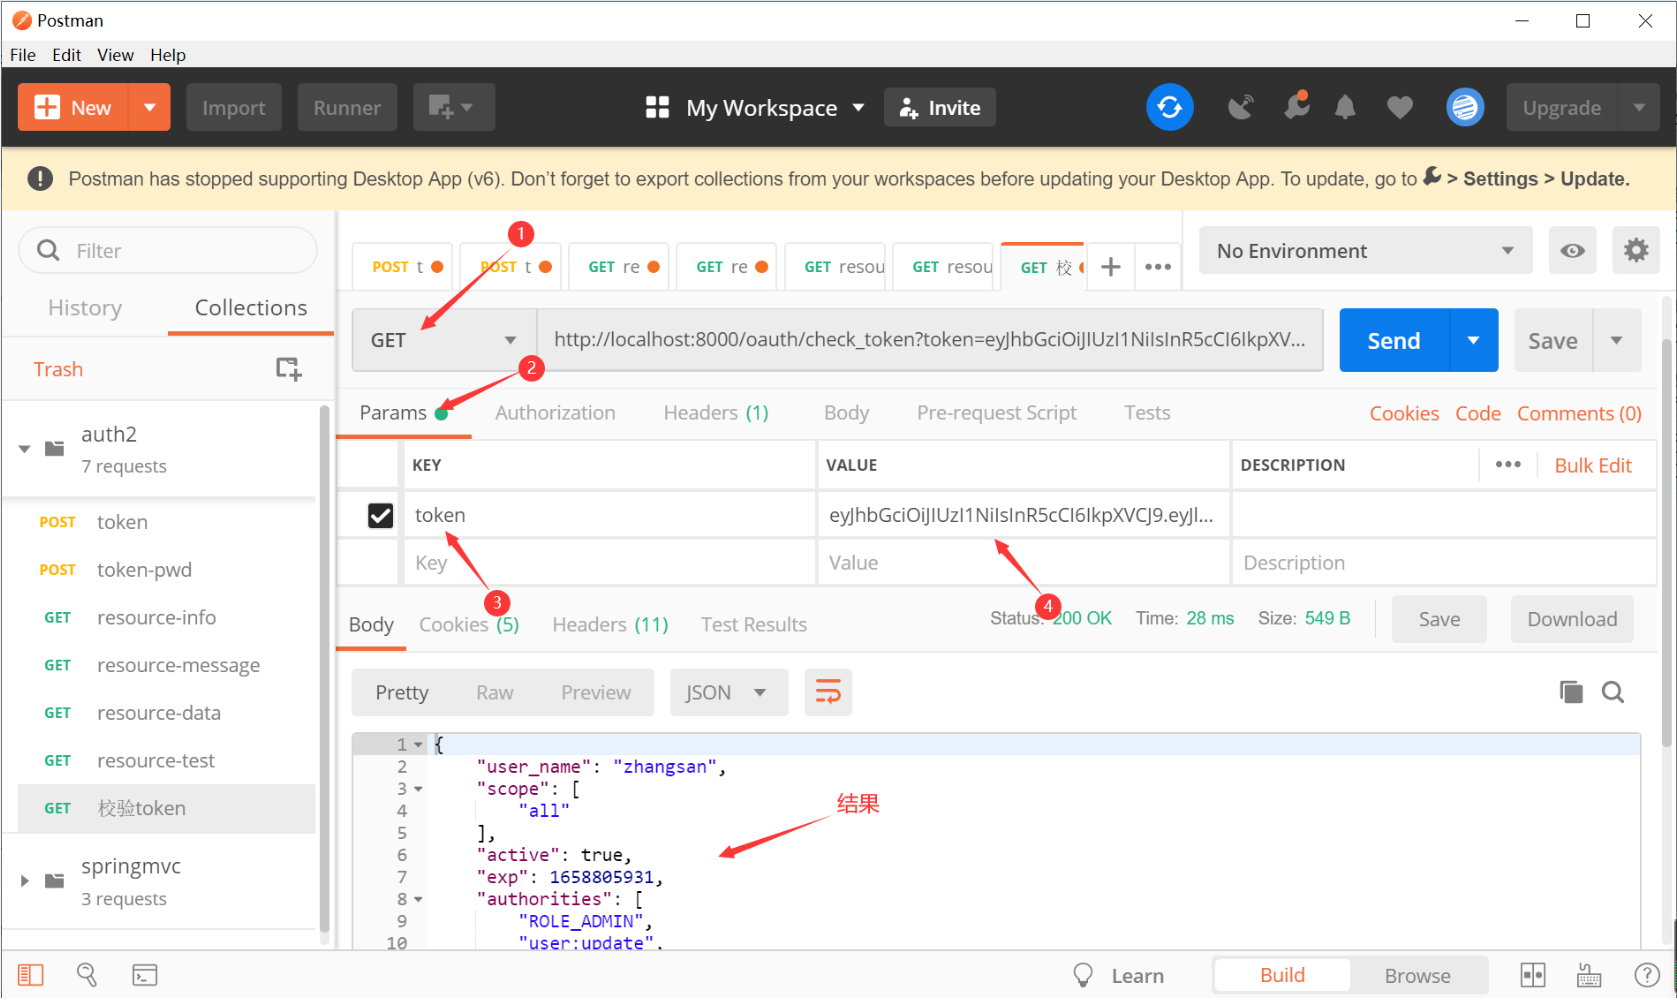
返回的结果中包含了用户的用户名、权限等信息,还包括了token是否可用的信息
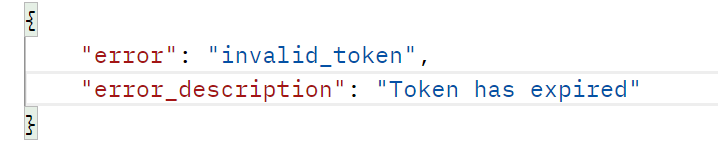
如果返回以下信息表示token已经过期
而如果返回以下信息表示token非法

通过refresh_token获取新token
获取token和刷新token使用的是同一个接口,所以地址栏url还是
http://local:8080/oauth/token
只是grant_type需要换成refresh_token,然后将之前的refresh token作为参数传递给后台
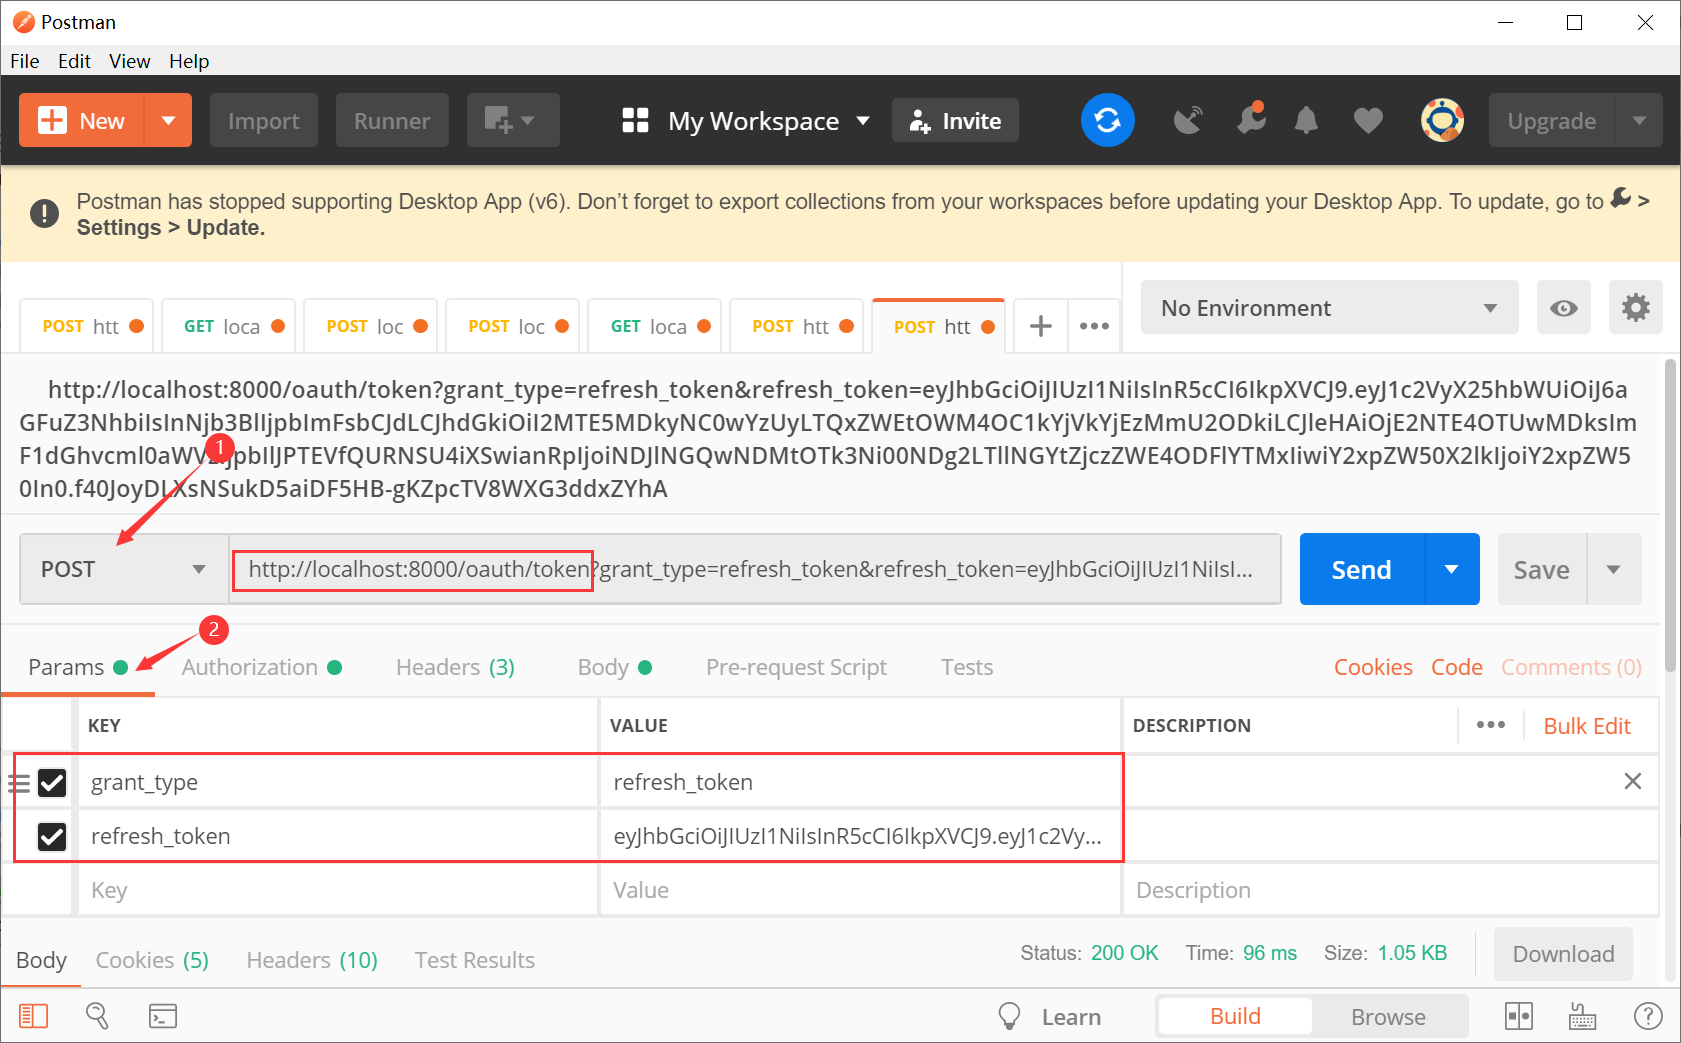
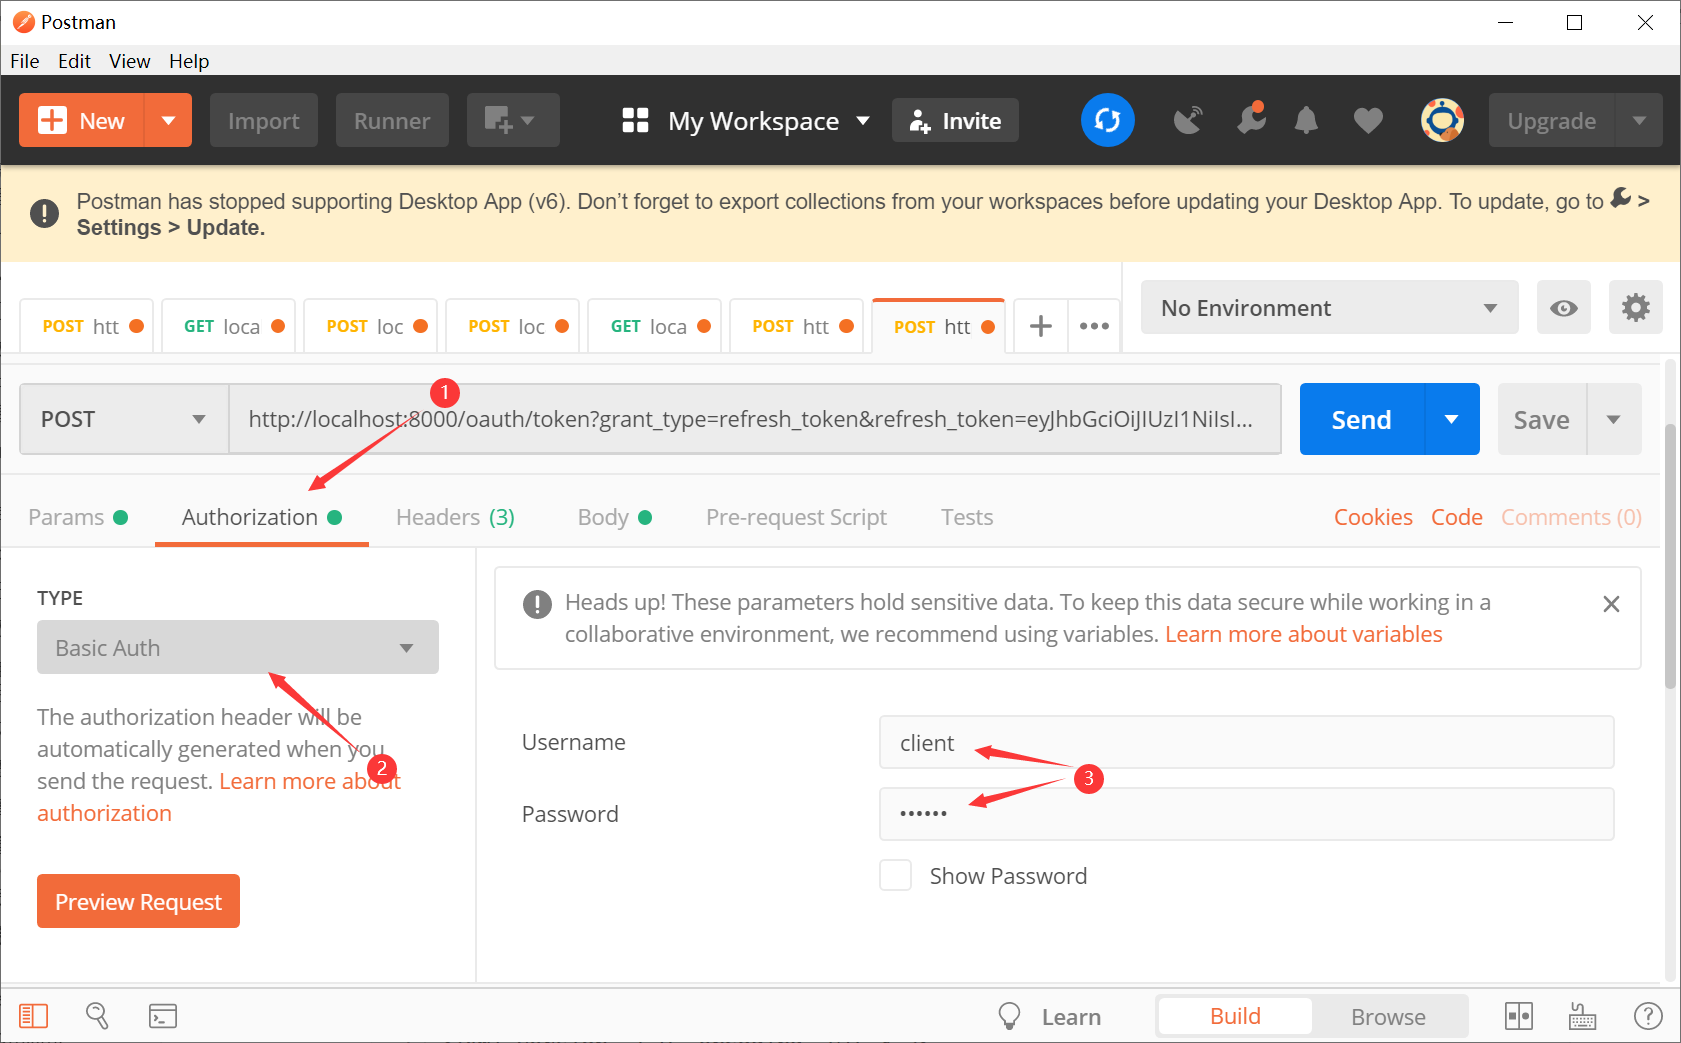
还是需要将客户端id、密码以base64编码放到请求头中
发送请求得到结果
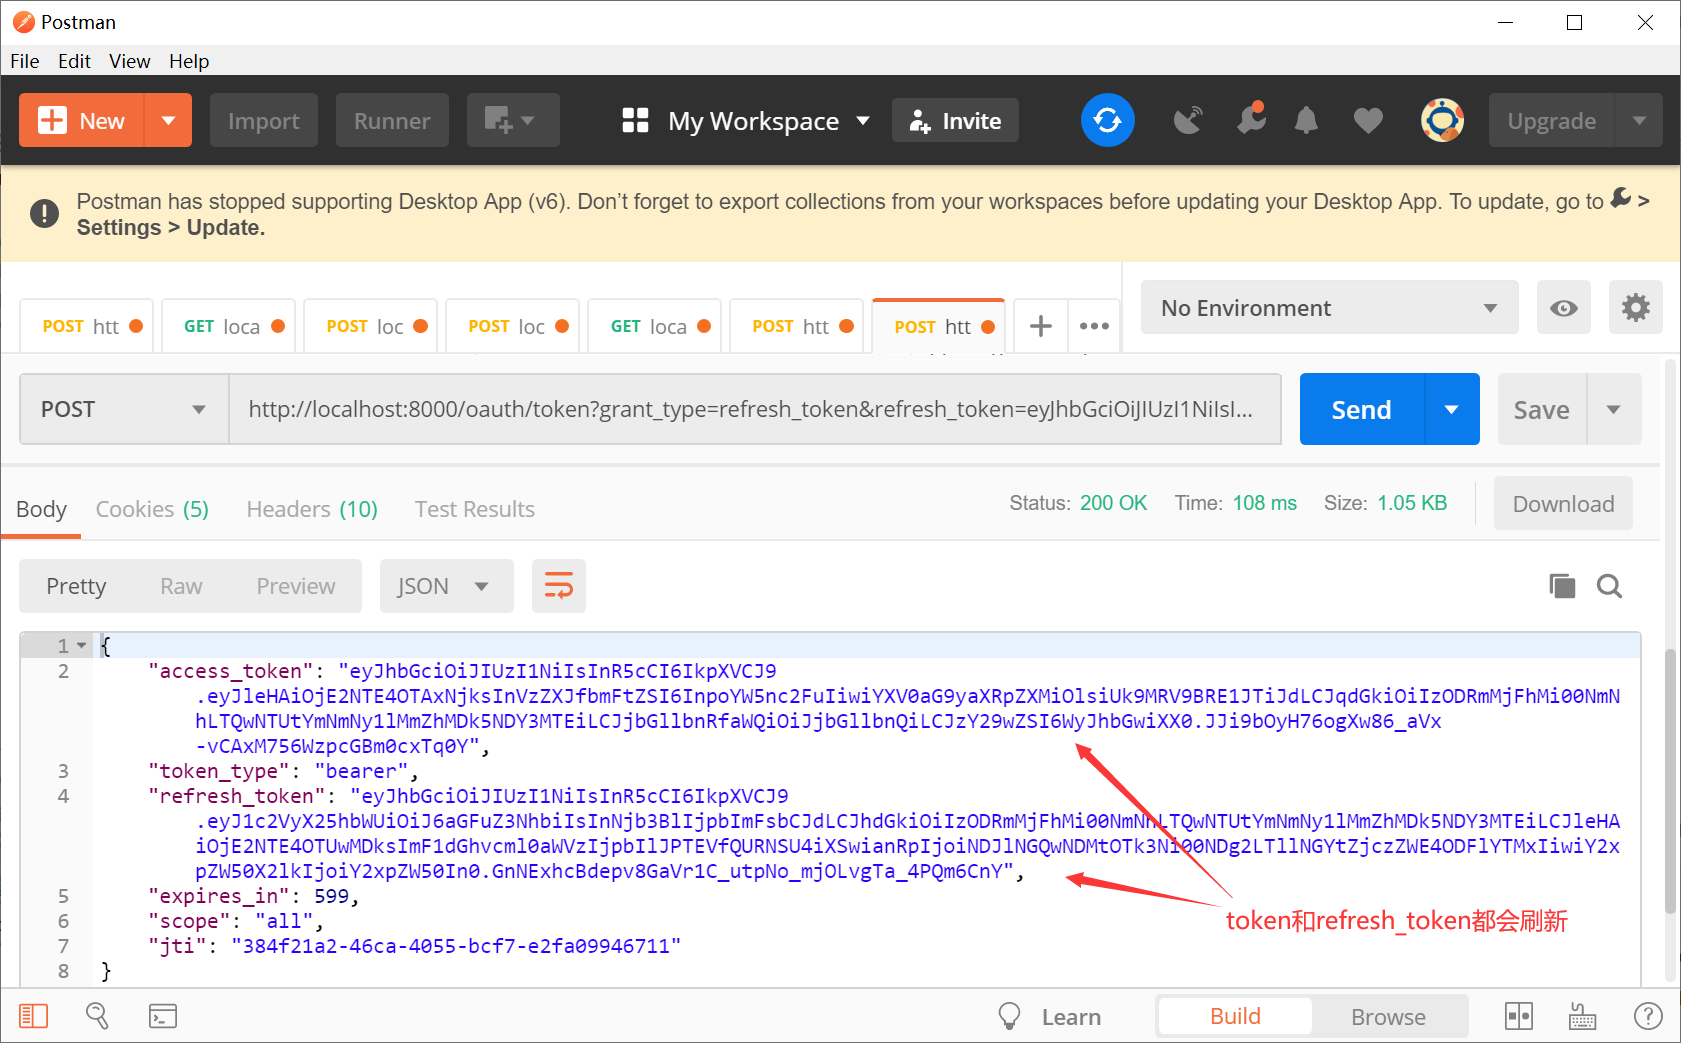
根据结果可以知道,token和refresh_token都会自动刷新,这样做的好处是当token过期时通过程序调用刷新接口,获取到新的token和refresh_token,实现自动续期。
refresh_token如果过期会得到以下结果
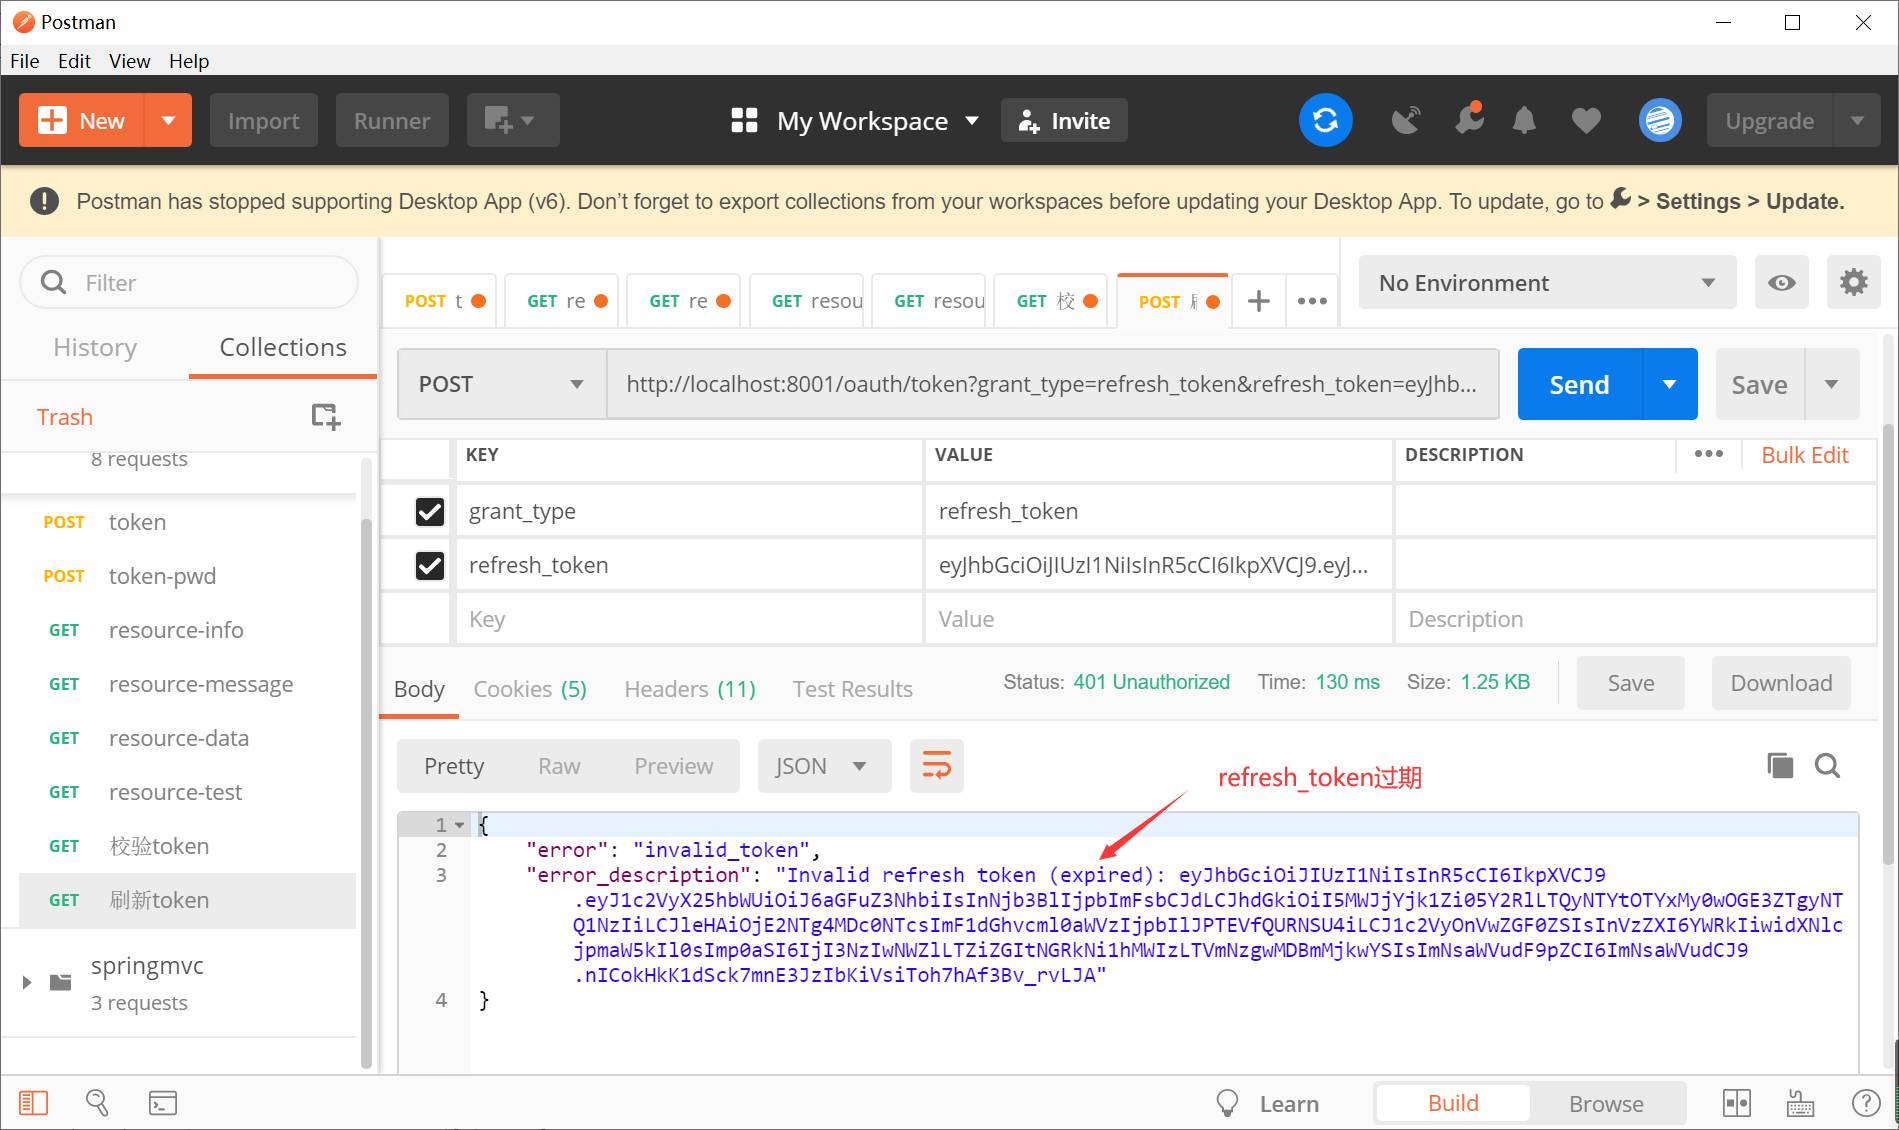
refresh_token过期就需要重新登录
1.5 资源服务器
创建resource子模块,导入相关依赖
设置父子关系
创建OAuth2ResourceServerConfig配置类
import org.springframework.context.annotation.Configuration;
import org.springframework.security.config.annotation.web.builders.HttpSecurity;
import org.springframework.security.oauth2.config.annotation.web.configuration.EnableResourceServer;
import org.springframework.security.oauth2.config.annotation.web.configuration.ResourceServerConfigurerAdapter;

@Configuration
@EnableResourceServer
public class OAuth2ResourceServerConfig extends ResourceServerConfigurerAdapter {

    @Override
    public void configure(HttpSecurity http) throws Exception {
        http.authorizeRequests()
            // 设置请求,需要认证后访问
            .anyRequest().authenticated();
    }
}
创建controller
import org.springframework.web.bind.annotation.RequestMapping;
import org.springframework.web.bind.annotation.RestController;

@RestController
@RequestMapping("/resource")
public class ResourceController {

    @RequestMapping("/info")
    public String info(){

        return "success";
    }
}
配置application.yml
server:
  port: 8001
spring:
  application:
    name: resource
security:
  oauth2:
    # OAuth2 Client 配置,对应 OAuth2ClientProperties 类
    client:
      client-id: client
      client-secret: secret
    # OAuth2 Resource 配置,对应 ResourceServerProperties 类
    resource:
      token-info-uri: http://127.0.0.1:8000/oauth/check_token # 获得 Token 信息的 URL
    # 访问令牌获取 URL,自定义的
    access-token-uri: http://127.0.0.1:8000/oauth/token
management:
  endpoints:
    web:
      exposure:
        include: '*'
启动resource资源服务器
先进行认证,得到token和refresh_token
localhost:8000/oauth/token

然后将得到的token放到请求资源服务器的请求头中
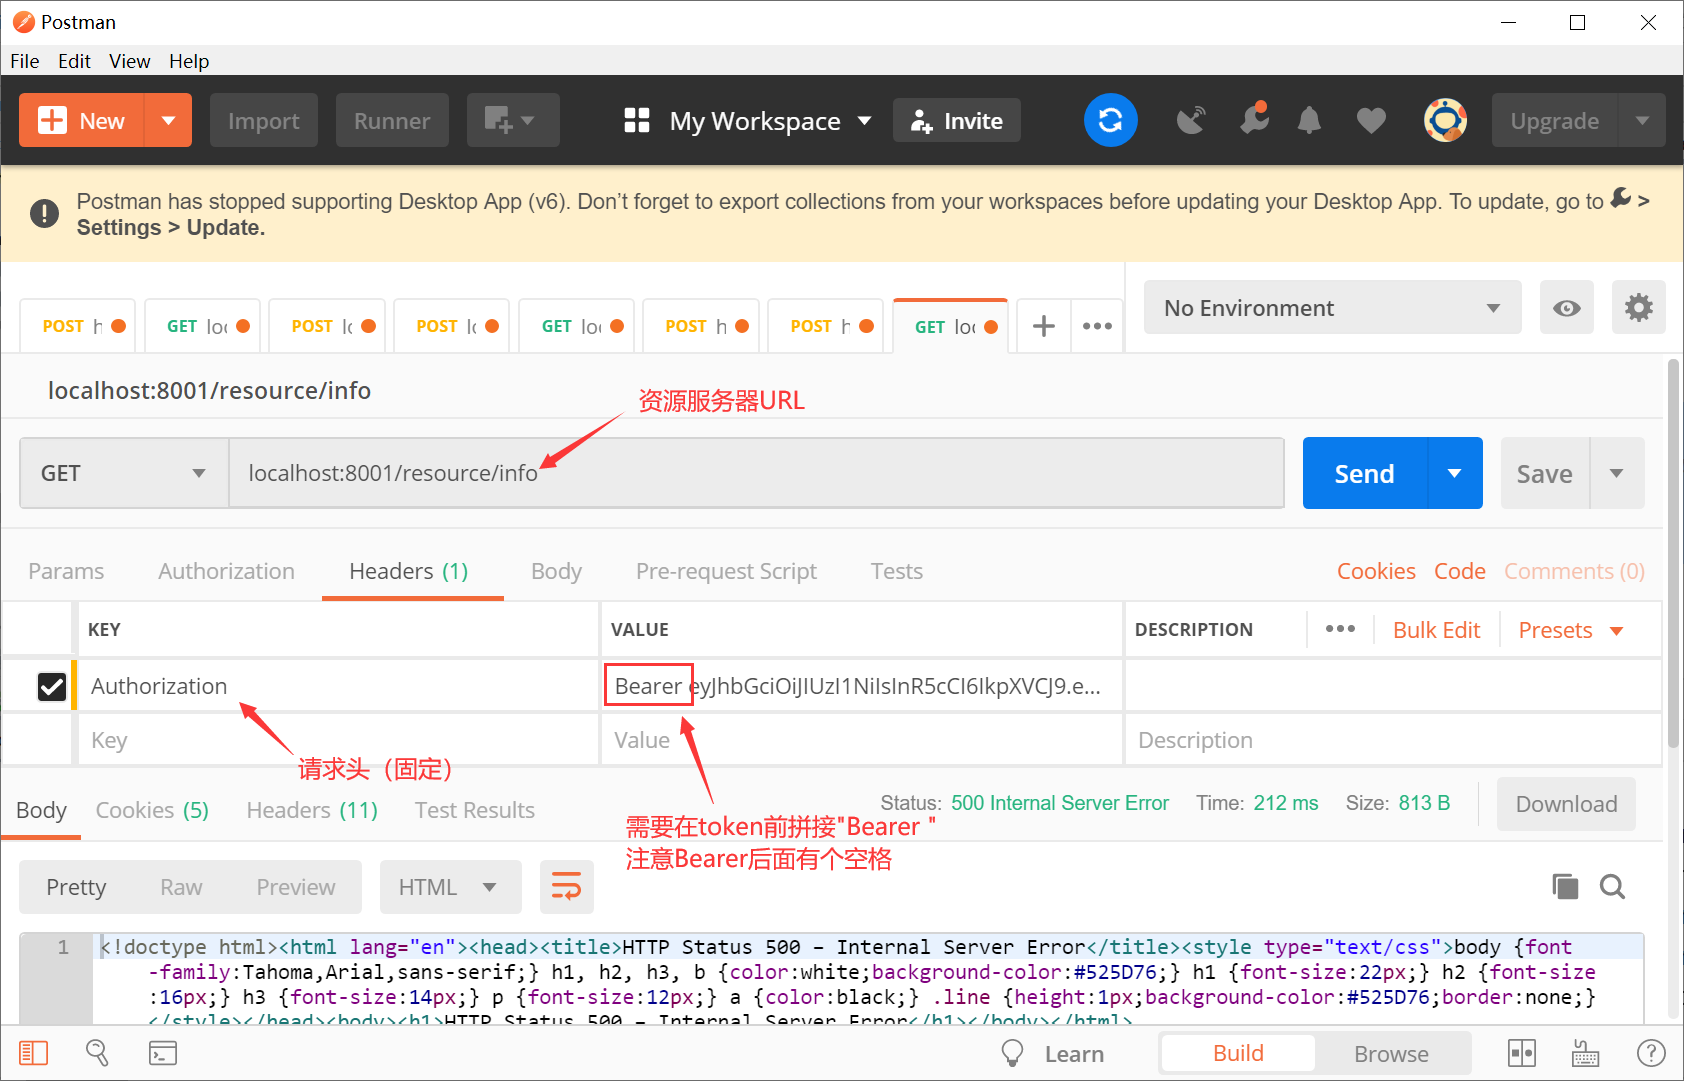
发送请求后可以发现报500错误,查看resource控制台可以发现以下信息
org.springframework.web.client.HttpClientErrorException$Forbidden: 403 : [{"timestamp":"2022-05-07T03:40:14.063+00:00","status":403,"error":"Forbidden","message":"","path":"/oauth/check_token"}]
根据信息提示:没有权限访问 /oauth/check_token,该URL是认证服务器用来校验token是否合法的接口。资源服务器在接收到请求时会获取到token,然后调用认证服务器的/oauth/check_token接口去检验token,但是此时认证服务器还没有开放该端口(默认关闭),所以造成了403无法访问。
到认证服务器的AuthorizationServerConfiguration配置类中开启/oauth/check_token
//设置 /oauth/check_token 端点,通过认证后可访问。
//该端点对应 CheckTokenEndpoint类,用于校验访问令牌的有效性。
//在客户端访问资源服务器时,会在请求中带上访问令牌。
//在资源服务器收到客户端的请求时,会使用请求中的访问令牌,找授权服务器确认该访问令牌的有效性。
@Override
public void configure(AuthorizationServerSecurityConfigurer oauthServer) throws Exception {
    // 默认是denyAll():拒绝所有
    oauthServer.checkTokenAccess("isAuthenticated()");
}
重启认证服务器
重新进行认证得到token,然后用新的token再访问资源服务器
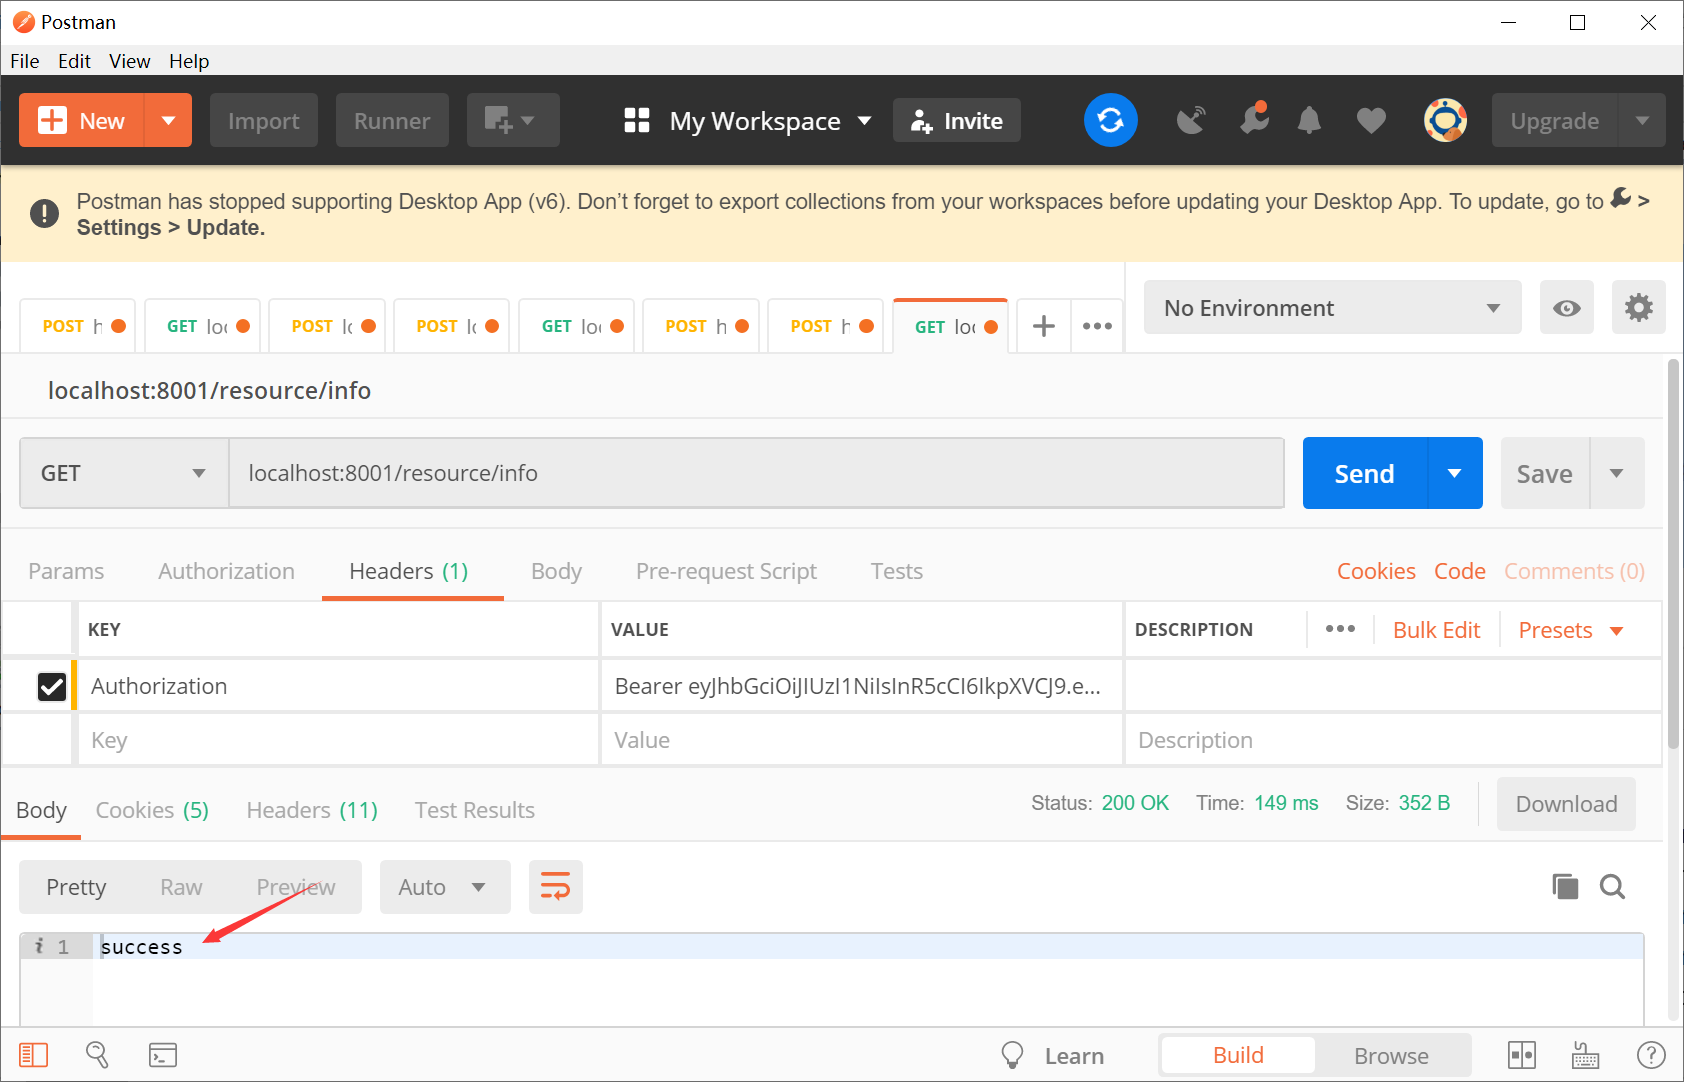
看到success表明成功
角色权限管理
在资源服务器主启动类上添加@EnableGlobalMethodSecurity注解,开启spring security权限注解的支持
import org.springframework.boot.SpringApplication;
import org.springframework.boot.autoconfigure.SpringBootApplication;
import org.springframework.security.config.annotation.method.configuration.EnableGlobalMethodSecurity;

@SpringBootApplication
@EnableGlobalMethodSecurity(prePostEnabled = true)
public class ResourceApplication {
    public static void main(String[] args) {
        SpringApplication.run(ResourceApplication.class, args);
    }
}
在resource/info接口方法上添加注解@PreAuthorize并指定角色或权限
@RequestMapping("/info")
@PreAuthorize("hasRole('USER')")
public String info(){

    return "success";
}
利用postman再次访问该接口
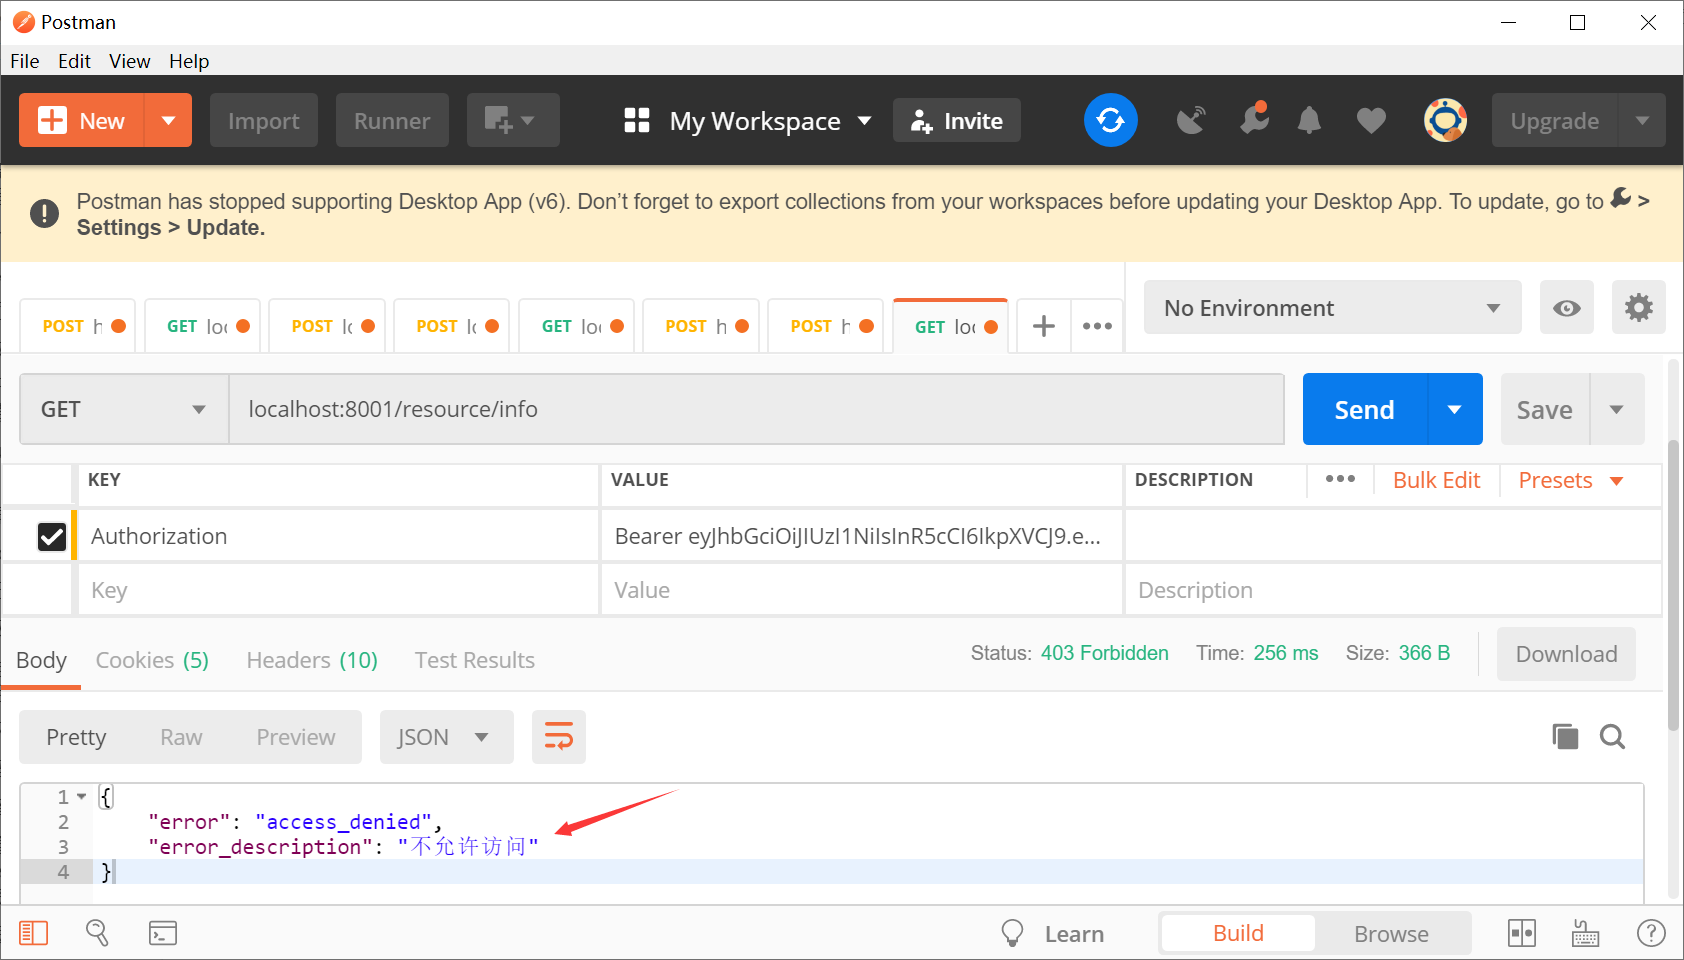
得到不允许访问的结果,表明角色权限管理生效
1.6 整合数据库(client)
建表SQL
CREATE TABLE `clientdetails` (
  `appId` VARCHAR(128) NOT NULL,
  `resourceIds` VARCHAR(256) DEFAULT NULL,
  `appSecret` VARCHAR(256) DEFAULT NULL,
  `scope` VARCHAR(256) DEFAULT NULL,
  `grantTypes` VARCHAR(256) DEFAULT NULL,
  `redirectUrl` VARCHAR(256) DEFAULT NULL,
  `authorities` VARCHAR(256) DEFAULT NULL,
  `access_token_validity` INT(11) DEFAULT NULL,
  `refresh_token_validity` INT(11) DEFAULT NULL,
  `additionalInformation` VARCHAR(4096) DEFAULT NULL,
  `autoApproveScopes` VARCHAR(256) DEFAULT NULL,
  PRIMARY KEY (`appId`)
) ENGINE=INNODB DEFAULT CHARSET=utf8;

CREATE TABLE `oauth_access_token` (
  `token_id` VARCHAR(256) DEFAULT NULL,
  `token` BLOB,
  `authentication_id` VARCHAR(128) NOT NULL,
  `user_name` VARCHAR(256) DEFAULT NULL,
  `client_id` VARCHAR(256) DEFAULT NULL,
  `authentication` BLOB,
  `refresh_token` VARCHAR(256) DEFAULT NULL,
  PRIMARY KEY (`authentication_id`)
) ENGINE=INNODB DEFAULT CHARSET=utf8;

CREATE TABLE `oauth_approvals` (
  `userId` VARCHAR(256) DEFAULT NULL,
  `clientId` VARCHAR(256) DEFAULT NULL,
  `scope` VARCHAR(256) DEFAULT NULL,
  `status` VARCHAR(10) DEFAULT NULL,
  `expiresAt` TIMESTAMP NULL DEFAULT NULL,
  `lastModifiedAt` TIMESTAMP NULL DEFAULT NULL
) ENGINE=INNODB DEFAULT CHARSET=utf8;

CREATE TABLE `oauth_client_details` (
  `client_id` VARCHAR(128) NOT NULL,
  `resource_ids` VARCHAR(256) DEFAULT NULL,
  `client_secret` VARCHAR(256) DEFAULT NULL,
  `scope` VARCHAR(256) DEFAULT NULL,
  `authorized_grant_types` VARCHAR(256) DEFAULT NULL,
  `web_server_redirect_uri` VARCHAR(256) DEFAULT NULL,
  `authorities` VARCHAR(256) DEFAULT NULL,
  `access_token_validity` INT(11) DEFAULT NULL,
  `refresh_token_validity` INT(11) DEFAULT NULL,
  `additional_information` VARCHAR(4096) DEFAULT NULL,
  `autoapprove` VARCHAR(256) DEFAULT NULL,
  PRIMARY KEY (`client_id`)
) ENGINE=INNODB DEFAULT CHARSET=utf8;

CREATE TABLE `oauth_client_token` (
  `token_id` VARCHAR(256) DEFAULT NULL,
  `token` BLOB,
  `authentication_id` VARCHAR(128) NOT NULL,
  `user_name` VARCHAR(256) DEFAULT NULL,
  `client_id` VARCHAR(256) DEFAULT NULL,
  PRIMARY KEY (`authentication_id`)
) ENGINE=INNODB DEFAULT CHARSET=utf8;

CREATE TABLE `oauth_code` (
  `code` VARCHAR(256) DEFAULT NULL,
  `authentication` BLOB
) ENGINE=INNODB DEFAULT CHARSET=utf8;

CREATE TABLE `oauth_refresh_token` (
  `token_id` VARCHAR(256) DEFAULT NULL,
  `token` BLOB,
  `authentication` BLOB
) ENGINE=INNODB DEFAULT CHARSET=utf8;
在表 oauth_client_details 中增加一条客户端配置记录,在填入时可以按照AuthorizationServerConfiguration配置类中的客户端配置进行配置
配置的效果如下:

注:各字段解释说明
-
client_id:客户端标识
-
client_secret:客户端安全码。注意安全码不能是明文需要加密,此处可以写一段程序,然后使用BCryptPasswordEncoder为客户端安全码加密,得到加密之后的安全码,再写入到数据库中,例如:
-
System.out.println(new BCryptPasswordEncoder().encode("secret"));
-
scope:客户端授权范围
-
authorized_grant_types:客户端授权类型,支持多种类型,多种类型之间用逗号隔开
-
web_server_redirect_uri:服务器回调地址
创建实体类User、Role、Perms
在auth-server模块的pom.xml中引入mybatis相关依赖
<!-- spring-boot-starter-jdbc 内置了HikariCP 连接池,所以使用该连接池连接数据库 -->
<dependency>
	<groupId>org.springframework.boot</groupId>
	<artifactId>spring-boot-starter-jdbc</artifactId>
</dependency>
<!-- mysql -->
<dependency>
    <groupId>mysql</groupId>
    <artifactId>mysql-connector-java</artifactId>
</dependency>
<!-- 获取application.yml文件中的配置 -->
<dependency>
	<groupId>org.springframework.boot</groupId>
	<artifactId>spring-boot-configuration-processor</artifactId>
	<optional>true</optional>
</dependency>
application.yml文件中添加数据库相关配置
server:
  port: 8000
spring:
  application:
    name: oauth
  datasource:
    type: com.zaxxer.hikari.HikariDataSource
    driver-class-name: com.mysql.cj.jdbc.Driver
    jdbc-url: jdbc:mysql://localhost:3306/sc?useUnicode=true&characterEncoding=utf8&serverTimezone=UTC
    username: root
    password: root
    hikari:
      minimum-idle: 5
      maximum-pool-size: 10
      auto-commit: true #自动提交
      pool-name: MYHIKARICP
      connection-test-query: SELECT 1 #测试是否能连接上数据库的SQL语句
  main:
    #true,后定义的bean会覆盖之前定义的相同名称的bean,生成dataSource替换掉原生的dataSource
    allow-bean-definition-overriding: true
创建数据库配置类DataSourceConfiguration,主要配置用到的数据源,用HikariCP连接池的数据源替换到spring内置的数据源。
import org.springframework.boot.context.properties.ConfigurationProperties;
import org.springframework.boot.jdbc.DataSourceBuilder;
import org.springframework.context.annotation.Bean;
import org.springframework.context.annotation.Configuration;
import org.springframework.context.annotation.Primary;

import javax.sql.DataSource;

@Configuration
public class DataSourceConfiguration {
    @Bean
    @Primary
    //根据application.yml中的配置信息创建dataSource
    @ConfigurationProperties(prefix = "spring.datasource")
    //import javax.sql.DataSource;
    public DataSource dataSource() {
        //创建dataSource
        return DataSourceBuilder.create().build();
    }
}在TokenConfiguration配置类中把token存储策略改成JDBC方式,将jwt存放到数据库中DataSource
@Resource
private DataSource dataSource;

// 令牌存储策略:jwt方式
@Bean
public TokenStore tokenStore(DataSource dataSource){
    //return new JwtTokenStore(accessTokenConverter());
    return new JdbcTokenStore(dataSource);
}
修改AuthorizationServerConfiguration配置类,添加ClientDetailsService clientDetailsService(DataSource dataSource)方法,让程序通过DataSource从数据库中获取到客户端信息
@Bean
public ClientDetailsService clientDetailsService(DataSource dataSource) {
    //在数据库中去获取客户端信息(oauth_client_details表)
    return new JdbcClientDetailsService(dataSource);
}
修改configure(ClientDetailsServiceConfigurer clients)方法指定到数据库获取客户端信息
@Override
public void configure(ClientDetailsServiceConfigurer clients) throws Exception {
    //配置客户端
    //clients
    //.inMemory()		//内存方式
    //.withClient("client")	//客户端名字
    //.secret(passwordEncoder.encode("secret"))	//客户端秘钥
    //.authorizedGrantTypes("authorization_code","password","refresh_token")
    //.scopes("all")	//授权范围
    //.redirectUris("http://www.woniuxy.com");	//回调网址

    clients.withClientDetails(clientDetailsService);
}
完成之后重启项目,再次进行认证测试
正常情况下,测试完毕之后会在数据库的oauth_access_token 表中会增加一个记录,这个记录就是浏览器获取到的token和refresh token

角色、权限管理测试
在resource服务的controller中添加以下方法
@RequestMapping("/message")
@PreAuthorize("hasRole('ADMIN')")
public String message(){

    return "message";
}

@RequestMapping("/data")
@PreAuthorize("hasAuthority('user:add')")
public String data(){

    return "data";
}
@RequestMapping("/test")
@PreAuthorize("hasAuthority('user:del')")
public String test(){

    return "test";
}
启动resource服务,通过postman分别测试info、message、data、test接口,如果只有message、data接口可以访问,那么说明角色、权限管理成功。