使用第三方工具AutoIt,实现文件上传
用于测试的HTML代码:
<html>
    <head> <title>上传文件</title> <meta http-equiv="Content-Type" content="text/html; charset=utf-8"> </head> <body> <form enctype="multipart/form-data" action="parse_file.jsp" method="post"> <p>Browse for a file to upload: </p> <input id="file" name="file" type="file"> <br> <br> <input id="filesubmit" value="SUBMIT" type="submit"> </form> </body> </html>
目的:实现操作有一些webdriver无法操作的文件上传对象。
AutoIt工具的使用说明:
-
下载安装工具
访问:https://www.autoitscript.com/site/sutoit/downloads/网址,下载工具包并进行安装。
2. 编辑操作文件上传框体的AutoIt脚本
(1)“开始”→“所有程序”→“AutoIt v3”→“SciTE”→“SciTE”命令,启动AutoIt的文本编辑器。
(2)在编辑器中输入如下脚本:
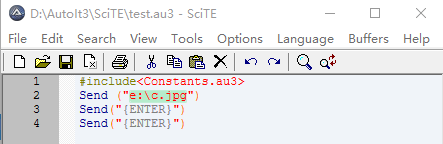
#include <Constants.au3>
Send("e:\test.txt") #使用键盘输入待上传文件的路径
Send("{ENTER}") #发送一个回车键
Send("{ENTER}") #再次发送一个回车键
说明:调用两次Enter键,主要是解决某些操作系统默认的输入法是中文输入法,输入“e:\test.txt”以后,必须按一下Enter键才能将输入的内容写入路径输入框中,再按一
次Enter键,就等价于单击文件打开窗体的“打开”按钮。
(3)将AutoIt脚本保存为文件名为“test.au3”的文件并存放在指定磁盘上。
如下图所示:
(4)“开始”→“所有程序”→“AutoIt v3”→“Compile script to.exe(x64)”(根据自己的操作系统位数选择正确的位数),调出将AutoIt脚本转换成exe文件的界面。
(5)在Source路径框中选择上面保存的AutoIt脚本“test.au3”文件, Destination处选择.exe单选项,并在接下来的输入框中设置好生成exe文件的保存路径,其他默认即可。
(6)单击Convert按钮,将会把AutoIt脚本“test.au3”文件转换成“test.exe”可执行文件。
如下图所示:

实例代码:
#encoding=utf-8
from selenium import webdriver
import unittest import time, os import traceback from selenium.webdriver.support.ui import WebDriverWait from selenium.webdriver.common.by import By from selenium.webdriver.support import expected_conditions as EC from selenium.common.exceptions import TimeoutException, NoSuchElementException class TestDemo(unittest.TestCase): def setUp(self): # 启动浏览器 self.driver = webdriver.Ie(executable_path = "d:\\IEDriverServer") def test_uploadFileByAutoIt(self): url = "http://127.0.0.1/test_upload_file.html" # 访问自定义网页  self.driver.get(url) try: # 创建一个显示等待对象 wait = WebDriverWait(self.driver, 10, 0.2) # 显示等待判断被测试页面上的上传文件按钮是否处于可被点击状态 wait.until(EC.element_to_be_clickable((By.ID, 'file'))) except TimeoutException, e: # 捕获TimeoutException异常 print traceback.print_exc() except NoSuchElementException, e: # 捕获NoSuchElementException异常 print traceback.print_exc() except Exception, e: # 捕获其他异常 print traceback.print_exc() else: # 查找页面上ID属性值为“file”的文件上传框, # 并点击调出选择文件上传框 self.driver.find_element_by_id("file").click() # 通过Python提供的os模块的system方法执行生成的test.exe文件,实现文件上传 os.system("D:\AutoIt3\SciTE\\test.exe") # 由于AutoIt脚本转换后的可执行文件test.exe可能执行速度比较慢,这里等待5秒,以确保test.exe脚本执行成功 time.sleep(5) # 找到页面上ID属性值为“filesubmit”的文件提交按钮对象 fileSubmitButton = self.driver.find_element_by_id("filesubmit") # 单击提交按钮,完成文件上传操作  fileSubmitButton.click() # 因为文件上传需要时间,所以这里可以添加显示等待场景,判断文件上传成功后,页面是否跳转到文件上传成功的页面。 # 通过EC.title_is()方法判断跳转后的页面的Title值是否符合期望,如果匹配将继续执行后续代码 #wait.until(EC.title_is(u"文件上传成功")) time.sleep(2) def tearDown(self): # 退出IE浏览器  self.driver.quit() if __name__ == '__main__': unittest.main()