知识点05:AirFlow的架构组件
-
目标:了解AirFlow的架构组件
-
路径
- step1:架构
- step2:组件
-
实施
-
架构
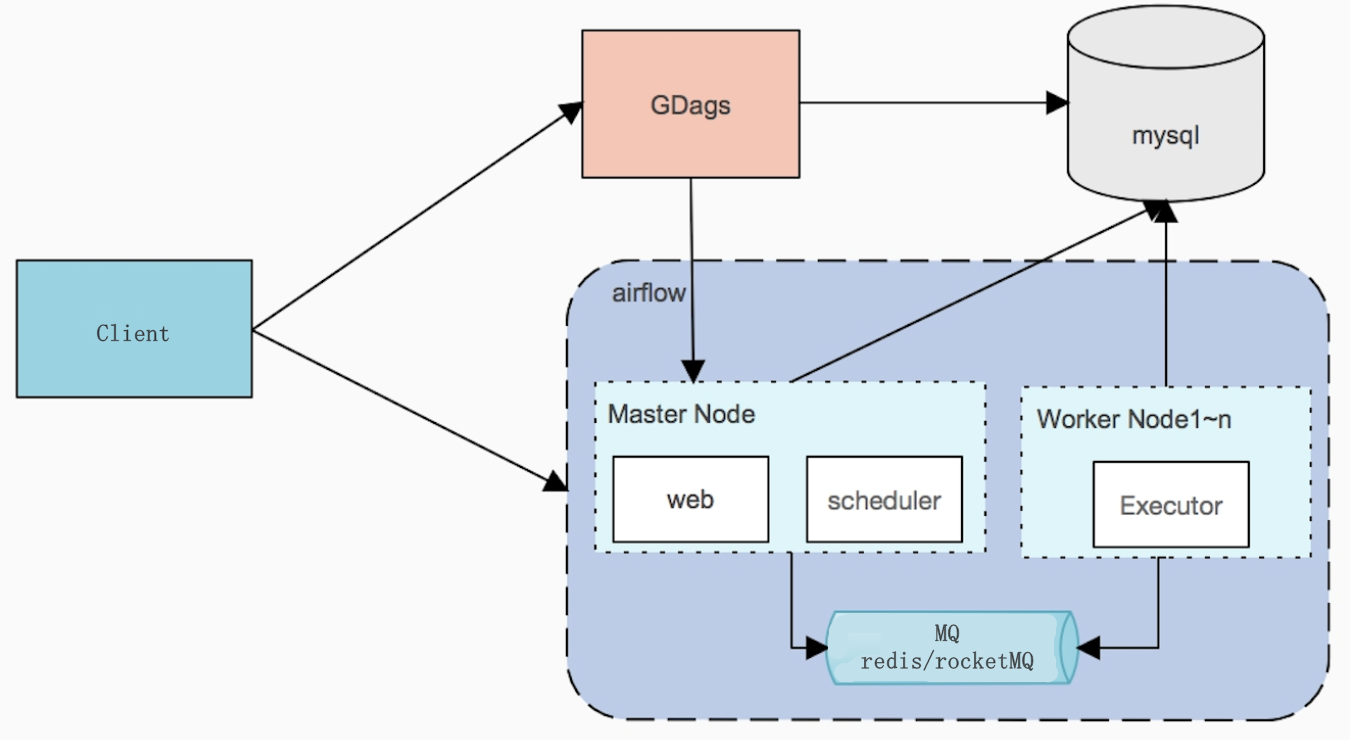
- Client:开发AirFlow调度的程序的客户端,用于开发AirFlow的Python程序
- Master:分布式架构中的主节点,负责运行WebServer和Scheduler
- Worker:负责运行Execution执行提交的工作流中的Task
-
组件
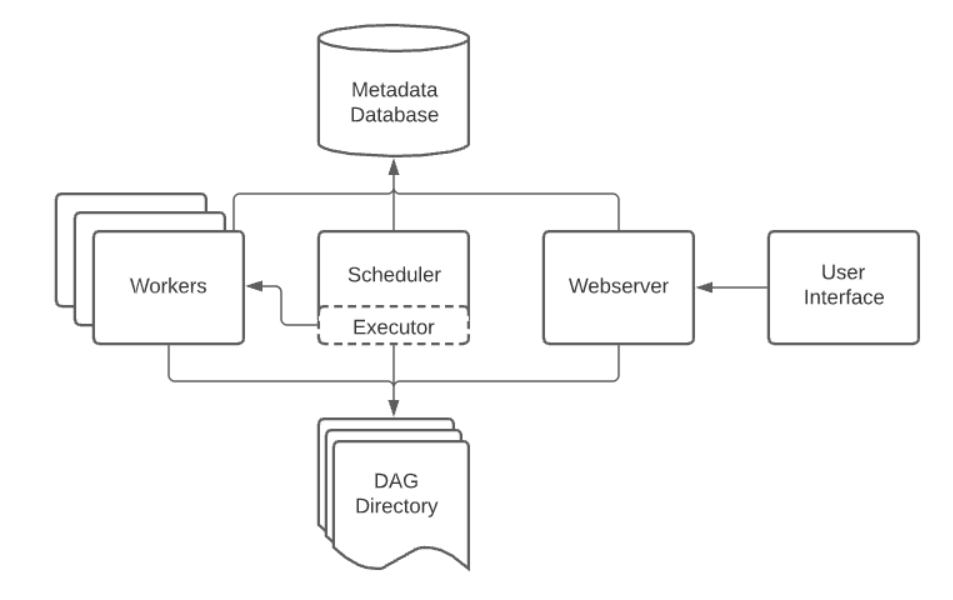
A scheduler, which handles both triggering scheduled workflows, and submitting Tasks to the executor to run. An executor, which handles running tasks. In the default Airflow installation, this runs everything inside the scheduler, but most production-suitable executors actually push task execution out to workers. A webserver, which presents a handy user interface to inspect, trigger and debug the behaviour of DAGs and tasks. A folder of DAG files, read by the scheduler and executor (and any workers the executor has) A metadata database, used by the scheduler, executor and webserver to store state.- WebServer:提供交互界面和监控,让开发者调试和监控所有Task的运行
- Scheduler:负责解析和调度Task任务提交到Execution中运行
- Executor:执行组件,负责运行Scheduler分配的Task,运行在Worker中
- DAG Directory:DAG程序的目录,将自己开发的程序放入这个目录,AirFlow的WebServer和Scheduler会自动读取
- airflow将所有程序放在一个目录中
- 自动检测这个目录有么有新的程序
- MetaData DataBase:AirFlow的元数据存储数据库,记录所有DAG程序的信息
-
-
小结
- 了解AirFlow的架构组件
知识点06:AirFlow的开发规则
-
目标:掌握AirFlow的开发规则
-
路径
- step1:开发Python调度程序
- step2:提交Python调度程序
-
实施
-
官方文档
- 概念:http://airflow.apache.org/docs/apache-airflow/stable/concepts/index.html
-
示例:http://airflow.apache.org/docs/apache-airflow/stable/tutorial.html
-
开发Python调度程序
-
开发一个Python程序,程序文件中需要包含以下几个部分
-
注意:该文件的运行不支持utf8编码,不能写中文
-
step1:导包
# 必选:导入airflow的DAG工作流
from airflow import DAG
# 必选:导入具体的TaskOperator类型
from airflow.operators.bash import BashOperator
# 可选:导入定时工具的包
from airflow.utils.dates import days_ago
-
step2:定义DAG及配置
# 当前工作流的基础配置 default_args = { # 当前工作流的所有者 'owner': 'airflow', # 当前工作流的邮件接受者邮箱 'email': ['[email protected]'], # 工作流失败是否发送邮件告警 'email_on_failure': True, # 工作流重试是否发送邮件告警 'email_on_retry': True, # 重试次数 'retries': 2, # 重试间隔时间 'retry_delay': timedelta(minutes=1), } # 定义当前工作流的DAG对象 dagName = DAG( # 当前工作流的名称,唯一id 'airflow_name', # 使用的参数配置 default_args=default_args, # 当前工作流的描述 description='first airflow task DAG', # 当前工作流的调度周期:定时调度【可选】 schedule_interval=timedelta(days=1), # 工作流开始调度的时间 start_date=days_ago(1), # 当前工作流属于哪个组 tags=['itcast_bash'], )- 构建一个DAG工作流的实例和配置
-
step3:定义Tasks
-
Task类型:http://airflow.apache.org/docs/apache-airflow/stable/concepts/operators.html
-
常用
BashOperator- executes a bash command- 执行Linux命令
PythonOperator- calls an arbitrary Python function- 执行Python代码
EmailOperator- sends an email- 发送邮件的
-
其他
-
BashOperator:定义一个Shell命令的Task
# 导入BashOperator from airflow.operators.bash import BashOperator # 定义一个Task的对象 t1 = BashOperator( # 指定唯一的Task的名称 task_id='first_bashoperator_task', # 指定具体要执行的Linux命令 bash_command='echo "hello airflow"', # 指定属于哪个DAG对象 dag=dagName ) -
PythonOperator:定义一个Python代码的Task
# 导入PythonOperator
from airflow.operators.python import PythonOperator

# 定义需要执行的代码逻辑
def sayHello():
    print("this is a programe")

#定义一个Task对象
t2 = PythonOperator(
    # 指定唯一的Task的名称
    task_id='first_pyoperator_task',
    # 指定调用哪个Python函数
    python_callable=sayHello,
    # 指定属于哪个DAG对象
    dag=dagName
)
-
-
step4:运行Task并指定依赖关系
-
定义Task
Task1:runme_0 Task2:runme_1 Task3:runme_2 Task4:run_after_loop Task5:also_run_this Task6:this_will_skip Task7:run_this_last -
需求
- Task1、Task2、Task3并行运行,结束以后运行Task4
- Task4、Task5、Task6并行运行,结束以后运行Task7

-
代码
task1 >> task4 task2 >> task4 task3 >> task4 task4 >> task7 task5 >> task7 task6 >> task7 -
如果只有一个Task,只要直接写上Task对象名称即可
task1
-
-
-
提交Python调度程序
-
哪种提交都需要等待一段时间
-
自动提交:需要等待自动检测
- 将开发好的程序放入AirFlow的DAG Directory目录中
- 默认路径为:/root/airflow/dags
-
手动提交:手动运行文件让airflow监听加载
python xxxx.py -
调度状态
-
No status (scheduler created empty task instance):调度任务已创建,还未产生任务实例
-
Scheduled (scheduler determined task instance needs to run):调度任务已生成任务实例,待运行
-
Queued (scheduler sent task to executor to run on the queue):调度任务开始在executor执行前,在队列中
-
Running (worker picked up a task and is now running it):任务在worker节点上执行中
-
Success (task completed):任务执行成功完成
-
-
-
-
小结
- 掌握AirFlow的开发规则