busybox版本:
1.35.0
一、ash程序入口分析
ash程序是linux内核启动后期进入busybox后,在busybox中启动的默认shell,用于响应和执行命令输入。ash的操作入口由ash_main()函数代表,定义在/shell/ash.c文件中。
贴上ash_main函数的完整代码(出自/shell/ash.c):
int ash_main(int argc, char **argv) MAIN_EXTERNALLY_VISIBLE;
#if NUM_SCRIPTS > 0
int ash_main(int argc, char **argv)
#else
int ash_main(int argc UNUSED_PARAM, char **argv)
#endif
/* note: 'argc' is used only if embedded scripts are enabled */
{


	volatile smallint state;
	struct jmploc jmploc;
	struct stackmark smark;
	int login_sh;

	/* Initialize global data */
	INIT_G_misc();
	INIT_G_memstack();
	INIT_G_var();
#if ENABLE_ASH_ALIAS
	INIT_G_alias();
#endif
	INIT_G_cmdtable();

#if PROFILE
	monitor(4, etext, profile_buf, sizeof(profile_buf), 50);
#endif

	state = 0;
	if (setjmp(jmploc.loc)) {


		smallint e;
		smallint s;

		exitreset();

		e = exception_type;
		s = state;
		if (e == EXEND || e == EXEXIT || s == 0 || iflag == 0 || shlvl) {


			exitshell();
		}

		reset();

		if (e == EXINT) {


			newline_and_flush(stderr);
		}

		popstackmark(&smark);
		FORCE_INT_ON; /* enable interrupts */
		if (s == 1)
			goto state1;
		if (s == 2)
			goto state2;
		if (s == 3)
			goto state3;
		goto state4;
	}
	exception_handler = &jmploc;
	rootpid = getpid();

	init();
	setstackmark(&smark);

#if NUM_SCRIPTS > 0
	if (argc < 0)
		/* Non-NULL minusc tells procargs that an embedded script is being run */
		minusc = get_script_content(-argc - 1);
#endif
	login_sh = procargs(argv);
#if DEBUG
	TRACE(("Shell args: "));
	trace_puts_args(argv);
#endif

	if (login_sh) {


		const char *hp;

		state = 1;
		read_profile("/etc/profile");
 state1:
		state = 2;
		hp = lookupvar("HOME");
		if (hp)
			read_profile("$HOME/.profile");
	}
 state2:
	state = 3;
	if (iflag
#ifndef linux
	 && getuid() == geteuid() && getgid() == getegid()
#endif
	) {


		const char *shinit = lookupvar("ENV");
		if (shinit != NULL && *shinit != '\0')
			read_profile(shinit);
	}
	popstackmark(&smark);
 state3:
	state = 4;
	if (minusc) {


		/* evalstring pushes parsefile stack.
		 * Ensure we don't falsely claim that 0 (stdin)
		 * is one of stacked source fds.
		 * Testcase: ash -c 'exec 1>&0' must not complain. */

		// if (!sflag) g_parsefile->pf_fd = -1;
		// ^^ not necessary since now we special-case fd 0
		// in save_fd_on_redirect()

		lineno = 0; // bash compat
		// dash: evalstring(minusc, sflag ? 0 : EV_EXIT);
		// The above makes
		//  ash -sc 'echo $-'
		// continue reading input from stdin after running 'echo'.
		// bash does not do this: it prints "hBcs" and exits.
		evalstring(minusc, EV_EXIT);
	}

	if (sflag || minusc == NULL) {


#if MAX_HISTORY > 0 && ENABLE_FEATURE_EDITING_SAVEHISTORY
		if (line_input_state) {


			const char *hp = lookupvar("HISTFILE");
			if (!hp) {


				hp = lookupvar("HOME");
				if (hp) {


					INT_OFF;
					hp = concat_path_file(hp, ".ash_history");
					setvar0("HISTFILE", hp);
					free((char*)hp);
					INT_ON;
					hp = lookupvar("HISTFILE");
				}
			}
			if (hp)
				line_input_state->hist_file = xstrdup(hp);
# if ENABLE_FEATURE_SH_HISTFILESIZE
			hp = lookupvar("HISTFILESIZE");
			line_input_state->max_history = size_from_HISTFILESIZE(hp);
# endif
		}
#endif
 state4: /* XXX ??? - why isn't this before the "if" statement */
		cmdloop(1);
	}
#if PROFILE
	monitor(0);
#endif
#ifdef GPROF
	{


		extern void _mcleanup(void);
		_mcleanup();
	}
#endif
	TRACE(("End of main reached\n"));
	exitshell();
	/* NOTREACHED */
}
下文将分段描述该函数。
首先是调用几个INIT_G_XXX命名的宏定义:
	INIT_G_misc();
	INIT_G_memstack();
	INIT_G_var();
#if ENABLE_ASH_ALIAS
	INIT_G_alias();
#endif
	INIT_G_cmdtable();
以上几个函数用于初始化全局变量。
然后将state变量值设置为0:
state = 0;
接着是调用一个C语言标准库中的setjmp()函数实现异常处理机制:
	if (setjmp(jmploc.loc)) {


		smallint e;
		smallint s;

		exitreset();

		e = exception_type;
		s = state;
		if (e == EXEND || e == EXEXIT || s == 0 || iflag == 0 || shlvl) {


			exitshell();
		}

		reset();

		if (e == EXINT) {


			newline_and_flush(stderr);
		}

		popstackmark(&smark);
		FORCE_INT_ON; /* enable interrupts */

		printf("s : %d\r\n",s);
		if (s == 1)
			goto state1;
		if (s == 2)
			goto state2;
		if (s == 3)
			goto state3;
		goto state4;
	}
	exception_handler = &jmploc;
在接下来的代码中,会调用procargs(argv)处理命令行参数;调用read_profile("/etc/profile")读取配置文件,该文件正是在busybox中需要我们自己添加的用于配置shell的描述文件。
在最后,则会调用cmdloop(1)函数用于执行命令行循环操作。该函数用于读取执行命令。
二、ash_main总结
ash_main()函数用于初始化,解析参数,执行/etc/profile配置文件,然后调用cmdloop()来执行命令。setjmp()函数是一个C语言库函数,用于设置当事件发生时跳转到的位置。当异常发生时,变量"state"是用于计算跳转的位置。
三、login进程
在busybox运行后,可在命令行下输入login命令则可以运行login程序,默认busybox配置下,在启动busybox后,会执行ash程序而不是login程序。在实际应用需求中,我们可以将login设置为busybox启动后的运行程序。方法如下:
(1)使用make menuconfig编译构建出busybox的图形配置界面,选择下列选项:

(2)进入Login/Password Management Utilities选项,将该配置下的所有项目都配置上:

(3)使用make -j12编译构建busybox。
(4)安装busybox
通过以上步骤,这时候的busybox是支持login程序的,接下来,在/etc/inittab文件中设置启动项:
::respawn:-/bin/login
或者
::respawn:/sbin/getty 115200 console
注:上述配置任选一种
配置/etc/group,/etc/passwd,/etc/shadow三个文件(如果在busybox中没有,则需要自己创建
)
- 在/etc/group文件中,添加如下配置:
root:x:0:root
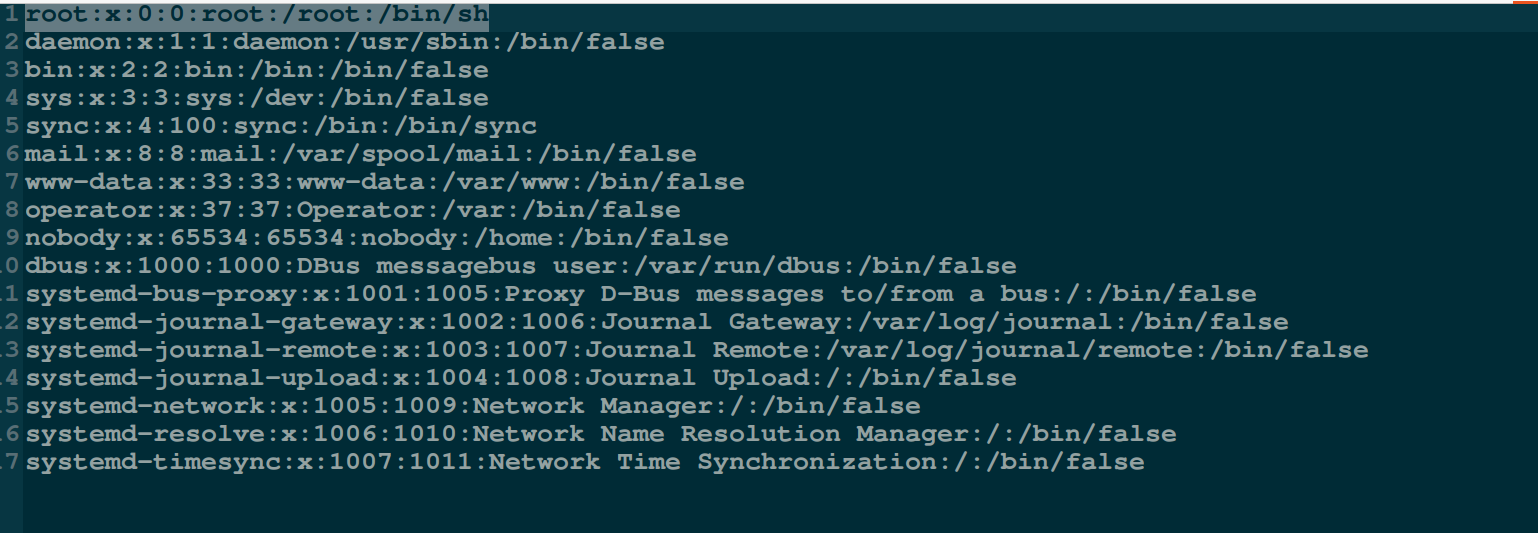
- 在/etc/passwd文件需要有root用户的口令信息:
root:x:0:0:root:/root:/bin/sh
小生这里/etc/passed文件中内容如下:
- 在/etc/shadow文件中配置用户(这里是root用户)口令:
root:DH9Ade75qXIdI:1:0:99999:7:::
DH9Ade75qXIdI表示设置的口令
该串密文可使用mkpasswd命令生成,在命令行终端输入mkpasswd后会提示输入口令,这时候输入我们想要设置的明文口令,完成后按下回车键即可生成crypt格式的字符串:

上述操作就将login登录的口令设置为iriczhao,用户名为root。
至此,通过上述步骤,就完成了login的配置,运行busybox后,即可进入login程序,如下图所示:
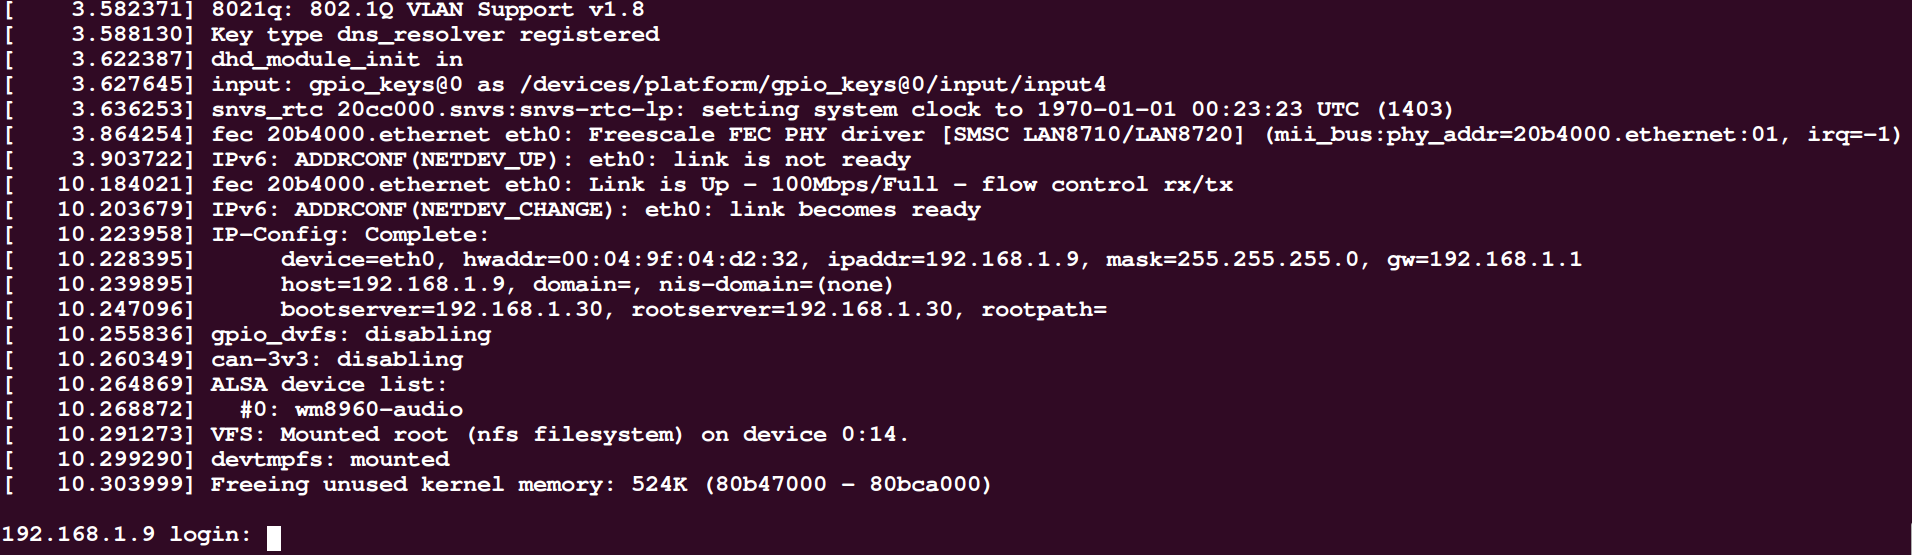
键入root和密码(本文是iriczhao)后,即可进入shell。
四、login程序入口分析
根据busybox的工具特征,知道login程序对应的入口则是login_main(),本小节将分析该函数:
当在busybox中运行login程序后,会提示输入登录名,然后会提示输入口令,按下Enter键后,将会去验证登录口令是否正确,这一系列的操作是由login_main函数中的while(1){}结构完成的,代码如下(出自/loginutils/login.c):
while (1) {


		/* flush away any type-ahead (as getty does) */
		tcflush(0, TCIFLUSH);

		if (!username[0])
			get_username_or_die(username, sizeof(username));

#if ENABLE_PAM
		pamret = pam_start("login", username, &conv, &pamh);
		if (pamret != PAM_SUCCESS) {


			failed_msg = "start";
			goto pam_auth_failed;
		}
		/* set TTY (so things like securetty work) */
		pamret = pam_set_item(pamh, PAM_TTY, short_tty);
		if (pamret != PAM_SUCCESS) {


			failed_msg = "set_item(TTY)";
			goto pam_auth_failed;
		}
		/* set RHOST */
		if (opt_host) {


			pamret = pam_set_item(pamh, PAM_RHOST, opt_host);
			if (pamret != PAM_SUCCESS) {


				failed_msg = "set_item(RHOST)";
				goto pam_auth_failed;
			}
		}
		if (!(opt & LOGIN_OPT_f)) {


			pamret = pam_authenticate(pamh, 0);
			if (pamret != PAM_SUCCESS) {


				failed_msg = "authenticate";
				goto pam_auth_failed;
				/* TODO: or just "goto auth_failed"
				 * since user seems to enter wrong password
				 * (in this case pamret == 7)
				 */
			}
		}
		/* check that the account is healthy */
		pamret = pam_acct_mgmt(pamh, 0);
		if (pamret == PAM_NEW_AUTHTOK_REQD) {


			pamret = pam_chauthtok(pamh, PAM_CHANGE_EXPIRED_AUTHTOK);
		}
		if (pamret != PAM_SUCCESS) {


			failed_msg = "acct_mgmt";
			goto pam_auth_failed;
		}
		/* read user back */
		pamuser = NULL;
		/* gcc: "dereferencing type-punned pointer breaks aliasing rules..."
		 * thus we cast to (void*) */
		if (pam_get_item(pamh, PAM_USER, (void*)&pamuser) != PAM_SUCCESS) {


			failed_msg = "get_item(USER)";
			goto pam_auth_failed;
		}
		if (!pamuser || !pamuser[0])
			goto auth_failed;
		safe_strncpy(username, pamuser, sizeof(username));
		/* Don't use "pw = getpwnam(username);",
		 * PAM is said to be capable of destroying static storage
		 * used by getpwnam(). We are using safe(r) function */
		pw = NULL;
		getpwnam_r(username, &pwdstruct, pwdbuf, sizeof(pwdbuf), &pw);
		if (!pw)
			goto auth_failed;
		pamret = pam_open_session(pamh, 0);
		if (pamret != PAM_SUCCESS) {


			failed_msg = "open_session";
			goto pam_auth_failed;
		}
		pamret = pam_setcred(pamh, PAM_ESTABLISH_CRED);
		if (pamret != PAM_SUCCESS) {


			failed_msg = "setcred";
			goto pam_auth_failed;
		}
		break; /* success, continue login process */

 pam_auth_failed:
		/* syslog, because we don't want potential attacker
		 * to know _why_ login failed */
		syslog(LOG_WARNING, "pam_%s call failed: %s (%d)", failed_msg,
					pam_strerror(pamh, pamret), pamret);
		login_pam_end(pamh);
		safe_strncpy(username, "UNKNOWN", sizeof(username));
#else /* not PAM */
		pw = getpwnam(username);
		if (!pw) {


			strcpy(username, "UNKNOWN");
			goto fake_it;
		}

		if (pw->pw_passwd[0] == '!' || pw->pw_passwd[0] == '*')
			goto auth_failed;

		if (opt & LOGIN_OPT_f)
			break; /* -f USER: success without asking passwd */

		if (pw->pw_uid == 0 && !is_tty_secure(short_tty))
			goto auth_failed;

		/* Don't check the password if password entry is empty (!) */
		if (!pw->pw_passwd[0])
			break;
 fake_it:
		/* Password reading and authorization takes place here.
		 * Note that reads (in no-echo mode) trash tty attributes.
		 * If we get interrupted by SIGALRM, we need to restore attrs.
		 */
		if (ask_and_check_password(pw) > 0)
			break;
#endif /* ENABLE_PAM */
 auth_failed:
		opt &= ~LOGIN_OPT_f;
		pause_after_failed_login();
		/* TODO: doesn't sound like correct English phrase to me */
		puts("Login incorrect");
		syslog(LOG_WARNING, "invalid password for '%s'%s",
					username, fromhost);
		if (++count == 3) {


			if (ENABLE_FEATURE_CLEAN_UP)
				free(fromhost);
			return EXIT_FAILURE;
		}
		username[0] = '\0';
	} /* while (1) */
在login_main函数中操作的重要数据结构是pw,pw是一个指向struct passwd的结构指针,其定义如下:
#include <sys/types.h>
#include <pwd.h>
struct passwd {


   char *pw_name;                /* 用户登录名 */
   char *pw_passwd;              /* 密码(加密后) */
   __uid_t pw_uid;               /* 用户ID */
   __gid_t pw_gid;               /* 组ID */
   char *pw_gecos;               /* 详细用户名 */
   char *pw_dir;                 /* 用户目录 */
   char *pw_shell;               /* Shell程序名 */
};
在login_main()函数中使用:
pw = getpwnam(username);
根据用户名获取用户信息。
如果输入正确,将会在while(1)中使用break跳出循环,继续执行后续代码;如果验证失败,则会跳转到auth_failed标签处,返回EXIT_FAILURE。
在login_main函数的最后,调用exec_login_shell(pw->pw_shell);登录shell。本质上则是execv()系统调用:

五、login_main总结
在命令行输入login命令后,则会执行login程序;也可以将login程序设置为busybox启动后执行的程序,实现带用户名和口令的登录方式。在buildroot构建工具中则自动实现了login机制,只需要在图形配置界面中开启并配置登录口令即可。