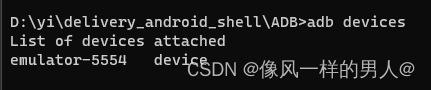
安装adb
安装adb后使用命令 adb devices 出现下图即可;
安装python依赖(uiautomator2,weditor)
pip install uiautomator2==2.16.23 weditor==0.6.8 -i https://pypi.doubanio.com/simple

# 在手机上安装 atx-agent 应用

# 安装apk服务到手机上
python -m uiautomator2 init
解决安装weditor报错UnicodeDecodeError: ‘gbk’ codec can’t decode byte 0xad in position 825
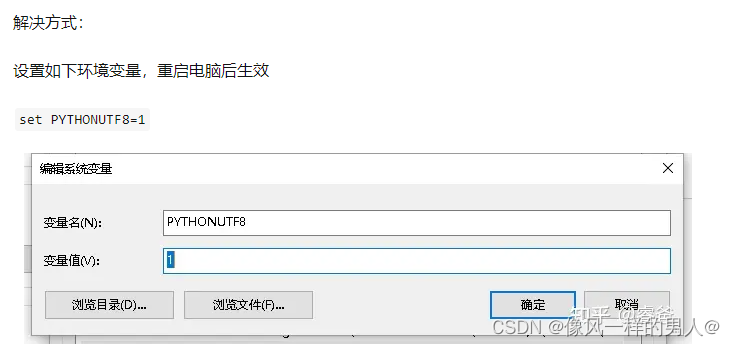
脚本如下(可复制直接运行)
import os

# https://pypi.douban.com/simple  # 豆瓣镜像
# https://pypi.tuna.tsinghua.edu.cn/simple  # 清华镜像

mirror = " -i https://pypi.douban.com/simple"

os.system("python -m pip install --upgrade pip" + mirror)  # 更新 pip
os.system("pip install --pre -U uiautomator2" + mirror)  # 安装 uiautomator2
os.system("pip install --pre weditor" + mirror)  # 安装 weditor
os.system("python -m uiautomator2 init")  #安装 atx-agent 至手机
运行demo
import uiautomator2 as ui
import os
from loguru import logger

ui.DEBUG = False


class Connet(object):
    '''连接设备'''

    def __init__(self):
        self.devices_name_list: list = []  # 所有设备名称
        self.device: list = []  # 所有设备连接对象(每一个元素都是连接对象)
        os.environ['PATH'] += ';' + os.path.join(os.getcwd(), 'ADB')  # 设置adb为环境变量

    def _get_devices_name(self) -> None:
        '''提取设备名称'''
        devices_all = []
        for i in os.popen('adb devices').read().split('\n'):
            if i not in ('List of devices attached', ''):
                devices_all.append(i.split()[0])

        if len(devices_all) < 1:
            logger.error('检测不到设备')
        self.devices_name_list = devices_all

    def _connect(self):
        '''连接设备并提取设备对象至变量'''
        for device_name in self.devices_name_list:
            logger.warning(f'设备名称:【{device_name}】')
            self.device.append(ui.connect(device_name))
            logger.success(f'【{device_name}】...连接成功')

	def _start_vx(self):
        for device in self.device:
            try:
                device(scrollable=True).scroll.toEnd()   # 滑动至屏幕最底部
            except ui.exceptions.UiObjectNotFoundError as e:
                ...
            device(text='微信').click()  # 点击微信
           #  qujianma_assembly = device(resourceId="com.landicorp.jd.delivery:id/etPickUpCode")
           #  if not qujianma_assembly.exists:
           #      logger.error(f'找不到取件码组件,请切换至取件码页面')
           #     exit()

    def start(self, weishu):
        self._get_devices_name()
        self._connect()
        self._start_vx()

c = Connet()
c.start()
API方法详解
1.1连接设备
设备连接主要分为有线连接和无线连接,如下:
# 有线连接
d = u2.connect_usb(id)  # id 为 adb devices 命令中得到的设备 id

# 无线连接
d = u2.connect(ip)  # ip 为 手机 ip
说明:返回的 d 为连接句柄,通过 d 可以实现对手机的操作。
| 方法名称 | 解析 |
|---|---|
| d.app_install(‘http://domain.com/xxx.apk’) | 安装应用 【注】只能从 URL 安装 |
| d.app_start(“app_package_name”, stop=False) | 打开应用(此处是包名)也可以用d(text='支付宝').click() ;stop参数为是否冷启动,默认为False |
| d.app_stop(“app_package_name”) | 关闭应用 |
| d.app_stop_all() | 关闭所有应用 |
| d.implicitly_wait(20) | 隐式等待20s,保证控件加载完成(可以全局设置) |
| d.app_uninstall(‘package_name’) | 卸载 |
| d.app_current() | 获取当前正在运行的app的包名 |
| d.app_info() | 获取app的信息 |
| d.app_list_running() | 列出正在运行的app,这个也可以获取包名 |
| d.app_clear(‘paceage_name’) | 清除app数据 |
| d.info() | 获取设备基本信息 |
| d.device_info() | 获取设备详细信息 |
| d.window_size() | 获取设备大小 |
| d.screenshot(‘d:/hello.png’) | 获取设备的截屏 传入电脑存放的路径 |
| d.push(‘d:/hello.png’,‘/data/’) | 推送文件(上传文件) 第一个参数 PC需要上传的文件路径 第二个参数 手机端存放路径 |
| d.pull(‘/data/hello.png’,‘d:/desktop/’) | 拉取文件和推送文件传参数相反 |
| d.click_post_delay = 1.5 | 全局设置每次单击UI后再次单击之间延迟1.5秒 默认无延迟 |
| ---------------------------------------------------------- | ------------------------------------------------------------------------------------------------------------- |
| d(resourceId=元素ID).click() | ID定位 |
| d(text=“公众号:AirPython”).click() | Text文本定位 |
| d(description=“AirPython”).click() | 控件描述定位 |
| d(className=“android.widget.TextView”).click() | 控件所属的类 |
| d.xpath(“//*[@content-desc=‘AirPython’]”) | Xpath定位 |
| d(className=“android.widget.ListView”, resourceId=元素ID) | 组合定位 |
| d(text=‘hello’, className=‘android.widget.TextView’) | 选text是’hello’,className 是’android.widget.TextView’ 的元素 |
| d(text=“WiFi”).right(className=“android.widget.Switch”).click() | 选择"WiFi" 右侧的"switch" 同d(text="WiFi").right().click()left, right, top, bottom |
| d(text=“hello”, instance=0) | 获取第一个文本中带有“hello”的元素对象 同device(text="hello")[0] |
| ------------------------------------------------------- | ------------------------------------------------------------------------------------------------------------- |
| d.wait_timeout = 10 | 设置全局的超时时间 10s 只要设置了全局的超时时间,则其他的操作也会内置智能等待,不需要再进行任何操作 |
| d.app_start(‘packagename’,wait=True) | 开启智能等待,即app完全打开后才执行后面代码 |
| d.wait_activity() | 等待页面加载出来 |
| d().wait() | 等待元素出现 |
| d().wait_gone() | 等待元素消失 |
| d().exists() | 等待元素是否存在 |
| --------------------------------------------------------- | ------------------------------------------------------------------------------------------------------------- |
| d.click() | 单击控件 支持xy坐标参数 |
| d.double_click() | 双击控件 支持xy坐标参数 |
| d.long_click(duration=0.5) | 长按控件支持xy坐标参数 |
| d.set_text(text) | 输入文本 |
| d.send_keys(text) | 输入文本广播式输入 |
| d.set_fastinput_ime(True) | 打开关闭输入法 为True打开 否则关闭 |
| d.clear_text() | 清除文本 d[index].clear_text() 定位的控件有多个,通过 index 指定某一个 |
| d.get_text() | 获取文本 定位的控件只有一个,等价于 element[0].get_text() |
| --------------------------------------------------------- | ------------------------------------------------------------------------------------------------------------- |
| device.screen_on() | 亮屏 |
| device.screen_off() | 熄屏 |
| device.press(“home”) | 首页 |
| device.press(“back”) | 返回键 |
| device.press(“left”) | 左移 |
| device.press(“right”) | 右移 |
| device.press(“up”) | 上划 |
| device.press(“down”) | 下划 |
| device.press(“center”) | 回到中间页 |
| device.press(“menu”) | 菜单 |
| device.press(“search”) | 搜索框 |
| device.press(“enter”) | 回车键 |
| device.press(“delete”) | 删除键 |
| device.press(“recent”) | 打开最近的页面 |
| device.press(“camera”) | 打开照相机 |
| device.press(“power”) | 电源键 |
| device.press(“volume_up”) | 声音调大 |
| device.press(“volume_down”) | 声音调小 |
| device.press(“volume_mute”) | 静音 |
| d.orientation | 获取屏幕方向,取值为{“natural”, “left”, “right”, “upsidedown”} |
| d.freeze_rotation() | 锁定屏幕方向 |
| d.freeze_rotation(True) | 解除锁定屏幕方向 |
| d.set_orientation(“left”) | 向左转为横屏 d.set_orientation("right") # 向右转为横屏 |
| device.screenshot(“screenshot.png”)) | 截屏,支持自定义路径 |
| d.screenrecord.start(“screenrecord.mp4”) | 录屏 需要从cv2 d.screenrecord.stop() 停止录屏 |
| device.open_notification() | 打开通知栏 |
滑动操作
device(scrollable=True).fling(steps=5)   飞滑5次,默认为1 手势向上,页面向下(正常翻页)
device(scrollable=True).fling.horiz.toBeginning()  横滑  手势向右,页面向左
device(scrollable=True).fling.toEnd()    飞滑到页面最底部


device(scrollable=True).scroll(steps=100)   滑动滚动条 距离为100
device(scrollable=True).scroll.horiz.forward(steps=100)  手势向左 页面向右
device(scrollable=True).scroll.horiz.toBeginning(steps=100, max_swipes=1000) 手势向右 页面向左
device(scrollable=True).scroll.toEnd()  滑动到末尾
device(scrollable=True).scroll.to(text="Security")  scroll 向前垂直,直到出现指定ui object

device.swipe(500,500,100,500)
"""
swipe 平滑
    第一种方式:需要传入四个参数
        startX:起始X坐标
        startY:起始Y坐标
        endX:结束X坐标
        endY:结束Y坐标
   """

"""
    第二种方式:需要传入两个参数
        direction(滑动的方向) : up、down、left、right
        scale(滑动的百分比)
"""
device.swipe_ext('left',scale=0.9)


"""
    第三种方式:先进行元素定位 再滑动
        direction(滑动的方向) : up、down、left、right
        steps(滑动的速度) ms
        d.swipe(sx, sy, ex, ey, duration=0.5)
"""
e = device(text='appname')
e.swipe('left',steps=100)
拖拽操作
d.drag(sx, sy, ex, ey, duration=0.5)
附录
#设置每次点击UI后再次单击之间延迟1.5秒
d.click_post_delay = 1.5
#设置默认元素等待超时(秒)
d.wait_timeout = 20


d.info
#得出设备链接信息
print(d.window_size())
#获取屏幕大小
print(d.current_app())
#获取当前应用的信息
print(d.serial)
#获取设备序列号
print(d.wlan_ip)
#获取WIFI IP
print(d.device_info)
#获取详细的设备信息


#打开/关闭屏幕
d.screen_on()
#开启屏幕
d.screen_off()
#关闭屏幕
d.info.get("screen")
#获取屏幕开/关状态
#android>=4.4
d.press("home")
#按下home键
d.press("back")
#按下back键
d.press(0*07,0*02)
#按下编码

'''支持按键模式'''
home
#主页按钮
back
#返回
left
#左
right
#右
up
#上
down
#下
center
#回车
menu
#菜单
search
#搜索
enter
#输入
delete ( or del)
#删除
recent (recent apps)
#打开最近项目
volume_up
#音量+
volume_down
#音量—
volume_mute
#静音
camera
#相机
power
#电源键


d.unlock()
#解锁屏幕
d.click(X,Y)
#点击屏幕坐标
d.long_click(x,y)
#长按屏幕
d.long_click(x,y,1)
#长按屏幕1s,默认是0.5,可自行配置
d.swipe(sx, sy, ex, ey)
#根据坐标滑动
d.swipe(sx, sy, ex, ey,1)
#根据坐标滑动,1代表滑动速度,默认0.5
d.drag(sx, sy, ex, ey)
#根据坐标拖动,适用于结算和滑块处理
d.drag(sx, sy, ex, ey, 1)
#根据坐标拖动,拖动时长1s,默认0.5


#截图
d.screenshot('1.jpg')
#截图保存在本地,文件名为1.jpg
#想获取其他格式的需要安装 pillow、numpy和cv2等库,具体不累述
d.open_notification()
#打开通知
d.open_quick_settings()
#打开快速设置
d.freeze_rotation()
# 冻结旋转
d.freeze_rotation(False)
# 开启旋转


'''检查特定的UI对象是否存在'''
d(text="Settings").exists
# 返回布尔值,如果存在则为True,否则为False
d.exists(text="Settings")
# 另一种写法
# 高级用法
d(text="Settings").exists(timeout=3)
# 等待'Settings'在3秒钟出现
 d(text="Settings").info
# 获取特定UI对象的信息

'''获取/设置/清除可编辑字段的文本(例如EditText小部件)'''
d(text="Settings").get_text()
#得到文本小部件
d(text="Settings").set_text("My text...")
#设置文本
d(text="Settings").clear_text()
#清除文本
d(text="Settings").center()
# 获取Widget中心点
#d(text="Settings").center(offset=(0, 0)) # 基准位置左前


d.push('1.txt','sdcard/downloacd')
#推送到文件下
d.push('1.txt','sdcard/downloacd/2.txt')
#推送并重命名到文件夹下
with open("foo.txt", 'rb') as f:
 d.push(f, "/sdcard/")
 #push fileobj
d.push("1.sh", "/data/local/tmp/", mode=0o755)
#推送并修改文件模式,在Python中表示八进制的友好方法默认0o755,文件权限设置
d.pull("/sdcard/1.txt", "1.txt")
#从设备侧拉取文件


'''定位方法'''
#text定位单击
d(text="Settings").click()
d(text="Settings", className="android.widget.TextView").click()

#resourceId定位单击
d(resourceId="com.ruguoapp.jike:id/tv_title", className="android.widget.TextView").click()

#description定位单击
d(description="确定").click()
d(description="确定", className="android.widget.TextView").click()

#className定位单击
d(className="android.widget.TextView").click()

#xpath定位单击
d.xpath("//android.widget.FrameLayout[@index='0']/android.widget.LinearLayout[@index='0']").click()

#坐标单击
d.click(182, 1264)


'''常用方法'''
# 等待10s
d.xpath("//android.widget.TextView").wait(10.0)
# 找到并单击
d.xpath("//*[@content-desc='分享']").click()
# 检查是否存在
if d.xpath("//android.widget.TextView[contains(@text, 'Se')]").exists:
 print("exists")
# 获取所有文本视图文本、属性和中心点
for elem in d.xpath("//android.widget.TextView").all():
 print("Text:", elem.text)
#获取视图文本
for elem in d.xpath("//android.widget.TextView").all():
 print("Attrib:", elem.attrib)
#获取属性和中心点
#返回: (100, 200)
for elem in d.xpath("//android.widget.TextView").all():
 print("Position:", elem.center())

'''xpath常见用法'''
# 所有元素
//*

# resource-id包含login字符
//*[contains(@resource-id, 'login')]

# 按钮包含账号或帐号
//android.widget.Button[contains(@text, '账号') or contains(@text, '帐号')]

# 所有ImageView中的第二个
(//android.widget.ImageView)[2]

# 所有ImageView中的最后一个
(//android.widget.ImageView)[last()]

# className包含ImageView
//*[contains(name(), "ImageView")]
# 等待10s
d.xpath("//android.widget.TextView").wait(10.0)

# 找到并单击
d.xpath("//*[@content-desc='分享']").click()

# 检查是否存在
if d.xpath("//android.widget.TextView[contains(@text, 'Se')]").exists:
 print("exists")

# 获取所有文本视图文本、属性和中心点
for elem in d.xpath("//android.widget.TextView").all():
 print("Text:", elem.text)

#获取视图文本
for elem in d.xpath("//android.widget.TextView").all():
 print("Attrib:", elem.attrib)

#获取属性和中心点
#返回: (100, 200)
for elem in d.xpath("//android.widget.TextView").all():
 print("Position:", elem.center())