最终效果如下:

附录:
github地址: https://github.com/ixixii/angular_tutorial_demo.git
cd /Users/beyond/sg_angular/angular_01/angular-tutorial-demo
git status
git add src/app/
git commit -m 'first commit'
git push https://github.com/ixixii/angular_tutorial_demo.git master
.
Angular2官方文档地址: https://angular.io/tutorial/toh-pt1
由于内容太长,分为上中下三篇
上篇已经介绍了1-5小点
中篇从第6点 Services, 第7点Routing章节
下篇为第8点 HTTP

HTTP
In this tutorial, you'll add the following data persistence features with help from Angular's HttpClient.
- The
HeroServicegets hero data with HTTP requests. - Users can add, edit, and delete heroes and save these changes over HTTP.
- Users can search for heroes by name.
When you're done with this page, the app should look like this live example / download example.

Enable HTTP services
HttpClient is Angular's mechanism for communicating with a remote server over HTTP.
To make HttpClient available everywhere in the app,
- 1. open the root
AppModule, - 2. import the
HttpClientModulesymbol from@angular/common/http, - 3. add it to the
@NgModule.importsarray.

Simulate a data server
This tutorial sample mimics communication with a remote data server
by using the In-memory Web API module.
After installing the module,
the app will make requests to
and receive responses from the HttpClient without knowing that :
the In-memory Web API is intercepting those requests,
applying them to an in-memory data store,
and returning simulated responses.
This facility is a great convenience for the tutorial.
You won't have to set up a server to learn about HttpClient
It may also be convenient in the early stages of your own app development
when the server's web api is ill-defined or not yet implemented.
Important:
1. the In-memory Web API module has nothing to do with HTTP in Angular.
2. If you're just reading this tutorial to learn about HttpClient,
you can skip over this step.
If you're coding along with this tutorial,
stay here and add the In-memory Web API now.
Install the In-memory Web API package from npm
npm install angular-in-memory-web-api --save
1. Import the HttpClientInMemoryWebApiModule
2. and the InMemoryDataService class,
3. which you will create in a moment (自己建立一个InMemoryDataService).
src/app/app.module.ts (In-memory Web API imports)import { HttpClientInMemoryWebApiModule } from 'angular-in-memory-web-api';
import { InMemoryDataService } from './in-memory-data.service';Add the HttpClientInMemoryWebApiModule to the @NgModule.imports数组 array
— after importing the HttpClient
—while configuring it with the InMemoryDataService.


位置: app.module.ts中@NgModule中imports数组中
HttpClientModule,

// The HttpClientInMemoryWebApiModule module intercepts HTTP requests
// and returns simulated server responses.
// Remove it when a real server is ready to receive requests.
HttpClientInMemoryWebApiModule.forRoot(
  InMemoryDataService, { dataEncapsulation: false }
)
The forRoot() configuration method :
takes an InMemoryDataService class that primes (初始化) the in-memory database.
The Tour of Heroes sample creates such a class src/app/in-memory-data.service.ts
which has the following content:
src/app/in-memory-data.service.tsimport { InMemoryDbService } from 'angular-in-memory-web-api';
export class InMemoryDataService implements InMemoryDbService {
createDb() {
const heroes = [
{ id: 11, name: 'Mr. Nice' },
{ id: 12, name: 'Narco' },
{ id: 13, name: 'Bombasto' },
{ id: 14, name: 'Celeritas' },
{ id: 15, name: 'Magneta' },
{ id: 16, name: 'RubberMan' },
{ id: 17, name: 'Dynama' },
{ id: 18, name: 'Dr IQ' },
{ id: 19, name: 'Magma' },
{ id: 20, name: 'Tornado' }
];
return {heroes};
}
}This file replaces mock-heroes.ts, which is now safe to delete.
When your server is ready,
detach the In-memory Web API, and the app's requests will go through to the server.
Now back to the HttpClient story.
Heroes and HTTP
Import some HTTP symbols that you'll need:
src/app/hero.service.ts (import HTTP symbols)import { HttpClient, HttpHeaders } from '@angular/common/http';Inject HttpClient into the constructor in a private property called http.
constructor(
  private http: HttpClient,
  private messageService: MessageService) { }
Keep injecting the MessageService.
You'll call it so frequently that you'll wrap it in private log method.
/** Log a HeroService message with the MessageService */
private log(message: string) {
  this.messageService.add('HeroService: ' + message);
}
Define the heroesUrl with the address of the heroes resource on the server.
private heroesUrl = 'api/heroes'; // URL to web apiGet heroes with HttpClient
The current HeroService.getHeroes() uses the RxJS of() function
to return an array of mock heroes as an Observable<Hero[]>.
src/app/hero.service.ts (getHeroes with RxJs 'of()')
getHeroes(): Observable<Hero[]> {
  return of(HEROES);
}
Convert that method to use HttpClient (分号不能少???)
/** GET heroes from the server */
getHeroes (): Observable<Hero[]> {
  return this.http.get<Hero[]>(this.heroesUrl);
}
Refresh the browser. The hero data should successfully load from the mock server.
You've swapped(交换) of for http.get
and the app keeps working without any other changes
because both functions return an Observable<Hero[]>.
Http methods return one value
All HttpClient methods return an RxJS Observable of something.
HTTP is a request/response protocol.
You make a request, it returns a single response.
In general, an observable can return multiple values over time.
An observable from HttpClient always emits a single value
and then completes, never to emit again.
This particular HttpClient.get call returns an Observable<Hero[]>,
literally "an observable of hero arrays".
In practice, it will only return a single hero array.
HttpClient.get returns response data
HttpClient.get returns the body of the response as an untyped JSON object by default.
Applying the optional type specifier, <Hero[]> , gives you a typed result object.
The shape of the JSON data is determined by the server's data API.
The Tour of Heroes data API returns the hero data as an array.
Other APIs may bury the data that you want within an object.
You might have to dig that data out by processing the Observable result with the RxJS map operator.
Although not discussed here,
there's an example of map in the getHeroNo404() method included in the sample source code.

Error handling
Things go wrong, especially when you're getting data from a remote server.
The HeroService.getHeroes() method should catch errors and do something appropriate.
To catch errors,
you "pipe" the observable result from http.get() through an RxJS catchError() operator.
Import the catchError symbol from rxjs/operators,
along with some other operators you'll need later.
import { catchError, map, tap } from 'rxjs/operators';1. Now extend the observable result with the .pipe() method
2. and give it a catchError() operator.
getHeroes (): Observable<Hero[]> {
  return this.http.get<Hero[]>(this.heroesUrl)
    .pipe(
      catchError(this.handleError('getHeroes', []))
    );
}
The catchError() operator intercepts (拦截) an Observable that failed.
It passes the error an error handler that can do what it wants with the error.
The following handleError() method reports the error
and then returns an innocuous result so that the application keeps working.
handleError
The following errorHandler() will be shared by many HeroService methods
so it's generalized to meet their different needs.
Instead of handling the error directly,
it returns an error handler function to catchError
that it has configured with
both the name of the operation that failed
and a safe return value.
- /**
- * Handle Http operation that failed.
- * Let the app continue.
- * @param operation - name of the operation that failed
- * @param result - optional value to return as the observable result
- */
- private handleError<T> (operation = 'operation', result?: T) {
- return (error: any): Observable<T> => {
- // TODO: send the error to remote logging infrastructure
- console.error(error); // log to console instead
- // TODO: better job of transforming error for user consumption
- this.log(`${operation} failed: ${error.message}`);
- // Let the app keep running by returning an empty result.
- return of(result as T);
- };
- }
After reporting the error to console,
the handler constructs a user friendly message
and returns a safe value to the app so it can keep working.
Because each service method returns a different kind of Observable result,
errorHandler() takes a type parameter <T>泛型
so it can return the safe value as the type that the app expects.
Tap into the Observable
接下来 The HeroService methods will tap into the flow of observable values
and send a message (via log()) to the message area at the bottom of the page.
They'll do that with the RxJS tap operator,
which looks at the observable values, does something with those values,
and passes them along.
The tap call back doesn't touch the values themselves.
Here is the final version of getHeroes with the tap that logs the operation.
/** GET heroes from the server */
getHeroes (): Observable<Hero[]> {
  return this.http.get<Hero[]>(this.heroesUrl)
    .pipe(
      tap(heroes => this.log(`fetched heroes`)),
      catchError(this.handleError('getHeroes', []))
    );
}
Get hero by id
Most web APIs support a get by id request in the form api/hero/:id (such as api/hero/11).
Add a HeroService.getHero() method to make that request:
/** GET hero by id. Will 404 if id not found */
getHero(id: number): Observable<Hero> {
  const url = `${this.heroesUrl}/${id}`;
  return this.http.get<Hero>(url).pipe(
    tap(_ => this.log(`fetched hero id=${id}`)),
    catchError(this.handleError<Hero>(`getHero id=${id}`))
  );
}
There are three significant differences from getHeroes().
- it constructs a request URL with the desired hero's id.
- the server should respond with a single hero rather than an array of heroes.
- therefore,
getHeroreturns anObservable<Hero>("an observable of Hero objects???") rather than an observable of hero arrays .
Update heroes
Editing a hero's name in the hero detail view.
As you type, the hero name updates the heading at the top of the page.
But when you click the "go back button", the changes are lost.
If you want changes to persist, you must write them back to the server.
At the end of the hero detail template,
add a save button with a click event binding
that invokes a new component method named save().
src/app/hero-detail/hero-detail.component.html (save)
<button (click)="save()">save</button>Add the following save() method,
which persists hero name changes using the hero service updateHero() method
and then navigates back to the previous view.
src/app/hero-detail/hero-detail.component.ts (save)
save(): void {
   this.heroService.updateHero(this.hero)
     .subscribe(() => this.goBack());
 }
Add HeroService.updateHero()
The overall structure of the updateHero() method is similar to that of getHeroes(),
but it uses http.put() to persist the changed hero on the server.
src/app/hero.service.ts (update)
/** PUT: update the hero on the server */
updateHero (hero: Hero): Observable<any> {
  return this.http.put(this.heroesUrl, hero, httpOptions).pipe(
    tap(_ => this.log(`updated hero id=${hero.id}`)),
    catchError(this.handleError<any>('updateHero'))
  );
}
The HttpClient.put() method takes three parameters
- 1. the URL
- 2. the data to update (the modified hero in this case)
- 3. options
The URL is unchanged.
The heroes web API knows which hero to update by looking at the hero's id.
The heroes web API expects a special header in HTTP save requests. (设置请求头)
That header is in the httpOptions constant defined in the HeroService.
const httpOptions = {
  headers: new HttpHeaders({ 'Content-Type': 'application/json' })
};
Refresh the browser, change a hero name, save your change, and click the "go back" button.
The hero now appears in the list with the changed name.
Add a new hero
To add a hero, this app only needs the hero's name.
You can use an input element paired with an add button.
Insert the following into the HeroesComponent template, just after the heading:
<div>
  <label>Hero name:
    <input #heroName />
  </label>
  <!-- (click) passes input value to add() and then clears the input -->
  <button (click)="add(heroName.value); heroName.value=''">
    add
  </button>
</div>
In response to a click event,
call the component's click handler
and then clear the input field so that it's ready for another name.
src/app/heroes/heroes.component.ts (add)
add(name: string): void {
  name = name.trim();
  if (!name) { return; }
  this.heroService.addHero({ name } as Hero)
    .subscribe(hero => {
      this.heroes.push(hero);
    });
}
When the given name is non-blank,
the handler creates a Hero-like object from the name (it's only missing the id)
and passes it to the services addHero() method.
When addHero saves successfully,
the subscribe callback receives the new hero
and pushes it into to the heroes list for display.
You'll write HeroService.addHero in the next section.
Add HeroService.addHero()
Add the following addHero() method to the HeroService class.
/** POST: add a new hero to the server */
addHero (hero: Hero): Observable<Hero> {
  return this.http.post<Hero>(this.heroesUrl, hero, httpOptions).pipe(
    tap((hero: Hero) => this.log(`added hero w/ id=${hero.id}`)),
    catchError(this.handleError<Hero>('addHero'))
  );
}
HeroService.addHero() differs from updateHero in two ways.
- it calls HttpClient.post instead of
put(). - it expects the server to generates an id for the new hero, which it returns in the
Observable<Hero>to the caller.
Refresh the browser and add some heroes.
Delete a hero
Each hero in the heroes list should have a delete button.
Add the following button element to the HeroesComponent template,
after the hero name in the repeated <li> element.
位于heroes.component.html文件
<button class="delete" title="delete hero"
(click)="delete(hero)">x</button>
The HTML for the list of heroes should look like this:
src/app/heroes/heroes.component.html (list of heroes)<ul class="heroes">
<li *ngFor="let hero of heroes">
<a routerLink="/detail/{{hero.id}}">
<span class="badge">{{hero.id}}</span> {{hero.name}}
</a>
<button class="delete" title="delete hero"
(click)="delete(hero)">x</button>
</li>
</ul>To position the delete button at the far right of the hero entry,
add some CSS to the heroes.component.css.
You'll find that CSS in the final review code below.
样式如下:
button {
  background-color: #eee;
  border: none;
  padding: 5px 10px;
  border-radius: 4px;
  cursor: pointer;
  cursor: hand;
  font-family: Arial;
}

button:hover {
  background-color: #cfd8dc;
}

button.delete {
  position: relative;
  left: 194px;
  top: -32px;
  background-color: gray !important;
  color: white;
}
Add the delete() handler to the component.
delete(hero: Hero): void {
  this.heroes = this.heroes.filter(h => h !== hero);
  this.heroService.deleteHero(hero).subscribe();
}
Although the component delegates hero deletion to the HeroService,
it remains responsible for updating its own list of heroes. (重要,删除后,更新数组)
The component's delete() method immediately removes the hero-to-delete from that list,
anticipating that the HeroService will succeed on the server.
There's really nothing for the component to do with the Observable returned by heroService.delete().
但是, It must subscribe anyway.
If you neglect to subscribe(),
the service will not send the delete request to the server!
As a rule, an Observable does nothing until something subscribes!
Confirm this for yourself by temporarily removing the subscribe(),
clicking "Dashboard", then clicking "Heroes".
You'll see the full list of heroes again.
Add HeroService.deleteHero()
Add a deleteHero() method to HeroService like this.
/** DELETE: delete the hero from the server */
deleteHero (hero: Hero | number): Observable<Hero> {
  const id = typeof hero === 'number' ? hero : hero.id;
  const url = `${this.heroesUrl}/${id}`;

  return this.http.delete<Hero>(url, httpOptions).pipe(
    tap(_ => this.log(`deleted hero id=${id}`)),
    catchError(this.handleError<Hero>('deleteHero'))
  );
}
Note that
- 1. it calls
HttpClient.delete. - 2. the URL is the heroes resource URL plus the
idof the hero to delete - 3. you don't send data as you did with
putandpost. 不用发送任何数据 - 4. But you still need send the
httpOptions.
Refresh the browser and try the new delete functionality.

Search by name
In this last exercise,
you learn to chain Observable operators together
so you can minimize the number of similar HTTP requests
and consume network bandwidth economically.
You will add a heroes search feature to the Dashboard.
As the user types a name into a search box,
you'll make repeated HTTP requests for heroes filtered by that name.
Your goal is to issue only as many requests as necessary (只发送必要的请求).
HeroService.searchHeroes
Start by adding a searchHeroes method to the HeroService.
/* GET heroes whose name contains search term */
searchHeroes(term: string): Observable<Hero[]> {
  if (!term.trim()) {
    // if not search term, return empty hero array.
    return of([]);
  }
  return this.http.get<Hero[]>(`${this.heroesUrl}/?name=${term}`).pipe(
    tap(_ => this.log(`found heroes matching "${term}"`)),
    catchError(this.handleError<Hero[]>('searchHeroes', []))
  );
}
The method returns immediately with an empty array if there is no search term.
The rest of it closely resembles getHeroes(). 剩下的部分 与 getHeroes() 方法 很像
The only significant difference is the URL, which includes a query string with the search term.
Add search to the Dashboard
Open the DashboardComponent template
and Add the hero search element, <app-hero-search>,
to the bottom of the DashboardComponent template.
src/app/dashboard/dashboard.component.html
<h3>Top Heroes</h3>
<div class="grid grid-pad">
  <a *ngFor="let hero of heroes" class="col-1-4"
      routerLink="/detail/{{hero.id}}">
    <div class="module hero">
      <h4>{{hero.name}}</h4>
    </div>
  </a>
</div>

<app-hero-search></app-hero-search>
This template looks a lot like the *ngFor repeater in the HeroesComponent template.
Unfortunately, adding this element breaks the app.
Angular can't find a component with a selector that matches <app-hero-search>.
The HeroSearchComponent doesn't exist yet. Let's fix that.
Create HeroSearchComponent
Create a HeroSearchComponent with the CLI.
ng generate component hero-searchThe CLI generates the three HeroSearchComponent
and adds the component to the `AppModule' declarations
Replace the generated HeroSearchComponent template with a text box
and a list of matching search results like this.
src/app/hero-search/hero-search.component.html
- <div id="search-component">
- <h4>Hero Search</h4>
- <input #searchBox id="search-box" (keyup)="search(searchBox.value)" />
- <ul class="search-result">
- <li *ngFor="let hero of heroes$ | async" >
- <a routerLink="/detail/{{hero.id}}">
- {{hero.name}}
- </a>
- </li>
- </ul>
- </div>
Add private CSS styles to hero-search.component.css as listed in the final code review below.
As the user types in the search box,
a keyup event binding calls the component's search() method with the new search box value.
AsyncPipe
As expected, the *ngFor repeats hero objects.
注意:
Look closely and you'll see that the *ngFor iterates over a list called heroes$, not heroes.
<li *ngFor="let hero of heroes$ | async" >注意:
The $ is a convention that indicates heroes$ is an Observable, not an array.
注意: The *ngFor can't do anything with an Observable.
But there's also a pipe character (|) followed by async,
which identifies Angular's AsyncPipe
The AsyncPipe subscribes to an Observable automatically
so you won't have to do so in the component class.
Fix the HeroSearchComponent class
Replace the generated HeroSearchComponent class and metadata as follows.
- import { Component, OnInit } from '@angular/core';
- import { Observable, Subject } from 'rxjs';
- import {
- debounceTime, distinctUntilChanged, switchMap
- } from 'rxjs/operators';
- import { Hero } from '../hero';
- import { HeroService } from '../hero.service';
- @Component({
- selector: 'app-hero-search',
- templateUrl: './hero-search.component.html',
- styleUrls: [ './hero-search.component.css' ]
- })
- export class HeroSearchComponent implements OnInit {
- heroes$: Observable<Hero[]>;
- private searchTerms = new Subject<string>();
- constructor(private heroService: HeroService) {}
- // Push a search term into the observable stream.
- search(term: string): void {
- this.searchTerms.next(term);
- }
- ngOnInit(): void {
- this.heroes$ = this.searchTerms.pipe(
- // wait 300ms after each keystroke before considering the term
- debounceTime(300),
- // ignore new term if same as previous term
- distinctUntilChanged(),
- // switch to new search observable each time the term changes
- switchMap((term: string) => this.heroService.searchHeroes(term)),
- );
- }
- }
Notice the declaration of heroes$ as an Observable
heroes$: Observable<Hero[]>;You'll set it in ngOnInit().
Before you do, focus on the definition of searchTerms.
The searchTerms RxJS subject
The searchTerms property is declared as an RxJS Subject.
private searchTerms = new Subject<string>();

// Push a search term into the observable stream.
search(term: string): void {
  this.searchTerms.next(term);
}
A Subject is both a source of observable values and an Observable itself.
You can subscribe to a Subject as you would any Observable.
You can also push values into that Observable
by calling its next(value) method as the search() method does.
The search() method is called via an event binding to the textbox's keystroke event.
<input #searchBox id="search-box" (keyup)="search(searchBox.value)" />Every time the user types in the textbox,
the binding calls search() with the textbox value, a "search term".
The searchTerms becomes an Observable emitting a steady stream of search terms.

Chaining RxJS operators
Passing a new search term directly to the searchHeroes()
after every user keystroke would create an excessive amount of HTTP requests,
taxing server resources and burning through the cellular network data plan.
Instead, the ngOnInit() method pipes the searchTerms observable through a sequence of RxJS operators
that reduce the number of calls to the searchHeroes(),
ultimately returning an observable of timely hero search results (each a Hero[]).
注意: Here's the code. 核心代码
this.heroes$ = this.searchTerms.pipe(
  // wait 300ms after each keystroke before considering the term
  debounceTime(300),

  // ignore new term if same as previous term
  distinctUntilChanged(),

  // switch to new search observable each time the term changes
  switchMap((term: string) => this.heroService.searchHeroes(term)),
);debounceTime(300)waits until the flow of new string events pauses for 300 milliseconds- before passing along the latest string.
- You'll never make requests more frequently than 300ms.
distinctUntilChanged()ensures that a request is sent only if the filter text changed.
switchMap()calls the search service for each search term- that makes it through
debounceanddistinctUntilChanged. - It cancels and discards previous search observables,
- returning only the latest search service observable.
With the switchMap operator,
every qualifying key event can trigger an HttpClient.get() method call.
Even with a 300ms pause between requests,
you could have multiple HTTP requests in flight
and they may not return in the order sent.
switchMap() preserves the original request order
while returning only the observable from the most recent HTTP method call.
Results from prior calls are canceled and discarded.
Note that canceling a previous searchHeroes() Observable
doesn't actually abort a pending HTTP request.
Unwanted results are simply discarded before they reach your application code.
Remember that the component class does not subscribe to the heroes$ observable.
That's the job of the AsyncPipe in the template.
Try it
Run the app again.
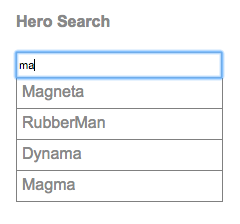
In the Dashboard, enter some text in the search box.
If you enter characters that match any existing hero names,
you'll see something like this.
最终效果如下:
git地址如下:
Final code review
Your app should look like this live example / download example.
Here are the code files discussed on this page (all in the src/app/ folder).

Summary
You're at the end of your journey, and you've accomplished a lot.
- You added the necessary dependencies to use HTTP in the app.
- You refactored
HeroServiceto load heroes from a web API. - You extended
HeroServiceto supportpost(),put(), anddelete()methods. - You updated the components to allow adding, editing, and deleting of heroes.
- You configured an in-memory web API.
- You learned how to use observables.
This concludes the "Tour of Heroes" tutorial.
You're ready to learn more about Angular development in the fundamentals section,
starting with the Architecture guide.
未完待续,下一章节,つづく