目录
一:ORM 操作 MySQL
使用MyBatis框架操作数据, 在SpringBoot框架集成MyBatis,使用步骤:
(1)mybatis起步依赖 : 完成mybatis对象自动配置, 对象放在容器中
(2)pom.xml 指定把src/main/java目录中的xml文件包含到classpath中
(3)创建实体类Student
扫描二维码关注公众号,回复: 16256148 查看本文章
(4)创建Dao接口 StudentDao , 创建一个查询学生的方法
(5)创建Dao接口对应的Mapper文件, xml文件, 写sql语句
(6)创建Service层对象, 创建StudentService接口和它的实现类。 去dao对象的方法,完成数据库的操作
(7)创建Controller对象,访问Service。
(8)写application.properties文件,配置数据库的连接信息。
1. 创建 Spring Boot 项目
(1)准备数据库表
字段及其类型

插入数据

(2)创建一个SpringBoot项目
选择Spring Web依赖

MybatisFramework依赖、MySQL Driver依赖

(3)生成的pom.xml配置和手动添加的resource插件配置
注:resource插件配置是表示将src/java/main下的或者说子包下的*.xml配置文件最终加载到target/classes目录下。
<?xml version="1.0" encoding="UTF-8"?>
<project xmlns="http://maven.apache.org/POM/4.0.0" xmlns:xsi="http://www.w3.org/2001/XMLSchema-instance"
         xsi:schemaLocation="http://maven.apache.org/POM/4.0.0 https://maven.apache.org/xsd/maven-4.0.0.xsd">
    <modelVersion>4.0.0</modelVersion>
    <parent>
        <groupId>org.springframework.boot</groupId>
        <artifactId>spring-boot-starter-parent</artifactId>
        <version>2.7.9</version>
        <relativePath/>
    </parent>
    <groupId>com.zl</groupId>
    <artifactId>study-springboot-mysql</artifactId>
    <version>0.0.1-SNAPSHOT</version>
    <properties>
        <java.version>1.8</java.version>
    </properties>

    <dependencies>
        <!--web的起步依赖-->
        <dependency>
            <groupId>org.springframework.boot</groupId>
            <artifactId>spring-boot-starter-web</artifactId>
        </dependency>
        <!--mybatis的起步依赖-->
        <dependency>
            <groupId>org.mybatis.spring.boot</groupId>
            <artifactId>mybatis-spring-boot-starter</artifactId>
            <version>2.3.0</version>
        </dependency>
        <!--mysql驱动依赖-->
        <dependency>
            <groupId>com.mysql</groupId>
            <artifactId>mysql-connector-j</artifactId>
            <scope>runtime</scope>
        </dependency>
        <!--测试-->
        <dependency>
            <groupId>org.springframework.boot</groupId>
            <artifactId>spring-boot-starter-test</artifactId>
            <scope>test</scope>
        </dependency>
    </dependencies>

    <build>
        <!--手动添加resources插件-->
        <resources>
            <resource>
                <!--指定目录-->
                <directory>src/main/java</directory>
                <!--指定目录下的文件-->
                <includes>
                    <include>**/*.xml</include>
                </includes>
            </resource>
        </resources>

        <!--plugins插件-->
        <plugins>
            <plugin>
                <groupId>org.springframework.boot</groupId>
                <artifactId>spring-boot-maven-plugin</artifactId>
            </plugin>
        </plugins>
    </build>

</project>
(4)实体类
准备一个实体类,类的属性名与数据库中的字段名保持一致。
package com.zl.pojo;

public class Student {
    private Integer id;
    private String name;
    private Integer age;

    public Student() {
    }

    public Student(Integer id, String name, Integer age) {
        this.id = id;
        this.name = name;
        this.age = age;
    }

    @Override
    public String toString() {
        return "Student{" +
                "id=" + id +
                ", name='" + name + '\'' +
                ", age=" + age +
                '}';
    }

    public Integer getId() {
        return id;
    }

    public void setId(Integer id) {
        this.id = id;
    }

    public String getName() {
        return name;
    }

    public void setName(String name) {
        this.name = name;
    }

    public Integer getAge() {
        return age;
    }

    public void setAge(Integer age) {
        this.age = age;
    }
}
(5)创建Dao接口
需要在类上加@Mapper注解:告诉MyBatis这是一个dao接口,创建此接口的代理对象。
package com.zl.dao;

import com.zl.pojo.Student;
import org.apache.ibatis.annotations.Mapper;

@Mapper //用来创建代理对象的
public interface StudentDao {
    // 根据id进行查询
    Student selectById(@Param("stuId") Integer id);
}
(6)在Dao接口下创建一个同名的StudentDao.xml文件
注:前面我们配置的resource配置就是为这个StudentDao.xml配置服务的!
<?xml version="1.0" encoding="UTF-8" ?>
<!DOCTYPE mapper
        PUBLIC "-//mybatis.org//DTD Mapper 3.0//EN"
        "http://mybatis.org/dtd/mybatis-3-mapper.dtd">

<mapper namespace="com.zl.dao.StudentDao">
    <!--编写sql语句,id是这条sql语句的唯一表示-->
    <select id="selectById" resultType="com.zl.pojo.Student">
        select id,name,age from t_student where id = #{stuId}
    </select>
</mapper>
(7)编写Service接口和对应的实现类
StudentService接口
package com.zl.service;

import com.zl.pojo.Student;

public interface StudentService {
    // 方法调用
   Student queryStudent(Integer id);

}
StudentService接口实现类,编写业务逻辑
package com.zl.service.impl;

import com.zl.dao.StudentDao;
import com.zl.pojo.Student;
import com.zl.service.StudentService;
import org.springframework.stereotype.Service;

import javax.annotation.Resource;

@Service // 交给Spring容器管理
public class StudentServiceImpl implements StudentService {

    // 调用Dao
    @Resource // 给属性赋值
    private StudentDao studentDao;

    @Override
    public Student queryStudent(Integer id) {
        Student student = studentDao.selectById(id);
        return student;
    }
}
(8)创建controller去调用service
package com.zl.controller;

import com.zl.pojo.Student;
import com.zl.service.StudentService;
import org.springframework.stereotype.Controller;
import org.springframework.web.bind.annotation.RequestMapping;
import org.springframework.web.bind.annotation.ResponseBody;

import javax.annotation.Resource;

@Controller
public class StudentController {
    @Resource
    public StudentService studentService;

    @RequestMapping("/student/query")
    @ResponseBody
    public String queryStudent(Integer id){
        Student student = studentService.queryStudent(id);
        return student.toString();
    }
}
(9)连接数据库,需要application.properties配置
useUnicode使用unicode编码,characterEncoding字符集是utf-8,serverTimezone时区。
server.port=9090
server.servlet.context-path=/orm
#连接数据库的配置
spring.datasource.driver-class-name=com.mysql.cj.jdbc.Driver
spring.datasource.url=jdbc:mysql://localhost:3306/springboot?useUnicode=true&characterEncoding=UTF-8&serverTimezone=GMT%2B8
spring.datasource.username=root
spring.datasource.password=123
(10)执行结果

2. @MapperScan
如果有多个Dao接口,那么需要在每个Dao接口上都加入@Mapper注解,比较麻烦!
StudentDao接口
package com.zl.dao;

import com.zl.pojo.Student;
import org.apache.ibatis.annotations.Mapper;

@Mapper
public interface StudentDao {
    // 根据id进行查询
    Student selectById(Integer id);
}
UserDao接口
package com.zl.dao;

import com.zl.pojo.User;
import org.apache.ibatis.annotations.Mapper;

@Mapper
public interface UserDao {
    // 根据id进行查询
    SUser selectById(Integer id);
}
也可以在主类上(启动类上)添加注解包扫@MapperScan("com.zl.dao")
注:basePackages是一个String数组,可以写多个要扫描的包。
package com.zl;

import org.mybatis.spring.annotation.MapperScan;
import org.springframework.boot.SpringApplication;
import org.springframework.boot.autoconfigure.SpringBootApplication;

@SpringBootApplication
@MapperScan(basePackages = "com.zl.dao")
public class Application {

    public static void main(String[] args) {
        SpringApplication.run(Application.class, args);
    }

}
细节:
如果我们导入一个项目,对于IDEA是不能识别resources的,图标如下:

右击鼠标----》Mark Directory as-----》 Resources Root即可

此时的图标如下:

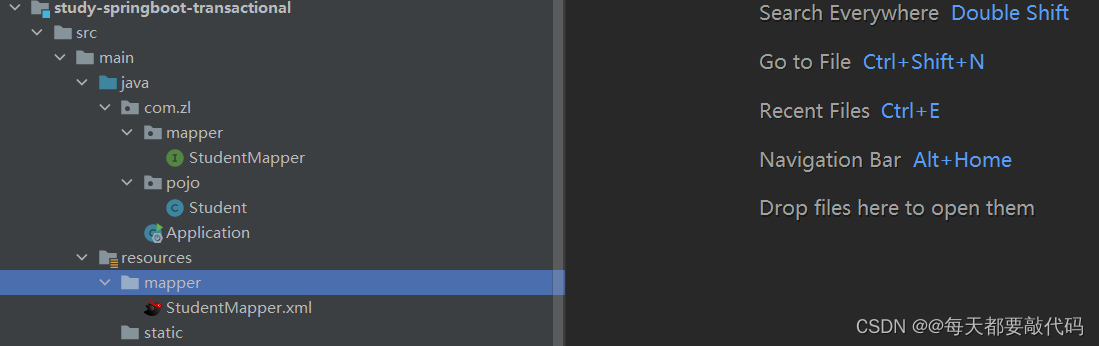
3. mapper文件和java代码分开管理
现在的xml文件和java代码是放在同一个包下管理的!

也可以分开存储,把xml文件放到resources目录下!在resources下创建一个mapper目录,把所有的*.xml全都放进去;但是此时就找不到了,需要我们去配置指定。

此时需要在application.properties文件里指定:
#指定mapper文件的位置
mybatis.mapper-locations=classpath:mapper/*.xml
注:此时低版本的Springboot可能出现application.properties文件没有编译到target/classes目录的情况下,此时就需要修改resources插件配置:
<resources>
     <resource>
       <directory>src/main/resources</directory>
       <includes>
          <include>**/*.properties</include>
          <include>**/*.xml</include>
       </includes>
     </resource>
</resources>
要想看到SQL语句的信息,需要在application.properties中添加日志框架
#指定mybatis的日志,使用StdOutImpl输出到控制台
mybatis.configuration.log-impl=org.apache.ibatis.logging.stdout.StdOutImpl
此时就可以看到SQL语句的日志信息

4. 事务支持
Spring框架中的事务:
(1)使用管理事务的对象: 事务管理器(接口, 接口有很多的实现类)
例:使用Jdbc或mybatis访问数据库,使用的事务管理器:DataSourceTransactionManager
(2)声明式事务: 在xml配置文件或者使用注解说明事务控制的内容
控制事务: 隔离级别,传播行为, 超时时间等
(3)事务处理方式:
①Spring框架中的@Transactional;
②aspectj框架可以在xml配置文件中,声明事务控制的内容;
SpringBoot使用事务非常简单,底层依然采用的是 Spring 本身提供的事务管理
①在业务方法的上面加入@Transactional , 加入注解后,方法有事务功能了。
②在主启动类的上面 ,加入@EnableTransactionManager,开启事务支持。
注:只加上@Transactional也能完成事务的功能,对于@EnableTransactionManager建议也加上。
第一步:创建一个SpringBoot项目,引入:Spring Web、MybatisFramework、MySQL Driver
第二步:使用mybatis逆向工程插件生成个pojo类、dao接口
①添加Mybatis逆向工程的插件
注:这个插件是需要MySQL驱动依赖的,如果这里没有引入MySQL驱动的依赖,那么下面的generatorConfig.xml配置中就需要<classPathEntry>标签去指定连接数据库的JDBC驱动包所在位置,指定到你本机的完整路径 ,例如:<classPathEntry location="E:\mysql-connector-java-5.1.38.jar"/>。
<!--mybatis逆向⼯程插件-->
<plugin>
     <!--插件的GAV坐标-->
     <groupId>org.mybatis.generator</groupId>
     <artifactId>mybatis-generator-maven-plugin</artifactId>
     <version>1.4.1</version>

     <configuration>
            <!--配置文件的位置,放在项目根目录下必须指定一下-->
	       <!--<configurationFile>GeneratorMapper.xml</configurationFile>-->
            <!--允许覆盖-->
           <overwrite>true</overwrite>
     </configuration>
     <!--插件的依赖-->
     <dependencies>
         <!--mysql驱动依赖-->
         <dependency>
               <groupId>mysql</groupId>
                <artifactId>mysql-connector-java</artifactId>
                <version>5.1.23</version>
         </dependency>
      </dependencies>
</plugin>
②编写generatorConfig.xml配置文件
注:如果下面的generatorConfig.xml配置文件放到src的resources目录下,那么配置文件的名字必须是generatorConfig.xml(不区分大小写),并且不需要上面的<configurationFile>标签去指定。
注:如果我们把generatorConfig.xml配置文件直接放到项目的根目录下(和src同级目录),那么此时generatorConfig.xml配置文件的名字随意,但是必须使用上面的<configurationFile>标签去指定一下(两者保持一致即可)。
注:当然也可以不直接放到项目的根目录下,例如:放到src/main目录下,那么对于<configurationFile>标签就需要指定src/main/generatorConfig.xml(两者也要保持一致)
注:对于高版本的MySQL驱动,对于URL后面必须跟上时区,但是在xml中是无法识别&,所以需要使用&去替换,例如:
connectionURL="jdbc:mysql://localhost:3306/springdb?useUnicode=true&characterEncoding=UTF-8&serverTimezone=GMT%2B8"最终会生成*.xml配置,要想让它最终编译后放到target/classes中,就需要配置处理资源目录
<!--处理资源目录-->
<resources>
    <resource>
       <directory>src/main/java</directory>
       <includes>
             <include>**/*.xml</include>
             <include>**/*.properties</include>
       </includes>
    </resource>
    <resource>
       <directory>src/main/resources</directory>
       <includes>
             <include>**/*.xml</include>
             <include>**/*.properties</include>
       </includes>
    </resource>
</resources>
generatorConfig.xml配置
<?xml version="1.0" encoding="UTF-8"?>
<!DOCTYPE generatorConfiguration
        PUBLIC "-//mybatis.org//DTD MyBatis Generator Configuration 1.0//EN"
        "http://mybatis.org/dtd/mybatis-generator-config_1_0.dtd">
<generatorConfiguration>


    <!-- 指定连接数据库的JDBC驱动包所在位置,如果前面插件中指定了,这里就不要指定了 -->
    <!--<classPathEntry location="E:\mysql-connector-java-5.1.38.jar"/>-->

    <!--
        targetRuntime有两个值:
            MyBatis3Simple:生成的是基础版,只有基本的增删改查。
            MyBatis3:生成的是增强版,除了基本的增删改查之外还有复杂的增删改查。
    -->
    <context id="DB2Tables" targetRuntime="MyBatis3Simple">
        <!--防止生成重复代码-->
        <plugin type="org.mybatis.generator.plugins.UnmergeableXmlMappersPlugin"/>

        <commentGenerator>
            <!--是否去掉生成日期-->
            <property name="suppressDate" value="true"/>
            <!--是否去除注释-->
            <property name="suppressAllComments" value="true"/>
        </commentGenerator>

        <!--连接数据库信息-->
        <jdbcConnection driverClass="com.mysql.jdbc.Driver"
                        connectionURL="jdbc:mysql://localhost:3306/springboot"
                        userId="root"
                        password="123">
        </jdbcConnection>

        <!-- 生成pojo包名和位置 -->
        <javaModelGenerator targetPackage="com.zl.pojo" targetProject="src/main/java">
            <!--是否开启子包-->
            <property name="enableSubPackages" value="true"/>
            <!--是否去除字段名的前后空白-->
            <property name="trimStrings" value="true"/>
        </javaModelGenerator>

        <!-- 生成SQL映射文件的包名和位置 -->
        <sqlMapGenerator targetPackage="mapper" targetProject="src/main/resources">
            <!--是否开启子包-->
            <property name="enableSubPackages" value="true"/>
        </sqlMapGenerator>

        <!-- 生成Mapper接口的包名和位置 -->
        <javaClientGenerator
                type="xmlMapper"
                targetPackage="com.zl.mapper"
                targetProject="src/main/java">
            <property name="enableSubPackages" value="true"/>
        </javaClientGenerator>

        <!-- 表名和对应的实体类名-->
        <table tableName="t_Student" domainObjectName="Student"/>

    </context>
</generatorConfiguration>
双击插件,执行结果如下:
第三步:编写application.properties配置
注:如果StudentMapper.xml的目录与StudentMapper目录保持一致,就不需要以下这个配置mybatis.mapper-locations=classpath:mapper/*.xml;这里我们是自己定义的mapper目录,把mapper.xml文件放进去了,所以需要我们指定出来它的位置!
#设置端口
server.port=8082
#配置项目根路径context-path
server.servlet.context-path=/myboot
#配置数据库
spring.datasource.driver-class-name=com.mysql.cj.jdbc.Driver
spring.datasource.url=jdbc:mysql://localhost:3306/springboot?useUnicode=true&characterEncoding=UTF-8&serverTimezone=GMT%2B8
spring.datasource.username=root
spring.datasource.password=123
#配置mybatis
mybatis.mapper-locations=classpath:mapper/*.xml
#配置日志
mybatis.configuration.log-impl=org.apache.ibatis.logging.stdout.StdOutImpl
第四步:编写service接口和实现类
StudentService接口
package com.zl.service;

import com.zl.pojo.Student;

public interface StudentService {
    int addStudent(Student student);
}
StudentService接口的实现类StudentServiceImpl
package com.zl.service.impl;
import com.zl.mapper.StudentMapper;
import com.zl.pojo.Student;
import com.zl.service.StudentService;
import org.springframework.stereotype.Service;
import org.springframework.transaction.annotation.Transactional;
import javax.annotation.Resource;
@Service // 交给Spring容器管理
public class StudentServiceImpl implements StudentService {
@Resource // 属性赋值
private StudentMapper studentDao;
@Transactional // 事务控制
@Override
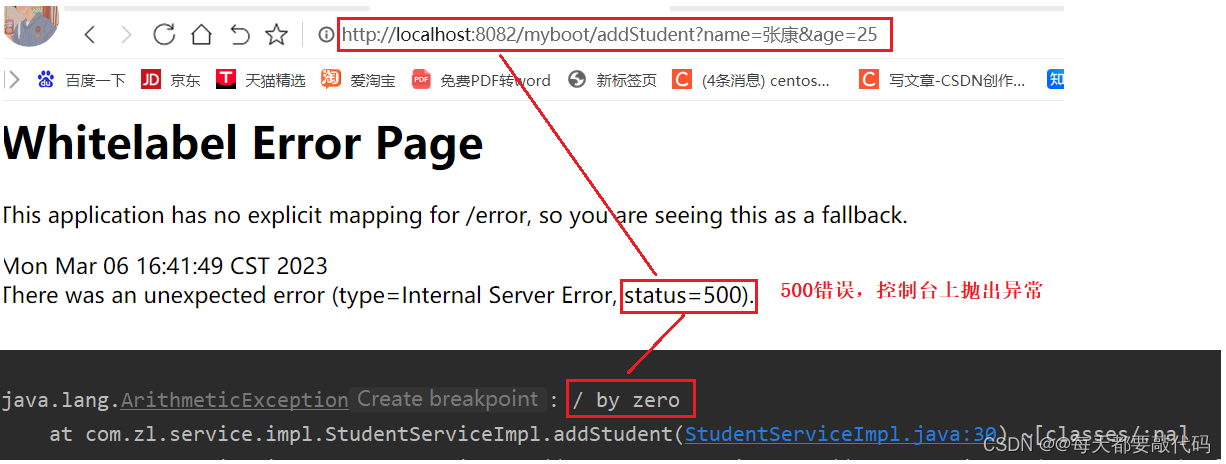
public int addStudent(Student student) {
System.out.println("准备执行sql语句");
int count = studentDao.insert(student);
System.out.println("已完成sql语句的执行");
// 模拟异常,回滚事务
int sum = 10 / 0;
return count;
}
}
第五步:编写controller类去调用service
package com.zl.controller;

import com.zl.pojo.Student;
import com.zl.service.StudentService;
import org.springframework.stereotype.Controller;
import org.springframework.web.bind.annotation.RequestMapping;
import org.springframework.web.bind.annotation.ResponseBody;

import javax.annotation.Resource;

@Controller
public class StudentController {

    @Resource
    private StudentService studentService;


    @RequestMapping("/addStudent")
    @ResponseBody
    public String addStudent(String name,Integer age){
        Student s = new Student();
        s.setName(name);
        s.setAge(age);
        int count = studentService.addStudent(s);
        return "添加的Student个数是:"+count;
    }
}
第六步:在启动类上面加上包扫描注解和启动事务管理器注解
package com.zl;

import org.mybatis.spring.annotation.MapperScan;
import org.springframework.boot.SpringApplication;
import org.springframework.boot.autoconfigure.SpringBootApplication;
import org.springframework.transaction.annotation.EnableTransactionManagement;

@SpringBootApplication
@MapperScan(basePackages = "com.zl.mapper") // 添加包扫描
@EnableTransactionManagement // 启动事务管理器
public class Application {

    public static void main(String[] args) {
        SpringApplication.run(Application.class, args);
    }

}
第七步:进行测试
有异常发生,会回滚事务,无法插入数据
无异常发生,正常插入数据
