目录
一、SpringMVC简介
1. 什么是MVC?
MVC是一种软件架构的思想,将软件按照模型、视图、控制器来划分
M:Model,模型层,指工程中的javaBean,作用是处理数据。javaBean分为两类:
- 一类称为实体类Bean: 专门存储业务数据的,如 Student、User等
- 一类称为业务处理Bean: 指 Service 或 Dao 对象,专门用于处理业务逻辑和数据访问。
V: View,视图层,指工程中的html或jsp等页面,作用是与用户进行交互,展示数据
C:Controller,控制层,指工程中的servlet,作用是接收请求和响应浏览器
MVC的工作流程:
用户通过视图层发送请求到服务器,在服务器中请求被Controller接收,Controller调用相应的Model层处理请求,处理完毕将结果返回到Controller,Controller再根据请求处理的结果找到相应的View视图,渲染数据后最终响应给浏览器。
2.什么是SpringMVC?
SpringMVC是Spring的一个后续产品,是Spring的一个子项目。
SpringMVC是Spring 为表述层开发提供的一整套完备的解决方案。在表述层框架历经 Strust、WebWork、Strust2等诸多产品的历代更迭之后,目前业界普遍选择了SpringMVC作为Java EE 项目表述层开发的首选方案。
注:三层架构分为表述层(或表示层)、业务逻辑层、数据访问层,表述层表示前台页面和后台servlet
3.SpringMVC的特点?
- Spring 家族原生产品,与I0C容器等基础设施无缝对接
- 基于原生的Servlet,通过了功能强大的前端控制器DispatcherServlet,对请求和响应进行统一处理
- 表述层各细分领域需要解决的问题全方位覆盖,提供全面解决方案
- 代码清新简洁,大幅度提升开发效率
- 内部组件化程度高,可插拔式组件即插即用,想要什么功能配置相应组件即可。
- 性能卓著,尤其适合现代大型、超大型互联网项目要求
二、SpringMVC入门案列
1. 开发环境
IDE: idea 2021
构建工具: maven 3.6.9
服务器: tomcat 8.5.9
Spring版本: 5.3.19
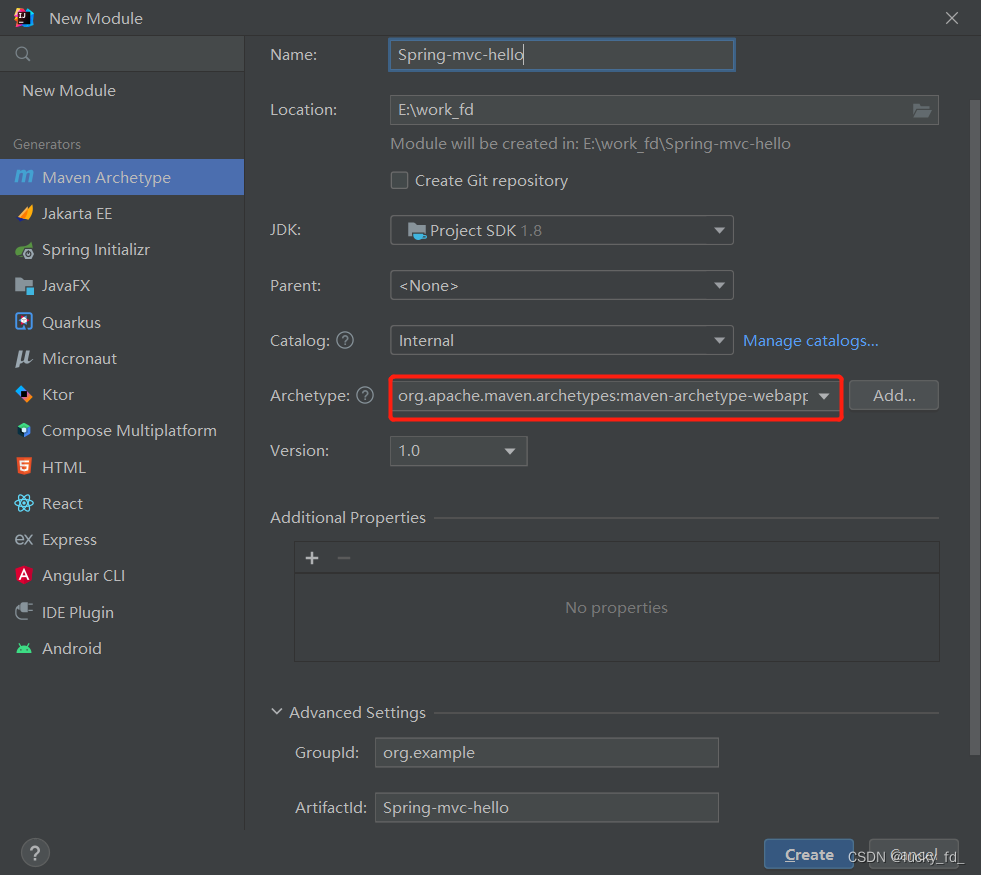
2. 创建Maven工程
2.1 添加web模块
2.2 引入依赖
<dependencies>
  <dependency>
    <groupId>junit</groupId>
    <artifactId>junit</artifactId>
    <version>4.11</version>
    <scope>test</scope>
  </dependency>
  <!--springMVC-->
  <dependency>
    <groupId>org.springframework</groupId>
    <artifactId>spring-webmvc</artifactId>
    <version>5.3.19</version>
  </dependency>
  <dependency>
    <!--日志-->
    <groupId>ch.qos.logback</groupId>
    <artifactId>logback-classic</artifactId>
    <version>1.2.3</version>
  </dependency>
  <!--ServletAPI-->
  <dependency>
    <groupId>javax.servlet</groupId>
    <artifactId>javax.servlet-api</artifactId>
    <version>4.0.1</version>
  </dependency>
  <!--Spring5和Thymeleaf整合包-->
  <dependency>
    <groupId>org.thymeleaf</groupId>
    <artifactId>thymeleaf-spring5</artifactId>
    <version>3.0.15.RELEASE</version>
  </dependency>
</dependencies>
3. 配置web.xml
作用:注册SpringMVC的前端控制器DispatcherServlet
3.1 默认配置方式
此配置作用下,SpringMVC的配置文件默认位于WEB-INF下,默认名称为 -servlet.xml,
例如,以下配置所对应SpringMVC的配置文件位于WEB-NF下,文件名为springMVC-servlet.xml
<!DOCTYPE web-app PUBLIC
 "-//Sun Microsystems, Inc.//DTD Web Application 2.3//EN"
 "http://java.sun.com/dtd/web-app_2_3.dtd" >

<web-app>
  <display-name>Archetype Created Web Application</display-name>

  <!--
      配置SpringMVC的前端控制器DispatcherServlet

      springMVC的配置文件默认的位置和名称
      位置: WEB-INF下
      名称: <servlet-name>-servlet.xml,当前配置下的配置文件名为springMVC-servlet.xml

      url-pattern中/和/*的区别:
        /:匹配浏览器向服务器发送的所有请求(不包括jsp)
        /*:匹配浏览器向服务器发送的所有请求(包括jsp)
  -->
  <servlet>
    <servlet-name>springMVC</servlet-name>
    <servlet-class>org.springframework.web.servlet.DispatcherServlet</servlet-class>
  </servlet>
  <servlet-mapping>
    <servlet-name>springMVC</servlet-name>
    <url-pattern>/</url-pattern>
  </servlet-mapping>
</web-app>
3.2 扩展配置方式
web.xml默认配置方式,spring配置文件位于WEB-INF目录下
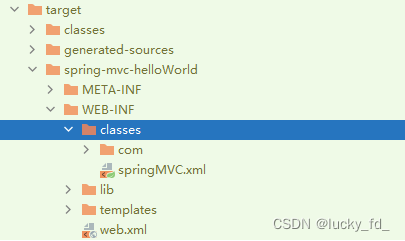
如果要将spring配置文件放在java类路径下(resources目录下),可以通过标签设置springMvC配置文件的位置和名称。
<!DOCTYPE web-app PUBLIC
 "-//Sun Microsystems, Inc.//DTD Web Application 2.3//EN"
 "http://java.sun.com/dtd/web-app_2_3.dtd" >

<web-app>
  <display-name>Archetype Created Web Application</display-name>

  <!--
      配置SpringMVC的前端控制器DispatcherServlet

      springMVC的配置文件默认的位置和名称
      位置: WEB-INF下
      名称: <servlet-name>-servlet.xml,当前配置下的配置文件名为springMVC-servlet.xml

      url-pattern中/和/*的区别:
        /:匹配浏览器向服务器发送的所有请求(不包括jsp)
        /*:匹配浏览器向服务器发送的所有请求(包括jsp)
  -->
  <servlet>
    <servlet-name>springMVC</servlet-name>
    <servlet-class>org.springframework.web.servlet.DispatcherServlet</servlet-class>
    <!--设置springMvC配置文件的位置和名称-->
    <init-param>
      <param-name>contextConfigLocation</param-name>
      <param-value>classpath:springMVC.xml</param-value>
    </init-param>
    <!--将DispatcherServlet的初始化时间提前到服务器启动时,避免初次访问加载时间过长-->
    <load-on-startup>1</load-on-startup>
  </servlet>

  <servlet-mapping>
    <servlet-name>springMVC</servlet-name>
    <url-pattern>/</url-pattern>
  </servlet-mapping>
</web-app>
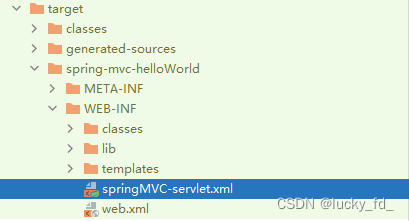
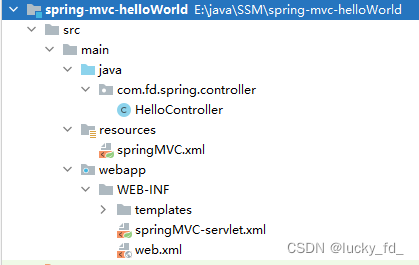
编译后的文件目录:
4.创建请求控制器
由于前端控制器对浏览器发送的请求进行了统一的处理,但是具体的请求有不同的处理过程,因此需要创建处理具体请求的类,即请求控制器
请求控制器中每一个处理请求的方法成为控制器方法
因为SpringMVC的控制器由一个POJO(普通的java类)担任,因此需要通过@Controller注解将其标识为一个控制层组件,交给Spring的IOC容器管理,此时SpringMVC才能够识别控制器的存在
@Controller
public class HelloController {


    /*
        @RequestMapping注解: 处理请求和控制器方法之间的映射关系
        @RequestMapping注解的value属性可以通过请求地址匹配请求,/表示的当前工程的上下文路径
        localhost:8080/springMvC/

    */
    @RequestMapping("/")
    public String protal() {


        System.out.println("请求方法");
        // 将逻辑视图返回
        return "index";
    }

    @RequestMapping("/hello")
    public String hello() {


        return "success";
    }
}
5. 创建SpringMVC的配置文件
<?xml version="1.0" encoding="UTF-8"?>
<beans xmlns="http://www.springframework.org/schema/beans"
       xmlns:xsi="http://www.w3.org/2001/XMLSchema-instance"
       xmlns:context="http://www.springframework.org/schema/context"
       xsi:schemaLocation="http://www.springframework.org/schema/beans http://www.springframework.org/schema/beans/spring-beans.xsd http://www.springframework.org/schema/context https://www.springframework.org/schema/context/spring-context.xsd">

    <!--开启扫描-->
    <context:component-scan base-package="com.fd.spring"></context:component-scan>

    <!--配置Thymeleaf视图解析器-->
    <bean id="viewResolver" class="org.thymeleaf.spring5.view.ThymeleafViewResolver">
        <property name="order" value="1"/>
        <property name="characterEncoding" value="UTF-8"/>
        <property name="templateEngine">
            <bean class="org.thymeleaf.spring5.SpringTemplateEngine">
                <property name="templateResolver">
                    <bean class="org.thymeleaf.spring5.templateresolver.SpringResourceTemplateResolver">
                        <!--视图前缀-->
                        <property name="prefix" value="/WEB_INF/templates"/>
                        <!--视图后缀-->
                        <property name="suffix" value=".html"/>
                        <property name="templateMode" value="HTML5"/>
                        <property name="characterEncoding" value="utf-8"/>
                    </bean>
                </property>
            </bean>
        </property>
    </bean>
</beans>
6. 测试方法
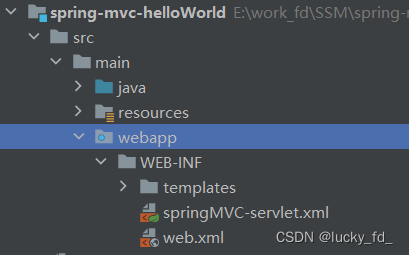
6.1 项目结构
6.2 视图层实现
index.html代码
<!DOCTYPE html>
<html lang="en" xmlns: th="http://www.thymeleaf.org">
<head>
    <meta charset="UTF-8">
    <title>Title</title>
</head>
<body>
    <h1>hello SpringMVC</h1>

<!--
    themeleaf命名空间,自动添加上下文
    th:href="@{/hello} 对应路径:localhost:8080/springMvC/hello
-->
    <a th:href="@{/hello}">测试SpringMVC</a>
    <a href="/hello">测试绝对路径</a>

    <div>
        这是主页界面。。。。。。。。。。
    </div>
</body>
</html>
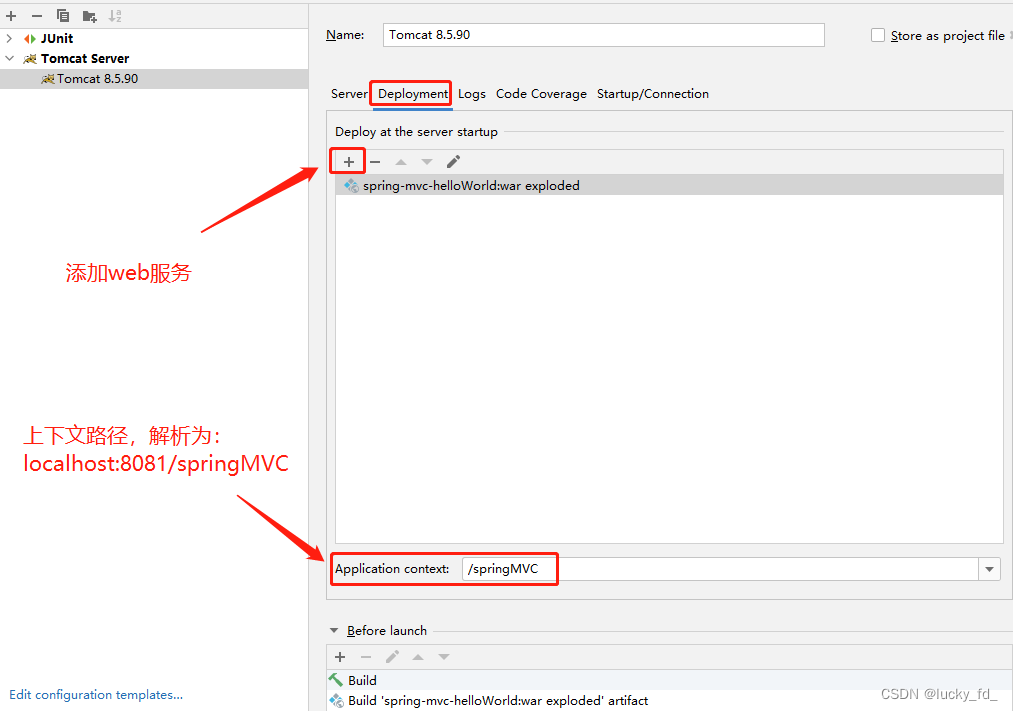
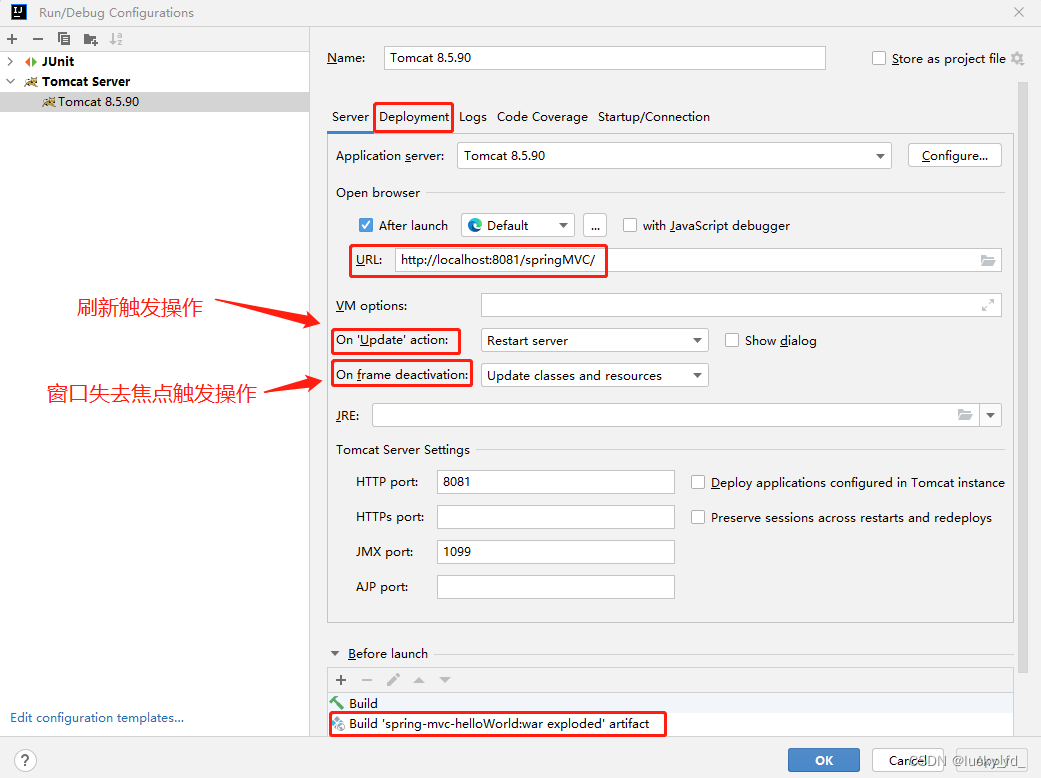
6.3 在tomcat服务器启动服务
7. 总结
浏览器发送请求,若请求地址符合前端控制器的url-pattern,该请求就会被前端控制器DispatcherServlet处理。前端控制器会读取SpringMVC的核心配置文件,通过扫描组件找到控制器,将请求地址和控制器中@RequestMapping注解的value属性值进行匹配,若匹配成功,该注解所标识的控制器方法就是处理请求的方法。处理请求的方法需要返回一个字符串类型的视图名称,该视图名称会被视图解析器解析,加上前缀和后缀组成视图的路径,通过Thymeleaf对视图进行渲染,最终转发到视图所对应页面。
三、@RequestMapping注解
1. @RequestMapping注解的功能
从注解名称上我们可以看到,@RequestMapping注解的作用就是将请求和处理请求的控制器方法关联起来,建立映射关系。
SpringMVC 接收到指定的请求,就会来找到在映射关系中对应的控制器方法来处理这个请求
2. @RequestMapping注解的位置
@RequestMapping标识一个类:设置映射请求的请求路径的初始信息
@RequestMapping标识一个方法: 设置映射请求请求路径的具体信息
@Controller
@RequestMapping("/test")
public class TestRequestMappingController {


    // 此时请求映射所映射的请求的请求路径为: /test/hello
    @RequestMapping("/hello")
    public String protal() {


        return "index";
    }
}
3. @RequestMapping注解的属性
注解源码:
@Target({

    ElementType.TYPE, ElementType.METHOD})
@Retention(RetentionPolicy.RUNTIME)
@Documented
@Mapping
public @interface RequestMapping {


    String name() default "";

    @AliasFor("path")
    String[] value() default {

    };

    @AliasFor("value")
    String[] path() default {

    };

    RequestMethod[] method() default {

    };

    String[] params() default {

    };

    String[] headers() default {

    };

    String[] consumes() default {

    };

    String[] produces() default {

    };
}
3.1 value属性
@RequestMapping注解value属性作用: 通过请求的请求路径匹配请求
value属性是数组类型,即当前浏览器所发送请求的请求路径匹配value属性中的任何一个值则当前请求就会被注解所标识的方法进行处理。
@Controller
@RequestMapping("/test")
public class TestRequestMappingController {


    @RequestMapping({

    "/hello", "/hai"})
    public String protal() {


        return "index";
    }
}
3.2 method属性
@RequestMapping注解的method属性作用:通过请求的请求方式匹配请求
method属性是RequestMethod类型的数组,即当前浏览器所发送请求的请求方式匹配method属性中的任何一个,则当前请求就会被注解所标识的方法进行处理。若浏览器所发送的请求的请求路径和RequestMapping注解value属性匹配,但是请求方式不匹配此时页面报错:405 - Request methodxxx’not supported
@Controller
@RequestMapping("/test")
public class TestRequestMappingController {


    // 此时请求映射所映射的请求的请求路径为: /test/hello
    @RequestMapping(value = {

    "/hello", "/hai"},
            method = RequestMethod.GET)
    public String protal() {


        return "index";
    }
}
扩展:
在@RequestMapping的基础上,结合请求方式的一些派生注解:
@GetMapping,@postMapping,@DeleteMapping,@PutMapping
- 处理get请求的映射–>@GetMapping
- 处理post请求的映射–>@PostMapping
- 处理put请求的映射–>@PutMapping
- 处理delete请求的映射–>@DeleteMapping
@Controller
@RequestMapping("/test")
public class TestRequestMappingController {


    // 此时请求映射所映射的请求的请求路径为: /test/hello及/test/hai,请求方法为get请求
    @GetMapping(value = {

    "/hello", "/hai"})
    public String protal() {


        return "index";
    }
}
常用的请求方式有get,post,put,delete。但是目前浏览器只支持get和post,若在form表单提交时,为method设置了其他请求方式的字符串 (put或delete),则按照默认的请求方式get处理
若要发送put和delete请求,则需要通过Spring提供的过滤器HiddenHttpMethodFilter,在下面RESTful部分会讲到。
3.3 params属性
@RequestMapping注解的params属性通过请求的请求参数匹配请求映射
@RequestMappin注解的params属性是一个字符串类型的数组,可以通过四种表达式设置请求参数和请求映射的匹配关系
“param”:要求请求映射所匹配的请求必须携带param请求参数
“!param”:要求请求映射所匹配的请求必须不能携带param请求参数
"param=value”: 要求请求映射所匹配的请求必须携带param请求参数且param=value
“param!=value”: 要求请求映射所匹配的请求必须携带param请求参数但是param!=value
@Controller
@RequestMapping("/test")
public class TestRequestMappingController {


    // 请求参数必须携带username参数,不能携带password参数,必须携带age参数且值为20
    @GetMapping(value = {

    "/hello", "/hai"},
    params = {

    "username", "!password", "age=20"})
    public String protal() {


        return "index";
    }
}
3.4 headers属性
@RequestMapping注解的headers属性通过请求的请求头信息匹配请求映射
@RequestMapping注解的headers属性是一个字符串类型的数组,可以通过四种表达式设置请求头信息和请求映射的匹配关系
”heaqer”:要求请求映射所匹配的请求必须携带header请求头信息
”!header”:要求请求映射所匹配的请求必须不能携带header请求头信息
"header=value”: 要求请求映射所匹配的请求必须携带header请求头信息且header=value
"header!=value”: 要求请求映射所匹配的请求必须携带header请求头信息且header!=value
若当前请求满足@RequestMapping注解的value和method属性,但是不满足headers属性,此时页面显示404错误,即资源未找到。
3.5 SpringMVC支持ant风格的路径
在@RequestMapping注解的value属性值中设置一些特殊字符
?:表示任息的单个字符
*:表示任意的0个或多个字符
:表示任意层数的任意目录
注意:在使用时,只能使用/**/xxx的方式
@RequestMapping("/a?a")
public String testAnt() {


    return "success";
}
3.6 SpringMVC支持路径中的占位符 (重点)
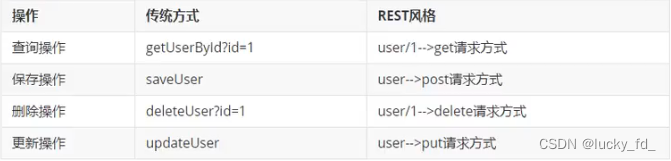
原始方式:/deleteUser?id=1
rest方式::/user/delete/1
SpringMVC路径中的占位符常用于RESTful风格中,当请求路径中将某些数据通过路径的方式传输到服务器中,就可以在相应的@RequestMapping注解的value属性中通过占位符(xxx)表示传输的数据,在通过@PathVariable注解,将占位符所表示的数据赋值给控制器方法的形参。
案列演示:
view视图:
<!DOCTYPE html>
<html lang="en" xmlns: th="http://www.thymeleaf.org">
<head>
    <meta charset="UTF-8">
    <title>Title</title>
</head>
<body>

    <a th:href="@{/user/delete/1}">测试SpringMVC路径中占位符</a>

</body>
</html>
控制器:
@RequestMapping("/user/delete/{id}")
public String test(@PathVariable String id) {


    System.out.println(id); // id = 1
    return "success";
}
4. SpringMVC获取请求参数
4.1 通过servletAPI获取
只需要在控制器方法的形参位置设置HttpservletRequest类型的形参就可以在控制器方法中使用request对象获取请求参数
案列演示:
视图层:
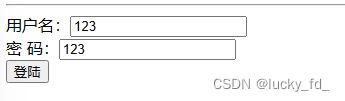
<form th:action="@{/param/servletAPI}" method="post">
    用户名:<input type="text" name="username"><br>
    密  码:<input type="text" name="password"> <br>
    <input type="submit" value="登陆">
</form>
控制层:
@RequestMapping("/param/servletAPI")
public String getParamByServletAPI(HttpServletRequest request) {


    String username = request.getParameter("username");
    String password = request.getParameter("password");
    System.out.println("username: " + username + ", password: " + password);
    return "success";
}
测试结果:

4.2 通过控制器方法的形参获取
只需要在控制器方法的形参位置,设置一个形参,形参的名字和请求参数的名字必须一致
案列演示:
视图层:
<a th:href="@{/param?username=tom&password=123456}">测试控制器方法的形参获取请求参数</a><br>
控制层:
@RequestMapping("/param")
public String getParam(String username, String password) {


    System.out.println("username: " + username + ", password: " + password);
    return "success";
}
测试结果:

4.3 @RequestParam:将请求参数和控制器方法的形参绑定
@RequestParam注解的三个属性: value,required,defaultValue
- value: 设置和形参绑定的请求参数的名称
- required:设置是否必须传输value所对应的请求参数。默认值为true,表示value所对应的请求参数必须传输,否则页面报错400 - Required string parameter xxx’ is not present。若设置为false,则表示value所对应的请求参数不是必须传输,若未传输,则形参值为null
- defaultValue:设置当没有传输value所对应的请求参数时,为形参设置的默认值,此时和required属性值无关
源码:
@Target({

    ElementType.PARAMETER})
@Retention(RetentionPolicy.RUNTIME)
@Documented
public @interface RequestParam {


    @AliasFor("name")
    String value() default "";

    @AliasFor("value")
    String name() default "";

    boolean required() default true;

    String defaultValue() default "\n\t\t\n\t\t\n\ue000\ue001\ue002\n\t\t\t\t\n";
}
案列演示:
视图层:
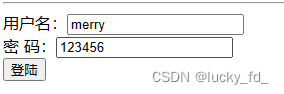
<form th:action="@{/param}" method="post">
    用户名:<input type="text" name="userName"><br>
    密  码:<input type="text" name="password"> <br>
    <input type="submit" value="登陆">
</form>
控制层:
// 设置userName参数和username绑定
@RequestMapping("/param")
public String getParamByAnnotation(@RequestParam("userName", defaultValue = "hello") String username,
                                   @RequestParam("password") String password) {


    System.out.println("username: " + username + ", password: " + password);
    return "success";
}
测试结果:

4.4 @RequestHeader: 将请求头信息和控制器方法的形参绑定
用法同@RequestParam
案列演示:
@RequestMapping("/param")
public String getParamByAnnotation(@RequestParam(value = "userName", defaultValue = "hello") String username,
                                   @RequestParam("password") String password,
                                   @RequestHeader("referer") String referer,

                                   ) {


    System.out.println("referer: " + referer);// 提供请求的访问来源,从哪一个请求链接过来的
    System.out.println("username: " + username + ", password: " + password);
    return "success";
}
测试结果:

4.5 @CookieValue:将cookie数据和控制器方法的形参绑定
用法同@RequestParam
案列演示:
@RequestMapping("/param")
public String getParamByAnnotation(@RequestParam(value = "userName", defaultValue = "hello") String username,
                                   @RequestParam("password") String password,
                                   @RequestHeader("referer") String referer,
                                   @CookieValue("JSESSIONID") String jsessionId) {


    System.out.println("referer: " + referer);
    System.out.println("jsessionId: " + jsessionId);
    System.out.println("username: " + username + ", password: " + password);
    return "success";
}
测试结果:

4.6 通过控制器方法的实体类类型的形参获取
请求参数需要在控制器方法的形参位置设置实体类类型的形参,要保证实体类中的属性的属性名和请求参数的名字一致。可以通过实体类类型的形参获取请求参数
案列演示:
控制层:
@RequestMapping("/param/pojo")
public String getParamByPojo(User user) {


    System.out.println(user);
    return "success";
}
pojo:
public class User {


    private String username;

    private String password;

    .....
}
视图层:
<form th:action="@{/param/pojo}" method="post">
    用户名:<input type="text" name="username"><br>
    密  码:<input type="text" name="password"> <br>
    <input type="submit" value="登陆">
</form>
测试结果:

4.7 过滤器解决获取请求参数的乱码问题
解决获取请求参数的乱码问题,可以使用SpringMVC提供的编码过滤器CharacterEncodingFilter,但是必须在web.xml中进行注册
<!--配置Spring的编码过滤器-->
<filter>
  <filter-name>CharacterEncodingFilter</filter-name>
  <filter-class>org.springframework.web.filter.CharacterEncodingFilter</filter-class>
  <!--设置请求的编码方式-->
  <init-param>
    <param-name>encoding</param-name>
    <param-value>UTF-8</param-value>
  </init-param>
  <!--设置请求的编码方式同时还会设置响应的编码方式-->
  <init-param>
    <param-name>forceEncoding</param-name>
    <param-value>true</param-value>
  </init-param>
</filter>
<filter-mapping>
  <filter-name>CharacterEncodingFilter</filter-name>
  <url-pattern>/*</url-pattern>
</filter-mapping>
注意:SpringMVC中处理编码的过滤器一定要配置到其他过滤器之前,否则无效
编码过滤源码解析:
// 通过web.xml中配置进行初始化赋值
public CharacterEncodingFilter(String encoding, boolean forceEncoding) {


    this(encoding, forceEncoding, forceEncoding);
}
// 判断设置请求及响应的编码格式
protected void doFilterInternal(HttpServletRequest request, HttpServletResponse response, FilterChain filterChain) throws ServletException, IOException {


    String encoding = this.getEncoding();
    if (encoding != null) {


        if (this.isForceRequestEncoding() || request.getCharacterEncoding() == null) {


            request.setCharacterEncoding(encoding);
        }

        if (this.isForceResponseEncoding()) {


            response.setCharacterEncoding(encoding);
        }
    }

    filterChain.doFilter(request, response);
}
四、域对象共享数据
请求域(request scope):请求域的生命周期是指一次请求的过程。页面通过forword方式跳转,目标页面仍然可以获得request的属性值。如果通过redirect方式进行页面跳转,会去重新访问新的指定的URL地址,request的属性值会丢失。
会话域(session scope):会话域的生命周期是指某个客户端与服务器所连接的时间,会话过期或用户自动退出后,会话失效。存储在会话域中的对象在整个会话期间都可以被访问。
应用域(application scope):应用域的生命周期是指从服务器开始执行到服务器关闭为止,是4个作用域时间最长的。 存储在应用域中的对象在整个应用程序运行期间可以被所有JSP和Servlet共享访问。
1. 使用ServletAPI向request域对象共享数据
视图层:
success.html界面代码
<!DOCTYPE html>
<html lang="en">
<head>
    <meta charset="UTF-8">
    <title>Title</title>
</head>
<body>
    <h2>欢迎登陆!</h2>
    <!--获取请求域数据-->
    <p th:text="${scope}"></p>
    <!--获取会话域数据-->
    <p th:text="${session.scope}"></p>
    <!--获取应用域数据-->
    <p th:text="${application.scope}"></p>
</body>
</html>
控制层:
@RequestMapping("/test/servletAPI")
public String servletAPI(HttpServletRequest request) {


    request.setAttribute("scope","hello servletAPI");
    return "success";
}
2. 使用ModelAndView向request域对象共享数据
使用ModeLAndView时,可以使用其Model功能向请求域共享数据
使用view功能设置逻辑视图,但是控制器方法一定要将ModelAndView作为方法的返回值
@RequestMapping("/test/mav")
public ModelAndView testMAV() {


    /*
    * ModelAndView包含Model和view的功能
    * Model:向请求域中共享数据
    * view:设置逻辑视图实现页面跳转
    *
    * */
    ModelAndView modelAndView = new ModelAndView();
    // 向共享域中共享数据
    modelAndView.addObject("scope", "hello ModelAndView");
    // 设置逻辑视图
    modelAndView.setViewName("success");
    return modelAndView;
}
3. 使用model向请求域共享数据
@RequestMapping("/test/modelMap")
public String testModelMap(ModelMap modelMap) {


    modelMap.addAttribute("scope", "hello, ModelMap");
    return "success";
}
4. 使用modelMap向请求域共享数据
@RequestMapping("/test/modelMap")
public String testModelMap(ModelMap modelMap) {


    modelMap.addAttribute("scope", "hello, ModelMap");
    return "success";
}
5. 使用map向请求域共享数据
@RequestMapping("/test/map")
public String testMap(Map<String, Object> map) {


    map.put("scope", "hello, map");
    return "success";
}
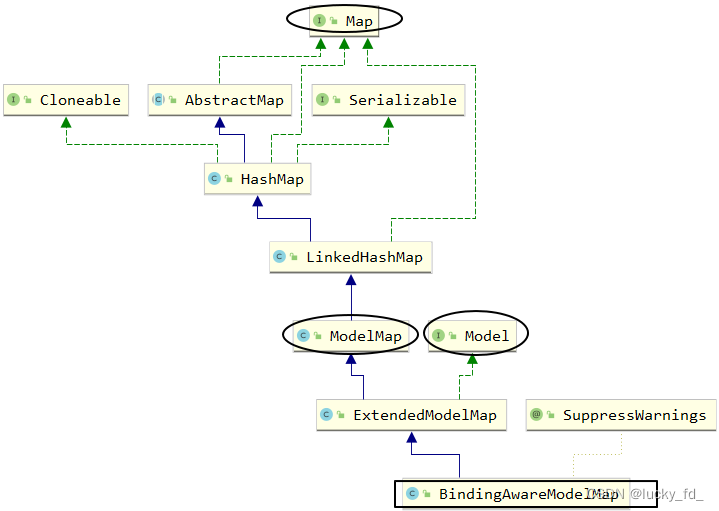
6. Model和ModelMap和map的关系
其实在底层中,这些类型的形参最终都是通过BindingAwareModelMap创建
- public class BindingAwareModelMap extends ExtendedModelMap
- public class ExtendedModelMap extends ModelMap implements Model
- public class ModelMap extends LinkedHashMap<String, Object>
7. 向会话域共享数据
/** 会话域:浏览器打开到关闭*/
@RequestMapping("/test/session")
public String testSession(HttpSession session) {


    session.setAttribute("scope", "hello, session");
    return "success";
}
8. 向应用域共享数据
/** 应用域:服务器打开到关闭*/
@RequestMapping("/test/application")
public String testApplication(HttpSession session) {


    ServletContext servletContext = session.getServletContext();
    servletContext.setAttribute("scope", "hello, application");
    return "success";
}
五、SpringMVC的视图
SpringMVC中的视图是View接口,视图的作用渲染数据,将模型Model中的数据展示给用户。
SpringMVC视图的种类很多,默认有转发视图和重定向视图。当工程引入jstl的依赖,转发视图会自动转换为jstlView。
若使用的视图技术为Thymeleaf,在SpringMVC的配置文件中配置了Thymeleaf的视图解析器,由此视图解析器解析之后所得到的是ThymeleafView
1. ThymeleafView
当控制器方法中所设置的视图名称没有任何前缀时,此时的视图名称会被SpringMVC配置文件中所配置的视图解析器解析,视图名称拼接视图前缀和视图后缀所得到的最终路径,会通过转发的方式实现跳转
@RequestMapping("/test/view/thymeleaf")
public String testThymeleafView() {
    return "success";
}
2. 转发视图
SpringMVC中默认的转发视图是InternalResourceView
SpringMV中创建转发视图的情况:
当控制器方法中所设置的视图名称以"forward:"为前缀时,创建lnternalResourceView视图,此时的视图名称不会被SpringMVC配置文件中所配置的视图解析器解析,而是会将前缀"forward:"去掉,剩余部分作为最终路径通过转发的方式实现跳转。例:“forward:/”,“forward:/employee”
/** 转发视图*/
@RequestMapping("/test/view/forward")
public String testInternalResourceView() {


    // 直接转发跳转到相应视图,但是视图中的数据没有办法解析。
    return "forward:/test/model";
}
3. 重定向视图
SpringMVC中默认的重定向视图是RedirectView
当控制器方法中所设置的视图名称以"redirect:"为前缀时,创建RedirectView视图,此时的视图名称不会被SpringMVC配置文件中所配置的视图解析器解析,而是会将前缀"rediret”去掉,剩余部分作为最终路径通过重定向的方式实现跳转。例:“redirect:/”,“redirect:/employee”
/** 重定向视图*/
@RequestMapping("/test/view/redirect")
public String testRedirectView() {


    return "redirect:/test/model";
}
注:
重定向视图在解析时,会先将redirect:前缀去掉,然后会判断剥余部分是否以/开头,若是则会自动拼接上下文路径
4. 视图控制器view-Controller
当控制器方法中,仅仅用来实现页面跳转,即只需要设置视图名称时,可以将处理器方法在SpringMVC.xml配置文件使用view-controller标签进行标识。不用单独封装一个控制器方法。
<!--开启扫描-->
<context:component-scan base-package="com.fd.spring"></context:component-scan>

<!--配置Thymeleaf视图解析器-->
<bean id="viewResolver" class="org.thymeleaf.spring5.view.ThymeleafViewResolver">
    <property name="order" value="1"/>
    <property name="characterEncoding" value="UTF-8"/>
    <property name="templateEngine">
        <bean class="org.thymeleaf.spring5.SpringTemplateEngine">
            <property name="templateResolver">
                <bean class="org.thymeleaf.spring5.templateresolver.SpringResourceTemplateResolver">
                    <!--视图前缀-->
                    <property name="prefix" value="/WEB-INF/templates/"/>
                    <!--视图后缀-->
                    <property name="suffix" value=".html"/>
                    <property name="templateMode" value="HTML5"/>
                    <property name="characterEncoding" value="utf-8"/>
                </bean>
            </property>
        </bean>
    </property>
</bean>

<!--开启mvc的注解驱动-->
<mvc:annotation-driven/>

<!--
    视图控制器,为当前的请求直接设置视图名称实现页面跳转
    若设置视图控制器,则只有视图控制器所设置的请求会被处理,其他的请求将全部404,此时必须在配置一个标签:<mvc:annotation-driven />
-->
<mvc:view-controller path="/" view-name="index"></mvc:view-controller>
注:
当SpringMVC中设置任何一个view-controller时,其他控制器中的请求映射将全部失效,此时需要在SpringMVC的核心配置文件中设置开启mvc注解驱动的标签:<mvc:annotation-driven />
六、RESTful架构
1. RESTful简介
REST: Representational State Transfer,表现层资源状态转移
- 资源
资源是一种看待服务器的方式,即,将服务器看作是由很多离散的资源组成。每个资源是服务器上一个可命名的抽象概念。因为资源是一个抽象的概念,所以它不仅仅能代表服务器文件系统中的一个文件、数据库中的一张表等等具体的东西,可以将资源设计的要多抽象有多抽象,只要想象力允许而且客户端应用开发者能够理解。与面向对象设计类似,资源是以名词为核心来组织的,首先关注的是名词。一个资源可以由一个或多个URI来标识。URI既是资源的名称,也是资源在Web上的地址。对某个资源感兴趣的客户端应用,可以通过资源的URI与其进行交互。 - 资源的表述
资源的表述是一段对于资源在某个特定时刻的状态的描述。可以在客户端-服务器端之间转移(交换)。资源的表述可以有多种格式,例如HTML/XML/JSON/纯文本/图片/视频/音频等等。资源的表述格式可以通过协商机制来确定。请求-响应方向的表述通常便用不同的格式。 - 状态转移
状态转移说的是:在客户端和服务器端之间转移( transfer)代表资源状态的表述。通过转移和操作资源的表述来间接实现操作资源的目的。
2. RESTful的实现
具体说,就是 HTTP 协议里面,四个表示操作方式的动词: GET、POST、PUT、DELETE.
它们分别对应四种基本操作: GET 用来获取资源,POST 用来新建资源,PUT 用来更新资源,DELETE 用来删除资源。
REST 风格提倡 URL 地址使用统一的风格设计,从前到后各个单词使用斜杠分开,不使用问号键值对方式携带请求参数,而是将要发送给服务器的数据作为 URL 地址的一部分,以保证整体风格的一致性。
案例演示:
控制层:
@Controller
public class TestRestController {
@RequestMapping("/")
public String protal() {
return "index";
}
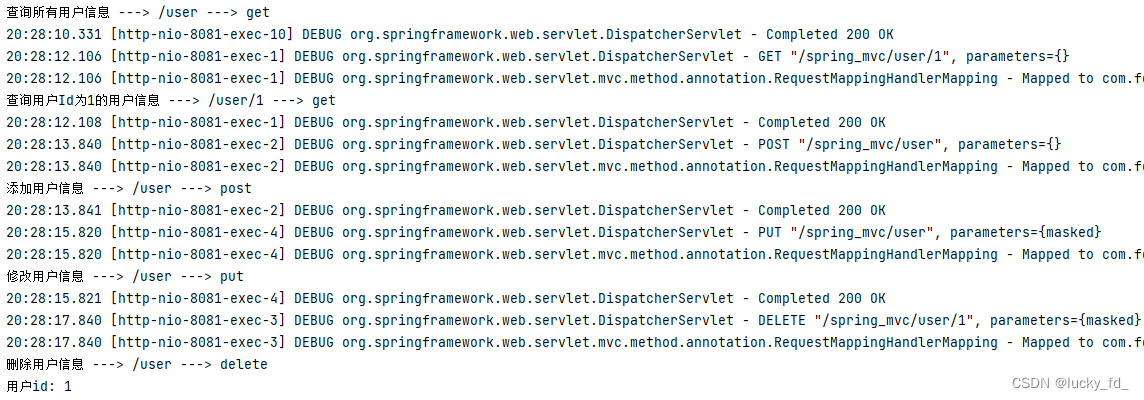
@GetMapping("/user")
public String getAllUser() {
System.out.println("查询所有用户信息 ---> /user ---> get");
return "success";
}
@GetMapping("/user/{id}")
public String getUserById(@PathVariable String id) {
System.out.println("查询用户Id为1的用户信息 ---> /user/1 ---> get");
return "success";
}
@PostMapping("/user")
public String addUser() {
System.out.println("添加用户信息 ---> /user ---> post");
return "success";
}
/**
* 注意:浏览器目前只能发送get和post请求
* 若要发送put和delete请求,需要在web.xml中配置一个过滤器HiddenHttpMethodFilter
* 配置了过滤器之后,发送的请求要满足两个条件,才能将请求方式转换为put或delete
* 1、当前请求必须为post
* 2、当前请求必须传输请求参数_method, method的值才是最终的请求方式
*
* */
@PutMapping("/user")
public String updateUser() {
System.out.println("修改用户信息 ---> /user ---> put");
return "success";
}
@DeleteMapping("/user/{id}")
public String deleteUser(@PathVariable String id) {
System.out.println("删除用户信息 ---> /user ---> delete");
System.out.println("用户id: " + id);
return "success";
}
}
视图层:
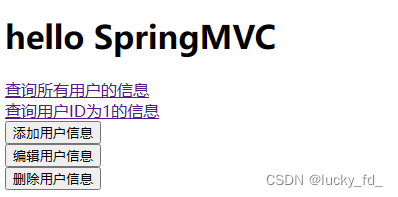
<a th:href="@{/user}">查询所有用户的信息</a><br>

<a th:href="@{/user/1}">查询用户ID为1的信息</a><br>

<form th:action="@{/user}" method="post">
    <input type="submit" value="添加用户信息">
</form>

<form th:action="@{/user}" method="post">
    <input type="hidden" name="_method" value="put">
    <input type="submit" value="编辑用户信息">
</form>

<form th:action="@{/user/1}" method="post">
    <input type="hidden" name="_method" value="delete">
    <input type="submit" value="删除用户信息">
</form>
测试结果:
3. 过滤器HiddenHttpMethodFilter
注意:浏览器目前只能发送get和post请求
* 若要发送put和delete请求,需要在web.xml中配置一个过滤器HiddenHttpMethodFilter
* 配置了过滤器之后,发送的请求要满足两个条件,才能将请求方式转换为put或delete
1、当前请求必须为post
2、当前请求必须传输请求参数_method, method的值才是最终的请求方式
满足以上条件,HiddenHttpMethodFilter 过滤器就会将当前请求的请求方式转换为请求参数_method的值,因此请求参数_method的值才是最终的请求方式
<!--配置Spring的编码过滤器-->
<filter>
  <filter-name>CharacterEncodingFilter</filter-name>
  <filter-class>org.springframework.web.filter.CharacterEncodingFilter</filter-class>
  <!--设置请求的编码方式-->
  <init-param>
    <param-name>encoding</param-name>
    <param-value>UTF-8</param-value>
  </init-param>
  <!--设置请求的编码方式同时还会设置响应的编码方式-->
  <init-param>
    <param-name>forceEncoding</param-name>
    <param-value>true</param-value>
  </init-param>
</filter>
<!--设置处理请求方式的过滤器-->
<filter>
  <filter-name>httpMethodFilter</filter-name>
  <filter-class>org.springframework.web.filter.HiddenHttpMethodFilter</filter-class>
</filter>

<filter-mapping>
  <filter-name>CharacterEncodingFilter</filter-name>
  <url-pattern>/*</url-pattern>
</filter-mapping>
<filter-mapping>
  <filter-name>httpMethodFilter</filter-name>
  <url-pattern>/*</url-pattern>
</filter-mapping>

<!--设置SpringMVC的前端控制器-->
<servlet>
  <servlet-name>springMVC</servlet-name>
  <servlet-class>org.springframework.web.servlet.DispatcherServlet</servlet-class>
  <init-param>
    <param-name>contextConfigLocation</param-name>
    <param-value>classpath:spring-mvc.xml</param-value>
  </init-param>
</servlet>
<servlet-mapping>
  <servlet-name>springMVC</servlet-name>
  <url-pattern>/</url-pattern>
</servlet-mapping>
目前为止,SpringMVC中提供了两个过滤器: CharacterEncodingFilter和HiddenHttpMethodFilter
在web.xml中注册时,必须先注册CharacterEncodingFilter,再注册HiddenHttpMethodFilter
原因:
在CharacterEncodingFilter 中通过 request.setCharacterEncoding(encoding)方法设置字符集的。
request.setCharacterEncoding(encoding)方法要求前面不能有任何获取请求参数的操作。
而 HiddenHttpMethodFilter 恰恰有一个获取请求方式的操作
源码解析:
public class HiddenHttpMethodFilter extends OncePerRequestFilter {


    private static final List<String> ALLOWED_METHODS;
    public static final String DEFAULT_METHOD_PARAM = "_method";
    private String methodParam = "_method";

    public HiddenHttpMethodFilter() {


    }

    public void setMethodParam(String methodParam) {


        Assert.hasText(methodParam, "'methodParam' must not be empty");
        this.methodParam = methodParam;
    }
    // 执行过滤操作
    protected void doFilterInternal(HttpServletRequest request, HttpServletResponse response, FilterChain filterChain) throws ServletException, IOException {


        HttpServletRequest requestToUse = request;
        // 判断请求方式为post请求
        if ("POST".equals(request.getMethod()) && request.getAttribute("javax.servlet.error.exception") == null) {


            // 获取请求参数为_method的参数,设置请求方式
            String paramValue = request.getParameter(this.methodParam);
            if (StringUtils.hasLength(paramValue)) {


                String method = paramValue.toUpperCase(Locale.ENGLISH);
                if (ALLOWED_METHODS.contains(method)) {


                    requestToUse = new HttpMethodRequestWrapper(request, method);
                }
            }
        }

        filterChain.doFilter((ServletRequest)requestToUse, response);
    }

    static {


        ALLOWED_METHODS = Collections.unmodifiableList(Arrays.asList(HttpMethod.PUT.name(), HttpMethod.DELETE.name(), HttpMethod.PATCH.name()));
    }

    private static class HttpMethodRequestWrapper extends HttpServletRequestWrapper {


        private final String method;

        public HttpMethodRequestWrapper(HttpServletRequest request, String method) {


            super(request);
            this.method = method;
        }

        public String getMethod() {


            return this.method;
        }
    }
}
七、SpringMVC处理ajax请求
1. @RequestBody获取请求体信息
@RequestBody可以获取请求体信息,使用@RequestBody注解标识控制器方法的形参,当前请求的请求体就会为当前注解所标识的形参赋值。
演示案例:
控制层:
@RequestMapping("/test/ajax")
public void testAjax(Integer id, @RequestBody String requestBody, HttpServletResponse response) throws IOException {


    System.out.println("id: " + id);
    System.out.println("requestBody: " + requestBody);
    // 响应到浏览器数据
    response.getWriter().write("hello axios");
}
视图层:
<body>
<div id="app">
<h1>index.html</h1>
<input type="button" value="测试SpringMVC处理Ajax" @click="testAjax()"><br>
</div>
<script type="text/javascript" th:src="@{/js/vue.js}"></script>
<script type="text/javascript" th:src="@{/js/axios.min.js}"></script>
<script type="text/javascript">
/*
axios({
url: '', //请求路径
method: '', // 请求方式
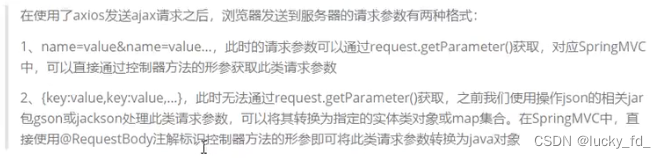
// 以name=value&name=value的方式发送的请求参数,不管使用的请求方式是get或post,请求参数都会被拼接到请求地址后,
// 此种方式的请求参数可以通过request.getParameter()获取
params: {},
// 以json格式发送的请求参数,请求参数会被保存到请求报文的请求体传输到服务器,此种方式的请求参数不可以通过request.getParameter()获取
data: {}
}).then(resp => {
console.log(resp.data)
})
* */
var vue = new Vue({
el: "#app",
methods: {
testAjax() {
axios.post("/spring_mvc/test/ajax?id=1001", {
username: "admin",
password: "12346"
}).then(resp => {
console.log(resp.data)
});
},
}
})
</script>
</body>
测试结果:

2. @RequestBody获取json格式的请求体参数
使用@RequestBody注解将json格式的请求参数转换为java对象
a>导入jackson的依赖
b>在SpringMVC的配置文件中设置<mvc:annotation-driven />
c>在处理请求的控制器方法的形参位置,直接设置json格式的请求参数要转换的java类型的形参,使用@RequestBody注解标记
2.1 导入jackson依赖
<dependency>
    <groupId>com.fasterxml.jackson.core</groupId>
    <artifactId>jackson-databind</artifactId>
    <version>2.15.1</version>
</dependency>
2.2 测试方法
控制层:
@RequestMapping("/test/ajax/requestBody/json")
public void testAjax(@RequestBody User user, HttpServletResponse response) throws IOException {


    System.out.println(user);
    response.getWriter().write("hello requestBody");
}
视图层:index.html
<body>
<div id="app">
    <h1>index.html</h1>

    <input type="button" value="测试SpringMVC处理Ajax" @click="testAjax()"><br>

    <input type="button" value="使用@RequestBody注解处理json格式的请求参数" @click="testRequestBody()"><br>
</div>

<script type="text/javascript" th:src="@{/js/vue.js}"></script>
<script type="text/javascript" th:src="@{/js/axios.min.js}"></script>
<script type="text/javascript">

    /*
    axios({
            url: '', //请求路径
            method: '', // 请求方式
            // 以name=value&name=value的方式发送的请求参数,不管使用的请求方式是get或post,请求参数都会被拼接到请求地址后,
            // 此种方式的请求参数可以通过request.getParameter()获取
            params: {},
            // 以json格式发送的请求参数,请求参数会被保存到请求报文的请求体传输到服务器,此种方式的请求参数不可以通过request.getParameter()获取
            data: {}
        }).then(resp => {
            console.log(resp.data)
        })

    * */
    var vue = new Vue({


        el: "#app",
        methods: {


            testAjax() {


                axios.post("/spring_mvc/test/ajax?id=1001", {


                    username: "admin",
                    password: "12346"
                }).then(resp => {


                    console.log(resp.data)
                });
            },
            testRequestBody() {


                axios.post(
                    "/spring_mvc/test/ajax/requestBody/json",
                    {


                        username: "admin",
                        password: "12346"
                    }
                ).then(resp => {


                    console.log(resp.data)
                })
            },
    })
</script>
</body>
测试结果:

3. @ResponseBody响应浏览器数据
@ResponseBody用于标识一个控制方法,可以将该方法的返回值直接作为响应报文的响应体响应到浏览器
@ResponseBody
@RequestMapping("/test/responseBody")
public String testResponseBody() {


    return "success";
}
4. @ResponseBody响应浏览器json格式数据
使用@ResponseBody注解响应浏览器json格式的数据
a>导入jackson的依赖
b>在SpringMVC的配置文件中设置<mvc:annotation-driven />
c>将需要转换为json字符串的java对象直接作为控制器方法的返回值,使用@ResponseBody注解标识控制器方法,就可以将java对象直接转换为json字符串,并响应到浏览器。
演示案例:
控制器方法:
@ResponseBody
@RequestMapping("/test/responseBody/json")
public User testResponseBodyJson() {


    User user = new User("张三", "123465", 23);
    return user;
}
请求方法:
testResponseBody() {


    axios.get("/spring_mvc/test/responseBody/json").then(resp => {


        console.log(resp.data)
    })
}
测试结果:

5. @RestController注解
@RestController注解是springMVC提供的一个复合注解,标识在控制的类上,就相当于为类添加了@Controller注解,并且为其中的每个方法添加了@ResponseBody注解
八、拦截器与过滤器
1. 简介
过滤器和拦截器。这两者在功能方面很类似,但是在具体技术实现方面,差距还是比较大的。
Filter是依赖于Servlet容器,属于Servlet规范的一部分,而拦截器则是独立存在的,可以在任何情况下使用。
Filter的执行由Servlet容器回调完成,而拦截器通常通过动态代理的方式来执行。
Filter的生命周期由Servlet容器管理,而拦截器则可以通过IOC容器来管理,因此可以通过注入等方式来获取其他Bean的实例,因此使用会更方便。
2. 过滤器的使用
目前为止,SpringMVC中提供了两个过滤器: CharacterEncodingFilter和HiddenHttpMethodFilter
在web.xml中注册时,必须先注册CharacterEncodingFilter,再注册HiddenHttpMethodFilter。
原因:
在CharacterEncodingFilter 中通过 request.setCharacterEncoding(encoding)方法设置字符集的。
request.setCharacterEncoding(encoding)方法要求前面不能有任何获取请求参数的操作。而 HiddenHttpMethodFilter 恰恰有一个获取请求方式的操作。
具体使用见上文
3. 拦截器的使用
SpringMVC中的拦截器用于拦截控制器方法的的执行
3.1 拦截器的配置
SpringMVC中的拦截器需要实现HandlerInterceptor接口
HandlerInterceptor接口
package org.springframework.web.servlet;

import javax.servlet.http.HttpServletRequest;
import javax.servlet.http.HttpServletResponse;
import org.springframework.lang.Nullable;

public interface HandlerInterceptor {


    default boolean preHandle(HttpServletRequest request, HttpServletResponse response, Object handler) throws Exception {


        return true;
    }

    default void postHandle(HttpServletRequest request, HttpServletResponse response, Object handler, @Nullable ModelAndView modelAndView) throws Exception {


    }

    default void afterCompletion(HttpServletRequest request, HttpServletResponse response, Object handler, @Nullable Exception ex) throws Exception {


    }
}
SpringMVC的拦截器必须在SpringMVC的配置文件中进行配置
bean和ref标签所配置的拦截器默认对DispatcherServlet处理的所有的请求进行拦截
<!--配置拦截器-->
    <mvc:interceptors>

        <!--bean和ref标签所配置的拦截器默认对DispatcherServlet处理的所有的请求进行拦截-->
        <!--<bean class="com.fd.springmvc.interceptor.FirstInterceptor"/>-->
        <!--<ref bean="firstInterceptor"></ref>-->

        <!--第三种:自定义请求路径拦截-->
        <mvc:interceptor>
            <!--配置需要拦截的请求的请求路径,/**表示所有请求,/*只表示一层路径下所有请求-->
            <mvc:mapping path="/*"/>
            <!--配置需要排除拦载的请求的请求路径-->
            <mvc:exclude-mapping path="/abc"/>
            <!--配置拦载器-->
            <ref bean="firstInterceptor"/>
        </mvc:interceptor>
    </mvc:interceptors>
3.2 拦截器的三个方法
preHandle(): 在控制器方法执行之前执行,其返回值表示对控制器方法的拦截(false)或放行(true)
postHandle(): 在控制器方法执行之后执行
afterCompletion(): 在控制器方法执行之后,且染视图完毕之后执行
演示案例:
创建拦截器
// 实现HandlerInterceptor接口
@Component
public class FirstInterceptor implements HandlerInterceptor {


    @Override
    public boolean preHandle(HttpServletRequest request, HttpServletResponse response, Object handler) throws Exception {


        System.out.println("FirstInterceptor ---> preHandle");
        return HandlerInterceptor.super.preHandle(request, response, handler);
    }

    @Override
    public void postHandle(HttpServletRequest request, HttpServletResponse response, Object handler, ModelAndView modelAndView) throws Exception {


        System.out.println("FirstInterceptor ---> postHandle");
        HandlerInterceptor.super.postHandle(request, response, handler, modelAndView);
    }

    @Override
    public void afterCompletion(HttpServletRequest request, HttpServletResponse response, Object handler, Exception ex) throws Exception {


        System.out.println("FirstInterceptor ---> afterCompletion");
        HandlerInterceptor.super.afterCompletion(request, response, handler, ex);
    }
}
测试结果:

3.3 多个拦截器的执行顺序
多个拦截器的执行顺序和在SpringMVC的配置文件中配置的顺序有关
preHandle()按照配置的顺序执行,而postHandle()和afterCompletion()按照配置的反序执行
若拦截器中有某个拦截器的preHandle()返回了false
- 拦载器的preHandle()返回false和它之前的拦截器的preHandle()都会执行
- 所有的拦截器的postHandle()都不执行
- 拦截器的preHandle()返回false之前的拦截器的afterCompletion()会执行
演示案例:
创建第二个拦截器
@Component
public class SecondInterceptor implements HandlerInterceptor {


    @Override
    public boolean preHandle(HttpServletRequest request, HttpServletResponse response, Object handler) throws Exception {


        System.out.println("SecondInterceptor ---> preHandle");
        return false;
    }

    @Override
    public void postHandle(HttpServletRequest request, HttpServletResponse response, Object handler, ModelAndView modelAndView) throws Exception {


        System.out.println("SecondInterceptor ---> postHandle");
        HandlerInterceptor.super.postHandle(request, response, handler, modelAndView);
    }

    @Override
    public void afterCompletion(HttpServletRequest request, HttpServletResponse response, Object handler, Exception ex) throws Exception {


        System.out.println("SecondInterceptor ---> afterCompletion");
        HandlerInterceptor.super.afterCompletion(request, response, handler, ex);
    }
}
配置spring-mvc.xml
<!--配置拦截器-->
    <mvc:interceptors>
        <mvc:interceptor>
            <!--配置需要拦截的请求的请求路径,/**表示所有请求,/*只表示一层路径下所有请求-->
            <mvc:mapping path="/*"/>
            <!--配置需要排除拦载的请求的请求路径-->
            <mvc:exclude-mapping path="/abc"/>
            <!--配置拦载器-->
            <ref bean="firstInterceptor"/>
        </mvc:interceptor>

        <bean class="com.fd.springmvc.interceptor.SecondInterceptor"/>
    </mvc:interceptors>
测试结果:

4. 拦截器实现源码解析(了解)
spring-webmvc:5.3.19版本
...
// 前端控制器DispatchServlet的调度操作方法
protected void doDispatch(HttpServletRequest request, HttpServletResponse response) throws Exception {


    HttpServletRequest processedRequest = request;
    HandlerExecutionChain mappedHandler = null;
    boolean multipartRequestParsed = false;
    WebAsyncManager asyncManager = WebAsyncUtils.getAsyncManager(request);

    try {


        try {


            ModelAndView mv = null;
            Exception dispatchException = null;

            try {


                processedRequest = this.checkMultipart(request);
                multipartRequestParsed = processedRequest != request;
                // 获取拦截器的执行链
                mappedHandler = this.getHandler(processedRequest);
                if (mappedHandler == null) {


                    this.noHandlerFound(processedRequest, response);
                    return;
                }

                HandlerAdapter ha = this.getHandlerAdapter(mappedHandler.getHandler());
                String method = request.getMethod();
                boolean isGet = HttpMethod.GET.matches(method);
                if (isGet || HttpMethod.HEAD.matches(method)) {


                    long lastModified = ha.getLastModified(request, mappedHandler.getHandler());
                    if ((new ServletWebRequest(request, response)).checkNotModified(lastModified) && isGet) {


                        return;
                    }
                }
                // 执行拦截器的preHandle方法,如果方法返回false,直接结束方法
                if (!mappedHandler.applyPreHandle(processedRequest, response)) {


                    return;
                }
                // 执行控制器方法
                mv = ha.handle(processedRequest, response, mappedHandler.getHandler());
                if (asyncManager.isConcurrentHandlingStarted()) {


                    return;
                }

                this.applyDefaultViewName(processedRequest, mv);
                // 执行拦截器的postHandle方法
                mappedHandler.applyPostHandle(processedRequest, response, mv);
            } catch (Exception var20) {


                dispatchException = var20;
            } catch (Throwable var21) {


                dispatchException = new NestedServletException("Handler dispatch failed", var21);
            }
            // 处理前端控制器调度结果
            this.processDispatchResult(processedRequest, response, mappedHandler, mv, (Exception)dispatchException);
        } catch (Exception var22) {


            this.triggerAfterCompletion(processedRequest, response, mappedHandler, var22);
        } catch (Throwable var23) {


            this.triggerAfterCompletion(processedRequest, response, mappedHandler, new NestedServletException("Handler processing failed", var23));
        }

    } finally {


        if (asyncManager.isConcurrentHandlingStarted()) {


            if (mappedHandler != null) {


                // 执行拦截器的afterCompletion方法
                mappedHandler.applyAfterConcurrentHandlingStarted(processedRequest, response);
            }
        } else if (multipartRequestParsed) {


            this.cleanupMultipart(processedRequest);
        }

    }
}

// 处理前端控制器调度结果的方法
private void processDispatchResult(HttpServletRequest request, HttpServletResponse response, @Nullable HandlerExecutionChain mappedHandler, @Nullable ModelAndView mv, @Nullable Exception exception) throws Exception {


    boolean errorView = false;
    if (exception != null) {


        if (exception instanceof ModelAndViewDefiningException) {


            this.logger.debug("ModelAndViewDefiningException encountered", exception);
            mv = ((ModelAndViewDefiningException)exception).getModelAndView();
        } else {


            Object handler = mappedHandler != null ? mappedHandler.getHandler() : null;
            mv = this.processHandlerException(request, response, handler, exception);
            errorView = mv != null;
        }
    }

    if (mv != null && !mv.wasCleared()) {


        // 渲染视图
        this.render(mv, request, response);
        if (errorView) {


            WebUtils.clearErrorRequestAttributes(request);
        }
    } else if (this.logger.isTraceEnabled()) {


        this.logger.trace("No view rendering, null ModelAndView returned.");
    }

    if (!WebAsyncUtils.getAsyncManager(request).isConcurrentHandlingStarted()) {


        if (mappedHandler != null) {


            // 执行拦截器的afterCompletion方法
            mappedHandler.triggerAfterCompletion(request, response, (Exception)null);
        }

    }
}
HandlerExecutionChain类
// 拦截器的处理链
public class HandlerExecutionChain {


    // 控制器执行前的拦截器方法preHandle
    boolean applyPreHandle(HttpServletRequest request, HttpServletResponse response) throws Exception {


        // preHandle()按照配置的顺序执行
        for(int i = 0; i < this.interceptorList.size(); this.interceptorIndex = i++) {


            HandlerInterceptor interceptor = (HandlerInterceptor)this.interceptorList.get(i);
            // 如果preHandle返回false
            if (!interceptor.preHandle(request, response, this.handler)) {


                // 执行拦截器的AfterCompletion方法
                this.triggerAfterCompletion(request, response, (Exception)null);
                return false;
            }
        }

        return true;
    }

    // postHandle方法
    void applyPostHandle(HttpServletRequest request, HttpServletResponse response, @Nullable ModelAndView mv) throws Exception {


        // postHandle()和afterCompletion()按照配置的反序执行
        for(int i = this.interceptorList.size() - 1; i >= 0; --i) {


            HandlerInterceptor interceptor = (HandlerInterceptor)this.interceptorList.get(i);
            interceptor.postHandle(request, response, this.handler, mv);
        }
    }

    // afterCompletion方法
    void triggerAfterCompletion(HttpServletRequest request, HttpServletResponse response, @Nullable Exception ex) {


        // postHandle()和afterCompletion()按照配置的反序执行
        for(int i = this.interceptorIndex; i >= 0; --i) {


            HandlerInterceptor interceptor = (HandlerInterceptor)this.interceptorList.get(i);

            try {


                interceptor.afterCompletion(request, response, this.handler, ex);
            } catch (Throwable var7) {


                logger.error("HandlerInterceptor.afterCompletion threw exception", var7);
            }
        }
    }
}
九、异常处理器
SpringMVC在处理请求过程中出现异常信息交由异常处理器进行处理,通过实现HandlerExceptionResolver接口可以实现一个系统的异常处理逻辑。
1. SpringMVC自带的异常处理器SimpleMappingExceptionResolver
1.1 基于配置的异常处理
在spring-mvc.xml中配置异常处理bean
<!--配置自定义异常处理,使用SpringMVC自带的SimpleMappingExceptionResolver-->
    <bean class="org.springframework.web.servlet.handler.SimpleMappingExceptionResolver">
        <!--异常映射到指定逻辑试图-->
        <property name="exceptionMappings">
            <props>
                <!--key设置要处理的异常,value设置出现该异常时要跳转的页面所对应的逻辑视图-->
                <prop key="ArithmeticException">error</prop>
            </props>
        </property>
        <!--设置异常信息共享在请求域中,value为请求域的异常信息的属性名-->
        <property name="exceptionAttribute" value="ex"></property>
    </bean>
案例演示:
控制器方法:
@Controller
public class TestController {


    @RequestMapping("/test")
    public String testInterceptor() {


        System.out.println(1/0);
        return "success";
    }
}
error视图
<!DOCTYPE html>
<html lang="en" xmlns: th="http://www.thymeleaf.org">
<head>
    <meta charset="UTF-8">
    <title>错误</title>
</head>
<body>

<h1>error.html</h1>

<p th:text="${ex}"></p>
</body>
</html>
控制器报ArithmeticException异常触发异常处理器,跳转到error逻辑视图,并向浏览器返回异常信息
1.2 基于注解的异常处理
创建异常处理组件类,通过@ControllerAdvice注解进行标记,触发异常时将会执行组件内相关异常处理方法
package com.fd.springmvc.controller;

import org.springframework.ui.Model;
import org.springframework.web.bind.annotation.ControllerAdvice;
import org.springframework.web.bind.annotation.ExceptionHandler;

//将当前类标识为异常处理的组件
@ControllerAdvice
public class ExceptionController {


    //设置要处理的异常信息
    @ExceptionHandler(ArithmeticException.class)
    public String error(Throwable ex, Model model) {


        //ex表示控制器方法所出现的异常
        model.addAttribute("ex", ex);
        return "error";
    }
}
1.3 源码解析
SimpleMappingExceptionResolver类继承AbstractHandlerExceptionResolver
public class SimpleMappingExceptionResolver extends AbstractHandlerExceptionResolver {


	...
	// 异常处理方法
	@Nullable
    protected ModelAndView doResolveException(HttpServletRequest request, HttpServletResponse response, @Nullable Object handler, Exception ex) {


    	// 获取异常逻辑视图
        String viewName = this.determineViewName(ex, request);
        if (viewName != null) {


            Integer statusCode = this.determineStatusCode(request, viewName);
            if (statusCode != null) {


                this.applyStatusCodeIfPossible(request, response, statusCode);
            }

            return this.getModelAndView(viewName, ex, request);
        } else {


            return null;
        }
    }

}
AbstractHandlerExceptionResolver类实现HandlerExceptionResolver接口
public abstract class AbstractHandlerExceptionResolver implements HandlerExceptionResolver, Ordered {


	...

	@Nullable
    public ModelAndView resolveException(HttpServletRequest request, HttpServletResponse response, @Nullable Object handler, Exception ex) {


        if (!this.shouldApplyTo(request, handler)) {


            return null;
        } else {


            this.prepareResponse(ex, response);
            // 执行异常处理的方法,抽象方法由子类实现
            ModelAndView result = this.doResolveException(request, response, handler, ex);
            if (result != null) {


                if (this.logger.isDebugEnabled() && (this.warnLogger == null || !this.warnLogger.isWarnEnabled())) {


                    this.logger.debug(this.buildLogMessage(ex, request) + (result.isEmpty() ? "" : " to " + result));
                }

                this.logException(ex, request);
            }

            return result;
        }
    }

	@Nullable
    protected abstract ModelAndView doResolveException(HttpServletRequest request, HttpServletResponse response, @Nullable Object handler, Exception ex);
}
2. 自定义异常处理器
实现HandlerExceptionResolver接口
public class CustomHandleException implements HandlerExceptionResolver {


    @Override
    public ModelAndView resolveException(HttpServletRequest request, HttpServletResponse response, Object handler,
                                         Exception exception) {


        // 定义异常信息
        String msg;

        // 判断异常类型
        if (exception instanceof MyException) {


            // 如果是自定义异常,读取异常信息
            msg = exception.getMessage();
        } else {


            // 如果是运行时异常,则取错误堆栈,从堆栈中获取异常信息
            Writer out = new StringWriter();
            PrintWriter s = new PrintWriter(out);
            exception.printStackTrace(s);
            msg = out.toString();
        }

        // 返回错误页面,页面显示错误信息
        ModelAndView modelAndView = new ModelAndView();
        modelAndView.addObject("ex", msg);
        modelAndView.setViewName("error");

        return modelAndView;
    }
}
在spring-mvc.xml中添加:
<!--自定义异常处理器-->
<bean class="com.fd.springmvc.handler.CustomHandleException" id="customHandleException"/>
3. 异常处理源码解析(了解)
spring-webmvc:5.3.19版本
public class DispatcherServlet extends FrameworkServlet {


    @Nullable
    private List<HandlerExceptionResolver> handlerExceptionResolvers; //异常处理器

    ...

    protected void doDispatch(HttpServletRequest request, HttpServletResponse response) throws Exception {


        HttpServletRequest processedRequest = request;
        HandlerExecutionChain mappedHandler = null;
        boolean multipartRequestParsed = false;
        WebAsyncManager asyncManager = WebAsyncUtils.getAsyncManager(request);

        try {


            try {


                ModelAndView mv = null;
                Exception dispatchException = null;

                try {


                    processedRequest = this.checkMultipart(request);
                    multipartRequestParsed = processedRequest != request;
                    mappedHandler = this.getHandler(processedRequest);
                    if (mappedHandler == null) {


                        this.noHandlerFound(processedRequest, response);
                        return;
                    }

                    HandlerAdapter ha = this.getHandlerAdapter(mappedHandler.getHandler());
                    String method = request.getMethod();
                    boolean isGet = HttpMethod.GET.matches(method);
                    if (isGet || HttpMethod.HEAD.matches(method)) {


                        long lastModified = ha.getLastModified(request, mappedHandler.getHandler());
                        if ((new ServletWebRequest(request, response)).checkNotModified(lastModified) && isGet) {


                            return;
                        }
                    }

                    if (!mappedHandler.applyPreHandle(processedRequest, response)) {


                        return;
                    }
                    // 执行控制器方法
                    mv = ha.handle(processedRequest, response, mappedHandler.getHandler());
                    if (asyncManager.isConcurrentHandlingStarted()) {


                        return;
                    }

                    this.applyDefaultViewName(processedRequest, mv);
                    mappedHandler.applyPostHandle(processedRequest, response, mv);
                } catch (Exception var20) {


                    dispatchException = var20;
                } catch (Throwable var21) {


                    dispatchException = new NestedServletException("Handler dispatch failed", var21);
                }
                // 处理控制器方法结果,如果上面方法报错,则dispatchException不为null
                this.processDispatchResult(processedRequest, response, mappedHandler, mv, (Exception)dispatchException);
            } catch (Exception var22) {


                this.triggerAfterCompletion(processedRequest, response, mappedHandler, var22);
            } catch (Throwable var23) {


                this.triggerAfterCompletion(processedRequest, response, mappedHandler, new NestedServletException("Handler processing failed", var23));
            }

        } finally {


            if (asyncManager.isConcurrentHandlingStarted()) {


                if (mappedHandler != null) {


                    mappedHandler.applyAfterConcurrentHandlingStarted(processedRequest, response);
                }
            } else if (multipartRequestParsed) {


                this.cleanupMultipart(processedRequest);
            }

        }
    }
}

// 处理前端控制器调度结果的方法
private void processDispatchResult(HttpServletRequest request, HttpServletResponse response, @Nullable HandlerExecutionChain mappedHandler, @Nullable ModelAndView mv, @Nullable Exception exception) throws Exception {


    boolean errorView = false;
    if (exception != null) {


        if (exception instanceof ModelAndViewDefiningException) {


            this.logger.debug("ModelAndViewDefiningException encountered", exception);
            mv = ((ModelAndViewDefiningException)exception).getModelAndView();
        } else {


            // 执行异常处理方法
            Object handler = mappedHandler != null ? mappedHandler.getHandler() : null;
            mv = this.processHandlerException(request, response, handler, exception);
            errorView = mv != null;
        }
    }

    if (mv != null && !mv.wasCleared()) {


        // 渲染视图
        this.render(mv, request, response);
        if (errorView) {


            WebUtils.clearErrorRequestAttributes(request);
        }
    } else if (this.logger.isTraceEnabled()) {


        this.logger.trace("No view rendering, null ModelAndView returned.");
    }

    if (!WebAsyncUtils.getAsyncManager(request).isConcurrentHandlingStarted()) {


        if (mappedHandler != null) {


            // 执行拦截器的afterCompletion方法
            mappedHandler.triggerAfterCompletion(request, response, (Exception)null);
        }

    }

    // 异常处理方法
    @Nullable
    protected ModelAndView processHandlerException(HttpServletRequest request, HttpServletResponse response, @Nullable Object handler, Exception ex) throws Exception {


        request.removeAttribute(HandlerMapping.PRODUCIBLE_MEDIA_TYPES_ATTRIBUTE);
        ModelAndView exMv = null;
        if (this.handlerExceptionResolvers != null) {


            Iterator var6 = this.handlerExceptionResolvers.iterator();

            while(var6.hasNext()) {


                HandlerExceptionResolver resolver = (HandlerExceptionResolver)var6.next();
                // 执行具体实现的异常处理方法
                exMv = resolver.resolveException(request, response, handler, ex);
                if (exMv != null) {


                    break;
                }
            }
        }
        // 异常逻辑视图
        if (exMv != null) {


            if (exMv.isEmpty()) {


                request.setAttribute(EXCEPTION_ATTRIBUTE, ex);
                return null;
            } else {


                if (!exMv.hasView()) {


                    String defaultViewName = this.getDefaultViewName(request);
                    if (defaultViewName != null) {


                        exMv.setViewName(defaultViewName);
                    }
                }

                if (this.logger.isTraceEnabled()) {


                    this.logger.trace("Using resolved error view: " + exMv, ex);
                } else if (this.logger.isDebugEnabled()) {


                    this.logger.debug("Using resolved error view: " + exMv);
                }

                WebUtils.exposeErrorRequestAttributes(request, ex, this.getServletName());
                return exMv;
            }
        } else {


            throw ex;
        }
    }
}
十、注解配置SpringMVC
使用配置类和注解代替web.xml和SpringMVC配置文件的功能
1. 创建初始化类,代替web.xml
在Servlet3.0环境中,容器会在类路径中查找实现javax.servlet.ServletContainerlnitializer接口的类,如果找到的话就用它来配置Servlet容器。
Spring提供了这个接口的实现,名为SpringServletContainerlnitializer,这个类反过来又会查找实现WebApplicationlnitializer的类并将配置的任务交给它们来完成。Spring3.2引入了一个便利的WebApplicationlnitializer基础实现,名为AbstractAnnotationConfigDispatcherServletlnitializer,当我们的类扩展了AbstractAnnotationConfigDispatcherServletlnitializer并将其部署到Servlet3.0容器的时候,容器会自动发现它,并用它来配置Servlet上下文
// 代替web.xml
public class WebInit extends AbstractAnnotationConfigDispatcherServletInitializer {


    //设置一个配置类代替spring的配置文件
    @Override
    protected Class<?>[] getRootConfigClasses() {


        return new Class[]{

    SpringConfig.class};
    }

    //设置一个配置类代替springMVC的配置文件
    @Override
    protected Class<?>[] getServletConfigClasses() {


        return new Class[]{

    WebConfig.class};
    }

    //设置springMVC的前端控制器DispatcherServlet的urL-pattern
    @Override
    protected String[] getServletMappings() {


        return new String[]{

    "/"};
    }

    //设置过滤器
    @Override
    protected Filter[] getServletFilters() {


        // 设置编码过滤器
        CharacterEncodingFilter characterEncodingFilter = new CharacterEncodingFilter();
        characterEncodingFilter.setEncoding("UTF-8");
        characterEncodingFilter.setForceEncoding(true);
        // 设置处理请求方式的过滤器
        HiddenHttpMethodFilter hiddenHttpMethodFilter = new HiddenHttpMethodFilter();
        return new Filter[]{

    characterEncodingFilter, hiddenHttpMethodFilter};
    }
}
2. 创建SpringConfig配置类,代替Spring的配置文件
/*代替Spring.xml配置文件*/

@Configuration //将类标识为配置类
@ComponentScan(value = "com.fd.springMVC")
public class SpringConfig {


}
3. 创建WebConfig配置类,代替SpringMVC的配置文件
/*
    代替Spring-mvc.xml配置文件

    扫描组件、视图解析器、默认的servlet、mvc的注解驱动、视图控制器、文件上传解析器、拦截器、异常解析器
* */

@Configuration //将类标识为配置类
@ComponentScan("com.fd.springMVC.controller") // 开启扫描组件
@EnableWebMvc // 开启mvc注解驱动
public class WebConfig implements WebMvcConfigurer {


    @Override
    // 设置默认的Servlet,处理静态资源
    public void configureDefaultServletHandling(DefaultServletHandlerConfigurer configurer) {


        configurer.enable();
    }

    @Override
    // 配置视图控制器
    public void addViewControllers(ViewControllerRegistry registry) {


        registry.addViewController("/").setViewName("index");
    }

    // @Bean注解修饰的方法返回对象可以被SpringIOC管理,bean的id为方法的方法名
    @Bean
    // 配置文件上传解析器
    public CommonsMultipartResolver multipartResolver() {


        // 默认编码格式为UTF-8
        return new CommonsMultipartResolver();
    }

    @Override
    // 配置拦截器
    public void addInterceptors(InterceptorRegistry registry) {


        FirstInterceptor firstInterceptor = new FirstInterceptor();
        // 添加拦截器,设置拦截的路径和排除的路径
        registry.addInterceptor(firstInterceptor).addPathPatterns("/**").excludePathPatterns("/abc");
    }

    // 配置异常处理
    @Override
    public void configureHandlerExceptionResolvers(List<HandlerExceptionResolver> resolvers) {


        SimpleMappingExceptionResolver simpleMappingExceptionResolver = new SimpleMappingExceptionResolver();
        Properties properties = new Properties();
        // 添加异常错误类型,以及出现该异常时要跳转的页面所对应的逻辑视图
        properties.setProperty("java.lang.ArithmeticException", "error");
        simpleMappingExceptionResolver.setExceptionMappings(properties);
        // 设置异常信息共享在请求域中的异常信息属性名“ex”
        simpleMappingExceptionResolver.setExceptionAttribute("ex");
        // 添加异常处理解析器
        resolvers.add(simpleMappingExceptionResolver);
    }

    // 配置生成模板解析器
    @Bean
    public ITemplateResolver templateResolver() {


        WebApplicationContext webApplicationContext = ContextLoader.getCurrentWebApplicationContext();
        // ServletContextTemplateResolver需要一个servletContext作为构造参数,可以通过WebApplicationContext获取
        ServletContextTemplateResolver templateResolver = new ServletContextTemplateResolver(webApplicationContext.getServletContext());
        templateResolver.setCharacterEncoding("UTF-8");
        templateResolver.setPrefix("/WEB-INF/templates/");
        templateResolver.setSuffix(".html");
        templateResolver.setTemplateMode(TemplateMode.HTML);
        return templateResolver;
    }

    // 生成模板引擎并为模板引擎注入模板解析器
    @Bean // @Bean注解修饰的方法返回对象可以被SpringIOC管理,bean的id为方法的方法名
    public SpringTemplateEngine templateEngine(ITemplateResolver templateResolver) {

     // 注入Bean的同时为bean的属性赋值可以设置在bean方法的参数里,相当于引用赋值
        SpringTemplateEngine springTemplateEngine = new SpringTemplateEngine();
        springTemplateEngine.setTemplateResolver(templateResolver);
        return springTemplateEngine;
    }

    //生成视图解析器并为解析器注入模板引擎
    @Bean // @Bean注解修饰的方法返回对象可以被SpringIOC管理,bean的id为方法的方法名
    public ViewResolver viewResolver(SpringTemplateEngine templateEngine) {

     // 注入Bean的同时为bean的属性赋值可以设置在bean方法的参数里,相当于引用赋值,要求:参数名需要和引用的bean的id相同
        ThymeleafViewResolver viewResolver = new ThymeleafViewResolver();
        viewResolver.setCharacterEncoding("UTF-8");
        viewResolver.setOrder(1);
        // 设置模板引擎
        viewResolver.setTemplateEngine(templateEngine);
        return viewResolver;
    }
}
十一、SpringMVC执行流程
1. SpringMVC常用组件
- DispatcherServlet: 前端控制器,不需要工程师开发,由框架提供
作用:统一处理请求和响应,整个流程控制的中心,由它调用其它组件处理用户的请求。 - HandlerMapping: 处理器映射器,不需要工程师开发,由框架提供
作用: 根据请求的url、method等信息查找Handler,即控制器方法。 - Handler:处理器(开发人员创建的控制器方法),需要工程师开发
作用:在DispatcherServlet的控制下Handler对具体的用户请求进行处理。 - HandlerAdapter: 处理器适配器,不需要工程师开发,由框架提供
作用:通过HandlerAdapter对处理器(控制器方法)进行执行 - ViewResolver: 视图解析器,不需要工程师开发,由框架提供
作用: 进行视图解析,得到相应的视图,例如: ThymeleafView、InternalResourceView、RedirectView - View: 视图页面
作用:将模型数据通过页面展示给用户
2. DispatcherServlet初始化过程
DispatcherServlet 本质上是一个Servlet,所以天然的遵循 Servlet 的生命周期。所以宏观上是 Servlet 生命周期来进行调度。
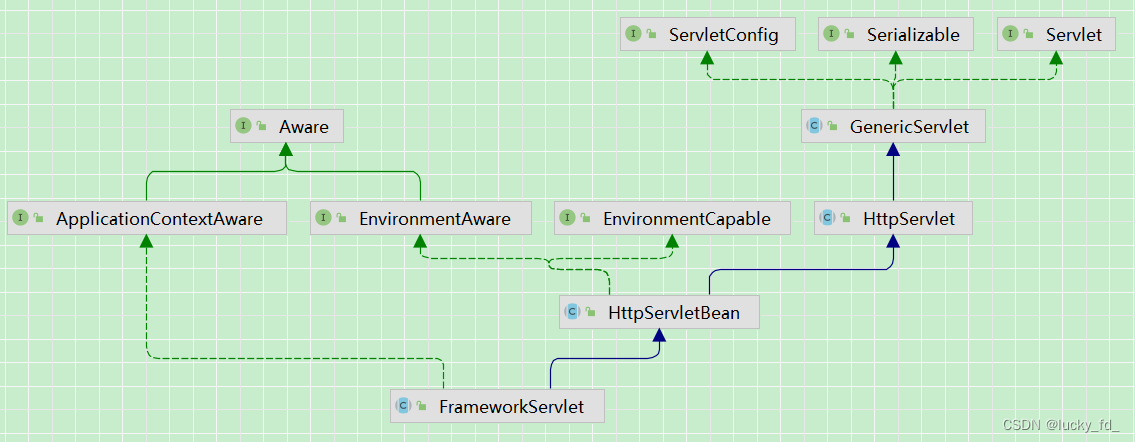
2.1 初始化WebApplicationContext
所在类: org.springframework.web.servlet.FrameworkServlet
2.2 创建WebApplicationContext
所在类:org.springframework.web.servletFrameworkServlet
2.3 DispatcherServlet初始化策略
FrameworkServlet创建WebApplicationContext后,刷新容器,调用onRefresh(wac),此方法在DispatcherServlet中进行了重写,调用了initStrategies(context)方法,初始化策略,即初始化DispatcherServlet的各个组件
所在类: org.springframework.web.servlet.DispatcherServlet
2.4 源码继承调用解析
public interface Servlet {


    // 初始化方法
    void init(ServletConfig var1);
    // 执行方法
    void service(ServletRequest var1, ServletResponse var2);
}

public abstract class GenericServlet implements Servlet {


    public void init(ServletConfig config) throws ServletException {


        this.config = config;
        this.init();
    }

    public void init() throws ServletException {


    }
}

public abstract class HttpServlet extends GenericServlet {


}

public abstract class HttpServletBean extends HttpServlet {


    public final void init() throws ServletException {


        PropertyValues pvs = new ServletConfigPropertyValues(this.getServletConfig(), this.requiredProperties);
        ...
        this.initServletBean();
    }

    protected void initServletBean() throws ServletException {


    }
}

public abstract class FrameworkServlet extends HttpServletBean {


    protected final void initServletBean() throws ServletException {


        ...
        try {


            this.webApplicationContext = this.initWebApplicationContext();
            this.initFrameworkServlet();
        } catch (RuntimeException | ServletException var4) {


            this.logger.error("Context initialization failed", var4);
            throw var4;
        }
        ...
    }

    protected WebApplicationContext initWebApplicationContext() {


        // 获取父级容器(Spring容器)
        WebApplicationContext rootContext = WebApplicationContextUtils.getWebApplicationContext(this.getServletContext());
        WebApplicationContext wac = null;
        if (this.webApplicationContext != null) {


            wac = this.webApplicationContext;
            if (wac instanceof ConfigurableWebApplicationContext) {


                ConfigurableWebApplicationContext cwac = (ConfigurableWebApplicationContext)wac;
                if (!cwac.isActive()) {


                    if (cwac.getParent() == null) {


                        cwac.setParent(rootContext);
                    }
                    this.configureAndRefreshWebApplicationContext(cwac);
                }
            }
        }

        if (wac == null) {


            wac = this.findWebApplicationContext();
        }
        // 创建容器
        if (wac == null) {


            wac = this.createWebApplicationContext(rootContext);
        }
        // 刷新容器
        if (!this.refreshEventReceived) {


            synchronized(this.onRefreshMonitor) {


                this.onRefresh(wac);
            }
        }

        if (this.publishContext) {


            String attrName = this.getServletContextAttributeName();
            this.getServletContext().setAttribute(attrName, wac);
        }
        return wac;
    }

    protected void onRefresh(ApplicationContext context) {


    }
}

public class DispatcherServlet extends FrameworkServlet {


    protected void onRefresh(ApplicationContext context) {


        this.initStrategies(context);
    }
    // 初始化SpringMVC组件
    protected void initStrategies(ApplicationContext context) {


        this.initMultipartResolver(context);
        this.initLocaleResolver(context);
        this.initThemeResolver(context);
        this.initHandlerMappings(context);
        this.initHandlerAdapters(context);
        this.initHandlerExceptionResolvers(context);
        this.initRequestToViewNameTranslator(context);
        this.initViewResolvers(context);
        this.initFlashMapManager(context);
    }
}
3. DispatcherServlet调用组件处理请求
3.1 processRequest()
FrameworkServlet重写HttpServlet中的service和doXxx(),这些方法中调用了processRequest(request,response)
所在类: org.springframework.web.servlet.FrameworkServlet
3.2 doService()
所在类: orgspringframework.web.servlet.DispatcherServlet
3.3 doDispatch()
所在类:orgspringframework.web.servlet.DispatcherServlet
3.4 processDispatchResult()
3.5 源码继承调用解析
public interface Servlet {


    // 初始化方法
    void init(ServletConfig var1);
    // 执行方法
    void service(ServletRequest var1, ServletResponse var2);
}

public abstract class GenericServlet implements Servlet {


    public abstract void service(ServletRequest var1, ServletResponse var2) throws ServletException, IOException;
}

public abstract class HttpServlet extends GenericServlet {


    public void service(ServletRequest req, ServletResponse res) throws ServletException, IOException {


        HttpServletRequest request;
        HttpServletResponse response;
        try {


            request = (HttpServletRequest)req;
            response = (HttpServletResponse)res;
        } catch (ClassCastException var6) {


            throw new ServletException("non-HTTP request or response");
        }

        this.service(request, response);
    }

    protected void service(HttpServletRequest req, HttpServletResponse resp) throws ServletException, IOException {


        String method = req.getMethod();
        long lastModified;
        if (method.equals("GET")) {


            lastModified = this.getLastModified(req);
            if (lastModified == -1L) {


                this.doGet(req, resp);
            } else {


                long ifModifiedSince = req.getDateHeader("If-Modified-Since");
                if (ifModifiedSince < lastModified / 1000L * 1000L) {


                    this.maybeSetLastModified(resp, lastModified);
                    this.doGet(req, resp);
                } else {


                    resp.setStatus(304);
                }
            }
        } else if (method.equals("HEAD")) {


            lastModified = this.getLastModified(req);
            this.maybeSetLastModified(resp, lastModified);
            this.doHead(req, resp);
        } else if (method.equals("POST")) {


            this.doPost(req, resp);
        } else if (method.equals("PUT")) {


            this.doPut(req, resp);
        } else if (method.equals("DELETE")) {


            this.doDelete(req, resp);
        } else if (method.equals("OPTIONS")) {


            this.doOptions(req, resp);
        } else if (method.equals("TRACE")) {


            this.doTrace(req, resp);
        } else {


            String errMsg = lStrings.getString("http.method_not_implemented");
            Object[] errArgs = new Object[]{

    method};
            errMsg = MessageFormat.format(errMsg, errArgs);
            resp.sendError(501, errMsg);
        }
    }
}

public abstract class HttpServletBean extends HttpServlet {


}

public abstract class FrameworkServlet extends HttpServletBean {


    protected void service(HttpServletRequest request, HttpServletResponse response) throws ServletException, IOException {


        HttpMethod httpMethod = HttpMethod.resolve(request.getMethod());
        if (httpMethod != HttpMethod.PATCH && httpMethod != null) {


            super.service(request, response);
        } else {


            this.processRequest(request, response);
        }
    }

    protected final void doGet(HttpServletRequest request, HttpServletResponse response) throws ServletException, IOException {


        this.processRequest(request, response);
    }

    protected final void doPost(HttpServletRequest request, HttpServletResponse response) throws ServletException, IOException {


        this.processRequest(request, response);
    }

    protected final void doPut(HttpServletRequest request, HttpServletResponse response) throws ServletException, IOException {


        this.processRequest(request, response);
    }

    protected final void doDelete(HttpServletRequest request, HttpServletResponse response) throws ServletException, IOException {


        this.processRequest(request, response);
    }

    protected final void processRequest(HttpServletRequest request, HttpServletResponse response) throws ServletException, IOException {


        ...
        try {


            this.doService(request, response);
        }
        ...
    }
}

public class DispatcherServlet extends FrameworkServlet {


    protected void doService(HttpServletRequest request, HttpServletResponse response) throws Exception {


        ...
        try {


            this.doDispatch(request, response);
        }
        ...
    }
    // 处理请求执行方法
    protected void doDispatch(HttpServletRequest request, HttpServletResponse response) throws Exception {


        ...
        try {


            try {


                ModelAndView mv = null;
                Exception dispatchException = null;

                try {


                    processedRequest = this.checkMultipart(request);
                    multipartRequestParsed = processedRequest != request;
                    mappedHandler = this.getHandler(processedRequest);
                    if (mappedHandler == null) {


                        this.noHandlerFound(processedRequest, response);
                        return;
                    }
                    // 获取处理适配器
                    HandlerAdapter ha = this.getHandlerAdapter(mappedHandler.getHandler());
                    String method = request.getMethod();
                    boolean isGet = HttpMethod.GET.matches(method);
                    if (isGet || HttpMethod.HEAD.matches(method)) {


                        long lastModified = ha.getLastModified(request, mappedHandler.getHandler());
                        if ((new ServletWebRequest(request, response)).checkNotModified(lastModified) && isGet) {


                            return;
                        }
                    }
                    // 执行拦截器的preHandle方法
                    if (!mappedHandler.applyPreHandle(processedRequest, response)) {


                        return;
                    }
                    // 执行控制器方法
                    mv = ha.handle(processedRequest, response, mappedHandler.getHandler());
                    if (asyncManager.isConcurrentHandlingStarted()) {


                        return;
                    }

                    this.applyDefaultViewName(processedRequest, mv);
                    mappedHandler.applyPostHandle(processedRequest, response, mv);
                } catch (Exception var20) {


                    dispatchException = var20;
                } catch (Throwable var21) {


                    dispatchException = new NestedServletException("Handler dispatch failed", var21);
                }
                // // 处理前端控制器调度结果的方法, 如果出现异常走异常处理器
                this.processDispatchResult(processedRequest, response, mappedHandler, mv, (Exception)dispatchException);
            } catch (Exception var22) {


                this.triggerAfterCompletion(processedRequest, response, mappedHandler, var22);
            } catch (Throwable var23) {


                this.triggerAfterCompletion(processedRequest, response, mappedHandler, new NestedServletException("Handler processing failed", var23));
            }

        } finally {


            if (asyncManager.isConcurrentHandlingStarted()) {


                if (mappedHandler != null) {


                    mappedHandler.applyAfterConcurrentHandlingStarted(processedRequest, response);
                }
            } else if (multipartRequestParsed) {


                this.cleanupMultipart(processedRequest);
            }

        }
    }
}
4. SpringMVC的执行流程
1)用户向服务器发送请求,请求被SpringMVC 前端控制器 DispatcherServlet捕获
2)DispatcherServlet对请求URL进行解析,得到请求资源标识符(URI),判断请求URI对应的映射:
a)不存在
i.再判断是否配置了mvc:default-servlet-handler
ii.如果没配置,则控制台报映射查找不到,客户端展示404错误
iii.如果有配置,则访问目标资源(一般为静态资源,如: JS,CSS,HTML),找不到客户端也会展示404错误
b)存在则执行下面的流程
3)根据该URL,调用HandlerMapping获得该Handler配置的所有相关的对象 (包括Handler对象以及Handler对象对应的拦截器),最后以HandlerExecutionChain执行链对象的形式返回。
4)DispatcherServlet 根据获得的Handler,选择一个合适的HandlerAdapter。
5)如果成功获得HandlerAdapter,此时将开始执行拦截器的preHandler(…)方法[正向]
6)提取Request中的模型数据,填充Handler入参,开始执行Handler (Controller)方法,处理请求。在填充Handler的入参过程中,根据你的配置,Spring将帮你做一些额外的工作:
a)HttpMessageConveter: 将请求消息(如json、xml等数据)转换成一个对象,将对象转换为指定的响应信息
b)数据转换:对请求消息进行数据转换。如String转换成Integer、Double等
c)数据格式化:对请求消息进行数据格式化。 如将字符串转换成格式化数字或格式化日期等
d)数据验证: 验证数据的有效性(长度、格式等),验证结果存储到BindingResult或Error中
7)Handler执行完成后,向DispatcherServlet 返回一个ModelAndView对象
8)此时将开始执行拦截器的postHandle(…)方法[逆向]
9)根据返回的ModelAndView (此时会判断是否存在异常: 如果存在异常,则执行HandlerExceptionResolver进行异常处理)选择一个适合的ViewResolver进行视图解析,根据Model和View,来渲染视图。
10)渣染视图完毕执行拦截器的afterCompletion(…)方法[逆向]。
11)将渲染结果返回给客户端
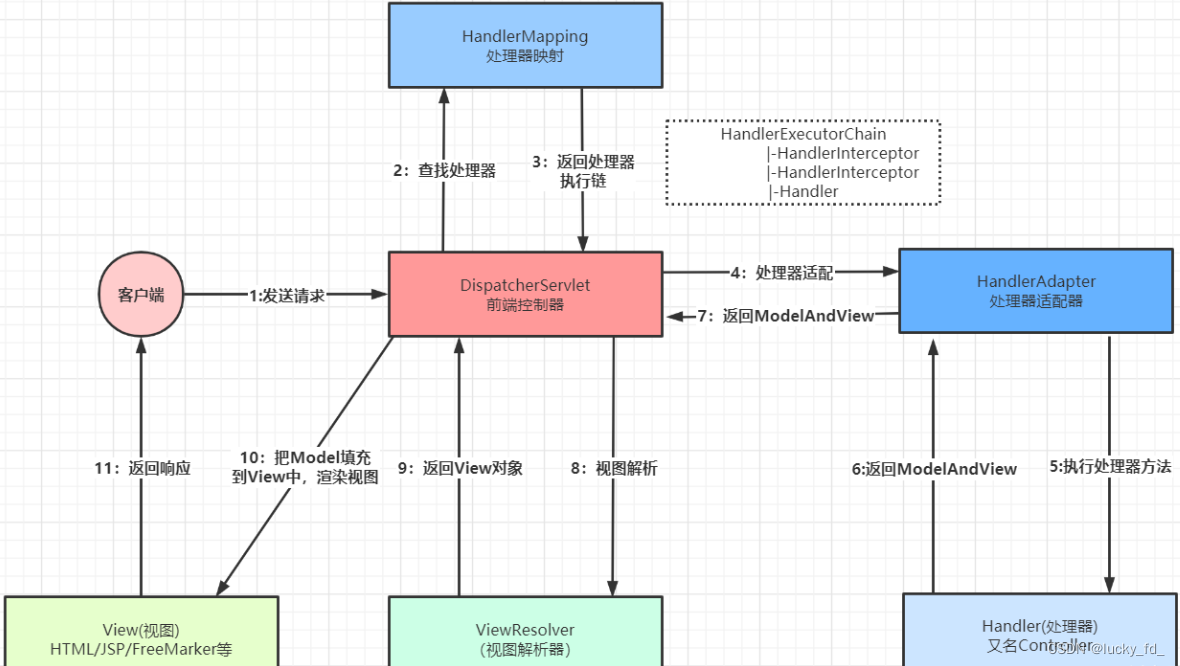
上图是在网上看到的觉得很形象就借用过来了,原图作者:云川之下
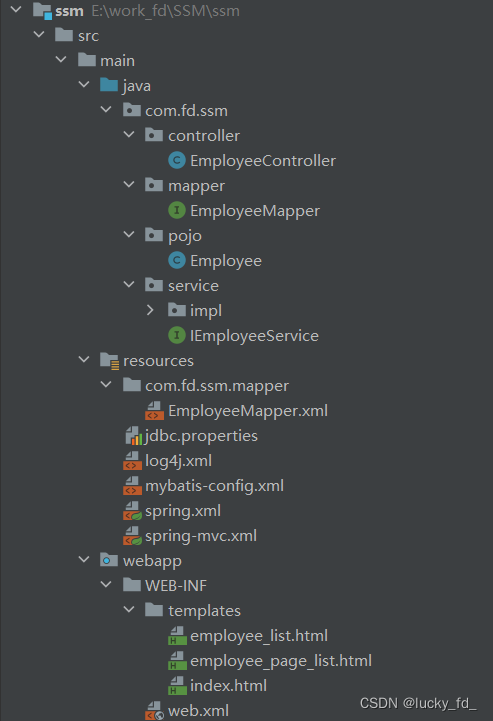
十二、SSM整合练习
项目结构
1. 引入依赖
<!--统一管理依赖版本-->
    <properties>
        <spring-version>5.3.19</spring-version>
    </properties>

    <dependencies>
        <!--Spring上下文依赖-->
        <dependency>
            <groupId>org.springframework</groupId>
            <artifactId>spring-context</artifactId>
            <version>${spring-version}</version>
        </dependency>
        <!--SpringMVC相关依赖-->
        <dependency>
            <groupId>org.springframework</groupId>
            <artifactId>spring-webmvc</artifactId>
            <version>${spring-version}</version>
        </dependency>
        <!--事务管理器datasource相关包依赖-->
        <dependency>
            <groupId>org.springframework</groupId>
            <artifactId>spring-jdbc</artifactId>
            <version>${spring-version}</version>
        </dependency>
        <dependency>
            <groupId>org.springframework</groupId>
            <artifactId>spring-aop</artifactId>
            <version>${spring-version}</version>
        </dependency>
        <!--spring整合junit的依赖-->
        <dependency>
            <groupId>org.springframework</groupId>
            <artifactId>spring-test</artifactId>
            <version>${spring-version}</version>
        </dependency>
        <!--mybatis核心依赖-->
        <dependency>
            <groupId>org.mybatis</groupId>
            <artifactId>mybatis</artifactId>
            <version>3.5.7</version>
        </dependency>
        <!--mybatis和spring的整合包-->
        <dependency>
            <groupId>org.mybatis</groupId>
            <artifactId>mybatis-spring</artifactId>
            <version>2.0.6</version>
        </dependency>
        <!--数据库连接池-->
        <dependency>
            <groupId>com.alibaba</groupId>
            <artifactId>druid</artifactId>
            <version>1.2.11</version>
        </dependency>
        <dependency>
            <groupId>junit</groupId>
            <artifactId>junit</artifactId>
            <version>4.12</version>
            <scope>test</scope>
        </dependency>
        <!--mysql的驱动-->
        <dependency>
            <groupId>mysql</groupId>
            <artifactId>mysql-connector-java</artifactId>
            <version>8.0.28</version>
        </dependency>
        <!--log4j日志依赖-->
        <dependency>
            <groupId>log4j</groupId>
            <artifactId>log4j</artifactId>
            <version>1.2.17</version>
        </dependency>
        <!--分页插件依赖-->
        <dependency>
            <groupId>com.github.pagehelper</groupId>
            <artifactId>pagehelper</artifactId>
            <version>5.3.0</version>
        </dependency>
        <!--日志相关依赖,slf4j门面日志的实现-->
        <dependency>
            <groupId>ch.qos.logback</groupId>
            <artifactId>logback-classic</artifactId>
            <version>1.2.11</version>
        </dependency>
        <!--servletAPI,DispatcherServlet继承的HttpServlet依赖于Servlet-->
        <dependency>
            <groupId>javax.servlet</groupId>
            <artifactId>javax.servlet-api</artifactId>
            <version>4.0.1</version>
        </dependency>
        <!--json转java对象相关依赖-->
        <dependency>
            <groupId>com.fasterxml.jackson.core</groupId>
            <artifactId>jackson-databind</artifactId>
            <version>2.15.1</version>
        </dependency>
        <!--文件上传的依赖-->
        <dependency>
            <groupId>commons-fileupload</groupId>
            <artifactId>commons-fileupload</artifactId>
            <version>1.4</version>
        </dependency>
        <!--thymeleaf整合spring5的依赖-->
        <dependency>
            <groupId>org.thymeleaf</groupId>
            <artifactId>thymeleaf-spring5</artifactId>
            <version>3.0.15.RELEASE</version>
        </dependency>
    </dependencies>
2. 配置文件
web.xml
<!DOCTYPE web-app PUBLIC
 "-//Sun Microsystems, Inc.//DTD Web Application 2.3//EN"
 "http://java.sun.com/dtd/web-app_2_3.dtd" >

<web-app>
  <display-name>Archetype Created Web Application</display-name>

  <context-param>
    <param-name>contextConfigLocation</param-name>
    <param-value>classpath:spring.xml</param-value>
  </context-param>

  <!--
    url-pattern中/和/*的区别:
        /:匹配浏览器向服务器发送的所有请求(不包括jsp)
        /*:匹配浏览器向服务器发送的所有请求(包括jsp)

  -->

  <!--配置编码过滤器-->
  <filter>
    <filter-name>characterEncodingFilter</filter-name>
    <filter-class>org.springframework.web.filter.CharacterEncodingFilter</filter-class>
    <init-param>
      <param-name>encoding</param-name>
      <param-value>UTF-8</param-value>
    </init-param>
    <init-param>
      <param-name>forceEncoding</param-name>
      <param-value>1</param-value>
    </init-param>
  </filter>
  <filter-mapping>
    <filter-name>characterEncodingFilter</filter-name>
    <url-pattern>/*</url-pattern>
  </filter-mapping>

  <listener>
    <!--在服务器启动时加载spring的配置文件-->
    <listener-class>org.springframework.web.context.ContextLoaderListener</listener-class>
  </listener>

  <!--配置前端控制器DispatcherServlet,处理前端请求映射到控制器-->
  <servlet>
    <servlet-name>dispatcherServlet</servlet-name>
    <servlet-class>org.springframework.web.servlet.DispatcherServlet</servlet-class>
    <init-param>
      <param-name>contextConfigLocation</param-name>
      <param-value>classpath:spring-mvc.xml</param-value>
    </init-param>
    <load-on-startup>1</load-on-startup>
  </servlet>
  <servlet-mapping>
    <servlet-name>dispatcherServlet</servlet-name>
    <url-pattern>/</url-pattern>
  </servlet-mapping>

</web-app>
spring-mvc.xml
<?xml version="1.0" encoding="UTF-8"?>
<beans xmlns="http://www.springframework.org/schema/beans"
       xmlns:xsi="http://www.w3.org/2001/XMLSchema-instance"
       xmlns:context="http://www.springframework.org/schema/context"
       xmlns:mvc="http://www.springframework.org/schema/mvc"
       xsi:schemaLocation="http://www.springframework.org/schema/beans http://www.springframework.org/schema/beans/spring-beans.xsd http://www.springframework.org/schema/context https://www.springframework.org/schema/context/spring-context.xsd http://www.springframework.org/schema/mvc https://www.springframework.org/schema/mvc/spring-mvc.xsd">

    <context:component-scan base-package="com.fd.ssm.controller"/>

    <!--配置Thymeleaf视图解析器-->
    <bean class="org.thymeleaf.spring5.view.ThymeleafViewResolver" id="viewResolver">
        <property name="order" value="1"/>
        <property name="characterEncoding" value="UTF-8"/>
        <property name="templateEngine">
            <bean class="org.thymeleaf.spring5.SpringTemplateEngine">
                <property name="templateResolver">
                    <bean class="org.thymeleaf.spring5.templateresolver.SpringResourceTemplateResolver">
                        <!--视图前缀-->
                        <property name="prefix" value="/WEB-INF/templates/"/>
                        <!--视图后缀-->
                        <property name="suffix" value=".html"/>
                        <property name="templateMode" value="HTML5"/>
                        <property name="characterEncoding" value="utf-8"/>
                    </bean>
                </property>
            </bean>
        </property>
    </bean>

    <!--配置默认处理器,处理静态资源-->
    <mvc:default-servlet-handler></mvc:default-servlet-handler>

    <!--开启注解驱动-->
    <mvc:annotation-driven/>

    <!--配置视图控制器-->
    <mvc:view-controller path="/" view-name="index"/>

    <!--配置文件上传解析器, id必须为multipartResolver-->
    <bean class="org.springframework.web.multipart.commons.CommonsMultipartResolver" id="multipartResolver">
        <property name="defaultEncoding" value="UTF-8"></property>
    </bean>
</beans>
spring.xml
<?xml version="1.0" encoding="UTF-8"?>
<beans xmlns="http://www.springframework.org/schema/beans"
       xmlns:xsi="http://www.w3.org/2001/XMLSchema-instance"
       xmlns:context="http://www.springframework.org/schema/context" xmlns:tx="http://www.springframework.org/schema/tx"
       xsi:schemaLocation="http://www.springframework.org/schema/beans http://www.springframework.org/schema/beans/spring-beans.xsd http://www.springframework.org/schema/context https://www.springframework.org/schema/context/spring-context.xsd http://www.springframework.org/schema/tx http://www.springframework.org/schema/tx/spring-tx.xsd">

    <!--引入jdbc.properties-->
    <context:property-placeholder location="classpath:jdbc.properties"/>

    <!--开启注解扫描,排除控制层组件-->
    <context:component-scan base-package="com.fd.ssm">
        <context:exclude-filter type="annotation" expression="org.springframework.stereotype.Controller"/>
    </context:component-scan>

    <!--配置事务管理器-->
    <bean class="org.springframework.jdbc.datasource.DataSourceTransactionManager" id="transactionManager">
        <property name="dataSource" ref="druidDataSource"/>
    </bean>

    <!--开启事务管理的注解驱动,将使用注解@Transactional标识的方法或类中所有的方法进行事务管理-->
    <tx:annotation-driven transaction-manager="transactionManager"/>

    <!--配置数据源-->
    <bean class="com.alibaba.druid.pool.DruidDataSource" id="druidDataSource">
        <property name="driverClassName" value="${jdbc.driver}"/>
        <property name="url" value="${jdbc.url}"/>
        <property name="username" value="${jdbc.username}"/>
        <property name="password" value="${jdbc.password}"/>
    </bean>

    <!--
        spring整合mybatis配置方式
        mybatis使用方式:
            InputStream stream = Resources.getResourceAsStream("mybatis-config.xml");
            SqlSessionFactoryBuilder sqlSessionFactoryBuilder = new SqlSessionFactoryBuilder();
            SqlSessionFactory sqlSessionFactory = sqlSessionFactoryBuilder.build(stream);
            sqlSession = sqlSessionFactory.openSession(true);
            SelectMapper mapper = sqlSession.getMapper(SelectMapper.class);

    -->
    <!--配置sqlSessionFactoryBean,可以直接在Spring的IOC中获取sqlSessionFactory-->
    <bean class="org.mybatis.spring.SqlSessionFactoryBean" id="sqlSessionFactoryBean">
        <!--
            设置myBatis的核心配置文件的路径,既可以通过mybatis的配置文件的方式配置,也可以直接通过spring配置
        -->
        <property name="configLocation" value="classpath:mybatis-config.xml"/>
        <!--配置数据源-->
        <property name="dataSource" ref="druidDataSource"/>
        <!--设置类型别名所对应的包-->
        <property name="typeAliasesPackage" value="com.fd.ssm.pojo"/>
        <!--设置映射文件的路径,只有映射文件的包和mapper接口的包不一致时需要设置-->
        <!--<property name="mapperLocations" value="classpath:mappers/*.xml"/>-->
    </bean>

    <!--
        配置mapper接口的扫描,可以将指定包下所有的mapper接口,通过sqlSession创建代理实现类对象,并将这些对象交给IOC容器管理
        使用时可以通过直接装配mapper接口,来实现mybatis的使用
    -->
    <bean class="org.mybatis.spring.mapper.MapperScannerConfigurer">
        <property name="basePackage" value="com.fd.ssm.mapper"/>
    </bean>
</beans>
mybatis-config.xml
<?xml version="1.0" encoding="UTF-8" ?>
<!DOCTYPE configuration
        PUBLIC "-//mybatis.org//DTD Config 3.0//EN"
        "https://mybatis.org/dtd/mybatis-3-config.dtd">
<configuration>

    <!--
        Mybatis核心配置文件中的标签必须按照指定的顺序配置
        (properties?,settings?,typeAliases?,typeHandlers?,objectFactory?,objectWrapperFactory?,reflectorFactory?,plugins?,environments?,databaseIdProvider?,mappers?)
    -->
    <settings>
        <!--将下划线映射为驼峰-->
        <setting name="mapUnderscoreToCamelCase" value="true"/>
        <!--开启延迟加载-->
        <setting name="lazyLoadingEnabled" value="true"/>
        <!--按需加载-->
        <setting name="aggressiveLazyLoading" value="false"/>
    </settings>

    <plugins>
        <!--配置分页拦截器-->
        <plugin interceptor="com.github.pagehelper.PageInterceptor"></plugin>
    </plugins>

</configuration>
3. 控制器方法
@Controller
@RequestMapping("/employee")
public class EmployeeController {


    @Autowired
    private IEmployeeService employeeService;

    @GetMapping
    public String listEmployee(Model model) {


        List<Employee> list =  employeeService.listEmployee();
        // 将数据共享在请求域
        model.addAttribute("list", list);
        return "employee_list";
    }

    @GetMapping("/page/{pageNum}")
    public String listPageEmployee(@PathVariable int pageNum, Model model) {


        // 开启导航分页
        PageHelper.startPage(pageNum, 4);
        // 获取分页后的数据
        List<Employee> list = employeeService.listEmployee();
        /*
        Pagelnfo{

            pageNum:当前页的页码
            pageSize: 每页显示的条数
            size:当前页显示的真实条数
            total: 总记录数
            pages:总页数
            prePage:上一页的页码
            nextPage:下一页的页码
            isFirstPage/isLastPage: 是否为第一页/最后一页
            hasPreviousPage/hasNextPage: 是否存在上一页/下一页
            navigatePages:导航分页的页码数
            navigatepageNums:导航分页的页码,[1,2,3,4,5]
        */
        // 获取分页相关数据
        PageInfo<Employee> pageInfo = new PageInfo<Employee>(list, 5);
        // 将分页数据共享在请求域
        model.addAttribute("pageInfo", pageInfo);
        return "employee_page_list";
    }
}
4. 业务层方法
@Service
public class EmployeeServiceImpl implements IEmployeeService {


    @Autowired
    private EmployeeMapper employeeMapper;

    public List<Employee> listEmployee() {


        return employeeMapper.listEmployee();
    }

    public List<Employee> listPageEmployee(int pageNum) {


        // 开启导航分页
        PageHelper.startPage(pageNum, 4);
        return employeeMapper.listEmployee();
    }
}
5. 数据层方法
public interface EmployeeMapper {


    List<Employee> listEmployee();
}
6. mapper映射文件
<?xml version="1.0" encoding="UTF-8" ?>
<!DOCTYPE mapper
        PUBLIC "-//mybatis.org//DTD Mapper 3.0//EN"
        "http://mybatis.org/dtd/mybatis-3-mapper.dtd">
<mapper namespace="com.fd.ssm.mapper.EmployeeMapper">

    <select id="listEmployee" resultType="employee">
        select * from t_employee
    </select>
</mapper>
7. 表现层
index.html
<!DOCTYPE html>
<html lang="en" xmlns: th="http://www.thymeleaf.org">
<head>
    <meta charset="UTF-8">
    <title>首页</title>
</head>
<body>

<h1>index.html</h1>

<a th:href="@{/employee}">查询所有用户的信息</a><br>

<a th:href="@{/employee/page/1}">查询分页用户的信息</a><br>
</body>
</html>
employee_list.html
<!DOCTYPE html>
<html lang="en" xmlns: th="http://www.thymeleaf.org">
<head>
    <meta charset="UTF-8">
    <title>员工列表</title>
</head>
<body>

<p th:each="item : ${list}" th:text="${item}"></p>
</body>
</html>
employee_page_list.html
<!DOCTYPE html>
<html lang="en" xmlns: th="http://www.thymeleaf.org">
<head>
    <meta charset="UTF-8">
    <title>员工列表</title>
</head>
<body>

<p th:each="item : ${pageInfo.list}" th:text="${item}"></p>

<div style="text-align: center">
    <a th:if="${pageInfo.hasPreviousPage}" th:href="@{/employee/page/1}">首页</a>
    <a th:if="${pageInfo.hasPreviousPage}" th:href="@{'/employee/page/' + ${pageInfo.prePage}}">上一页</a>
    <a th:if="${pageInfo.hasNextPage}" th:href="@{'/employee/page/' + ${pageInfo.nextPage}}">下一页</a>
    <a th:if="${pageInfo.hasNextPage}" th:href="@{'/employee/page/' + ${pageInfo.pages}}">尾页</a>
</div>
</body>
</html>
8. 测试结果

这里主要提供一个整合及实现的思路,实现的功能也比较简单就是一个员工数据的查询,只要项目整合成功其他业务逻辑其实都差不多,所以不多做缀诉。
总算整理完了,从开始动笔到现在花了半个多月。断断续续的有空就补充点,自己在整理笔记的过程中也是去深入理解消化的过程,所以比较慢。希望能对其他朋友也有点帮助!