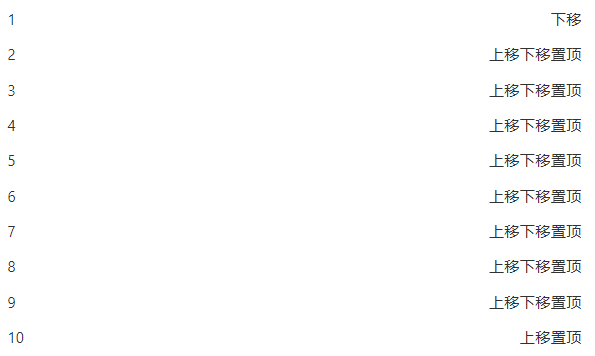
1. 实现预览
2. 实现分析
- 实现就是对数组元素的位置改变;
- 实现方法一,使用变量接收一个位置的元素,然后改变当前位置,用接收变量去替换改变位置的值;
- 实现方法二,使用数组的 splice 方法实现;
- 实现方法三,使用 es6 解构赋值。
3. html 基础结构
- v-if=“index != 0” 判断,第一行数据已经是最顶部,因此不能上移和置顶操作;
- v-if=“index != nums.length - 1” 判断,最后一行数据已经是最底部,因此不能下移和置底操作。
<div class="rui-flex-ac" v-for="item,index in nums" :key="item">
    <div class="rui-fg">{

   {item}}</div>
    <div class="rui-fa" v-if="index != 0" @click="moveUp(index)">上移</div>
    <div class="rui-fa" v-if="index != nums.length - 1" @click="moveDown(index)">下移</div>
    <div class="rui-fa" v-if="index != 0" @click="moveTop(index)">置顶</div>
</div>
4. 方法一:变量接收
- 上移或者下移都是使用 temp 变量获取当前位置的元素;
- 当前位置获取需要移动方向位置的元素【前一个或者后一个位置的元素】;
- 移动方向位置获取 temp 变量的值,完成元素的替换;
- 置顶采用变量 temp 获取当前位置元素,other 获取其他位置元素值;
- 将 temp 和 other 拼接,这里可以使用 unshift, concat等实现。
    // 上移
    moveUp(index){
      let nums = this.nums;
      let temp = nums[index]
      nums[index] = nums[index - 1]
      nums[index - 1] = temp;
      this.nums = [...nums];
    },
    // 下移
    moveDown(index){
      let nums = this.nums;
      let temp = nums[index]
      nums[index] = nums[index + 1]
      nums[index + 1] = temp;
      this.nums = [...nums];
    },
    // 置顶
    moveTop(index){
      let nums = [...this.nums]
      let temp = nums[index]
      let other = nums.filter((item,idx) => index != idx)
      this.nums = [temp,...other]
    },
5. 方法二:双 splice 实现元素替换
- 第一步 nums.splice(index - 1, 1, nums[index]),将 index - 1 位置的元素替换为 nums[index];
- 注意:splice 会返回被替换元素的列表,因此将返回元素替换给 index 位置,就可以实现元素位置的互换;
- 第二步 nums.splice(index, 1, …nums.splice(index - 1, 1, nums[index])),将第一步中的返回值,替换为 index 位置的元素;
- 置顶获取 splice 返回的值,放到数组的0的位置。
    // 上移
    moveUp(index){
      let nums = this.nums;
      nums.splice(index, 1, ...nums.splice(index - 1, 1, nums[index]))
      this.nums = [...nums];
    },
    // 下移
    moveDown(index){
      let nums = this.nums;
      nums.splice(index, 1, ...nums.splice(index + 1, 1, nums[index]))
      this.nums = [...nums];
    },
    // 置顶
    moveTop(index){
      let nums = [...this.nums]
      this.nums = [...nums.splice(index,1),...nums]
    },
6. 方法三:单 splice 实现元素互换
此方法和方法二的区别再去,方法二第二次替换值使用 splice,而方法三是直接将第一次的 splice 的返回值赋值给当前位置。
    // 上移
    moveUp(index){
      let nums = this.nums;
      nums[index] = nums.splice(index - 1, 1, nums[index])[0]
      this.nums = [...nums];
    },
    // 下移
    moveDown(index){
      let nums = this.nums;
      nums[index] = nums.splice(index + 1, 1, nums[index])[0]
      this.nums = [...nums];
    },
    // 置顶
    moveTop(index){
      let nums = [...this.nums]
      this.nums = [...nums.splice(index,1),...nums]
    },
7. 方法四:ES6 解构赋值
- 直接通过解构赋值,将两个位置的元素互换。
    // 上移
    moveUp(index){
      let nums = this.nums;
      [nums[index], nums[index - 1]] = [nums[index - 1], nums[index]]
      this.nums = [...nums];
    },
    // 下移
    moveDown(index){
      let nums = this.nums;
      [nums[index], nums[index + 1]] = [nums[index + 1], nums[index]]
      this.nums = [...nums];
    },
    // 置顶
    moveTop(index){
      let nums = [...this.nums]
      this.nums = [...nums.splice(index,1),...nums]
    }
8. 归纳
     move(type, nums, index, row={}){
      if(!Array.isArray(nums)){
        return nums
      }
      switch(type){
        case 'up':
          [nums[index], nums[index - 1]] = [nums[index - 1], nums[index]]
          break;
        case 'down':
          [nums[index], nums[index + 1]] = [nums[index + 1], nums[index]]
          break;
        case 'top':
          nums = [...nums.splice(index,1), ...nums]
          break;
        case 'bottom':
          let val = nums.splice(index,1)[0]
          nums = [...nums, val]
          break;
      }
      return [...nums]
    },
    // 上移[up]、下移[down]、置顶[top]
    moveRow(type, index, item = {}){
      this.nums = this.move(type, this.nums, index, item)
    },
9. 总结
- 将上移、下移、置顶、置底后边新增、删除等操作集中到一个工具函数中,方便集中操作;
- 实现方法很多,此处只总结了我在工作中常使用的方法。