最近在为系统做一个限流的小组件,采用漏桶算法,基于AOP+Semaphore实现,限流不是本文的重点,有兴趣的读者可以去查阅相关资料。我们首先来简单描述一下实现过程:
- 用AOP切面的方式对需要进行限流的服务进行统一切面
- 在切面层用Semaphore信号量实现漏桶限流
- 限流的维度为每个类的每个方法
- 限流的配置如许可数量、降级服务列表等通过Zookeeper实现统一的配置下发
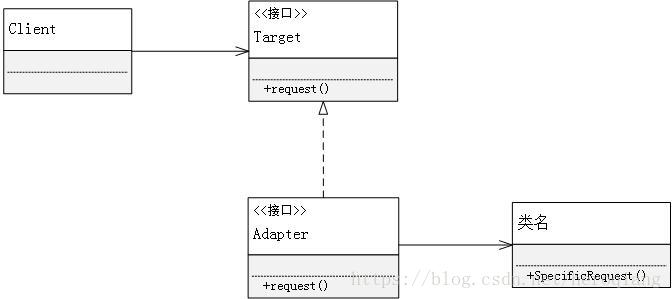
所以,这里的关键点之一就是根据切面的切入点拿到类和方法的信息,而我们工程中现有的AOP切面是用两种方式实现的,一种是采用@Aspect注解,切入点为ProceedingJoinPoint实例,另一种是通过实现MethodInterceptor接口实现,切入点为MethodInvocation实例,两者获取类和方法信息的方式是不同的,逻辑无法统一,这里使用适配器模式来解决这个问题,我们来看适配器模式的类图:
首先定义统一的用于限流器的切入点接口:
/**
 * 限流器切入点
 */
public interface PointCut {

    /**
     * 执行切入点方法
     */
    Object proceed() throws Throwable;

    /**
     * 获取类名
     */
    String getClassName();

    /**
     * 获取方法名
     */
    String getMethodName();

}
接下来为ProceedingJoinPoint和MethodInvocation创建适配器:
/**
 * MethodInvocation适配器
 */
public class MethodInvocationAdapter implements PointCut {

    private MethodInvocation methodInvocation;

    public MethodInvocationAdapter(MethodInvocation methodInvocation) {
        this.methodInvocation = methodInvocation;
    }

    public Object proceed() throws Throwable {
        return methodInvocation.proceed();
    }

    public String getClassName() {
        return methodInvocation.getMethod().getDeclaringClass().getName();
    }

    public String getMethodName() {
        return methodInvocation.getMethod().getName();
    }

}
/**
* ProceedingJoinPoint适配器
*/
public class ProceedingJoinPointAdapter implements PointCut {
private ProceedingJoinPoint proceedingJoinPoint;
public ProceedingJoinPointAdapter(ProceedingJoinPoint proceedingJoinPoint) {
this.proceedingJoinPoint = proceedingJoinPoint;
}
public Object proceed() throws Throwable {
return proceedingJoinPoint.proceed();
}
public String getClassName() {
return proceedingJoinPoint.getTarget().getClass().getName();
}
public String getMethodName() {
return proceedingJoinPoint.getSignature().getName();
}
}
下面我们来看限流器的实现:
import com.xxx.PointCut;
import org.slf4j.Logger;
import org.slf4j.LoggerFactory;
import org.springframework.beans.factory.DisposableBean;
import org.springframework.beans.factory.annotation.Autowired;
import org.springframework.stereotype.Service;

import java.util.concurrent.ConcurrentHashMap;
import java.util.concurrent.ConcurrentMap;
import java.util.concurrent.Semaphore;

/**
 * 限流工具
 */
@Service
public class Limiter implements DisposableBean {

    private static final Logger logger = LoggerFactory.getLogger(Limiter.class);

    /**
     * 默认许可数量
     */
    private static final int DEFAULT_PERMITS_COUNT = 100;

    /**
     * 配置许可数量后缀
     */
    private static final String CONFIG_PERMITS_SUFFIX = "_permits";

    private final ConcurrentMap<String, Semaphore> semaphoreMap = new ConcurrentHashMap<String, Semaphore>();

    @Autowired
    private ConfigCenterUtils configCenterUtils;

    /**
     * 尝试获取许可,该方法会立即尝试获取一个许可,不会阻塞,获取失败将抛出异常
     */
    public Object invoke(PointCut pointCut) throws Throwable {
        String key = getKey(pointCut);
        Semaphore semaphore = getSemaphore(key);
        if (!semaphore.tryAcquire()) {
            throw new RuntimeException("Limiter --> tryAcquire fail! no remaining permits! key: " + key);
        }
        try {
            return pointCut.proceed();
        } finally {
            logger.debug("Limiter --> invoke release permit! key: {}, permits: {}", key, semaphore.availablePermits());
            semaphore.release();
        }
    }

    /**
     * 获取信号量
     */
    private Semaphore getSemaphore(String key) {
        Semaphore semaphore = semaphoreMap.get(key);
        if (semaphore == null) {
            semaphore = new Semaphore(getPermitsCount(key));
            semaphoreMap.putIfAbsent(key, semaphore);
        }
        return semaphore;
    }

    /**
     * 获取key,格式:[类名_方法名],作用:
     * 1、信号量map的key
     * 2、后面拼接常量CONFIG_PERMITS_SUFFIX的值用作配置许可数量的key
     */
    private String getKey(PointCut pointCut) {
        return pointCut.getClassName() + "_" + pointCut.getMethodName();
    }

    /**
     * 获取许可数量,默认为常量DEFAULT_PERMITS_COUNT的值
     */
    private int getPermitsCount(String key) {
        try {
            return Integer.parseInt(configCenterUtils.getContentFromConfigCenter(key + CONFIG_PERMITS_SUFFIX));
        } catch (Exception e) {
            // 如果获取配置中心许可数量失败(最可能的原因是没有配置)则返回默认许可数量
            return DEFAULT_PERMITS_COUNT;
        }
    }

    public void destroy() throws Exception {
        semaphoreMap.clear();
    }
}
这里的ConfigCenterUtils是使用ZkClient实现的统一配置中心工具类,用于获取zookeeper中的配置。限流器的使用只需要在拦截器中注入限流器,并在执行切入点方法时加入限流器即可:
@Autowired
protected Limiter limiter;

public Object process(ProceedingJoinPoint point) throws Throwable {
    // ...
    return limiter.invoke(new ProceedingJoinPointAdapter(point));
    // ...
}
@Autowired
protected Limiter limiter;
public Object invoke(MethodInvocation invocation) throws Throwable {
// ...
return limiter.invoke(new MethodInvocationAdapter(invocation));
// ...
}本文旨在凸现适配器模式的应用,示例只是一个简版,它有很多缺陷,并不适合应用在生产环境中,利用zookeeper的watcher机制更新配置的代码也没有给出(监听到节点变更之后移除map中对应的key即可,这样就可以读取新的配置生成新的Semaphore对象)。
示例使用适配器的好处是:
- 便于复用,限流器可以应用到不同的场景,不仅仅是AOP层面,只需要实现新的适配器即可复用限流器
- 便于扩展,我们在扩展限流器的应用时只需要增加适配器即可
- 便于维护,我们将获取方法和类的信息、执行目标方法的逻辑封装在各个适配器中,这样这部分逻辑需要变更时就可以直接修改适配器即可,不需要修改限流器,这也符合面向对象设计的开闭原则