目录
1. 说明
本篇文章是对上篇文章训练的模型进行测试。首先是将训练好的模型进行重新加载,然后采用opencv对图片进行加载,最后将加载好的图片输送给模型并且显示结果。
2. 手写数字识别的CNN模型测试
2.1 导入相关库
在这里导入需要的第三方库如cv2,如果没有,则需要自行下载。
from tensorflow import keras
# 引入内置手写体数据集mnist
from keras.datasets import mnist
import skimage, os, sys, cv2
from PIL import ImageFont, Image, ImageDraw  # PIL就是pillow包(保存图像)
import numpy as np
2.2 加载数据和模型
把MNIST数据集进行加载,并且把训练好的模型也加载进来。
# 加载mnist数据
(x_train, y_train), (x_test, y_test) = mnist.load_data()
# 加载cnn_mnist.h5文件,重新生成模型对象, 等价于之前训练好的cnn_model
recons_model = keras.models.load_model('cnn_mnist.h5')
2.3 设置保存图片的路径
将数据集的某个数据以图片的形式进行保存,便于测试的可视化。
在这里设置图片存储的位置。
# 创建图片保存路径
test_file_path = os.path.join(sys.path[0], 'imgs', 'test100.png')
# 存储测试数据的任意一个
Image.fromarray(x_test[100]).save(test_file_path)
在书写完上述代码后,需要在代码的当前路径下新建一个imgs的文件夹用于存储图片,如下。

执行完上述代码后就会在imgs的文件中可以发现多了一张图片,如下(下面测试了很多次)。
2.4 加载图片
采用cv2对图片进行加载,下面最后一行代码取一个通道的原因是用opencv库也就是cv2读取图片的时候,图片是三通道的,而训练的模型是单通道的,因此取单通道。
# 加载本地test.png图像
image = cv2.imread(test_file_path)
# 复制图片
test_img = image.copy()
# 将图片大小转换成(28,28)
test_img = cv2.resize(test_img, (28, 28))
# 取单通道值
test_img = test_img[:, :, 0]
print(test_img.shape)
2.5 图片预处理
对图片进行预处理,即进行归一化处理和改变形状处理,这是为了便于将图片输入给训练好的模型进行预测。
# 预处理: 归一化 + reshape
new_test_img = (test_img/255.0).reshape(1, 28, 28, 1)
2.6 对图片进行预测
将图片输入给训练好我的模型并且进行预测。
预测的结果是10个概率值,所以需要进行处理, np.argmax()是得到概率值最大值的序号,也就是预测的数字。
# 预测
y_pre_pro = recons_model.predict(new_test_img, verbose=1)
# 哪一类数字
class_id = np.argmax(y_pre_pro, axis=1)[0]
print('test.png的预测概率:', y_pre_pro)
print('test.png的预测概率:', y_pre_pro[0, class_id])
print('test.png的所属类别/手写体数字:', class_id)
class_id = str(class_id)
2.7 显示图片
对预测的图片进行显示,把预测的数字显示在图片上。
下面6行代码分别是创建窗口,设定窗口大小,显示数字,显示图片,停留图片,清除内存。
# # 显示
cv2.namedWindow('img', 0)
cv2.resizeWindow('img', 500, 500)  # 自己设定窗口图片的大小
cv2.putText(image, class_id, (2, 5), cv2.FONT_HERSHEY_SCRIPT_SIMPLEX, 0.2, (255, 0, 0), 1)
cv2.imshow('img', image)
cv2.waitKey()
cv2.destroyAllWindows()
3. 完整代码和显示结果
以下是完整的代码和图片显示结果。
from tensorflow import keras
# 引入内置手写体数据集mnist
from keras.datasets import mnist
import skimage, os, sys, cv2
from PIL import ImageFont, Image, ImageDraw  # PIL就是pillow包(保存图像)
import numpy as np

# 加载mnist数据
(x_train, y_train), (x_test, y_test) = mnist.load_data()
# 加载cnn_mnist.h5文件,重新生成模型对象, 等价于之前训练好的cnn_model
recons_model = keras.models.load_model('cnn_mnist.h5')
# 创建图片保存路径
test_file_path = os.path.join(sys.path[0], 'imgs', 'test100.png')
# 存储测试数据的任意一个
Image.fromarray(x_test[100]).save(test_file_path)
# 加载本地test.png图像
image = cv2.imread(test_file_path)
# 复制图片
test_img = image.copy()
# 将图片大小转换成(28,28)
test_img = cv2.resize(test_img, (28, 28))
# 取单通道值
test_img = test_img[:, :, 0]
print(test_img.shape)
# 预处理: 归一化 + reshape
new_test_img = (test_img/255.0).reshape(1, 28, 28, 1)
# 预测
y_pre_pro = recons_model.predict(new_test_img, verbose=1)
# 哪一类数字
class_id = np.argmax(y_pre_pro, axis=1)[0]
print('test.png的预测概率:', y_pre_pro)
print('test.png的预测概率:', y_pre_pro[0, class_id])
print('test.png的所属类别/手写体数字:', class_id)
class_id = str(class_id)
# # 显示
cv2.namedWindow('img', 0)
cv2.resizeWindow('img', 500, 500)  # 自己设定窗口图片的大小
cv2.putText(image, class_id, (2, 5), cv2.FONT_HERSHEY_SCRIPT_SIMPLEX, 0.2, (255, 0, 0), 1)
cv2.imshow('img', image)
cv2.waitKey()
cv2.destroyAllWindows()
To enable them in other operations, rebuild TensorFlow with the appropriate compiler flags.
(28, 28)
1/1 [==============================] - 0s 210ms/step
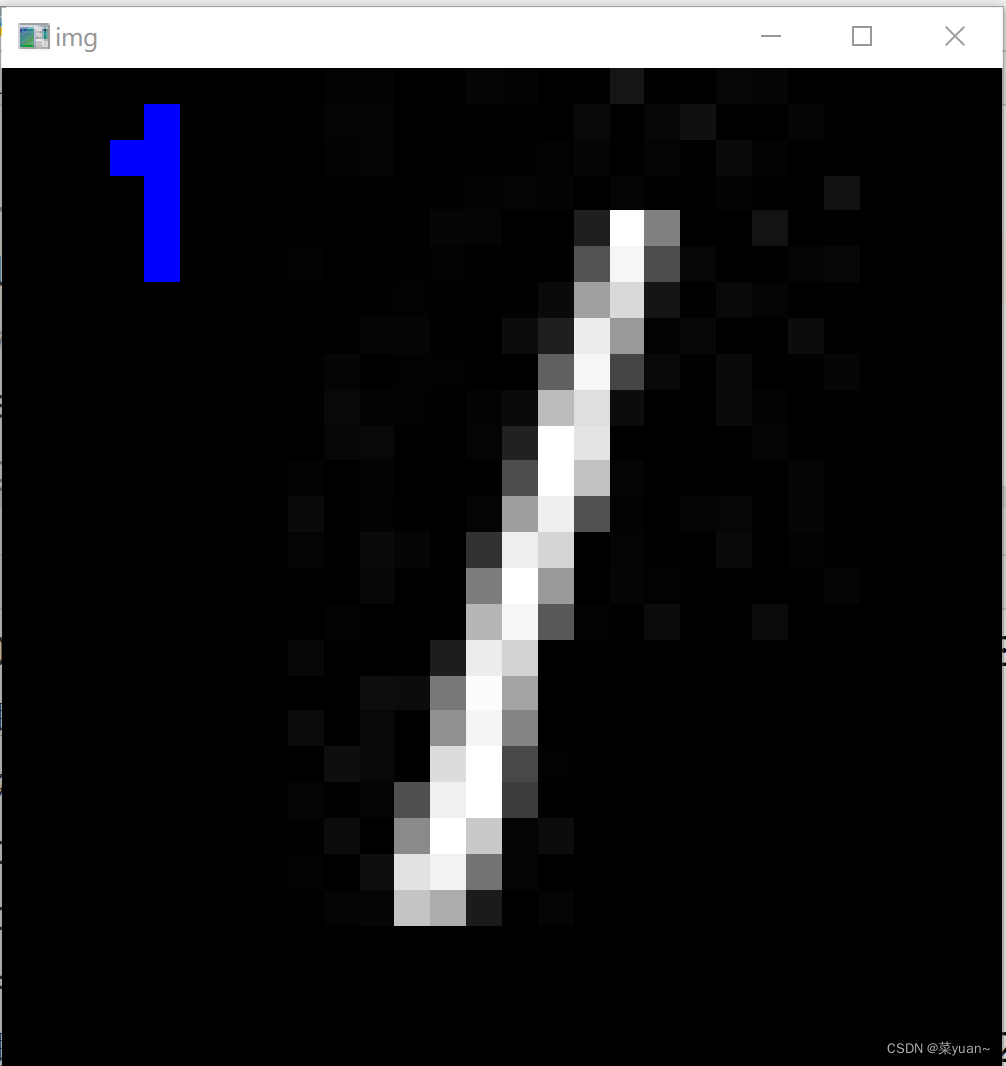
test.png的预测概率: [[2.3381226e-05 1.1173951e-09 2.5884110e-09 2.3000638e-10 1.5515226e-07
3.6373976e-07 9.9997604e-01 5.8317045e-13 1.0071908e-07 1.6725430e-09]]
test.png的预测概率: 0.99997604
test.png的所属类别/手写体数字: 6
4. 多张图片进行测试的完整代码以及结果
为了测试更多的图片,引入循环进行多次测试,效果更好。
from tensorflow import keras
# 引入内置手写体数据集mnist
from keras.datasets import mnist
import skimage, os, sys, cv2
from PIL import ImageFont, Image, ImageDraw  # PIL就是pillow包(保存图像)
import numpy as np

# 加载mnist数据
(x_train, y_train), (x_test, y_test) = mnist.load_data()
# 加载cnn_mnist.h5文件,重新生成模型对象, 等价于之前训练好的cnn_model
recons_model = keras.models.load_model('cnn_mnist.h5')

prepicture = int(input("input the number of test picture :"))
for i in range(prepicture):
    path1 = input("input the test picture path:")
    # 创建图片保存路径
    test_file_path = os.path.join(sys.path[0], 'imgs', path1)
    # 存储测试数据的任意一个
    num = int(input("input the test picture num:"))
    Image.fromarray(x_test[num]).save(test_file_path)
    # 加载本地test.png图像
    image = cv2.imread(test_file_path)
    # 复制图片
    test_img = image.copy()
    # 将图片大小转换成(28,28)
    test_img = cv2.resize(test_img, (28, 28))
    # 取单通道值
    test_img = test_img[:, :, 0]
    # 预处理: 归一化 + reshape
    new_test_img = (test_img/255.0).reshape(1, 28, 28, 1)
    # 预测
    y_pre_pro = recons_model.predict(new_test_img, verbose=1)
    # 哪一类数字
    class_id = np.argmax(y_pre_pro, axis=1)[0]
    print('test.png的预测概率:', y_pre_pro)
    print('test.png的预测概率:', y_pre_pro[0, class_id])
    print('test.png的所属类别/手写体数字:', class_id)
    class_id = str(class_id)
    # # 显示
    cv2.namedWindow('img', 0)
    cv2.resizeWindow('img', 500, 500)  # 自己设定窗口图片的大小
    cv2.putText(image, class_id, (2, 5), cv2.FONT_HERSHEY_SCRIPT_SIMPLEX, 0.2, (255, 0, 0), 1)
    cv2.imshow('img', image)
    cv2.waitKey()
    cv2.destroyAllWindows()
下面的test picture num指的是数据集中该数据的序号(0-59999),并不是值实际的数字。
To enable them in other operations, rebuild TensorFlow with the appropriate compiler flags.
input the number of test picture :2
input the test picture path:1.jpg
input the test picture num:1
1/1 [==============================] - 0s 156ms/step
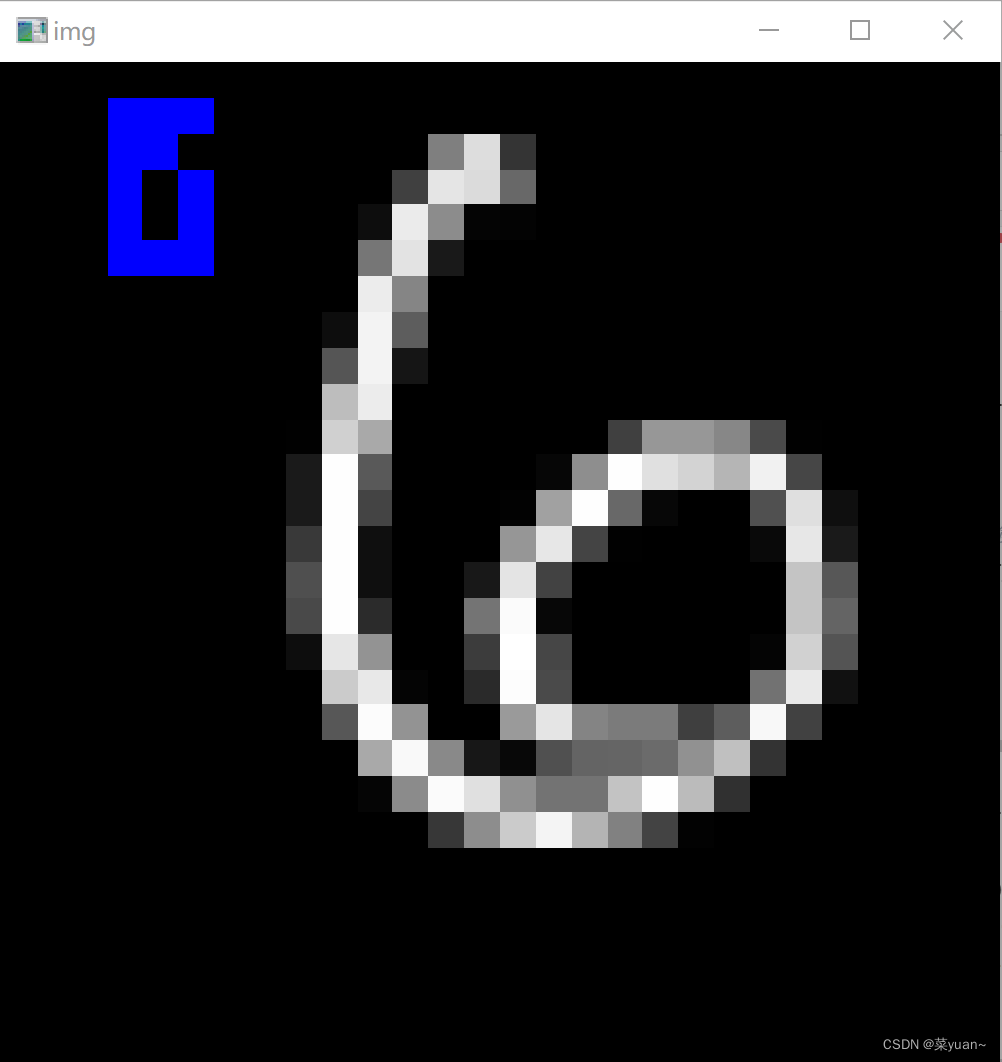
test.png的预测概率: [[4.3549915e-07 4.7153802e-07 9.9998319e-01 5.7891691e-07 2.7986115e-08
5.3348625e-08 7.1938064e-09 1.4849566e-05 3.6678301e-07 2.2624316e-09]]
test.png的预测概率: 0.9999832
test.png的所属类别/手写体数字: 2
input the test picture path:2.jpg
input the test picture num:2
1/1 [==============================] - 0s 26ms/step
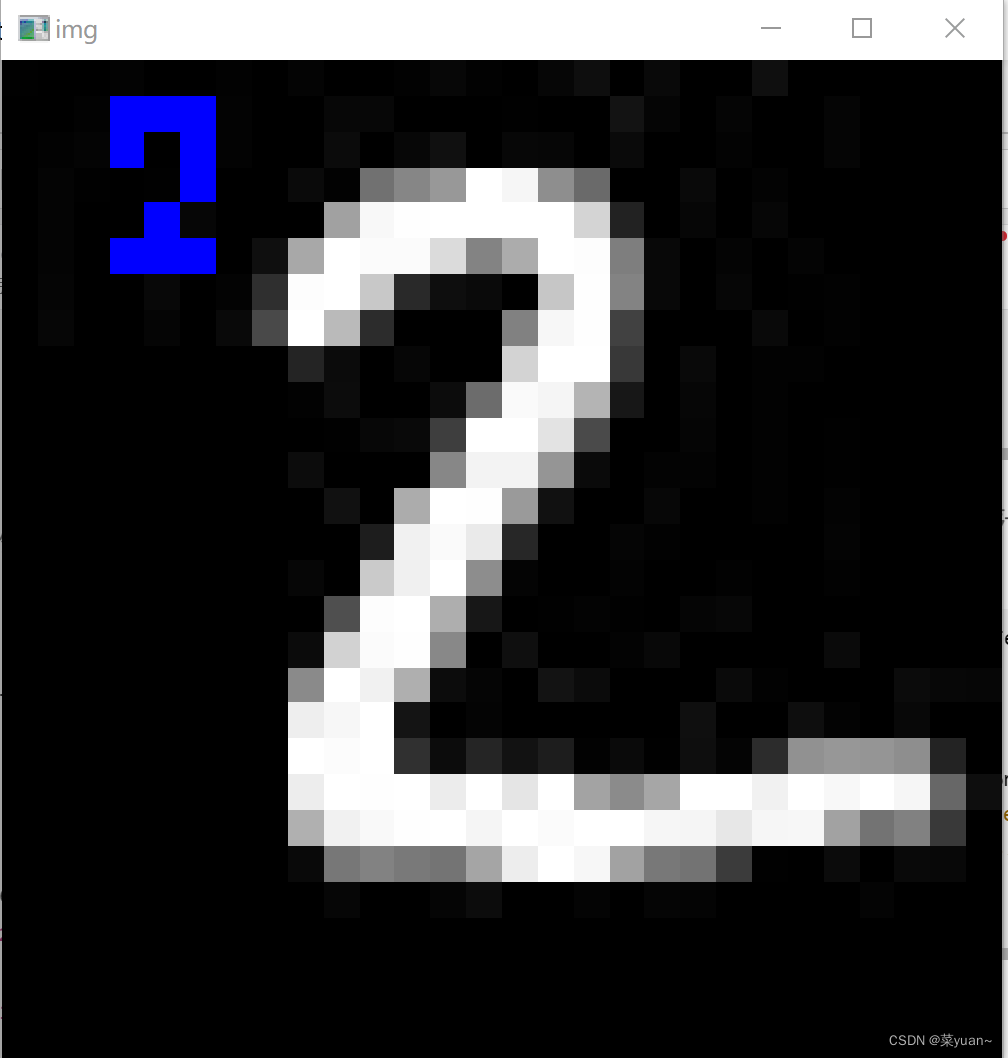
test.png的预测概率: [[1.4249144e-10 9.9994874e-01 6.1170212e-08 2.7543174e-09 1.9512597e-06
5.1548787e-09 1.5619334e-07 3.3457465e-07 4.5184272e-05 3.6284032e-06]]
test.png的预测概率: 0.99994874
test.png的所属类别/手写体数字: 1