一、说明
所以在过去的几天里,我在各种互联网资源中翻找,寻找使用单目视觉计算物体距离的方法。在此过程中,我发现了基于深度学习的单目深度估计模型和一些基于地标的距离近似方法。考虑到我对这个问题的低资源替代方案的执拗,发现只能唯一地选择下例。
二、距离测量
通常,深度或距离是使用立体视觉方法计算的。立体视觉是一种受人类视觉启发的强大技术,它使用双眼视差概念来精确地近似物体与相机的距离。但是,它需要能够通过同时捕获场景的两个略微偏移的图像来进行深度估计的立体相机。我缺乏这种奢侈,所以我将精力集中在基于地标的距离近似方法上。
2.1 导入运算库
所以这是一个背景,在不浪费一分钟的情况下,我们将浏览代码:
import mediapipe as mp
import cv2
import numpy as np
import math

mp_pose = mp.solutions.pose
pose = mp_pose.Pose()
2.2 导入依赖项
实例化媒体管道类实例mp_pose。Pose() 并将其分配给变量 pose。
cap = cv2.VideoCapture('distance.mp4')
while cap.isOpened():
  ret,img = cap.read()

#Converting to RGB
  img = cv2.cvtColor(img,cv2.COLOR_BGR2RGB)
  results = pose.process(img)

#check to see if bodylandmarks are being detected
  if results.pose_landmarks is not None:
    mp_drawing = mp.solutions.drawing_utils
    mp_drawing.draw_landmarks(img,results.pose_landmarks, mp_pose.POSE_CONNECTIONS)

    cv2.imshow('ImgWindow',img)

  if cv2.waitKey(1) & 0xFF == ord('q'):
    cap.release()
    cv2.destroyAllWindows()
从 OpenCV 加载视频捕获窗口,并将图像转换为 RGB 作为 cv2 加载 BGR 格式的图像。接下来,我们在图像上绘制提取的地标以进行健全性检查。这是到目前为止的结果:
图片 : 02 — 地标检测
2.3 现在正在检测地标,
下一步是提取地标坐标,我们将将其用作检测距离的参考点。我们将以鼻子地标为参考,尽管身体只能从后面看到——该模型仍然能够推断鼻子的关键点。
#Extracting the nose landmark.
landmarks = []
for landmark in results.pose_landmarks.landmark:
    landmarks.append((landmark.x, landmark.y, landmark.z))

nose_landmark = landmarks[mp_pose.PoseLandmark.NOSE.value]
_,_, nose_z = nose_landmark我们提取了地标,并将所有检测到的地标附加到地标列表中。 从那里我们提取封装 x、y 和 z 轴三个值的nose_landmark。x 轴和 y 轴值提供点沿 x 和 y 平面的位置,而 z 轴提供来自所有其他关键点的相对深度/距离信息。通过利用这些深度信息,我们可以估计物体与相机的距离。我们可以参考任何关键点,下图来自官方媒体管道网站,提供了所有关键点位置及其各自的名称和编号,以帮助您选择。
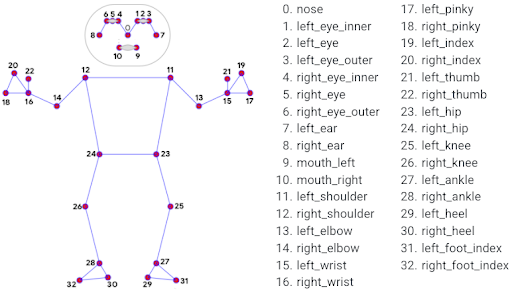
图:03 — 地标列表(学分))
#Calculating distance from the z-axis
#Set the depth_scale to 1
depth_scale = 1
def depth_to_distance(depth_value,depth_scale):
    return -1.0 / (depth_value*depth_scale)
distance = depth_to_distance(nose_z,depth_scale)
cv2.putText(img, "Depth in unit: " + str(np.format_float_positional(distance, precision=2)),(20,50),cv2.FONT_HERSHEY_SIMPLEX,1,(255,255,255),3)
cv2.imshow('Video',img)2.4 测量距离
函数 height_to_distance 将 z 轴值转换为距离值。参数“深度值”是从鼻子地标获得的值,“深度比例”用于将深度值调整为所需的测量单位。深度尺度通常由算法提供。在这种情况下,深度比例以米为单位,如模型文档网站中所述。此外,常数 -1.0 用于反转深度值,因为深度通常为负数。

上述深度值正在快速波动。此外,值中存在随机峰值。随机峰值是由于相机不是静止的,导致关键点检测偶尔出现故障,从而导致负值或非常大的值。为了稳定距离的波动,我们可以使用指数移动平均滤波器。过滤器会将值近似到更稳定的状态,从而减少波动。对过滤技术的说明超出了本文的范围。因此,我们将保留它以备其他日期和其他应用程序使用。下面是应用此筛选技术并获得更好结果的代码。
#Tweak the alpha value to suit your needs
alpha = 0.6
previous_depth = 0.0

def apply_ema_filter(current_depth):
    global previous_depth
    filtered_depth = alpha * current_depth + (1 - alpha) * previous_depth
    previous_depth = filtered_depth  # Update the previous depth value
    return filtered_depth
filter = apply_ema_filter(nose_z)
distance = depth_to_distance(filter,depth_scale)这是应用过滤器后的视频结果。该值比以前稳定一些,但是如前所述,由于相机的移动性,仍然存在一些随机的负峰值和正峰值。文具相机将提供更好的效果。

三、 展现整体代码
import mediapipe as mp
import cv2
import numpy as np

mp_pose = mp.solutions.pose
pose = mp_pose.Pose(static_image_mode=False)

#Tweak this parameter to suit your own need
alpha = 0.6
previous_depth = 0.0

def apply_ema_filter(current_depth):
    global previous_depth
    filtered_depth = alpha * current_depth + (1 - alpha) * previous_depth
    previous_depth = filtered_depth  # Update the previous depth value
    return filtered_depth

#Play with this constant value and vary it to check what suits your needs.
def depth_to_distance(depth_value, depth_scale):
  return -1.0 / (depth_value * depth_scale)

#Change it to your own camera feed
cap = cv2.VideoCapture('distance.mp4')
while cap.isOpened():
  ret,frame = cap.read()

#Grayscaling the image
  img = cv2.cvtColor(frame,cv2.COLOR_BGR2RGB)
  results = pose.process(img)

#check to see if bodylandmarks are being detected
  if results.pose_landmarks is not None:
    landmarks = []
    for landmark in results.pose_landmarks.landmark:
      landmarks.append((landmark.x, landmark.y, landmark.z))

    nose_landmark = landmarks[mp_pose.PoseLandmark.NOSE.value]
    _, _, nose_z = nose_landmark

    img = cv2.cvtColor(img,cv2.COLOR_BGR2RGB)
    filter = apply_ema_filter(nose_z)
    distance = depth_to_distance(filter,1)
#Convert the distance to your own requirement.
    cv2.putText(img, "Depth in unit: " + str(np.format_float_positional(distance, precision=2)),(20,50),cv2.FONT_HERSHEY_SIMPLEX,1,(255,255,255),3)
    cv2.imshow('ImgWindow',img)

  if cv2.waitKey(1) & 0xFF == ord('q'):
   cap.release()
   cv2.destroyAllWindows()
四、结论:
尽管这种寻找距离的单目方法是玩弄这个概念的有效方法。但是,建议将专用立体视觉设备的结果用于需要高精度和精密度的应用。我希望,这能满足您基于单眼视觉的距离估计需求