iOS14 Widget开发踩坑(五)定位与地图的使用
前言
最近又抽出时间来看小组件的问题了,产品也是想要实现一下系统应用 地图 的小组件的样子,并且研究一下小组件定位的实现。
分析
SwiftUI使用MKMapView是使用UIViewRepresentable协议将将MKMapView转化为View来进行使用的。但是在小组件中,无法使用UIViewRepresentable,也无法直接使用MKMapView,MapKit中有Map,但是在主程序可以使用,在小组件上却根本无法加载出来。我很怀疑苹果给自己的系统程序留了后门。
struct ContentView: View {


    @State var region = MKCoordinateRegion(center:CLLocationCoordinate2D(latitude: 31.203115, longitude: 121.598637), span: .init(latitudeDelta: 0.01, longitudeDelta: 0.01))
    var body: some View {


		Map(coordinateRegion: $region, showsUserLocation: true)
	}
}

但是经过Baidu和Google的帮助还是找到了一些蛛丝马迹以及参考文章,他们都详细的描述了如何加载地图和调用定位。我只是在这里做一下总结。

实现案例
地图
已经明确需要使用MKMapSnapshotter,以下是MKMapSnapshotter的说明:
extension MKMapSnapshotter {


    public typealias CompletionHandler = (MKMapSnapshotter.Snapshot?, Error?) -> Void
}
@available(iOS 7.0, *)
open class MKMapSnapshotter : NSObject {


    public init(options: MKMapSnapshotter.Options)
    open func start(completionHandler: @escaping MKMapSnapshotter.CompletionHandler) // defaults to the main queue
    open func start() async throws -> MKMapSnapshotter.Snapshot
    open func start(with queue: DispatchQueue, completionHandler: @escaping MKMapSnapshotter.CompletionHandler)
    open func start(with queue: DispatchQueue) async throws -> MKMapSnapshotter.Snapshot
    open func cancel()
    open var isLoading: Bool {

     get }
}

extension MKMapSnapshotter {


    @available(iOS 7.0, *)
    open class Options : NSObject, NSCopying {


        @NSCopying open var camera: MKMapCamera
        open var mapRect: MKMapRect
        open var region: MKCoordinateRegion
        open var mapType: MKMapType
        @available(iOS 13.0, *)
        @NSCopying open var pointOfInterestFilter: MKPointOfInterestFilter?
        @available(iOS, introduced: 7.0, deprecated: 13.0, message: "Use pointOfInterestFilter")
        open var showsPointsOfInterest: Bool
        open var showsBuildings: Bool
        open var size: CGSize
        @available(iOS, introduced: 7.0, deprecated: 100000, message: "Use traitCollection.displayScale")
        open var scale: CGFloat
        @available(iOS 13.0, *)
        @NSCopying open var traitCollection: UITraitCollection
    }
}
使用options进行地图的相关配置,使用MKMapSnapshotter进行快照。闭包返回一个UIImage和Bool
let mapImageSize = 440.0
func getMapSnapshot(region:MKCoordinateRegion, completionHandler: @escaping (UIImage, Bool) -> Void) {


    let options = MKMapSnapshotter.Options()
    options.pointOfInterestFilter = MKPointOfInterestFilter.includingAll
    options.region = region
    options.size = CGSize(width: mapImageSize, height: mapImageSize)
    options.showsBuildings = true
    let snapshot = MKMapSnapshotter(options: options)
    snapshot.start {

     (snapshot, error) in
        if ((error) != nil) {


            completionHandler(UIImage(), false)
        } else {


            if (snapshot?.image != nil) {


                completionHandler(snapshot!.image, true)
            } else {


                completionHandler(UIImage(), false)
            }
        }
    }
}
// 方法2,可以将用户位置图片直接绘制到截图中,也可以将图片放到视图里再显示,仅供参考
func getMapSnapshot2(region:MKCoordinateRegion, completionHandler: @escaping (Image, Bool) -> Void) {


    let options = MKMapSnapshotter.Options()
    options.pointOfInterestFilter = MKPointOfInterestFilter.includingAll
    options.region = region
    options.size = CGSize(width: mapImageSize, height: mapImageSize)
    options.showsBuildings = true
    let snapshot = MKMapSnapshotter(options: options)
    snapshot.start {

     (snapshot, error) in
        if ((error) != nil) {


            completionHandler(Image(""), false)
        } else {


            if (snapshot?.image != nil) {


                let snapShotImage = snapshot!.image
                if let pinImage = UIImage(named: "tkt_alltrack_startPoint") {


                    UIGraphicsBeginImageContextWithOptions(snapShotImage.size, true, snapShotImage.scale)
                    snapShotImage.draw(at: CGPoint.zero)
                    let fixedPinPoint = CGPoint(x: (options.size.width - pinImage.size.width) / 2, y: (options.size.height - pinImage.size.height) / 2)
                    pinImage.draw(at: fixedPinPoint)
                    let mapImage = UIGraphicsGetImageFromCurrentImageContext()
                    UIGraphicsEndImageContext()
                    DispatchQueue.main.async {


                        if (mapImage != nil) {


                            completionHandler(Image(uiImage: mapImage!), true)
                        } else {


                            completionHandler(Image(""), false)
                        }
                    }
                } else {


                    completionHandler(Image(""), false)
                }
            } else {


                completionHandler(Image(""), false)
            }
        }
    }
}
在getTimeLine方法中进行调用,其中MKCoordinateSpan的数值越小,地图缩放等级越大。
    func getTimeline(in context: Context, completion: @escaping (Timeline<LocationWidgetEntry>) -> ()) {


        let currentDate = Date()
        let refreshDate = Calendar.current.date(byAdding: .minute, value: 15, to: currentDate)!
        // 这里使用了一个固定的坐标,可以通过主程序将用户坐标传递过来
        let coordinate = CLLocationCoordinate2D(latitude: 31.203115, longitude: 121.598637)
        let region = MKCoordinateRegion(center:coordinate, span: MKCoordinateSpan(latitudeDelta: 0.01, longitudeDelta: 0.01))
        getMapSnapshot(region: region) {

     image, success in
            let entry    = LocationWidgetEntry(date: currentDate,image: image, success: success)
            let timeline = Timeline(entries: [entry], policy: .after(refreshDate))
            completion(timeline)
        }
    }
再写一个简单的视图
struct LocationWidgetEntryView : View {


    var entry: LocationWidgetProvider.Entry
    var body: some View {


        if (entry.success) {


        	ZStack(alignment: .center) {


				Image(uiImage: entry.image)
                	.resizable()
                    .frame(width: mapImageSize, height: mapImageSize)
                    .scaledToFill()
                Image("tkt_alltrack_startPoint")
                    .resizable()
                    .frame(width: 20, height: 20)
                    .shadow(color: .gray, radius: 5)
            }
        } else {


            Text("截图失败了")
        }
    }
}

定位
使用CLLocationManager可以在小组件进行定位,前提是需要在小组件的Info.plist文件中添加权限
Widget Wants Location 为 YES 时程序位置权限中会出现“使用App或小组件期间”选项。需要请求权限时也会弹出相应提示。
当主程序定位权限为“始终”或“使用App或小组件期间”两个选项时,小组件都可以请求到位置。

判断小组件是否支持定位可以使用字段authorizedForWidgetUpdates

代码
var widgetLocationManager = WidgetLocationManager()

func getTimeline(in context: Context, completion: @escaping (Timeline<LocationWidgetEntry>) -> ()) {


    let currentDate = Date()
    let refreshDate = Calendar.current.date(byAdding: .minute, value: 15, to: currentDate)!
    widgetLocationManager.fetchLocation(handler: {

     location in
        print(location)
        let entry    = LocationWidgetEntry(date: currentDate,coordinate: location.coordinate)
        let timeline = Timeline(entries: [entry], policy: .after(refreshDate))
        completion(timeline)
    })
}

class WidgetLocationManager: NSObject, CLLocationManagerDelegate {


    var locationManager: CLLocationManager?
    private var handler: ((CLLocation) -> Void)?

    override init() {


        super.init()
        DispatchQueue.main.async {


            self.locationManager = CLLocationManager()
            self.locationManager!.delegate = self
            if self.locationManager!.authorizationStatus == .notDetermined {


                self.locationManager!.requestWhenInUseAuthorization()
            }
        }
    }

    func fetchLocation(handler: @escaping (CLLocation) -> Void) {


        self.handler = handler
        self.locationManager!.requestLocation()
    }

    func locationManager(_ manager: CLLocationManager, didUpdateLocations locations: [CLLocation]) {


        self.handler!(locations.last!)
    }

    func locationManager(_ manager: CLLocationManager, didFailWithError error: Error) {


        print(error)
    }
}

struct LocationWidgetEntryView : View {


    var entry: LocationWidgetProvider.Entry
    var body: some View {


        VStack() {


			Text("latitude:\(entry.coordinate.latitude)")
			Text("longitude:\(entry.coordinate.longitude)")
       }
    }
}

问题
目前,还有一下问题没有解决,如果有人知道请联系我,欢迎大家一起讨论解决方案!!!!!
适配黑暗模式
地图的小组件的地图是可以在黑暗模式时自动切换到黑暗模式的,但MKMapSnapshotter的截图只能有亮色模式的。目前还不知道怎么解决。

2022年12月15日已解决
对于MKMapSnapshotter有如下方法可以设置暗黑模式
let options = MKMapSnapshotter.Options()
options.pointOfInterestFilter = MKPointOfInterestFilter.includingAll
options.region = region
options.size = size
options.showsBuildings = true
options.traitCollection = UITraitCollection(traitsFrom: [
    options.traitCollection,
    UITraitCollection(userInterfaceStyle: .dark)
])
所以我们可以对截图方法稍微进行改造,使其可以接收是否黑暗模式的参数
func getMapSnapshot(region:MKCoordinateRegion, size: CGSize ,isDark:Bool ,completionHandler: @escaping (UIImage, Bool) -> Void) {


    let options = MKMapSnapshotter.Options()
    options.pointOfInterestFilter = MKPointOfInterestFilter.includingAll
    options.region = region
    options.size = size
    options.showsBuildings = true
    options.traitCollection = UITraitCollection(traitsFrom: [
        options.traitCollection,
        UITraitCollection(userInterfaceStyle: isDark ? .dark : .light)
    ])
    let snapshot = MKMapSnapshotter(options: options)
    snapshot.start {

     (snapshot, error) in
        if ((error) != nil) {


            completionHandler(UIImage(), false)
        } else {


            if (snapshot?.image != nil) {


                completionHandler(snapshot!.image, true)
            } else {


                completionHandler(UIImage(), false)
            }
        }
    }
}
// 但是这样写的话,调用就会变成
getMapSnapshot(region: region, size: context.displaySize, isDark: false) {

     lightImage, lightSuccess in
	getMapSnapshot(region: region, size: context.displaySize,isDark: true) {

     darkImage, darkSuccess in
		let entry = LocationWidgetEntry(date: currentDate, lightImage: lightImage, darkImage: darkImage, success: (lightSuccess && darkSuccess))
		let timeline = Timeline(entries: [entry], policy: .after(refreshDate))
		completion(timeline)
	}
}
这样写不够优雅,我们可以用GCD包裹一下。
func getMapSnapshotWithGCD(region:MKCoordinateRegion, size: CGSize ,completionHandler: @escaping (_ lightImage: UIImage, _ darkImage: UIImage, _ success: Bool) -> Void) {


    let group = DispatchGroup()
    let queue = DispatchQueue(label: "com.widget.MKMapSnapshotter")
    var lightSuccess = false
    var darkSuccess = false
    var lightImage = UIImage()
    var darkImage = UIImage()
    group.enter()
    queue.async {


        getMapSnapshot(region: region, size: size, isDark: false) {

     image, success in
            lightImage = image
            lightSuccess = success
            group.leave()
        }
    }
    group.enter()
    queue.async {


        getMapSnapshot(region: region, size: size, isDark: true) {

     image, success in
            darkImage = image
            darkSuccess = success
            group.leave()
        }
    }
    group.notify(queue: DispatchQueue.main) {


        let doubleSuccess = (lightSuccess && darkSuccess)
        completionHandler(lightImage, darkImage, doubleSuccess)
    }
}

// 在TimeLine中调用就会更优雅一些
getMapSnapshotWithGCD(region: region, size: context.displaySize) {

     lightImage, darkImage, success in
	let entry = LocationWidgetEntry(date: currentDate, lightImage: lightImage, darkImage: darkImage, success: success)
	let timeline = Timeline(entries: [entry], policy: .after(refreshDate))
	completion(timeline)
}

// 视图使用环境变量进行判断
struct LocationWidgetEntryView : View {


    @Environment(\.widgetFamily) var family
    @Environment(\.colorScheme) var colorScheme
    var entry: LocationWidgetProvider.Entry
    var body: some View {


        if (family == .systemLarge) {


            if (entry.success) {


                ZStack(alignment: .center) {


                    Image(uiImage: colorScheme == .dark ? entry.darkImage : entry.lightImage)
                        .resizable()
                        .scaledToFill()
                    Ellipse()
                        .fill(Color.gray.opacity(0.8))
                        .frame(width: 15, height: 8)
                    ZStack(alignment: .top) {


                        Image("nh_annotation_bg_boy")
                            .resizable()
                            .frame(width: 72, height: 80)
                        Image("icon_upload_avatar_boy")
                            .resizable()
                            .frame(width: 60, height: 60)
                            .offset(y:6)
                    }
                    .offset(y:-40)
                }

            } else {


                VStack {


                    Text("截图失败了")
                }
            }
        } else  {


            if (entry.success) {


                ZStack(alignment: .center) {


                    Image(uiImage: colorScheme == .dark ? entry.darkImage : entry.lightImage)
                        .resizable()
                        .scaledToFill()
                    Image("tkt_alltrack_startPoint")
                        .resizable()
                        .frame(width: 20, height: 20)
                        .shadow(color: .gray, radius: 5)
                }

            } else {


                VStack {


                    Text("截图失败了")
                }
            }
        }
    }
}
这样写完,在切换系统的显示模式的时候,地图的截图也会跟随替换颜色了。
中心点偏移问题
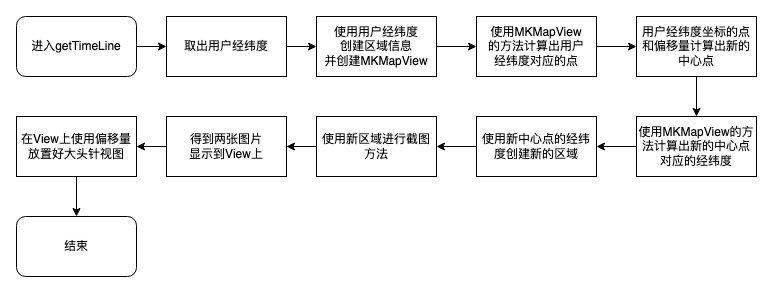
MKMapSnapshotter截图出来,用户坐标会显示在中心,但是设计师想要将用户坐标进行偏移(小尺寸向下15,向右25;中尺寸向下15向右90),然而使用将图片放大,移动显示图片中心点的方法是不可行的,因为中尺寸需要宽度增加180,超出了截图的限制,导致失败。
2022年12月19日已解决
只能算出新的中心点的经纬度坐标去截图,再将大头针元素放置到原来的经纬度坐标上,这样就可以只截图小组件尺寸的图片。
struct LocationWidgetEntry: TimelineEntry {


    let date: Date
    let offsetX:CGFloat
    let offsetY:CGFloat
    let lightImage: UIImage
    let darkImage: UIImage
    let success:Bool
}

struct LocationWidgetProvider: TimelineProvider {


    var widgetLocationManager = WidgetLocationManager()
    let emptyEntry = LocationWidgetEntry(date: Date(),offsetX: 0,offsetY: 0,lightImage: UIImage(), darkImage: UIImage(), success: false)

    func placeholder(in context: Context) -> LocationWidgetEntry {


        emptyEntry
    }

    func getSnapshot(in context: Context, completion: @escaping (LocationWidgetEntry) -> ()) {


        completion(emptyEntry)
    }

    func getTimeline(in context: Context, completion: @escaping (Timeline<LocationWidgetEntry>) -> ()) {


        // 当前时间
        let currentDate = Date()
        // 刷新时间:15分钟后
        let refreshDate = Calendar.current.date(byAdding: .minute, value: 15, to: currentDate)!
        // 地图精细度
        let delta = 0.01
        // 纬度
        let la = 31.203115
        // 经度
        let lo = 121.598637
        // Y轴偏移量
        let offsetY = 15.0
        // X轴偏移量
        var offsetX = 25.0
        if context.family == .systemMedium {


            offsetX = 90.0
        }
        // 用户坐标
        let coordinate = CLLocationCoordinate2D(latitude:la , longitude: lo)
        // 用户区域
        let region = MKCoordinateRegion(center:coordinate, span: MKCoordinateSpan(latitudeDelta: delta, longitudeDelta: delta))
        // 计算用地图
        let map = MKMapView(frame: CGRect(x: 0, y: 0, width: context.displaySize.width, height: context.displaySize.height))
        map.region = region
        // 用户点
        let point = map.convert(coordinate, toPointTo: map)
        // 新中心点
        let cPoint = CGPoint(x: point.x - offsetX, y: point.y - offsetY)
        // 新中心坐标
        let cCoordinate = map.convert(cPoint, toCoordinateFrom: map)
        // 新中心区域
        let cRegion = MKCoordinateRegion(center:cCoordinate, span: MKCoordinateSpan(latitudeDelta: delta, longitudeDelta: delta))
        // 截图
        getMapSnapshotWithGCD(region: cRegion, size: context.displaySize) {

     lightImage, darkImage, success in
            let entry = LocationWidgetEntry(date: currentDate, offsetX: offsetX, offsetY: offsetY, lightImage: lightImage, darkImage: darkImage, success: success)
            let timeline = Timeline(entries: [entry], policy: .after(refreshDate))
            completion(timeline)
        }
    }
}

struct LocationWidgetEntryView : View {


    @Environment(\.widgetFamily) var family
    @Environment(\.colorScheme) var colorScheme
    var entry: LocationWidgetProvider.Entry
    var body: some View {


        if (entry.success) {


            ZStack(alignment: .center) {


                Image(uiImage: colorScheme == .dark ? entry.darkImage : entry.lightImage) // 适配暗黑模式
                    .resizable()
                    .scaledToFit()
                Ellipse()
                    .fill(Color.gray.opacity(0.8))
                    .frame(width: 15, height: 8)
                    .offset(x: entry.offsetX, y: entry.offsetY) // 偏移到用户位置
                ZStack(alignment: .top) {


                    Image("nh_annotation_bg_boy")
                        .resizable()
                        .frame(width: 72, height: 80)
                    Image("icon_upload_avatar_boy")
                        .resizable()
                        .frame(width: 60, height: 60)
                        .offset(y:6)
                }
                .offset(x: entry.offsetX, y: (entry.offsetY - 40)) // 偏移到用户位置,并升高到自己的底部对齐
            }
        } else {


            VStack {


                Text("截图失败了")
            }
        }
    }
}

延迟问题
使用上面的代码请求定位,结果返回有5s-20s的延迟,不知道是什么原因。
本篇参考文献
《10 Tips on Developing iOS 14 Widgets》
《ShowingMapsInWidgets》
《SHOWING MAP PREVIEW WITH MKMAPSNAPSHOTTER》
《Fetching current location in iOS 14 Widget》
《Accessing Location Information in Widgets》
小组件参考文献总结
《Widgets》
《How to create Widgets in iOS 14 in Swift》
《Add configuration and intelligence to your widgets》
《Creating a Widget Extension》
《Keeping a Widget Up To Date》
《Making a Configurable Widget》
《SwiftUI-Text》
《混编之oc调用swift》
《从开发者的角度看 iOS 14 小组件》
《iOS14WidgetKit开发实战1-4》
《iOS14 Widget 开发相关及易报错地方处理》
《iOS小组件Widget踩坑》
《iOS小组件Widget从0到1开发》
《Swift-Realm数据库的使用详解》
《iOS14 WidgetKit小试牛刀-用户配置与intent》
【iOS14】仿网易云桌面小组件(一)
【iOS14】仿网易云桌面小组件(二)
【iOS14】仿网易云桌面小组件(三)
【iOS14】仿网易云桌面小组件(四)
《iOS14 Widget开发踩坑(一)修正版-初识别与刷新》
《iOS14 Widget开发踩坑(二)修正版-多个小组件》
《iOS14 Widget开发踩坑(三)数据通信与用户配置》
《iOS14 Widget开发踩坑(四)伪透明的实现和其他研究》