文章目录
效果演示


QML语法 ClickableImageV2.qml
import QtQuick 2.0

// 用于创建一个可点击的项目(Item)
Item {


    id:root
    // 设置项目的宽度为column子元素的宽度。
    width: column.childrenRect.width
    height: column.childrenRect.height

    // 定义一个名为text的属性,该属性与label的text属性关联,允许在外部访问和修改该属性。
    property alias text: label.text
    property alias source: image.source

    // signal clicked - 声明一个clicked信号,表示项目被点击的事件。
    signal clicked

    Column {


        id:column
        spacing: 10
        Image {


            id: image
            sourceSize: Qt.size(90,90)
        }

        Text {


            id: label
           width: image.width
           // 设置文本的水平对齐方式为居中对齐。
            horizontalAlignment: Text.AlignHCenter
            wrapMode: Text.WordWrap
            color: "#000000"
        }
    }

    MouseArea {


        // 设置鼠标区域的大小与父元素(即Item)相同。
        anchors.fill: parent
        // 当鼠标区域被点击时,触发项目的clicked信号
        onClicked: root.clicked()
    }
}
QML语法 EasingCurves.qml
import QtQuick 2.12
import QtQuick.Window 2.12
import QtQuick.Controls 2.12
import QtQuick.Layouts 1.3


Rectangle {


    id: root

        property int duration: 3000
        property Item ufo: ufo
        property Item ufo1: ufo1

        width: 600
        height: 400

        Image {


            anchors.fill: parent
            source: "pic//2.jpg"
        }

        ClickableImageV2 {


            id: ufo
            x: 20; y: root.height-height
            text: qsTr('ufo')
            clip: false
            visible: true
            source: "pic//3.jpg"
            onClicked: anim.restart()
        }

        ClickableImageV2 {


            id: ufo1
            x:120; y: root.height-height
            text: qsTr('ufo1')
            clip: false
            visible: true
            source: "pic//4.jpg"
            onClicked: anim1.restart()
        }


        // 并行动画
        ParallelAnimation {


            id: anim
            NumberAnimation {


                target: ufo
                properties: "y"
                to: 20
                duration: root.duration
            }
            NumberAnimation {


                target: ufo
                properties: "x"
                to: 160
                duration: root.duration
            }
        }

        // 连续动画 顺序动画按照声明的顺序运行每个子动画:从上到下。
        SequentialAnimation {


               id: anim1
               NumberAnimation {


                   target: ufo1
                   properties: "y"
                   to: 20
                   // 60% of time to travel up
                   duration: root.duration * 0.6
               }
               NumberAnimation {


                   target: ufo1
                   properties: "x"
                   to: 400
                   // 40% of time to travel sideways
                   duration: root.duration * 0.4
               }
           }

}
时钟小球滚动QML 源码
import QtQuick 2.12
import QtQuick.Window 2.12
import QtQuick.Controls 2.12
import QtQuick.Layouts 1.3
import Qt.labs.calendar 1.0

Rectangle {


    id: root
    property int duration: 3000

       width: 600
       height: 400

    // 上面的蓝色矩形高度为200像素,下面的矩形固定在天空的底部和根元素的底部。
    Rectangle {


        id: sky
        width: parent.width
        height: 200
        gradient: Gradient {


            GradientStop {

     position: 0.0; color: "#0080FF" }
            GradientStop {

     position: 1.0; color: "#66CCFF" }
        }
    }
    Rectangle {


        id: ground
        anchors.top: sky.bottom
        anchors.bottom: root.bottom
        width: parent.width
        gradient: Gradient {


            GradientStop {

     position: 0.0; color: "#00FF00" }
            GradientStop {

     position: 1.0; color: "#00803F" }
        }
    }

    Image {


        id: ball
        x: 0; y: root.height-height
        source: "pic//clock.png"

        // 该图像附有一个鼠标区域。如果球被点击,球的位置将重置,动画将重新开始。
        MouseArea {


            anchors.fill: parent
            onClicked: {


                ball.x = 0
                ball.y = root.height-ball.height
                ball.rotation = 0
                anim.restart()
            }
        }
    }

    ParallelAnimation {


        id: anim
        SequentialAnimation {


            NumberAnimation {


                target: ball
                properties: "y"
                to: 20
                duration: root.duration * 0.4
                easing.type: Easing.OutCirc
            }
            NumberAnimation {


                target: ball
                properties: "y"
                to: root.height-ball.height
                duration: root.duration * 0.6
                easing.type: Easing.OutBounce
            }
        }
        NumberAnimation {


            target: ball
            properties: "x"
            to: root.width-ball.width
            duration: root.duration
        }
        RotationAnimation {


            target: ball
            properties: "rotation"
            to: 720
            duration: root.duration
        }
    }
}
## 时钟小球滚动QML解释
导入 QtQuick 2.12
导入 QtQuick.Window 2.12
导入 QtQuick.Controls 2.12
导入 QtQuick.Layouts 1.3
导入 Qt.labs.calendar 1.0
矩形 {
id: root
属性 int duration: 3000
   宽度: 600
   高度: 400

// 上面的蓝色矩形高度为200像素,下面的矩形固定在天空的底部和根元素的底部。
矩形 {
    id: 天空
    宽度: 父宽度
    高度: 200
    渐变: 渐变 {
        渐变停止 { 位置: 0.0; 颜色: "#0080FF" }
        渐变停止 { 位置: 1.0; 颜色: "#66CCFF" }
    }
}
矩形 {
    id: 地面
    锚点.顶: 天空.底部
    锚点.底: root.底部
    宽度: 父宽度
    渐变: 渐变 {
        渐变停止 { 位置: 0.0; 颜色: "#00FF00" }
        渐变停止 { 位置: 1.0; 颜色: "#00803F" }
    }
}

图像 {
    id: 球
    x: 0; y: root.高度-高度
    源: "图片//clock.png"

    // 该图像附有一个鼠标区域。如果球被点击,球的位置将重置,动画将重新开始。
    鼠标区域 {
        锚点.填充: 父
        当被点击时: {
            球.x = 0
            球.y = root.高度-球.高度
            球.旋转 = 0
            动画.restart()
        }
    }
}

并行动画 {
    id: 动画
    顺序动画 {
        数字动画 {
            目标: 球
            属性: "y"
            到: 20
            持续时间: root.duration * 0.4
            缓动类型: Easing.OutCirc
        }
        数字动画 {
            目标: 球
            属性: "y"
            到: root.高度-球.高度
            持续时间: root.duration * 0.6
            缓动类型: Easing.OutBounce
        }
    }
    数字动画 {
        目标: 球
        属性: "x"
        到: root.宽度-球.宽度
        持续时间: root.duration
    }
    旋转动画 {
        目标: 球
        属性: "旋转"
        到: 720
        持续时间: root.duration
    }
}
}
语法解释
这段代码使用了QtQuick库来创建一个用户界面。其中的Rectangle是界面的根元素。
-
id: root: 为Rectangle元素指定唯一的标识符root。 -
property int duration: 3000: 定义了一个名为duration的整型属性,初始值为3000。 -
property Item ufo: ufo: 定义了一个名为ufo的Item类型属性,对应的对象为ufo。 -
property Item ufo1: ufo1: 定义了一个名为ufo1的Item类型属性,对应的对象为ufo1。 -
width: 600: 设置Rectangle的宽度为600。 -
height: 400: 设置Rectangle的高度为400。 -
Image元素嵌套在Rectangle内部,用于显示图像。anchors.fill: parent表示将图像的尺寸与父元素Rectangle相同,source指定图像的来源为"pic//2.jpg"。
-
ClickableImageV2元素代表可点击的图像对象。id属性指定了唯一的标识符ufo,其他属性设置了其位置、文本、可见性和图像来源。onClicked事件指定了当点击这个图像对象时,执行anim动画对象的restart()方法。
-
同样地,定义了另一个ClickableImageV2元素,它代表另一个可点击的图像对象,拥有独特的id、位置、文本、可见性和图像来源。当点击该图像对象时,执行anim1动画对象的restart()方法。
-
ParallelAnimation元素表示并行动画,其中包含了两个NumberAnimation元素。第一个NumberAnimation对象设定了目标为ufo对象,通过改变y属性使其移动到y=20的位置,持续时间为root.duration所指定的时间。第二个NumberAnimation对象设定了目标为ufo对象,通过改变x属性使其移动到x=160的位置,同样持续时间为root.duration。
-
SequentialAnimation元素表示连续动画,其中包含了两个NumberAnimation元素。这些动画将按顺序依次执行。第一个动画设定了目标为ufo1对象,通过改变y属性使其移动到y=20的位置,持续时间为root.duration * 0.6,即运动时间的60%。第二个动画设定了目标为ufo1对象,通过改变x属性使其移动到x=400的位置,持续时间为root.duration * 0.4,即运动时间的40%。
整个代码块实现了一个用户界面,其中包含了图像、可点击的图像对象以及并行和连续的动画效果。
参考
动画片
动画应用于属性更改。当属性值改变时,动画定义从一个值到另一个值的插值曲线。这些动画曲线创建从一个值到另一个值的平滑过渡。
动画由一系列要制作动画的目标属性、插值曲线的缓动曲线和持续时间定义。Qt Quick中的所有动画都由同一个定时器控制,因此是同步的。这提高了动画的性能和视觉质量。
动画使用值插值控制属性如何变化
这是一个基本概念。QML基于元素、属性和脚本。每个元素都提供了几十个属性,每个属性都等着你来激活。在书中,你会看到这是一个壮观的竞技场。
你会发现自己在看一些动画,欣赏它们的美丽,也欣赏你的创作天才。请记住:动画控制属性的变化,每个元素都有几十个属性供您使用.
// AnimationExample.qml

import QtQuick

Image {


    id: root
    source: "assets/background.png"

    property int padding: 40
    property int duration: 4000
    property bool running: false

    Image {


        id: box
        x: root.padding;
        y: (root.height-height)/2
        source: "assets/box_green.png"

        NumberAnimation on x {


            to: root.width - box.width - root.padding
            duration: root.duration
            running: root.running
        }
        RotationAnimation on rotation {


            to: 360
            duration: root.duration
            running: root.running
        }
    }

    MouseArea {


        anchors.fill: parent
        onClicked: root.running = true
    }

}
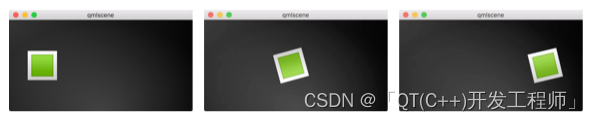
上面的示例显示了一个应用于x和rotation属性。每个动画的持续时间为4000毫秒。动画开始了x将对象的x坐标逐渐移动到240像素。旋转动画从当前角度运行到360度。这两个动画并行运行,并在MouseArea被点击。
您可以通过更改to和duration属性,或者您可以添加另一个动画(例如,在opacity或者甚至是scale). 将这些结合起来,它看起来就像是物体正在消失在太空深处。试试吧!
动画元素
有几种类型的动画元素,每一种都针对特定的用例进行了优化。以下是最著名的动画列表:
-
PropertyAnimation-显示属性值的变化
-
NumberAnimation-显示真实类型值的变化
-
ColorAnimation-动画显示颜色值的变化
-
RotationAnimation-动画显示旋转值的变化
除了这些基本的和广泛使用的动画元素,Qt Quick还为特定的用例提供了更专业的动画:
-
PauseAnimation-为动画提供暂停
-
SequentialAnimation-允许动画按顺序运行
-
ParallelAnimation-允许动画并行运行
-
AnchorAnimation-动画显示锚值的变化
-
ParentAnimation-激发父值的变化
-
SmoothedAnimation-允许属性平滑地跟踪值
-
SpringAnimation-允许属性以类似弹簧的动作跟踪值
-
PathAnimation-沿路径动画显示项目
-
Vector3dAnimation-动画显示QVector3d值的变化
稍后我们将学习如何创建一个动画序列。在处理更复杂的动画时,有时需要在正在进行的动画过程中更改属性或运行脚本。为此,Qt Quick提供了动作元素,这些元素可以在任何可以使用其他动画元素的地方使用:
-
PropertyAction-指定动画期间的即时属性更改
-
ScriptAction-定义动画期间要运行的脚本
主要的动画类型将在这一章中使用小的、集中的例子来讨论。
应用动画
动画可以多种方式应用:
属性动画-在元素完全加载后自动运行
财产行为-当属性值改变时自动运行
独立动画-在使用显式启动动画时运行start()或者running被设置为真(例如,通过属性绑定)
稍后我们还将看到如何在状态转换中使用动画。
可点击图像V2
为了演示动画的用法,我们重用了前一章中的ClickableImage组件,并用一个文本元素扩展了它。
// ClickableImageV2.qml
// Simple image which can be clicked

import QtQuick

Item {


    id: root
    width: container.childrenRect.width
    height: container.childrenRect.height
    property alias text: label.text
    property alias source: image.source
    signal clicked

    Column {


        id: container
        Image {


            id: image
        }
        Text {


            id: label
            width: image.width
            horizontalAlignment: Text.AlignHCenter
            wrapMode: Text.WordWrap
            color: "#ececec"
        }
    }

    MouseArea {


        anchors.fill: parent
        onClicked: root.clicked()
    }
}
为了组织图像下方的元素,我们使用了列定位器,并根据列的childrenRect属性计算了宽度和高度。我们公开了文本和图像源属性,以及一个点击信号。我们还希望文本和图像一样宽,并且可以换行。我们通过使用文本元素的wrapMode财产。
父/子几何从属关系
由于几何相关性的反转(父几何依赖于子几何),我们不能设置width/height在ClickableImageV2上,因为这会破坏我们的width/height装订。
如果项目更像是其他项目的容器,并且应该适应父项的几何体,则应该更喜欢子项的几何体依赖于父项的几何体。
上升的物体
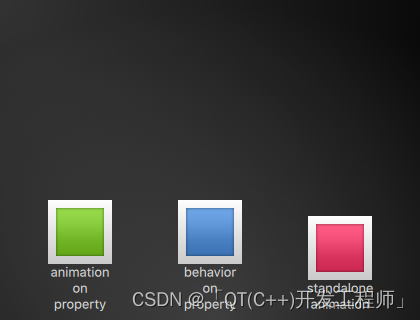
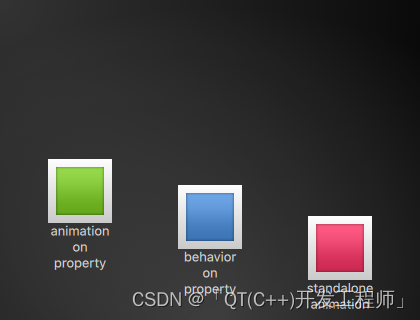
这三个对象都在相同的y位置(y=200).他们都需要前往y=40每一种都使用不同的方法,具有不同的副作用和特点。
第一个对象
第一个对象使用Animation on 策略。动画会立即开始。
ClickableImageV2 {


    id: greenBox
    x: 40; y: root.height-height
    source: "assets/box_green.png"
    text: qsTr("animation on property")
    NumberAnimation on y {


        to: 40; duration: 4000
    }
}
当单击一个对象时,它的y位置被重置为起始位置,这适用于所有对象。在第一个对象上,只要动画在运行,重置就没有任何效果。
这可能会在视觉上造成干扰,因为在动画开始前的几分之一秒内,y位置被设置为新值。应该避免这种竞争性的属性变化.
第二个对象
第二个对象使用Behavior on动画。此行为告诉属性它应该对值的每次变化进行动画处理。可以通过设置来禁用该行为enabled: false在……上Behavior元素。
ClickableImageV2 {


    id: blueBox
    x: (root.width-width)/2; y: root.height-height
    source: "assets/box_blue.png"
    text: qsTr("behavior on property")
    Behavior on y {


        NumberAnimation {

     duration: 4000 }
    }

    onClicked: y = 40
    // random y on each click
    // onClicked: y = 40 + Math.random() * (205-40)
}
当您单击对象时,它将开始移动(其y位置将设置为40)。另一次单击没有影响,因为位置已经设置。
您可以尝试使用随机值(例如40 + (Math.random() * (205-40))为y位置。您将看到对象将始终动画到新位置,并调整其速度以匹配动画持续时间定义的目的地的4秒钟。
第三个对象
第三个对象使用独立动画。动画被定义为它自己的元素,几乎可以出现在文档中的任何地方。
ClickableImageV2 {


    id: redBox
    x: root.width-width-40; y: root.height-height
    source: "assets/box_red.png"
    onClicked: anim.start()
    // onClicked: anim.restart()

    text: qsTr("standalone animation")

    NumberAnimation {


        id: anim
        target: redBox
        properties: "y"
        to: 40
        duration: 4000
    }
}
单击将使用动画的开始动画start()功能。每个动画都有start()、stop()、resume()和restart()函数。动画本身包含的信息比早期的其他动画类型多得多。
我们需要定义target,它是要制作动画的元素,以及我们要制作动画的属性的名称。我们还需要定义一个to值,在本例中是一个from值,该值允许动画重新开始。
单击背景会将所有对象重置到其初始位置。第一个对象不能被重新启动,除非通过重新启动程序来触发元素的重新加载。
控制动画的其他方式
另一种启动/停止动画的方法是将属性绑定到running动画的属性。当用户输入控制属性时,这尤其有用:
NumberAnimation {


    // [...]
    // animation runs when mouse is pressed
    running: area.pressed
}
MouseArea {


    id: area
}
缓和曲线
属性的值更改可以由动画控制。缓动属性允许影响属性更改的插值曲线。
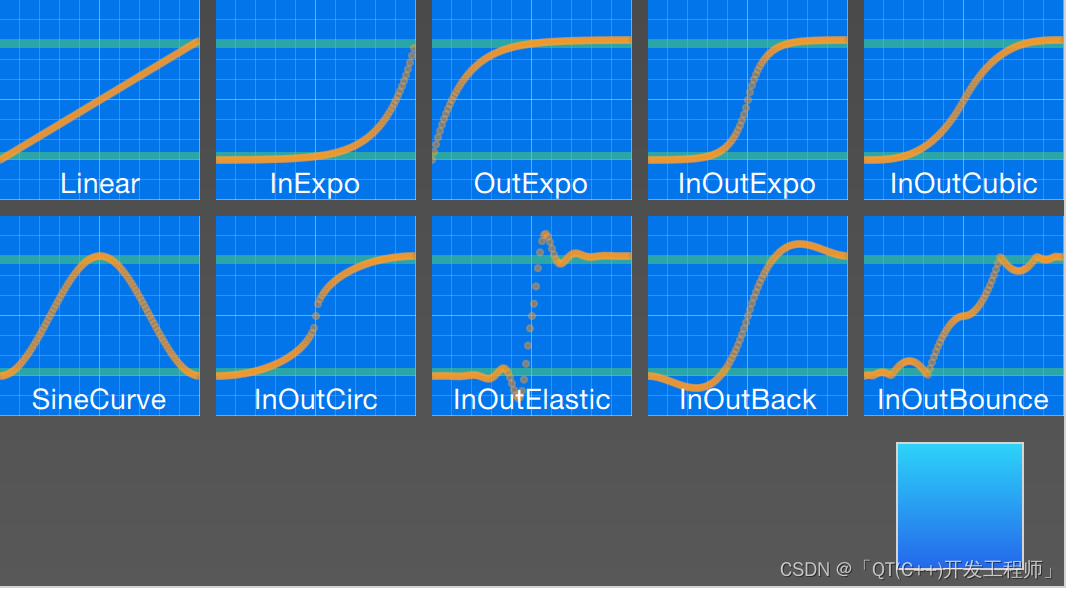
我们现在定义的所有动画都使用线性插值,因为动画的初始缓动类型是Easing.Linear。最好用一个小图来可视化,其中y轴是要制作动画的属性,x轴是时间(期间).线性插值将从from动画开始时的值添加到to动画结束时的值。所以缓动类型定义了变化曲线。
应该仔细选择缓动类型,以支持移动对象的自然配合。例如,当页面滑出时,页面最初应该缓慢滑出,然后获得动量以最终高速滑出,类似于翻页。
动画不应该被过度使用。
与UI设计的其他方面一样,动画应该被精心设计以支持UI流,而不是主导它。眼睛对移动的物体非常敏感,动画很容易分散用户的注意力。
在下一个例子中,我们将尝试一些缓和曲线。每个缓动曲线都由一个可单击的图像显示,单击该图像时,将在square动画,然后触发一个restart()使用新曲线运行动画。
这个例子的代码变得稍微复杂了一点。我们首先创建一个网格EasingTypes和一个Box这由缓动类型控制。缓动类型仅显示长方体用于动画的曲线。当用户点击缓和曲线时,框根据缓和曲线在一个方向上移动。动画本身是一个独立的动画,目标设置为长方体,并配置为持续时间为2秒的x属性动画。
EasingType的内部实时呈现曲线,感兴趣的读者可以在EasingCurves举例。
// EasingCurves.qml

import QtQuick
import QtQuick.Layouts

Rectangle {


    id: root
    width: childrenRect.width
    height: childrenRect.height

    color: '#4a4a4a'
    gradient: Gradient {


        GradientStop {

     position: 0.0; color: root.color }
        GradientStop {

     position: 1.0; color: Qt.lighter(root.color, 1.2) }
    }

    ColumnLayout {


        Grid {


            spacing: 8
            columns: 5
            EasingType {


                easingType: Easing.Linear
                title: 'Linear'
                onClicked: {


                    animation.easing.type = easingType
                    box.toggle = !box.toggle
                }
            }
            EasingType {


                easingType: Easing.InExpo
                title: "InExpo"
                onClicked: {


                    animation.easing.type = easingType
                    box.toggle = !box.toggle
                }
            }
            EasingType {


                easingType: Easing.OutExpo
                title: "OutExpo"
                onClicked: {


                    animation.easing.type = easingType
                    box.toggle = !box.toggle
                }
            }
            EasingType {


                easingType: Easing.InOutExpo
                title: "InOutExpo"
                onClicked: {


                    animation.easing.type = easingType
                    box.toggle = !box.toggle
                }
            }
            EasingType {


                easingType: Easing.InOutCubic
                title: "InOutCubic"
                onClicked: {


                    animation.easing.type = easingType
                    box.toggle = !box.toggle
                }
            }
            EasingType {


                easingType: Easing.SineCurve
                title: "SineCurve"
                onClicked: {


                    animation.easing.type = easingType
                    box.toggle = !box.toggle
                }
            }
            EasingType {


                easingType: Easing.InOutCirc
                title: "InOutCirc"
                onClicked: {


                    animation.easing.type = easingType
                    box.toggle = !box.toggle
                }
            }
            EasingType {


                easingType: Easing.InOutElastic
                title: "InOutElastic"
                onClicked: {


                    animation.easing.type = easingType
                    box.toggle = !box.toggle
                }
            }
            EasingType {


                easingType: Easing.InOutBack
                title: "InOutBack"
                onClicked: {


                    animation.easing.type = easingType
                    box.toggle = !box.toggle
                }
            }
            EasingType {


                easingType: Easing.InOutBounce
                title: "InOutBounce"
                onClicked: {


                    animation.easing.type = easingType
                    box.toggle = !box.toggle
                }
            }
        }
        Item {


            height: 80
            Layout.fillWidth: true
            Box {


                id: box
                property bool toggle
                x: toggle ? 20 : root.width - width - 20
                anchors.verticalCenter: parent.verticalCenter
                gradient: Gradient {


                    GradientStop {

     position: 0.0; color: "#2ed5fa" }
                    GradientStop {

     position: 1.0; color: "#2467ec" }
                }
                Behavior on x {


                    NumberAnimation {


                        id: animation
                        duration: 500
                    }
                }
            }
        }
    }
}
请播放示例,观察动画中速度的变化。有些动画对对象来说感觉更自然,而有些则令人不快。
除了duration和easing.type,您可以微调动画。例如,将军PropertyAnimation类型(大多数动画都继承自该类型)还支持easing.amplitude, easing.overshoot,以及easing.period属性,这些属性允许您微调特定缓动曲线的行为。
并非所有缓动曲线都支持这些参数。请参考放松桌 (打开新窗口)从PropertyAnimation检查缓动参数是否对缓动曲线有影响的文档。
选择正确的动画
为用户界面上下文中的元素选择正确的动画对结果至关重要。记住动画应该支持UI流;不刺激用户。
分组动画
通常动画会比仅仅制作一个属性的动画更复杂。您可能希望同时或一个接一个地运行几个动画,甚至在两个动画之间执行一个脚本。
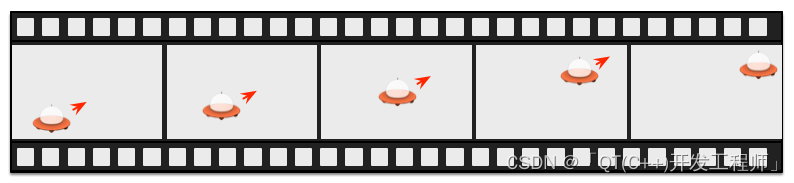
为此,可以使用成组的动画。顾名思义,可以对动画进行分组。分组有两种方式:并行或顺序。您可以使用SequentialAnimation或者ParallelAnimation元素,它们充当其他动画元素的动画容器。这些成组的动画本身就是动画,可以完全照原样使用。
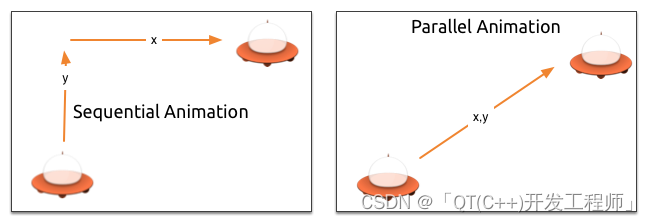
并行动画
并行动画的所有直接子动画在启动时并行运行。这允许您同时设置不同属性的动画。
// ParallelAnimationExample.qml
import QtQuick

BrightSquare {


    id: root

    property int duration: 3000
    property Item ufo: ufo

    width: 600
    height: 400

    Image {


        anchors.fill: parent
        source: "assets/ufo_background.png"
    }

    ClickableImageV3 {


        id: ufo
        x: 20; y: root.height-height
        text: qsTr('ufo')
        source: "assets/ufo.png"
        onClicked: anim.restart()
    }

    ParallelAnimation {


        id: anim
        NumberAnimation {


            target: ufo
            properties: "y"
            to: 20
            duration: root.duration
        }
        NumberAnimation {


            target: ufo
            properties: "x"
            to: 160
            duration: root.duration
        }
    }
}
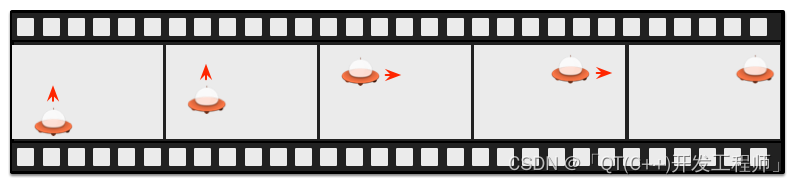
连续动画
顺序动画按照声明的顺序运行每个子动画:从上到下。
// SequentialAnimationExample.qml
import QtQuick

BrightSquare {


    id: root

    property int duration: 3000
    property Item ufo: ufo

    width: 600
    height: 400

    Image {


        anchors.fill: parent
        source: "assets/ufo_background.png"
    }

    ClickableImageV3 {


        id: ufo
        x: 20; y: root.height-height
        text: qsTr('rocket')
        source: "assets/ufo.png"
        onClicked: anim.restart()
    }

    SequentialAnimation {


        id: anim
        NumberAnimation {


            target: ufo
            properties: "y"
            to: 20
            // 60% of time to travel up
            duration: root.duration * 0.6
        }
        NumberAnimation {


            target: ufo
            properties: "x"
            to: 400
            // 40% of time to travel sideways
            duration: root.duration * 0.4
        }
    }
}
嵌套动画
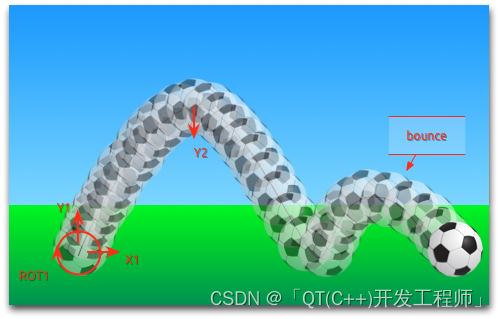
分组动画也可以嵌套。例如,一个连续动画可以有两个并行动画作为子动画,依此类推。我们可以用一个足球的例子来想象这一点。这个想法是从左向右扔一个球,并设置其行为的动画。
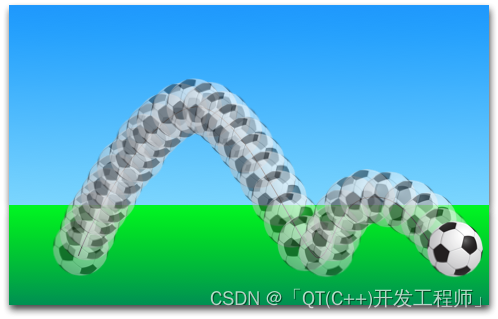
为了理解动画,我们需要把它分解成物体的整体变换。我们需要记住,动画是属性变化的动画。以下是不同的转换:
从左到右的x平移(X1)
从底部到顶部的y平移(Y1)后跟从上至下的翻译(Y2)随着一些弹跳
在动画的整个持续时间内旋转360度(ROT1)
动画的整个持续时间应该是三秒钟。
我们从一个空项目开始,作为宽度为480、高度为300的根元素。
import QtQuick

Item {


    id: root

    property int duration: 3000

    width: 480
    height: 300

    // [...]
}
我们已经定义了我们的总动画持续时间,作为更好地同步动画部分的参考。
下一步是添加背景,在我们的例子中是两个带有绿色和蓝色渐变的矩形。
Rectangle {


    id: sky
    width: parent.width
    height: 200
    gradient: Gradient {


        GradientStop {

     position: 0.0; color: "#0080FF" }
        GradientStop {

     position: 1.0; color: "#66CCFF" }
    }
}
Rectangle {


    id: ground
    anchors.top: sky.bottom
    anchors.bottom: root.bottom
    width: parent.width
    gradient: Gradient {


        GradientStop {

     position: 0.0; color: "#00FF00" }
        GradientStop {

     position: 1.0; color: "#00803F" }
    }
}
上面的蓝色矩形高度为200像素,下面的矩形固定在天空的底部和根元素的底部。
让我们把足球带到草地上。球是一个图像,存储在“assets/soccer_ball.png”下。首先,我们想把它放在左下角,靠近边缘。
Image {


    id: ball
    x: 0; y: root.height-height
    source: "assets/soccer_ball.png"

    MouseArea {


        anchors.fill: parent
        onClicked: {


            ball.x = 0
            ball.y = root.height-ball.height
            ball.rotation = 0
            anim.restart()
        }
    }
}
该图像附有一个鼠标区域。如果球被点击,球的位置将重置,动画将重新开始。
让我们先从两个y平移的连续动画开始。
SequentialAnimation {


    id: anim
    NumberAnimation {


        target: ball
        properties: "y"
        to: 20
        duration: root.duration * 0.4
    }
    NumberAnimation {


        target: ball
        properties: "y"
        to: 240
        duration: root.duration * 0.6
    }
}

这指定总动画持续时间的40%是向上动画,60%是向下动画,每个动画按顺序依次运行。变换在线性路径上设置动画,但是当前没有曲线。稍后将使用缓动曲线添加曲线,此时我们正专注于将变换动画化。
接下来,我们需要添加x平移。x平移应该与y平移并行运行,所以我们需要将y平移序列与x平移一起封装到并行动画中。
ParallelAnimation {


    id: anim
    SequentialAnimation {


        // ... our Y1, Y2 animation
    }
    NumberAnimation {

     // X1 animation
        target: ball
        properties: "x"
        to: 400
        duration: root.duration
    }
}

最后,我们希望球旋转。为此,我们需要在并行动画中添加另一个动画。我们选择RotationAnimation,因为它专门用于旋转。
ParallelAnimation {


    id: anim
    SequentialAnimation {


        // ... our Y1, Y2 animation
    }
    NumberAnimation {

     // X1 animation
        // X1 animation
    }
    RotationAnimation {


        target: ball
        properties: "rotation"
        to: 720
        duration: root.duration
    }
}
这就是整个动画序列。剩下的一件事就是为球的运动提供正确的缓动曲线。为了Y1动画,我们使用一个Easing.OutCirc曲线,因为这应该看起来更像一个圆形运动。Y2是使用Easing.OutBounce让球反弹,反弹应该发生在最后(尝试与Easing.InBounce您将看到弹跳立即开始)。
这X1和ROT1动画保持原样,带有一条线性曲线。
以下是最终的动画代码,供您参考:
ParallelAnimation {


    id: anim
    SequentialAnimation {


        NumberAnimation {


            target: ball
            properties: "y"
            to: 20
            duration: root.duration * 0.4
            easing.type: Easing.OutCirc
        }
        NumberAnimation {


            target: ball
            properties: "y"
            to: root.height-ball.height
            duration: root.duration * 0.6
            easing.type: Easing.OutBounce
        }
    }
    NumberAnimation {


        target: ball
        properties: "x"
        to: root.width-ball.width
        duration: root.duration
    }
    RotationAnimation {


        target: ball
        properties: "rotation"
        to: 720
        duration: root.duration
    }
}