在实际的使用中,我们有时希望把 Elasticsearch 的索引保存到 JSON 文件中。在之前,我写了一篇管如何备份 Elasticsearch 索引的文章 “Elasticsearch:索引备份及恢复”。在今天,我们使用一种 Python 的方法来做进一步的探讨。你可以将单个 Elasticsearch 索引中的所有事件导出到 JSON 文件。 此脚本使用 Elasticsearch python API 调用 PIT 和 search_after 一次导出 10,000 个事件,并继续下去,直到所有事件都导出为止。 可以从单个 Elasticsearch 索引导出数百万个事件。有关 Elasticsearch 分页的操作,请参考文章 “Elasticsearch:分页搜索结果”。
我将从如下的几个方面来讲述:
- 下载 ElasticsearchExporter
- 配置连接到 Elasticsearch 集群的设置
- 通过导出单个索引来测试设置
- 过滤导出
- 未来更新
在下面的展示中,我将使用最新的 Elastic Stack 8.8.2 来进行展示。
安装
如果你还没有安装好自己的 Elasticsearch 及 Kibana,请参阅如下的链接:
在安装的时候,我们选择使用 Elastic Stack 8.x 的安装手册来进行安装。在默认的情况下,Elasticsearch 的安装是带有 https 的安全访问。
准备数据
在今天的练习中,我们使用 Kibana 自带的数据来进行展示:
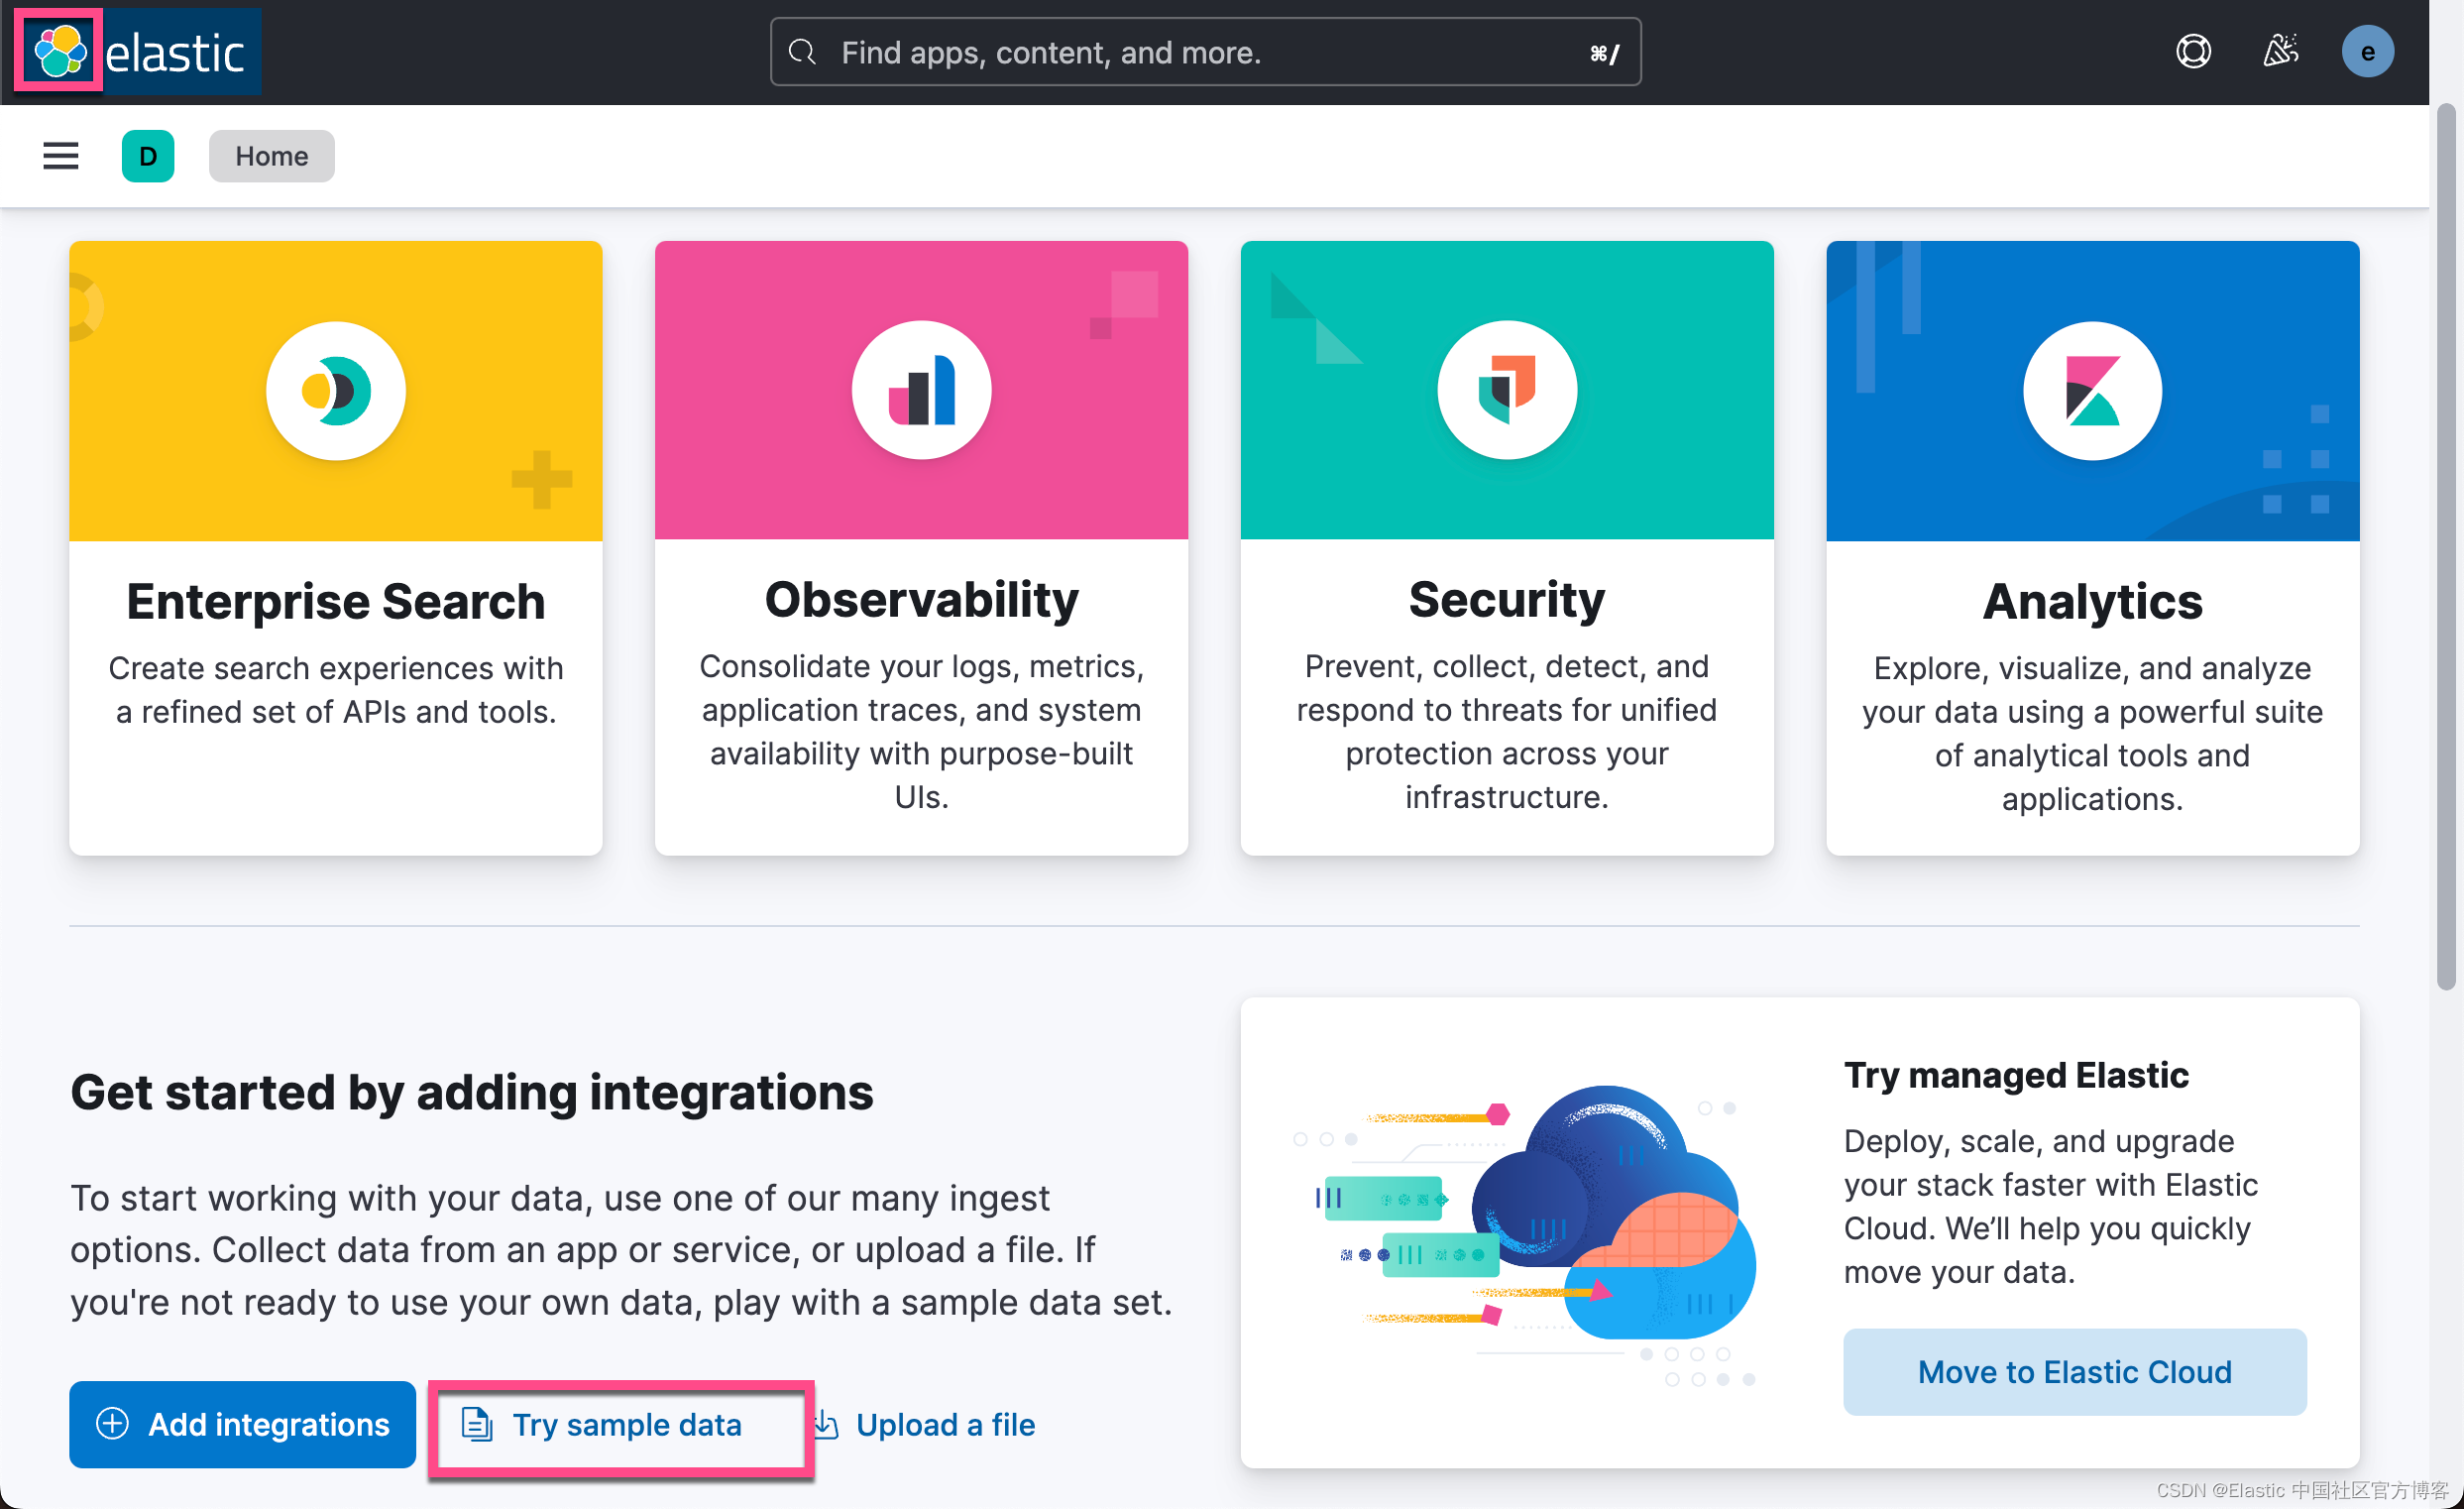

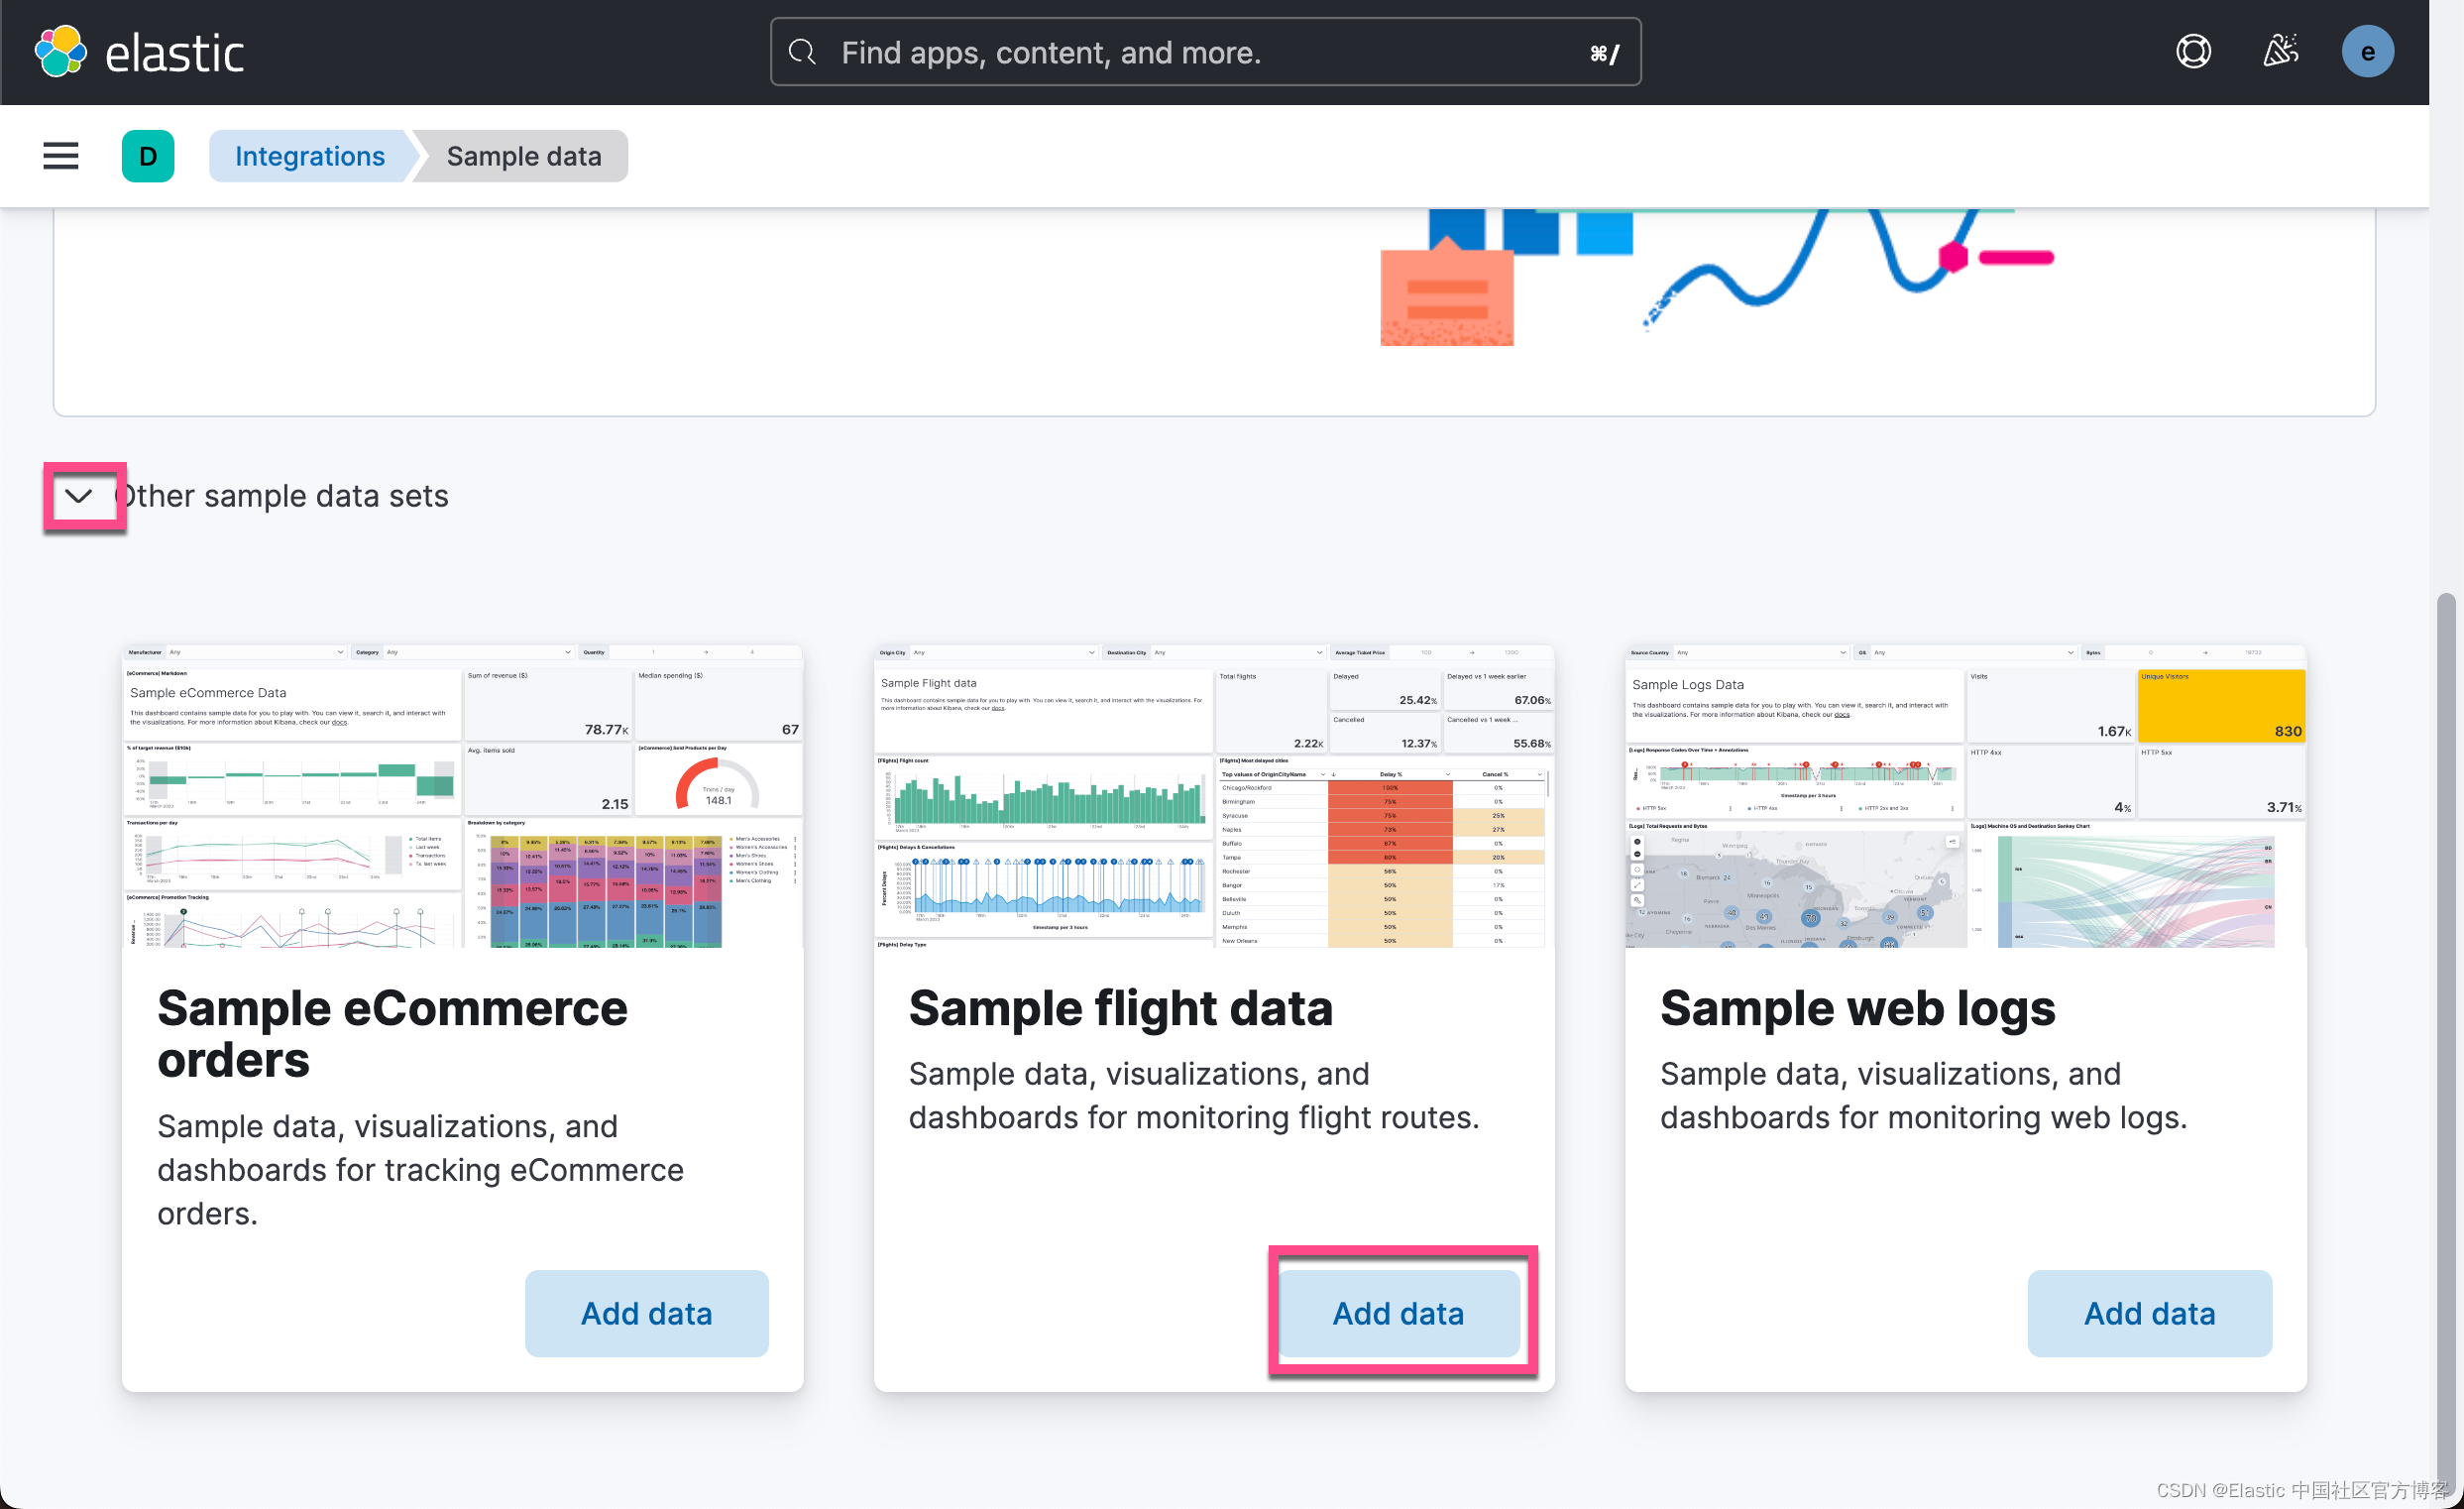
在执行完上面动作后,我们就会在 Elasticsearch 中看到一个新创建的 kibana_sample_data_flights 索引。
导出索引
为了能够导出 kibana_sample_data_flights,我们分为如下的几个步骤:
下载 ElasticsearchExporter
我们使用如下的命令来下载 ElasticsearchExporter
git clone https://github.com/liu-xiao-guo/ElasticsearchExporter
cd ElasticsearchExporter
pip3 install -r requirements.txt
配置连接到 Elasticsearch 集群的设置
我们可以参考之前的博文 “Elasticsearch:关于在 Python 中使用 Elasticsearch 你需要知道的一切 - 8.x” 来配置如何在 Python 客户端中连接到 Elasticsearch 集群。我们需要修改 ElasticExporterSettings.py。
如果你的 Elasticsearch 集群使用 https,则使用此命令查找指纹并更新 CERT_FINGERPRINT。
$ openssl s_client -connect localhost:9200 -servername localhost -showcerts </dev/null 2>/dev/null | while openssl x509 -sha256 -subject -issuer -fingerprint -noout 2>/dev/null; do :; done
subject=CN = liuxgm.local
issuer=CN = Elasticsearch security auto-configuration HTTP CA
sha256 Fingerprint=B8:B3:2F:CD:A4:D4:26:EA:E9:33:87:EA:CB:18:0B:11:68:21:0E:85:25:7C:D6:B4:12:31:9A:8F:2A:B3:BB:13
subject=CN = Elasticsearch security auto-configuration HTTP CA
issuer=CN = Elasticsearch security auto-configuration HTTP CA
sha256 Fingerprint=BD:0A:26:DC:64:6E:F1:CB:3C:B5:E1:32:E7:7D:61:13:E1:B4:6D:56:EE:39:0D:D3:C6:F0:B2:D2:B1:69:62:C4
要获得没有冒号的 fingerprint,我们可以使用如下的命令来直接进行获得:
$ pwd
/Users/liuxg/elastic/elasticsearch-8.8.2/config/certs
$ openssl x509 -in http_ca.crt -sha256 -fingerprint | grep sha256 | sed 's/://g'
sha256 Fingerprint=BD0A26DC646EF1CB3CB5E132E77D6113E1B46D56EE390DD3C6F0B2D2B16962C4
当然获得 fingerprint 最直接的方法是打开 config/kibana.yml 文件:
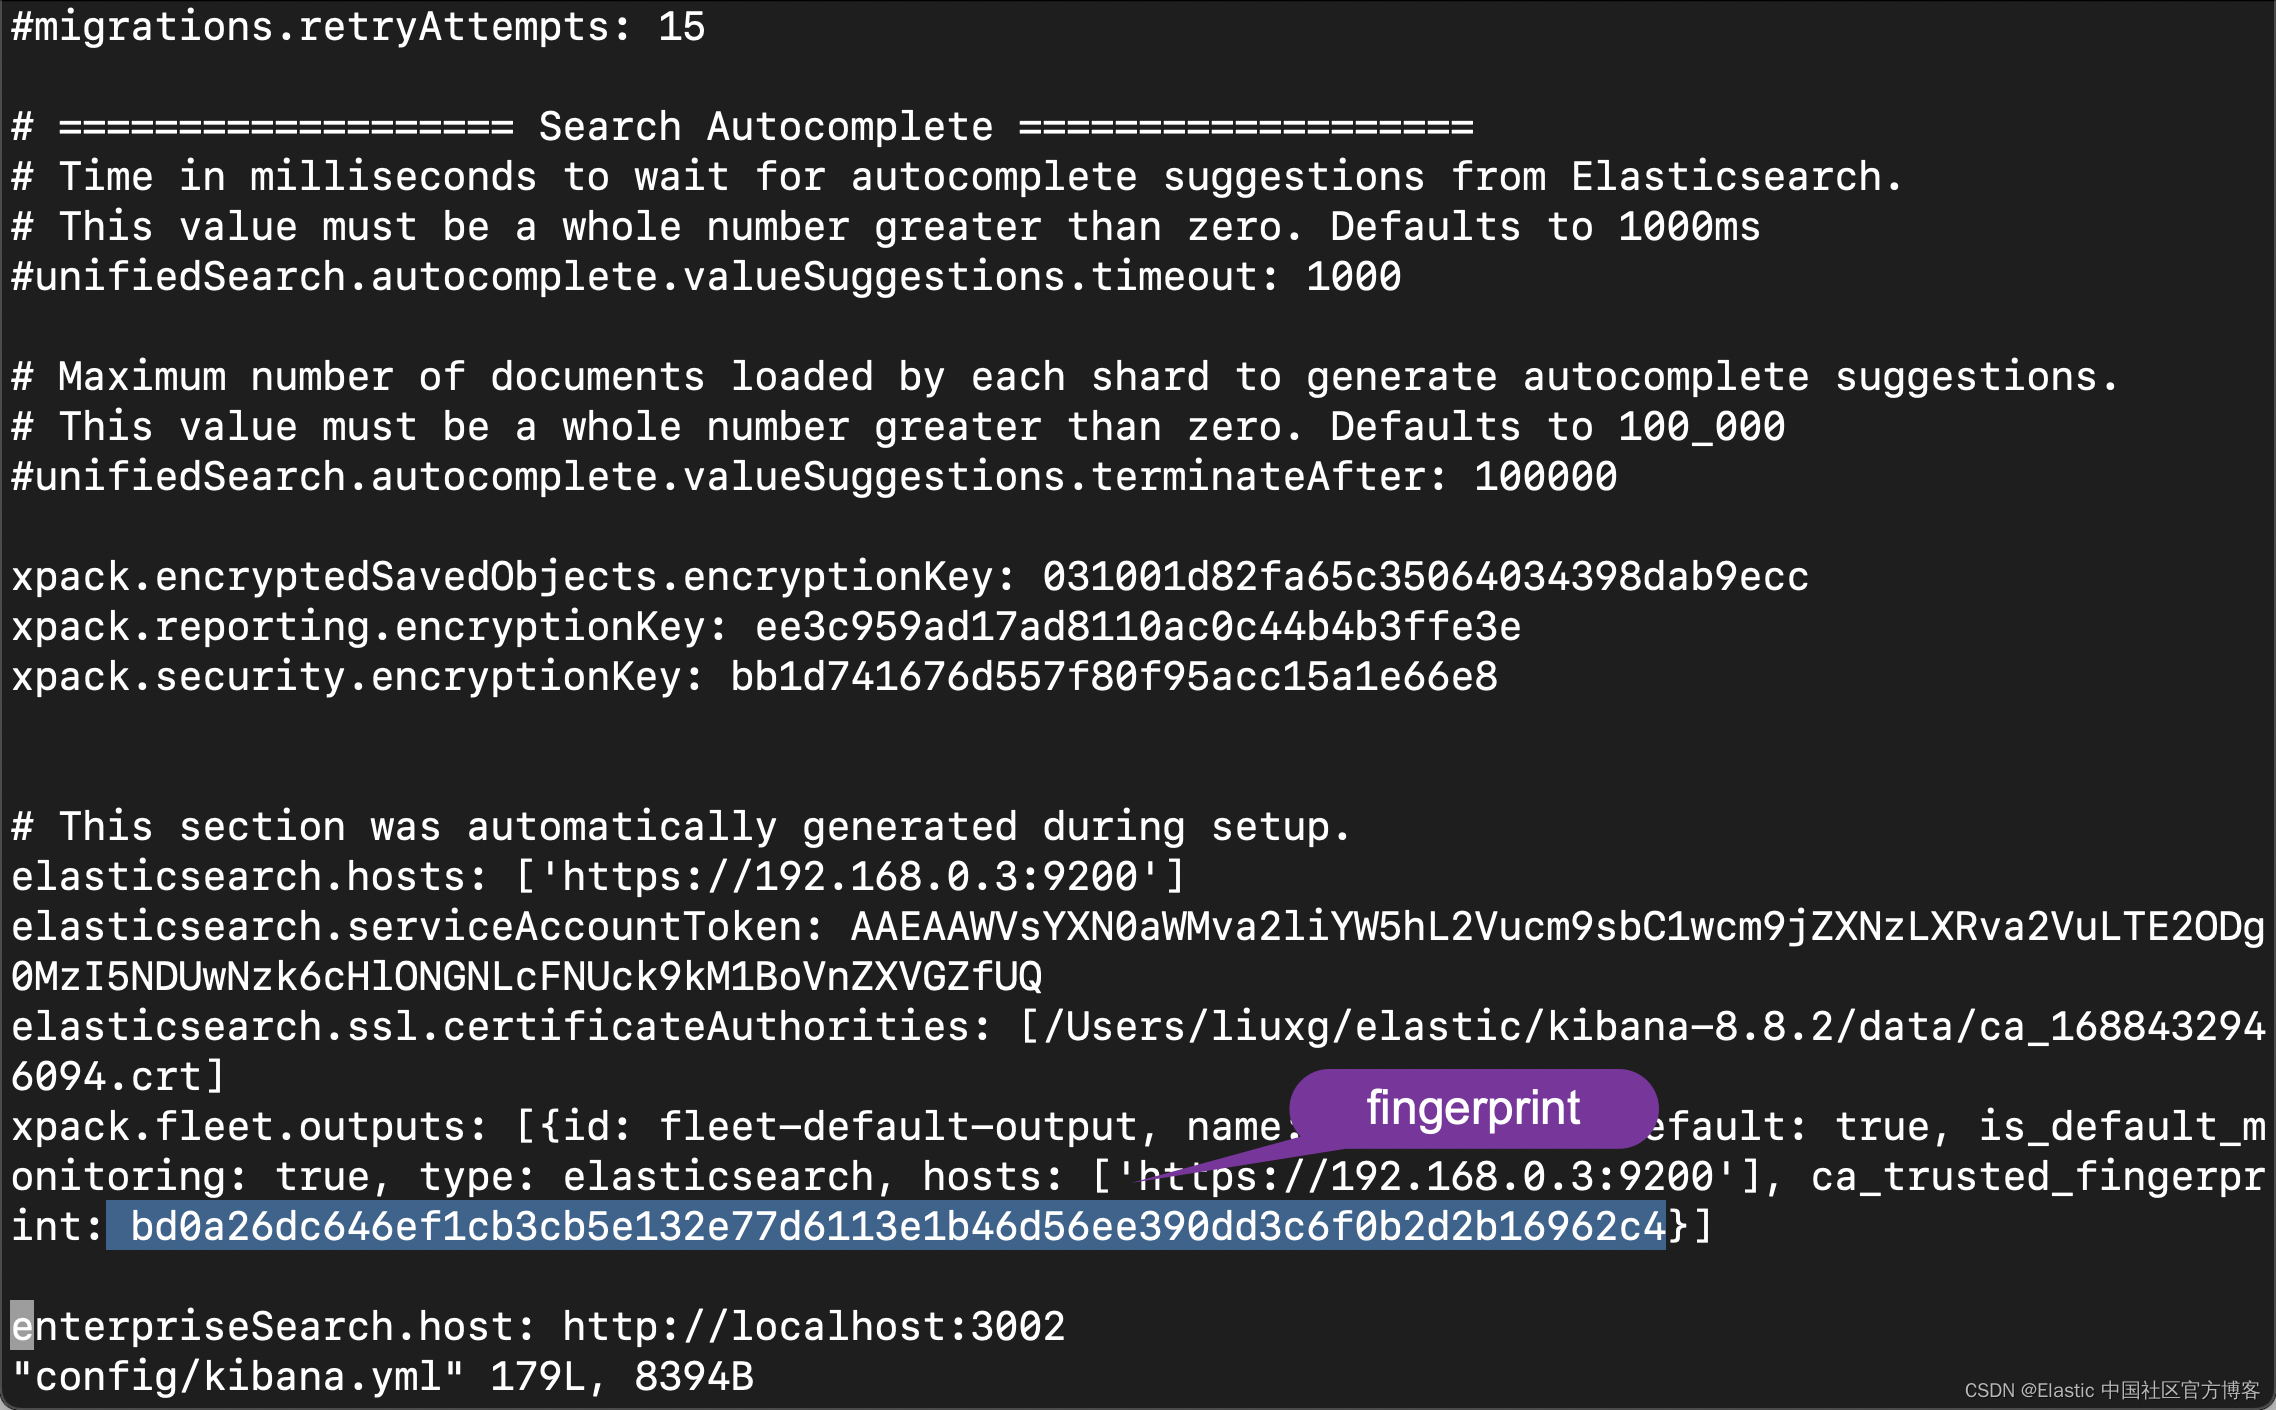
有了 fingerprint 值,我们还必须获得 elastic 超级用户及其密码。打开 ElasticExporterSettings.py 文件:
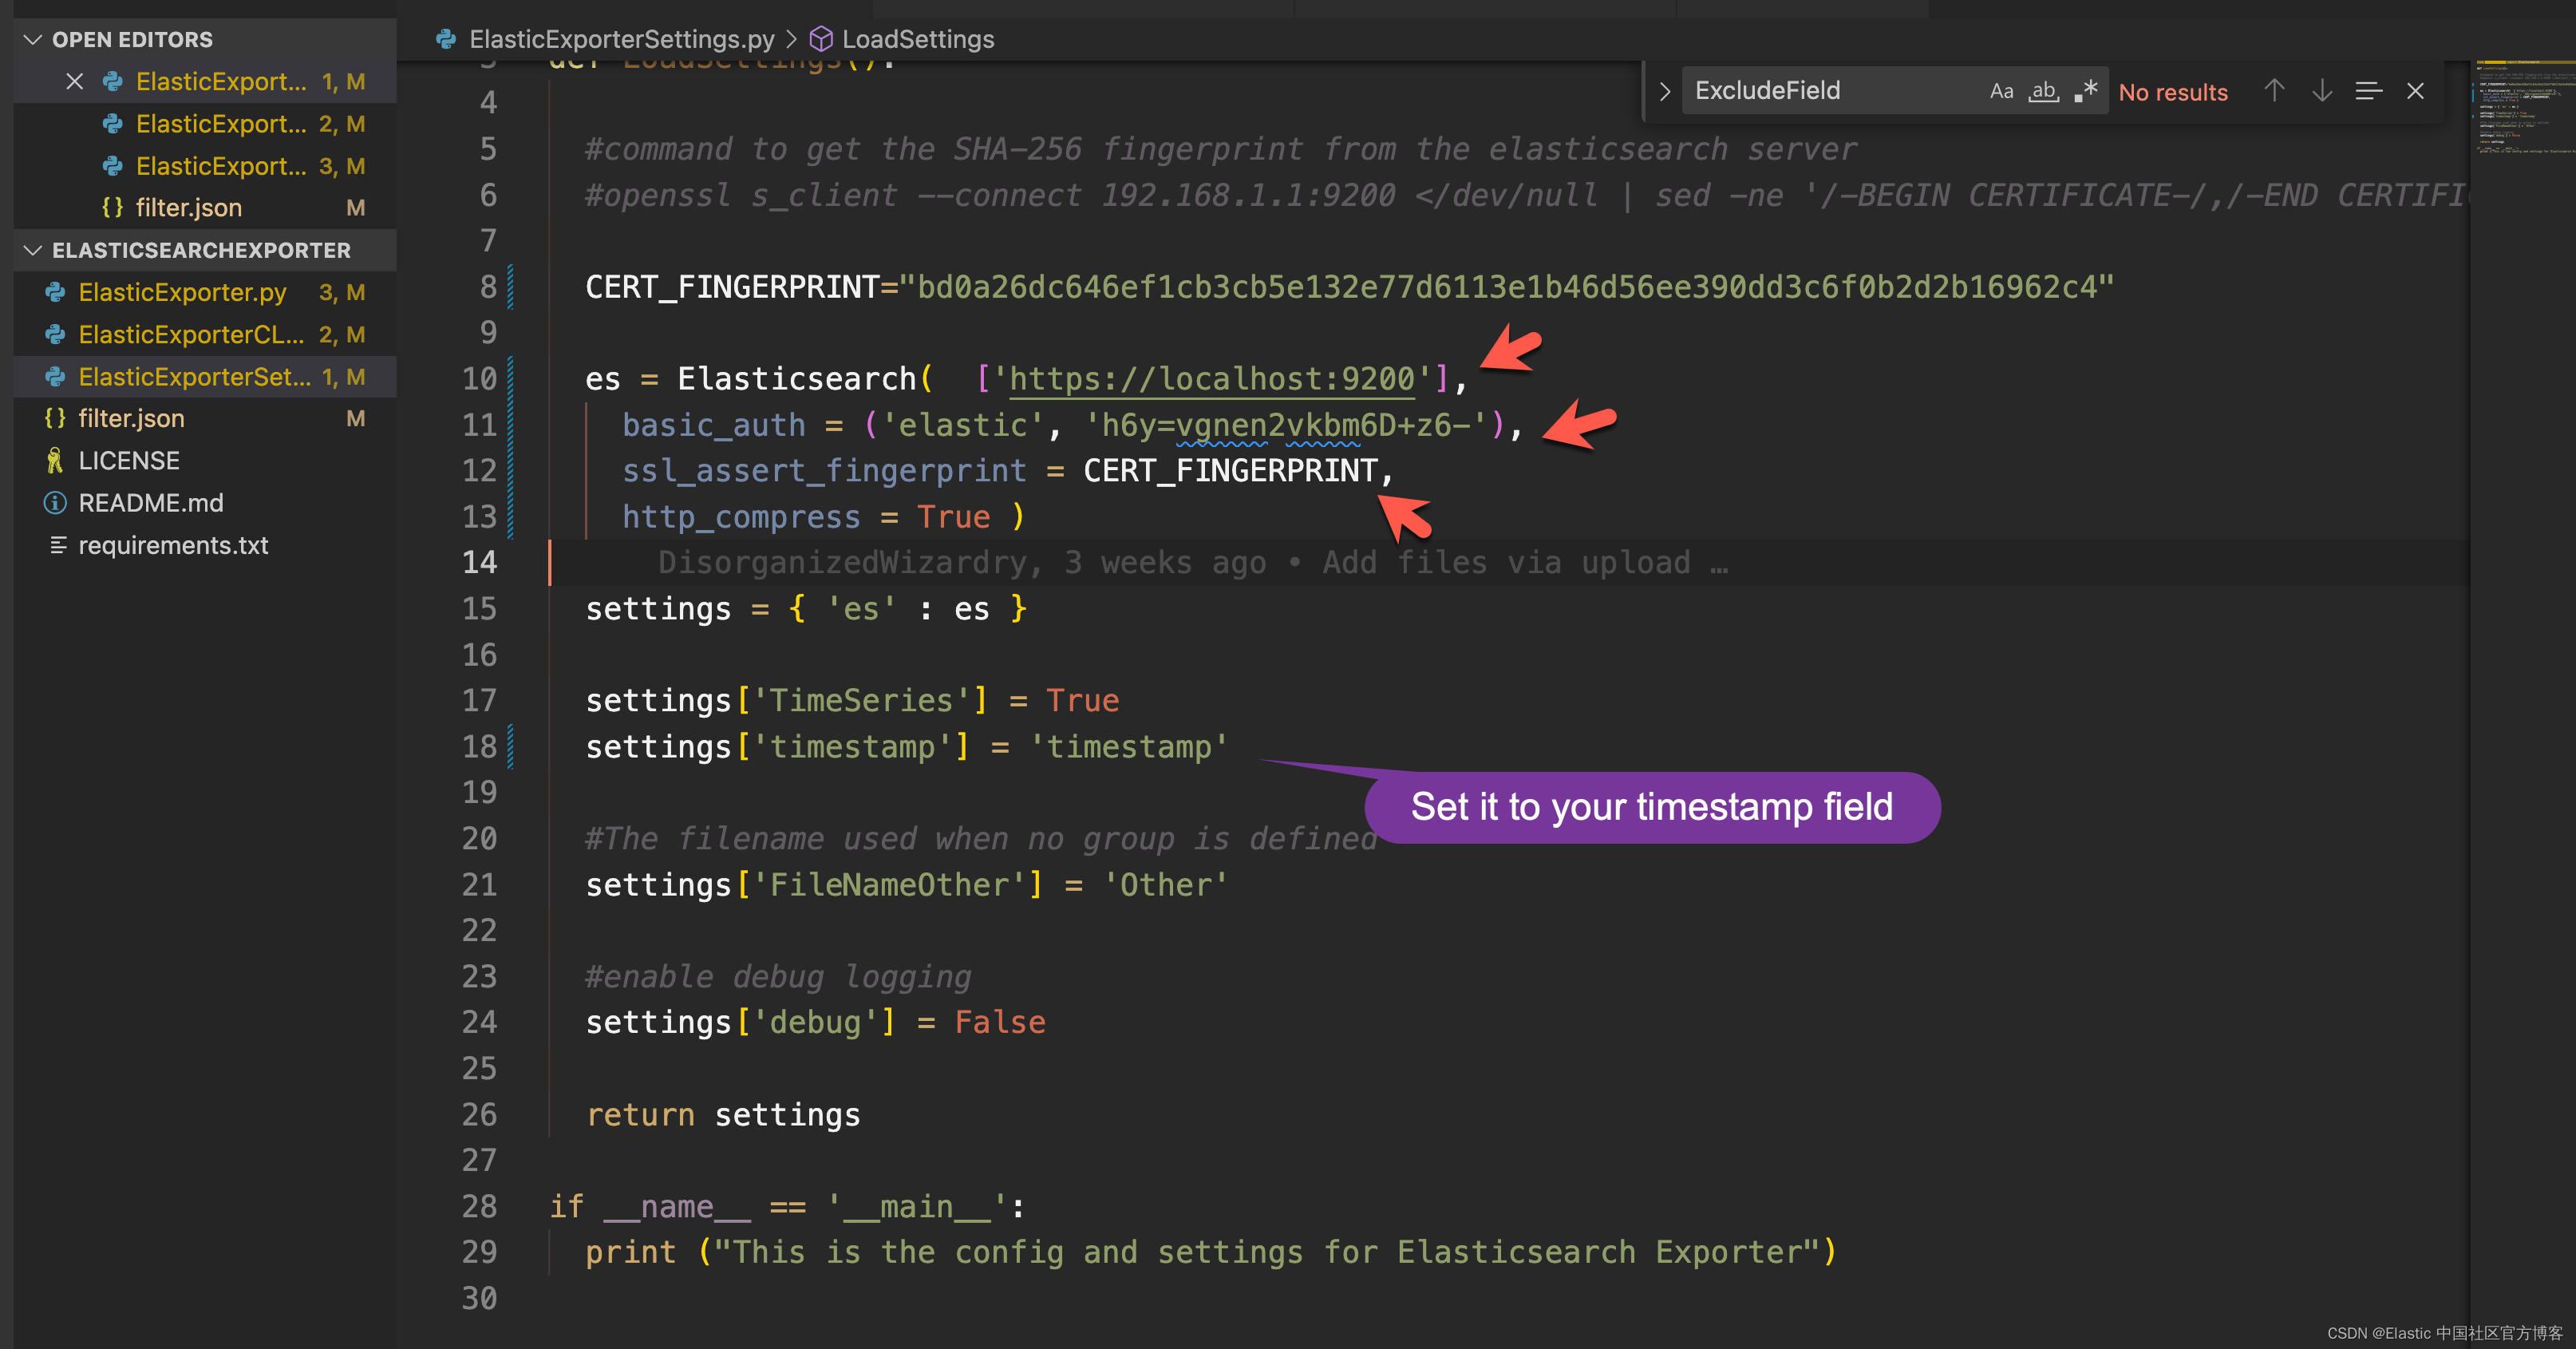
总结一下,你需要修改三个部分:
- 你的集群的 CERT_FINGERPRINT
- 每个 Elasticsearch 服务器的 IP 地址。 可以使用 DNS 名称代替 IP 地址。
- 用户名和密码
通过导出单个索引来测试设置
作为测试脚本是否配置正确并且能够连接到 Elasticsearch 集群的测试,我将使用此命令导出单个索引中的所有文档。我们首先在当前目录创建以叫做 exported 的子目录:
$ pwd
/Users/liuxg/tmp/ElasticsearchExporter
$ mkdir exported
$ ls
ElasticExporter.py         LICENSE                    filter.json
ElasticExporterCLI.py      README.md                  requirements.txt
ElasticExporterSettings.py exported
python3 ElasticExporterCLI.py --index=kibana_sample_data_flights --backup-folder=exported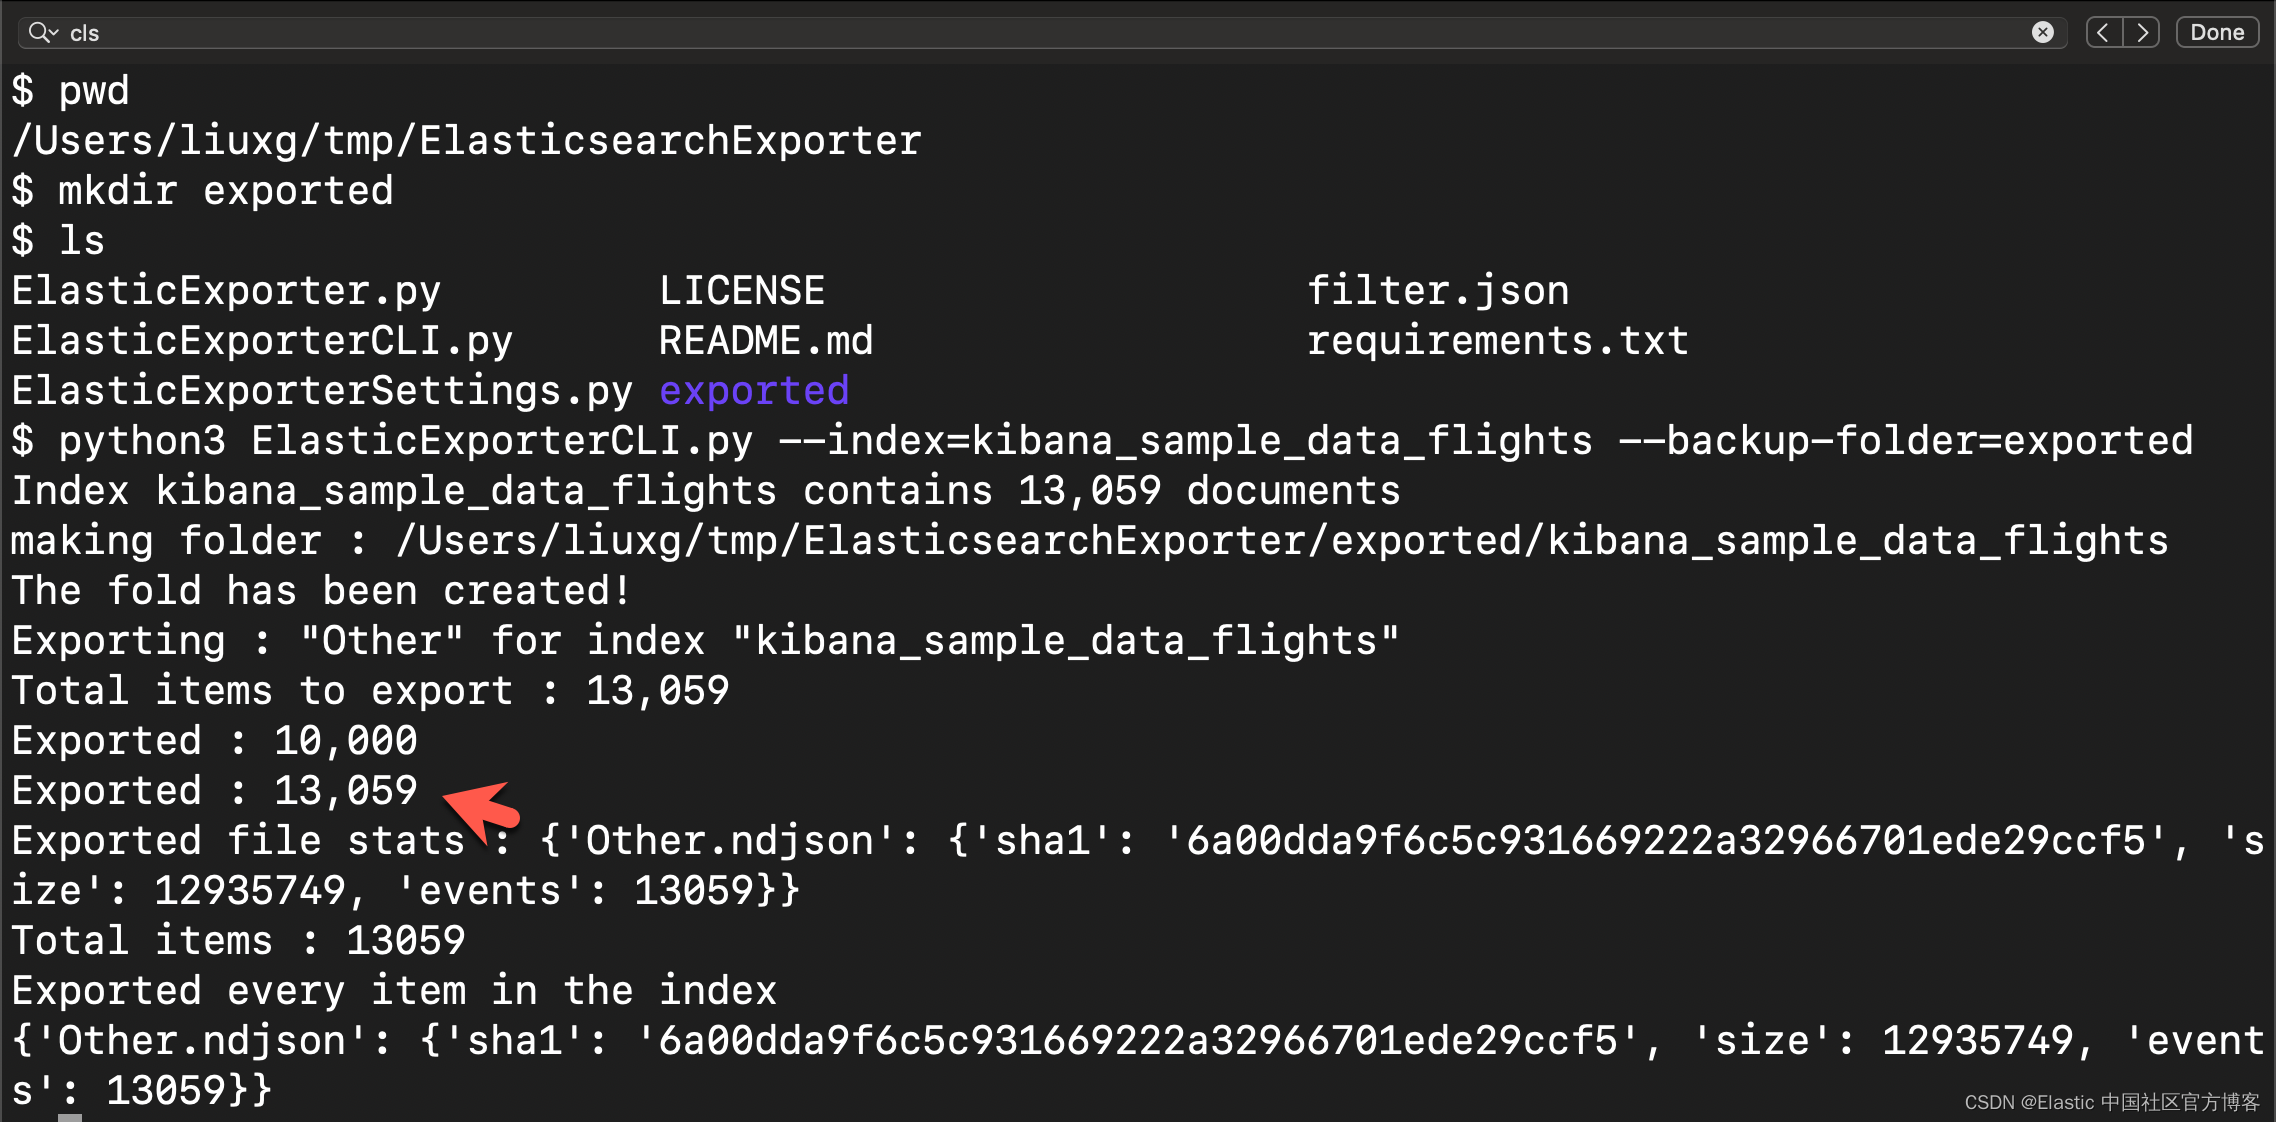
从上面的输出中,我们可以看到有 13,059 个文档被处理。我们可以在当前的 exported 目录中查看已经写好的 JSON 文档:

我们可以看已经备份好的 JSON 文档。输出文件将被格式化为换行符分隔的 JSON 文件。 同一文件夹中写入了一些校验和。 这些文件用于防止重新导出已导出的索引。
过滤输出
为了过滤导出的事件,你可以使用查询文件参数传入过滤器。我们可以在根目录下找到一个叫做 filter.json 的文件:
{
"bool": {
"filter": [
{
"range": {
"timestamp": {
"format": "strict_date_optional_time",
"gte": "2023-07-25T04:00:00.000Z",
"lte": "2023-07-28T07:00:00.000Z"
}
}
}
]
}
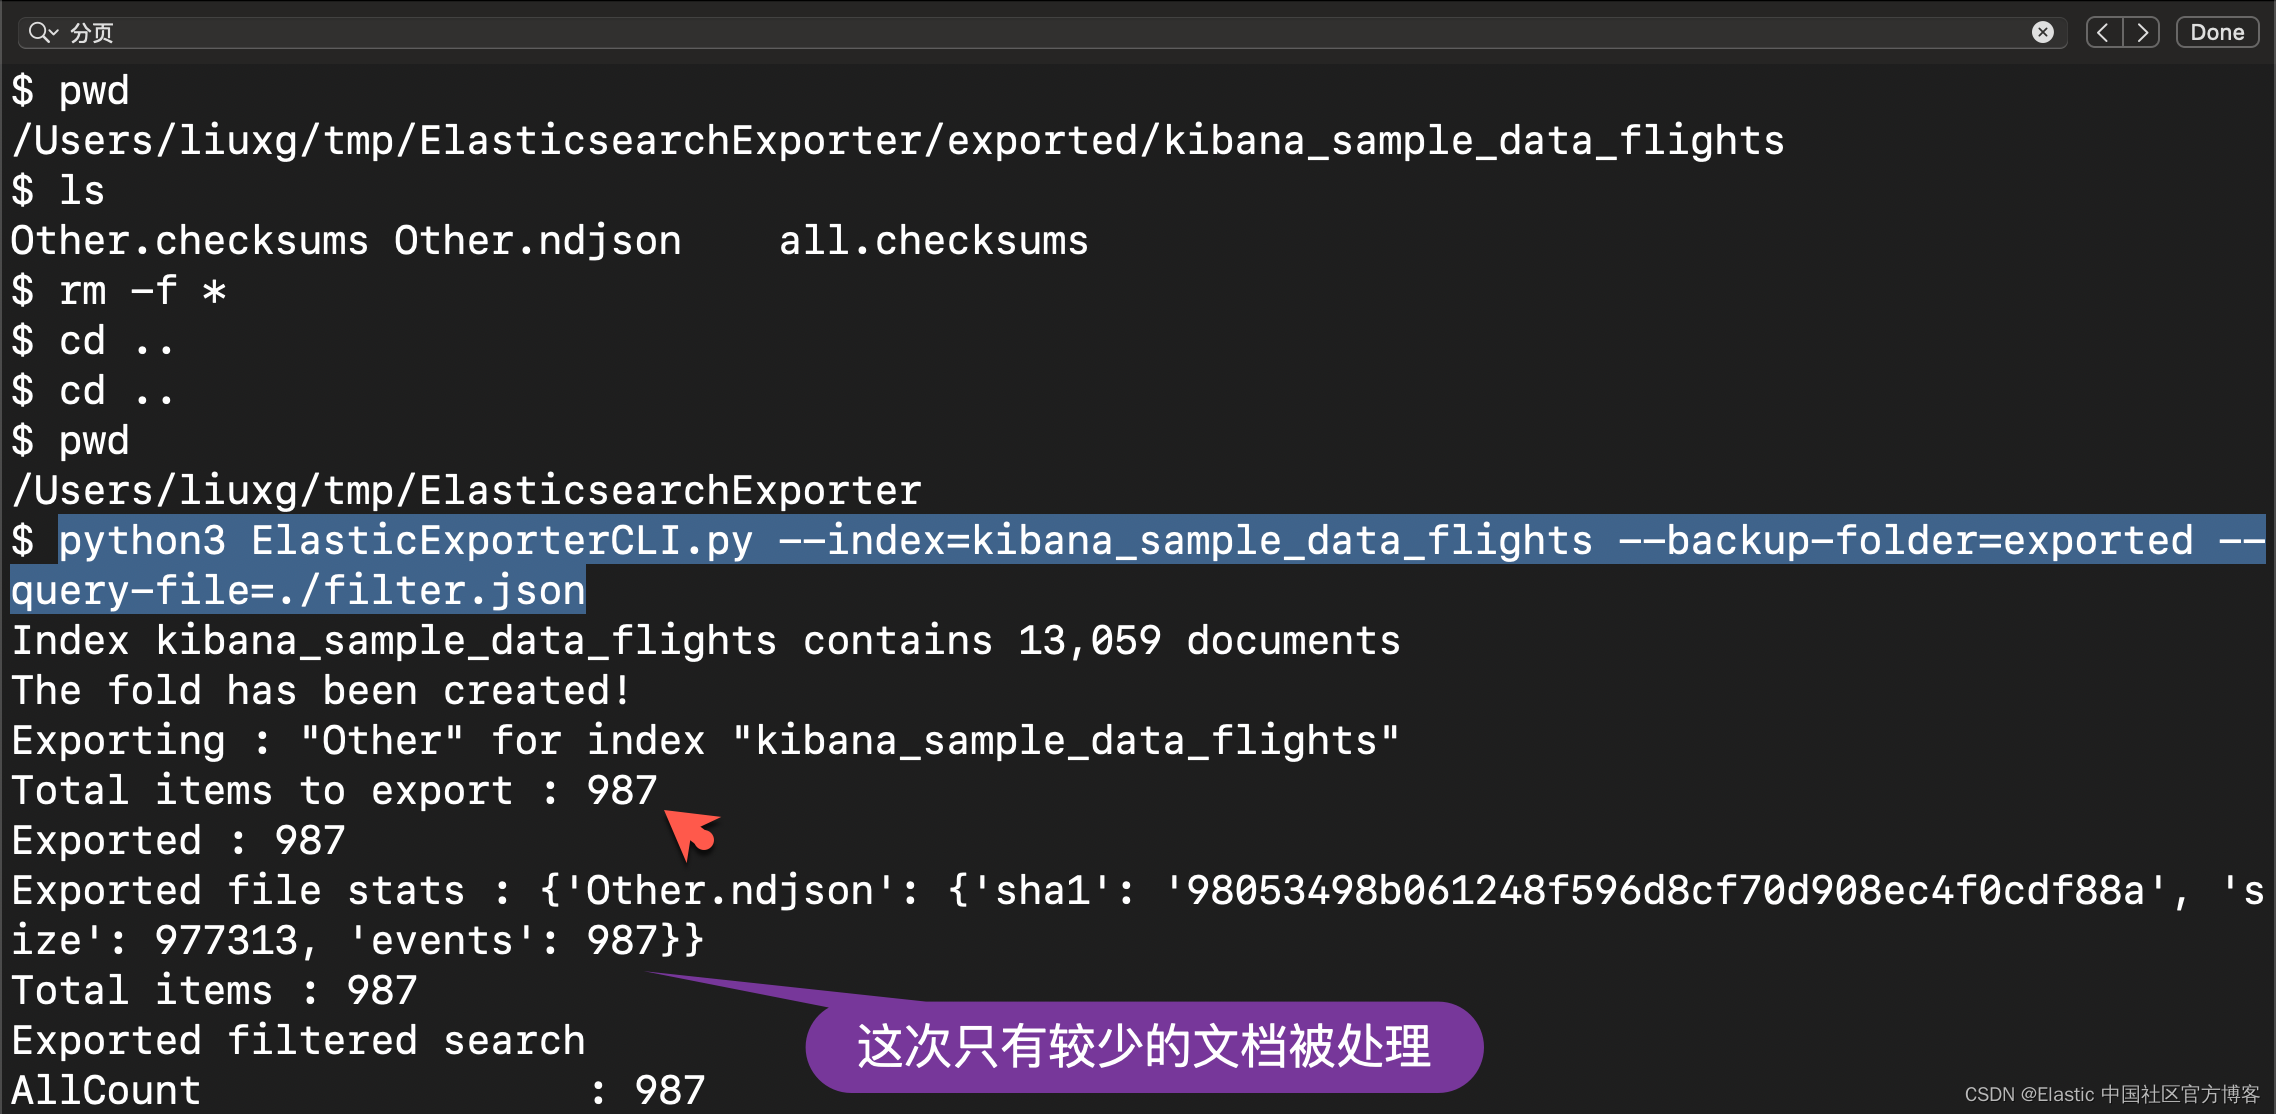
}这是一个简单的按照时间过滤的查询。你可以根据自己的需求进行修改。在上面,我根据索引 kibana_sample_data_flights 的时间范围进行了配置。
我们可以在命令行进行如下的配置:
--query-file=filter.json我们接下来进行如下的操作。首先我们删除上面已经生成的文件:
当然,我们可以可以在 Kibana 里得到这种搜索的配置,比如:

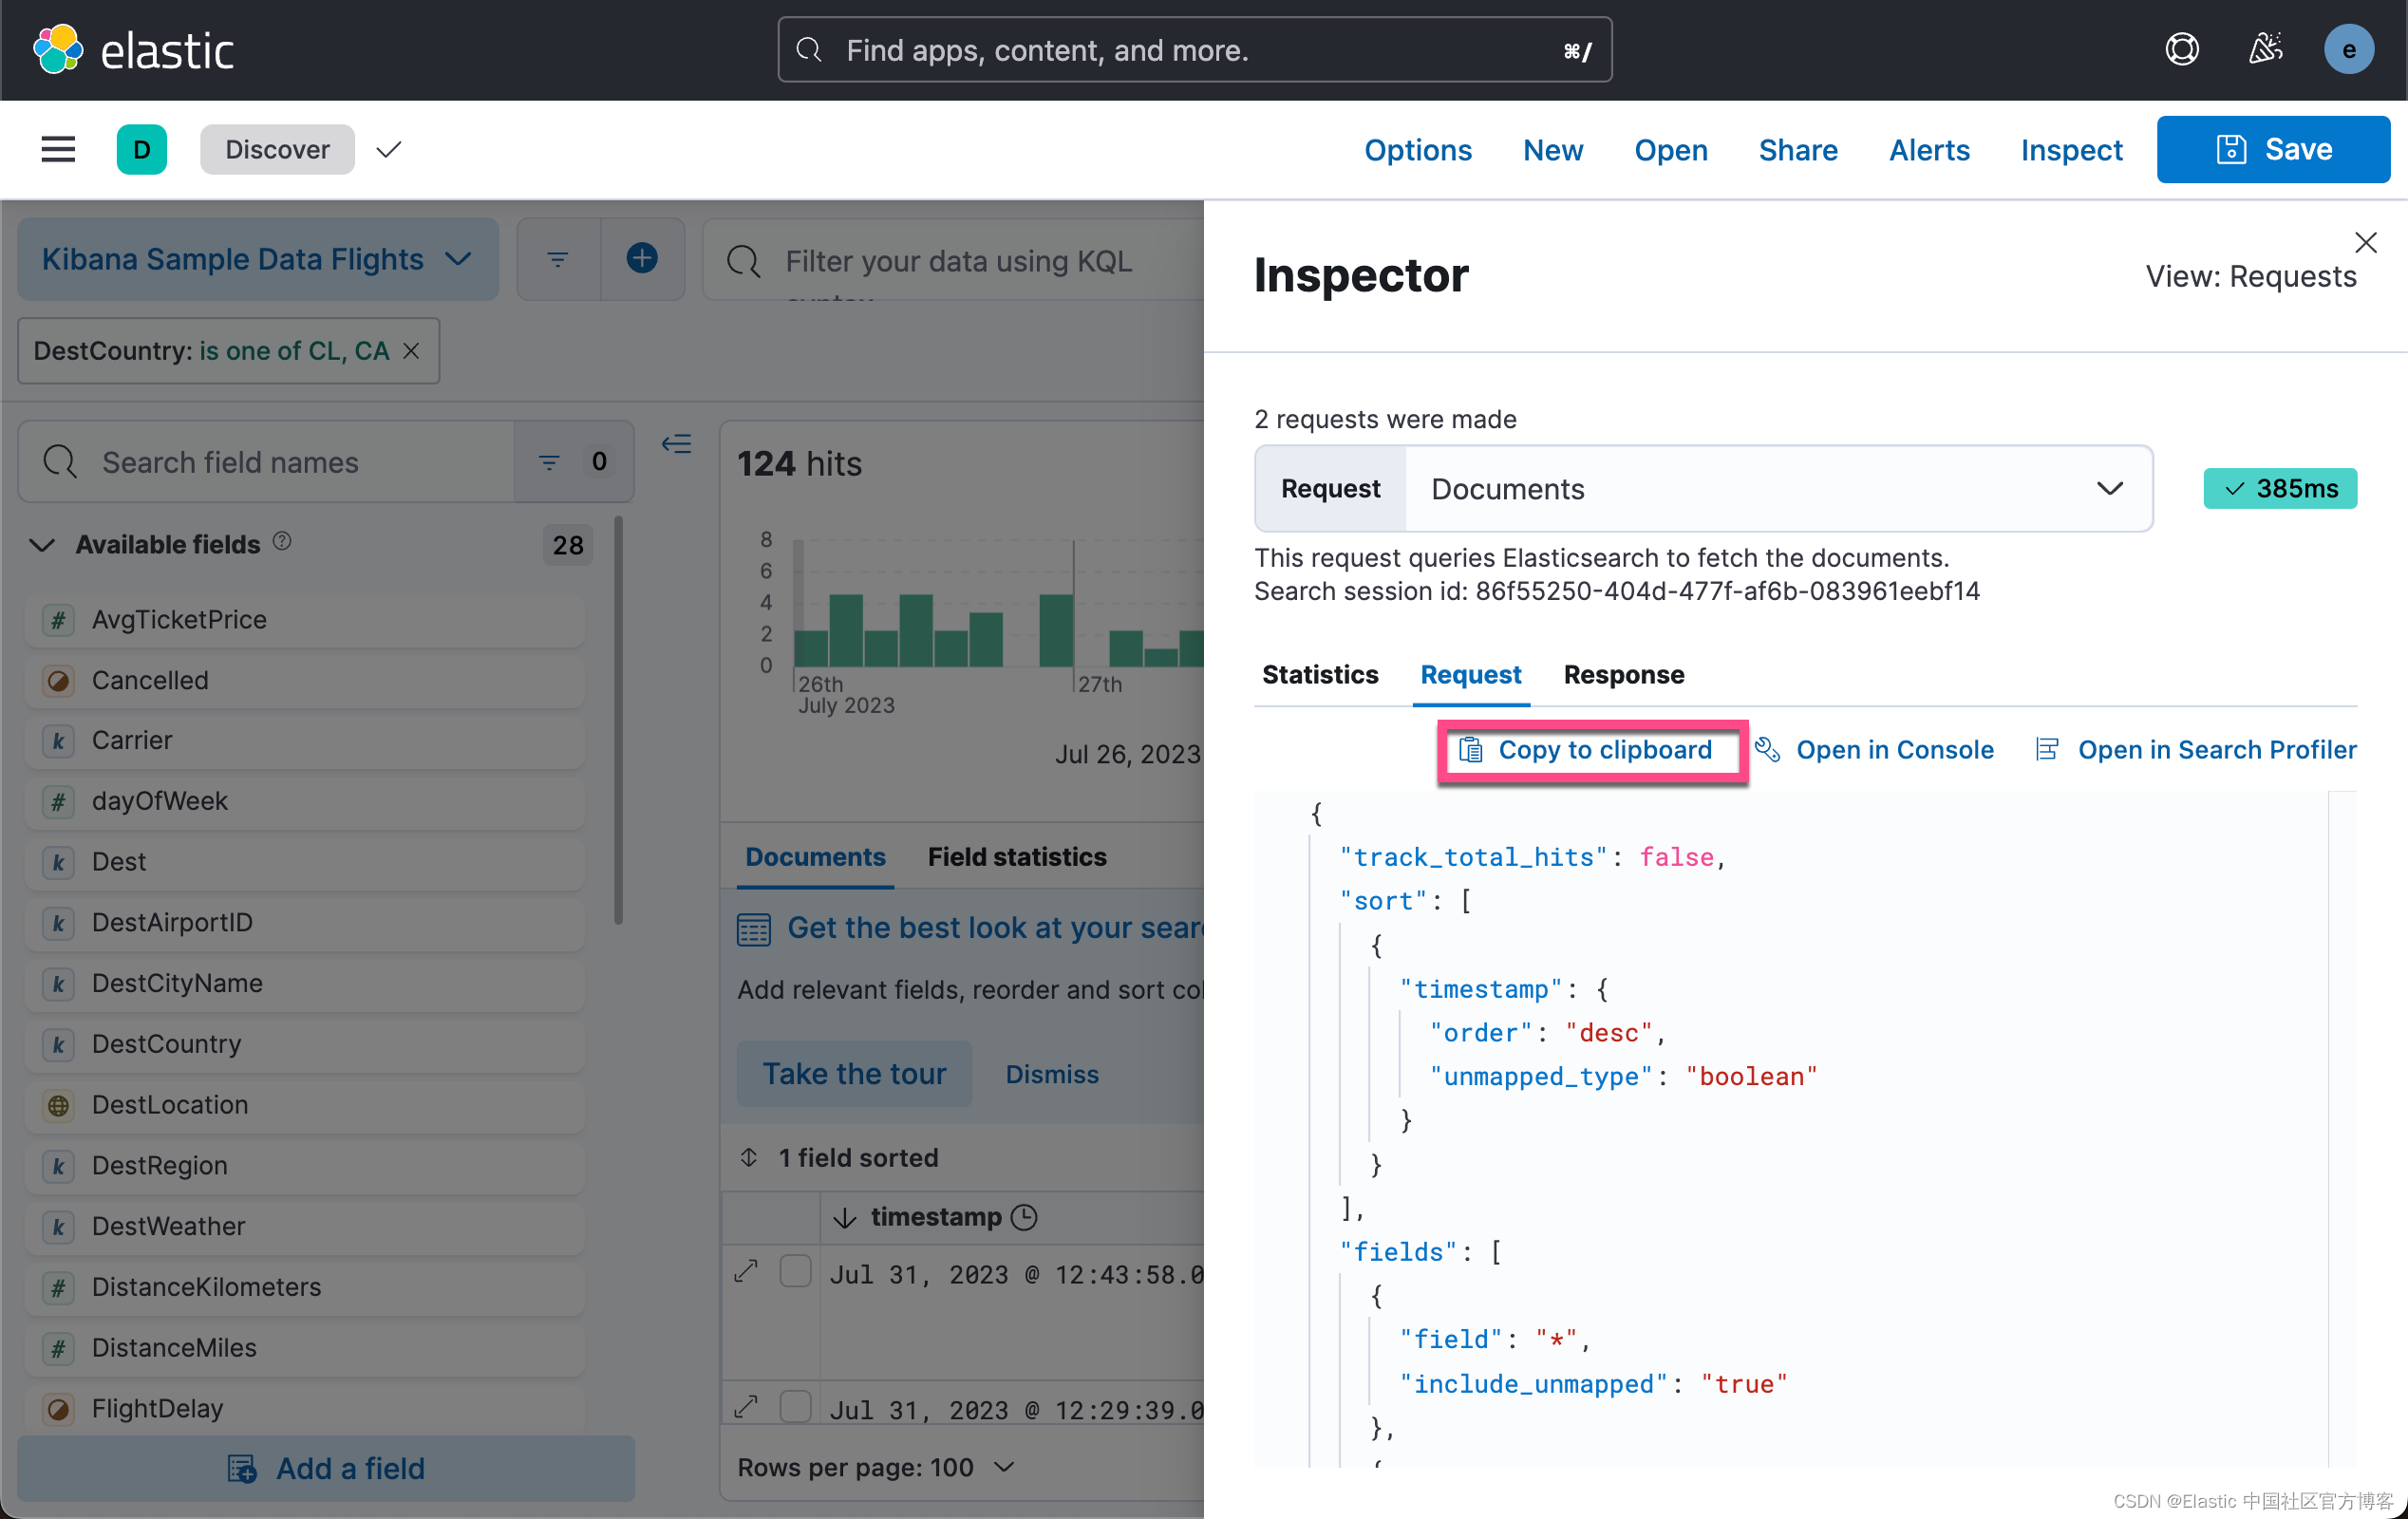
我们点击上面的 Copy to clipboard 来选择需要的搜索:
{
    "bool": {
      "filter": [
        {
          "range": {
            "timestamp": {
              "format": "strict_date_optional_time",
              "gte": "2023-07-25T16:52:09.937Z",
              "lte": "2023-07-31T05:40:19.805Z"
            }
          }
	      },
        {
          "bool": {
            "minimum_should_match": 1,
            "should": [
              {
                "match_phrase": {
                  "DestCountry": "CL"
                }
              },
              {
                "match_phrase": {
                  "DestCountry": "CA"
                }
              }
            ]
          }
        }
      ]
    }
}
把上面的拷贝结果粘贴到 filter.json 文件中,并再次执行上面的操作:
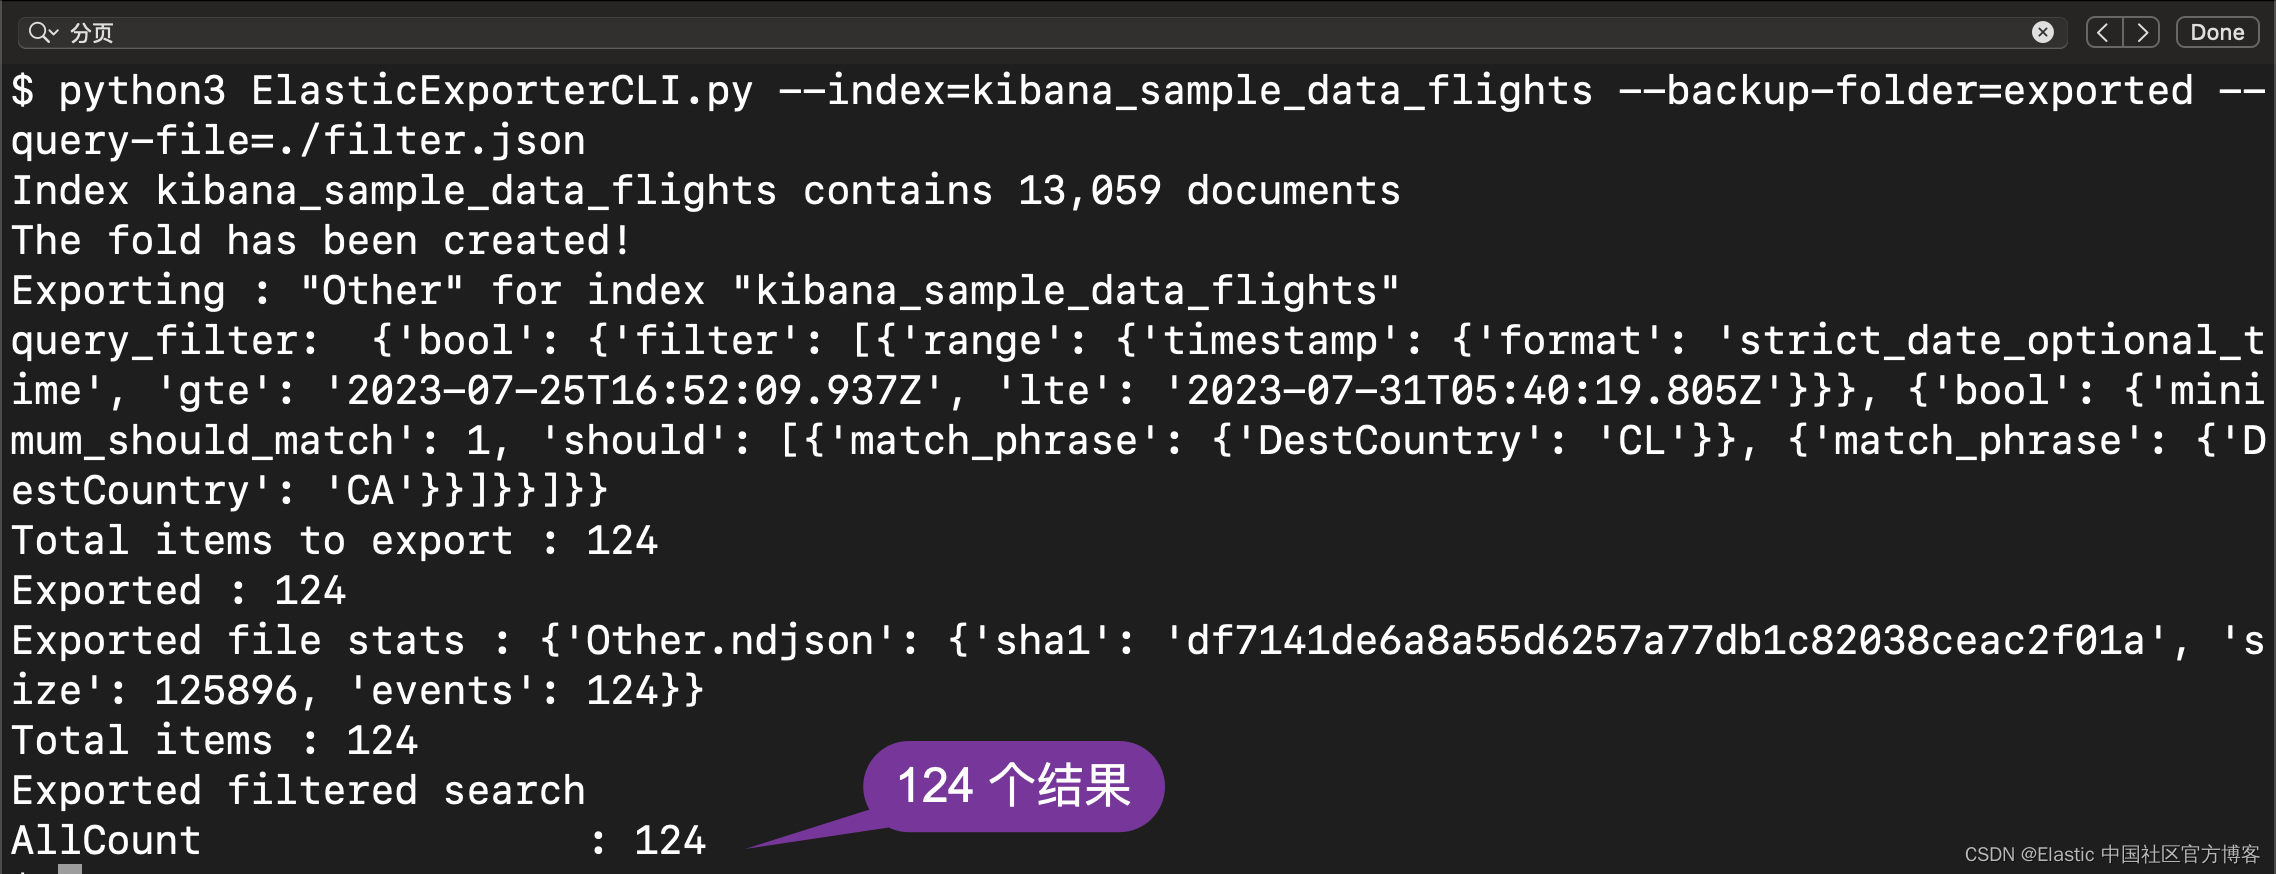
这个和我们上面在 Kibana 中显示的结果是一样的。
在我提供的示例中,仅导出了少量数据。 该脚本能够导出大量数据。 可以使用它导出 Elasticsearch 集群中的所有事件和索引,即使该集群包含数 TB 的数据和数十亿个事件。