Vue入门
目录
1.3生命周期
1、生命周期图解
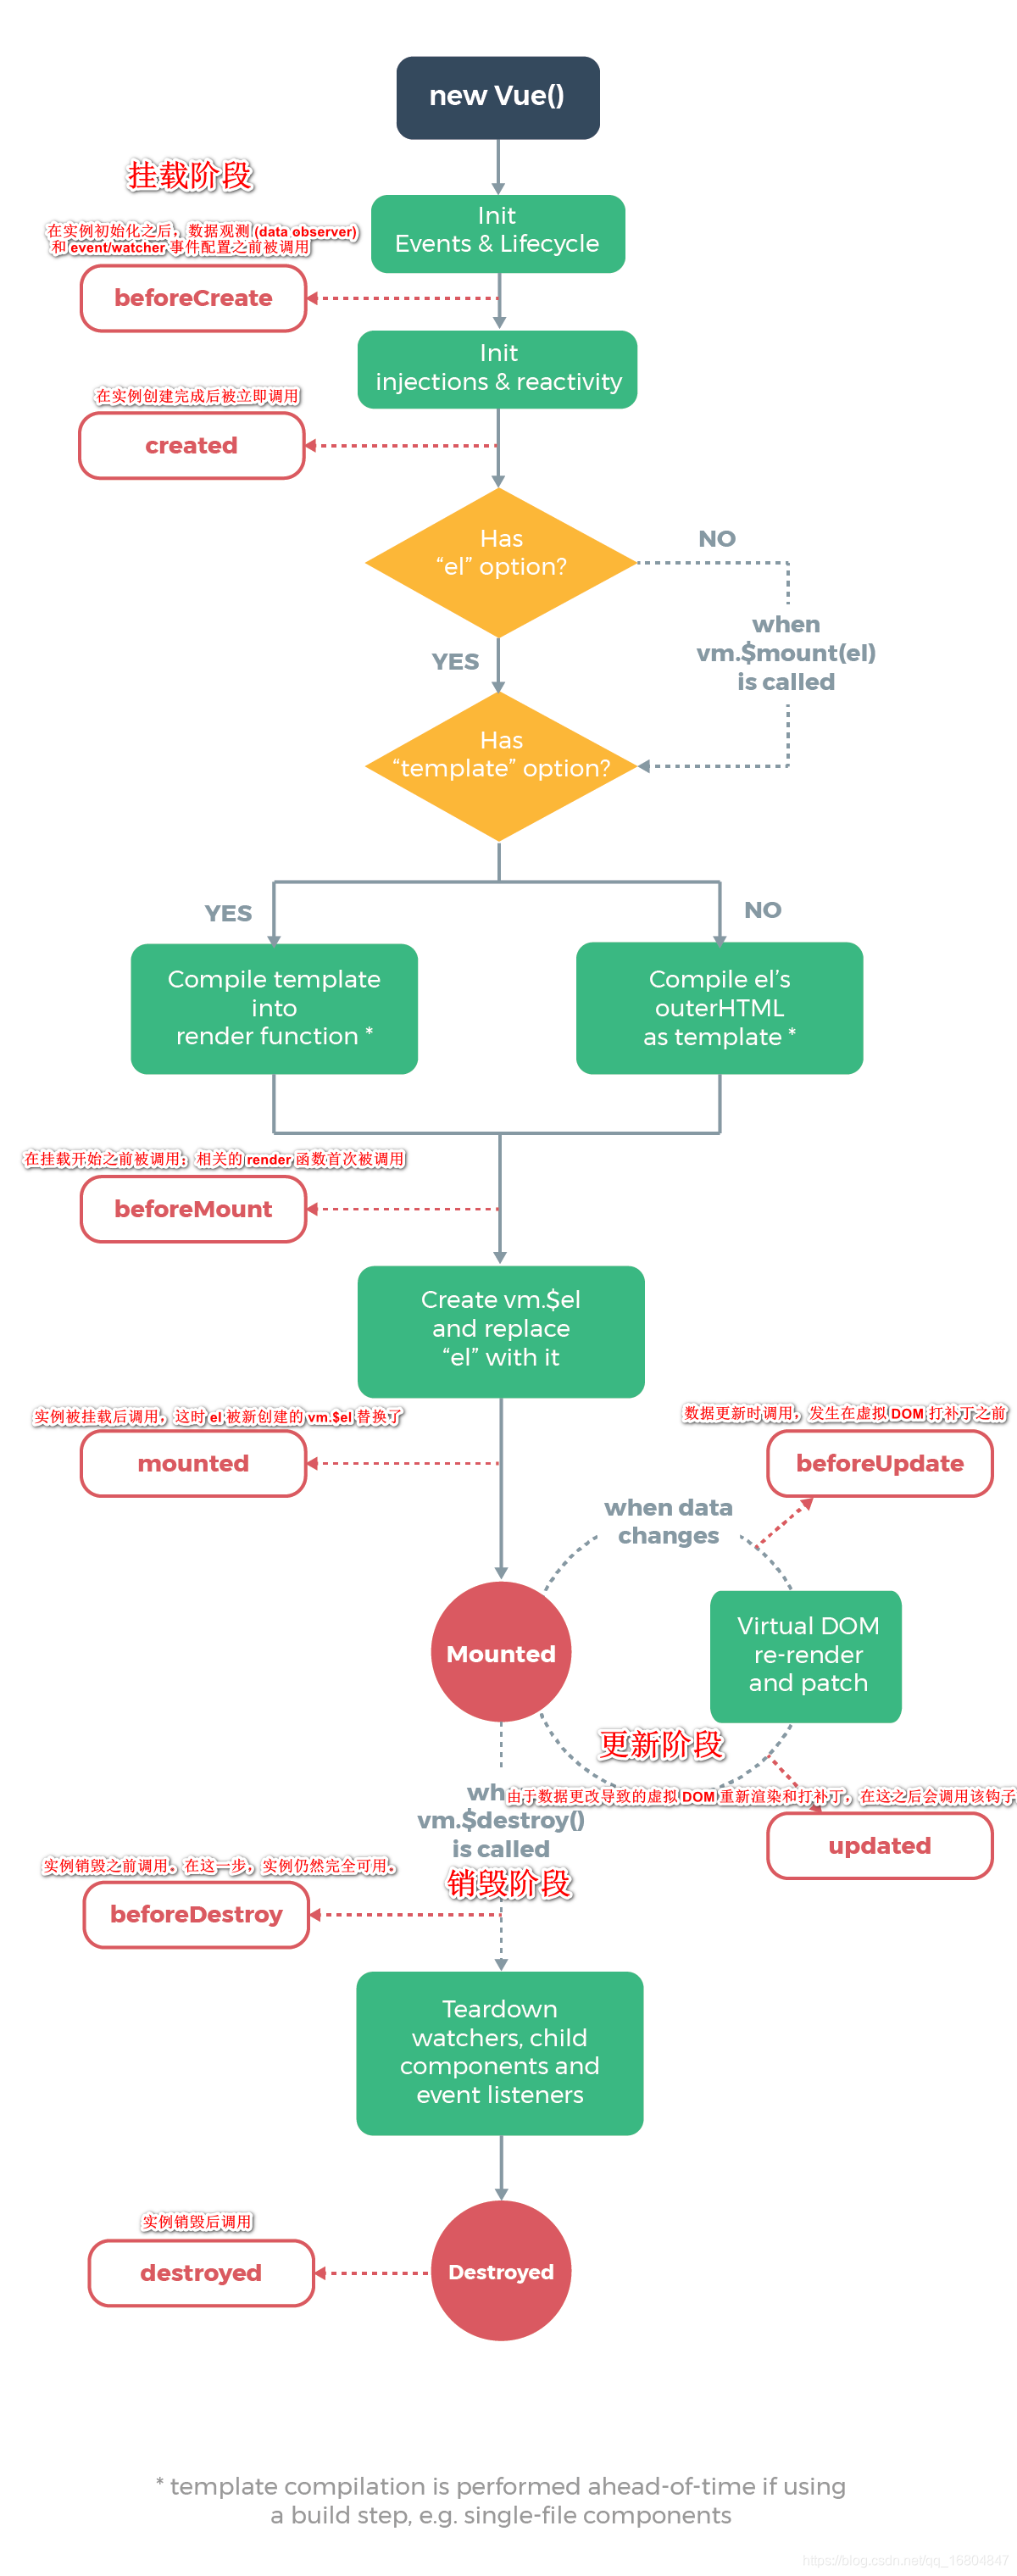
2、生命周期表格
| 周期 |
说明 |
| beforeCreate |
在实例初始化之后,数据观测和事件配置之前被调用 |
| created |
在实例创建完成后被立即调用,完成数据观测,属性和方法的运算,初始化事件,$el属性未见 |
| beforeMount |
在挂载开始之前被调用:相关的 render 函数首次被调用,只在虚拟DOM生成HTML |
| mounted |
在el 被新创建的 vm.$el 替换,并挂载到实例上去之后调用。实例已完成以下的配置:用上面编译好的html内容替换el属性指向的DOM对象。完成模板中的html渲染到html页面中。此过程中进行ajax交互 |
| beforeUpdate |
在数据更新之前调用,发生在虚拟DOM重新渲染和打补丁之前。可以在该钩子中进一步地更改状态,不会触发附加的重渲染过程 |
| updated |
在由于数据更改导致的虚拟DOM重新渲染和打补丁之后调用。调用时,组件DOM已经更新,所以可以执行依赖于DOM的操作。然而在大多数情况下,应该避免在此期间更改状态,因为这可能会导致更新无限循环。该钩子在服务器端渲染期间不被调用 |
| activated |
keep-alive 组件激活时调用 |
| deactivated |
keep-alive 组件停用时调用 |
| beforeDestroy |
在实例销毁之前调用。实例仍然完全可用 |
| destroyed |
在实例销毁之后调用。调用后,所有的事件监听器会被移除,所有的子实例也会被销毁。该钩子在服务器端渲染期间不被调用 |
3、代码详解
<!DOCTYPE html>
<html lang="en">
	<head>
		<meta charset="UTF-8">
		<title>Vue入门之Helloworld</title>
		<script src="https://cdn.jsdelivr.net/npm/vue/dist/vue.js"></script>
	</head>
	<body>
		<div id="app">
			{

   {message}}
		</div>

		<script type="text/javascript">
			var app=new Vue({
				el:'#app',
				data:{
					message:'hello Vue!'
				},
				beforeCreate: function () {
					console.group('beforeCreate 创建前状态===============》');
					console.log("%c%s", "color:red" , "el      : " + this.$el); //undefined
					console.log("%c%s", "color:red","data    : " + this.$data); //undefined
					console.log("%c%s", "color:red","message: " + this.message)
				},
				created: function () {
					console.group('created 创建完毕状态===============》');
					console.log("%c%s", "color:red","el      : " + this.$el); //undefined
					console.log("%c%s", "color:red","data    : " + this.$data); //已被初始化
					console.log("%c%s", "color:red","message: " + this.message); //已被初始化
				},
				beforeMount: function () {
					console.group('beforeMount 挂载前状态===============》');
					console.log("%c%s", "color:red","el      : " + (this.$el)); //已被初始化
					console.log(this.$el);
					console.log("%c%s", "color:red","data    : " + this.$data); //已被初始化
					console.log("%c%s", "color:red","message: " + this.message); //已被初始化
				},
				mounted: function () {
					console.group('mounted 挂载结束状态===============》');
					console.log("%c%s", "color:red","el      : " + this.$el); //已被初始化
					console.log(this.$el);
					console.log("%c%s", "color:red","data    : " + this.$data); //已被初始化
					console.log("%c%s", "color:red","message: " + this.message); //已被初始化
				},
				beforeUpdate: function () {
					console.group('beforeUpdate 更新前状态===============》');
					console.log("%c%s", "color:red","el      : " + this.$el);
					console.log(this.$el);
					console.log("%c%s", "color:red","data    : " + this.$data);
					console.log("%c%s", "color:red","message: " + this.message);
				},
				updated: function () {
					console.group('updated 更新完成状态===============》');
					console.log("%c%s", "color:red","el      : " + this.$el);
					console.log(this.$el);
					console.log("%c%s", "color:red","data    : " + this.$data);
					console.log("%c%s", "color:red","message: " + this.message);
				},
				beforeDestroy: function () {
					console.group('beforeDestroy 销毁前状态===============》');
					console.log("%c%s", "color:red","el      : " + this.$el);
					console.log(this.$el);
					console.log("%c%s", "color:red","data    : " + this.$data);
					console.log("%c%s", "color:red","message: " + this.message);
				},
				destroyed: function () {
					console.group('destroyed 销毁完成状态===============》');
					console.log("%c%s", "color:red","el      : " + this.$el);
					console.log(this.$el);
					console.log("%c%s", "color:red","data    : " + this.$data);
					console.log("%c%s", "color:red","message: " + this.message)
				}
			})
		</script>
	</body>
</html>
4、结果解析
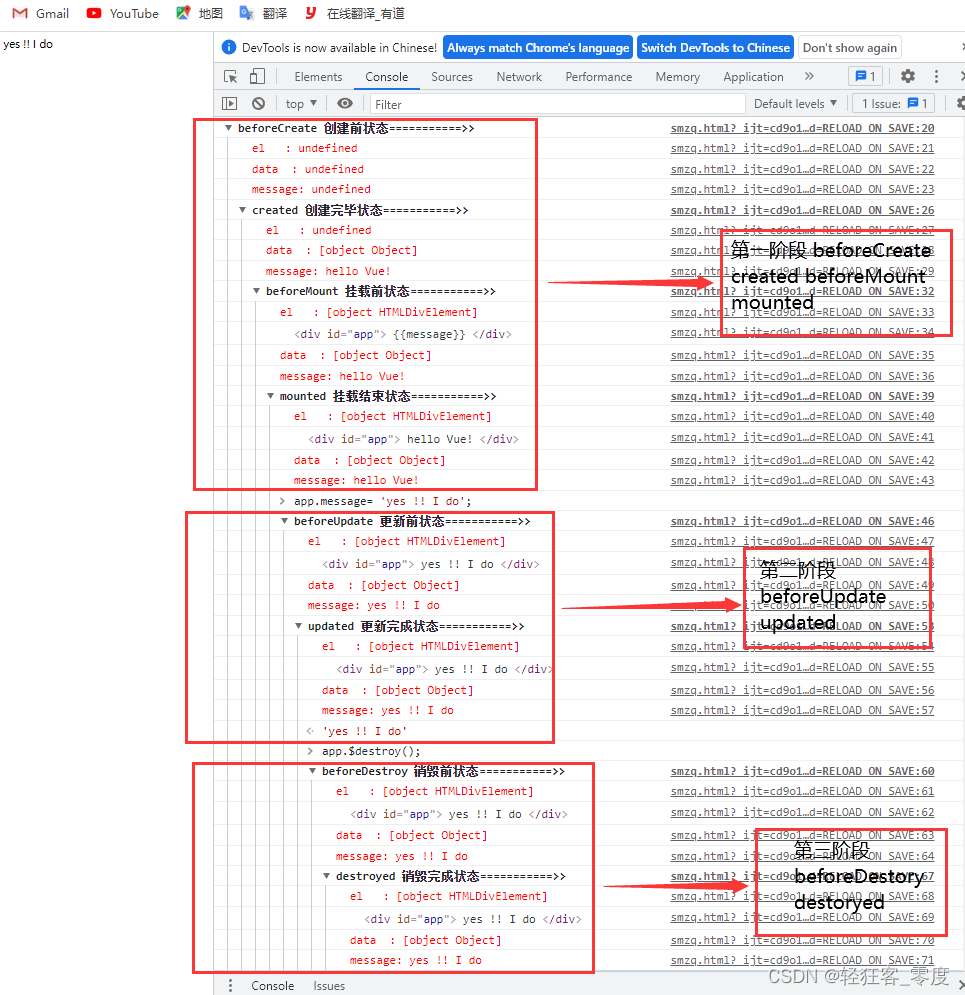
在chrome浏览器里打开,F12看console查看,分三个阶段解读
阶段一:创建和挂载
- beforecreated:el 和 data 并未初始化
- created:完成了 data 数据的初始化,el没有
- beforeMount:完成了 el 和 data 初始化
- mounted :完成挂载
阶段二:更新
在chrome console执行以下命令:
app.message= 'yes !! I do';
- beforeUpdate:虚拟DOM中根据data变化去更新html
- updated:将虚拟DOM更新完成的HTML更新到页面中
阶段三:销毁
在chrome console执行以下命令:
app.$destroy();
- beforeDestroy:销毁之前调用
- destroyed:销毁之后调用,之后再执行app.message= ‘hello vue’,页面不会同步更新。
具体图解如下:
1.4 常用选项
vue有许多配置选项,这节之列出常用的一些选项
1、computed
计算属性:主要是对原数据进行改造输出。改造输出:包括格式化数据(价格,日期),大小写转换,排序,添加符号
调用get/set方法 来进行数据的改造
<!DOCTYPE html>
<html>
	<head>
		<meta charset="utf-8">
		<title></title>
		<script src="https://cdn.jsdelivr.net/npm/vue/dist/vue.js"></script>
	</head>
	<body>
		<div id="app">
			<input type="text" v-model="price">
			<div v-text="changePirce"></div>
		</div>
	</body>
</html>
<script>
	let vue = new Vue({
		el: "#app",
		data: {
			price: 15
		},
		computed: {
			changePirce : {
				get: function() {
					return "¥" + this.price + "元";
				},
				set : function (v){
					return this.price = v;
				}
			}
		}
	});
</script>
2、methods
方法属性:用于绑定html中的事件对应的方法
methods:{
	add (num) {
		this.count += num;
	}
}
3、watch
数据变化监听器:主要用于监测data中的数据变化,使v-model生效
注意,不应该使用箭头函数来定义 watcher 函数
watch: {
			被监听的属性: {
				处理方法 : function(val, oldVal) {
					console.log('new: %s, old: %s', val, oldVal);
				},
				被嵌套也能成功监听(深度监听) : true
			}
		}
4、filters
过滤器:通常格式化字符,使用传值

filters: {
	filterA(value) {
		return value.toUpperCase();
	}
}
5、mixins
混入:用于减少代码污染、减少代码量、实现代码重用
// 额外临时加入时,用于显示日志
var addLog={
	updated:function(){
		console.log("数据放生变化,变化成"+this.count+".");
	}
}

// 实例化vue
var app = new Vue({
	// 挂载实例
	el:'#app',
	// 页面数据初始化,字符,对象、数组
	data:{
		count: 100
	},
	// 混入
	mixins: [addLog]
})
6、extends
扩展:对构造器进行扩展
// 扩展
var extendObj ={
	created: function(){
		console.log("我是被扩展出来的");
	}
}

// 实例化vue
var app = new Vue({
	// 挂载实例
	el:'#app',
	// 页面数据初始化,字符,对象、数组
	data:{
	},
	// 扩展
	extends: extendObj
})
1.5 实例事件
vue有实例属性,实例方法,实例事件,前两个跟选项类似,不是很常用,这里只讲实例事件。
1、$on(在构造器外部添加事件)
$on接收两个参数,第一个参数是调用时的事件名称,第二个参数是一个匿名方法
app.$on('reduce',function(){
    console.log('执行了reduce()');
    this.count--;
});
2、$once(执行一次的事件)
app.$once('reduceOnce',function(){
    console.log('只执行一次的方法');
    this.count--;
});
3、$off(关闭事件)
function off(){
    console.log('关闭事件');
    app.$off('reduce');
}
4、$emit(事件调用)
function reduce() {
    // 事件调用
    console.log('emit事件调用');
    app.$emit('reduce');
}
5、完整示例代码
<!DOCTYPE html>
<html lang="en">
	<head>
		<meta charset="UTF-8">
		<title></title>
		<script src="https://cdn.jsdelivr.net/npm/vue/dist/vue.js"></script>
	</head>
	<body>
		<div id="app">
			<div>数字:{

   {count}}</div>
			<button onclick="reduce()">on调用</button>
			<button onclick="reduceOnce()">once调用</button>
			<button onclick="off()">off调用</button>
		</div>

		<script type="text/javascript">
			var app = new Vue({
				el: '#app',
				data: {
					count: 1
				}
			})
			// $on 在构造器外部添加事件
			app.$on('reduce', function() {
				console.log('执行了reduce()');
				this.count--;
			});
			// 调用
			function reduce() {
				// 事件调用
				console.log('emit事件调用');
				app.$emit('reduce');
			}

			// $once执行一次的事件
			app.$once('reduceOnce', function() {
				console.log('只执行一次的方法');
				this.count--;
			});
			// 调用
			function reduceOnce() {
				app.$emit('reduceOnce');
			}

			// 关闭事件
			function off() {
				console.log('关闭事件');
				app.$off('reduce');
			}
		</script>
	</body>
</html>