在《Spring基于XML实现事务管理》一节中,我们通过 tx:advice 元素极大的简化了 Spring 声明式事务所需的 XML 配置。但其实我们还可以通过另一种方式进行进一步的简化,那就是“使用注解实现事务管理”。
在 Spring 中,声明式事务除了可以使用 XML 实现外,还可以使用注解实现,以进一步降低代码之间的耦合度。下面我们就来介绍下,通过注解是如何实现声明式事务管理。
- 开启注解事务
tx 命名空间提供了一个 tx:annotation-driven 元素,用来开启注解事务,简化 Spring 声明式事务的 XML 配置。
tx:annotation-driven 元素的使用方式也十分的简单,我们只要在 Spring 的 XML 配置中添加这样一行配置即可。
<tx:annotation-driven transaction-manager=“transactionManager”></tx:annotation-driven>
与 tx:advice 元素一样,tx:annotation-driven 也需要通过 transaction-manager 属性来定义一个事务管理器,这个参数的取值默认为 transactionManager。如果我们使用的事务管理器的 id 与默认值相同,则可以省略对该属性的配置,形式如下。
tx:annotation-driven/
通过 tx:annotation-driven 元素开启注解事务后,Spring 会自动对容器中的 Bean 进行检查,找到使用 @Transactional 注解的 Bean,并为其提供事务支持。
2. 使用 @Transactional 注解
@Transactional 注解是 Spring 声明式事务编程的核心注解,该注解既可以在类上使用,也可以在方法上使用。
@Transactional
public class XXX {
@Transactional
public void A(Order order) {
……
}
public void B(Order order) {
……
}
}
若 @Transactional 注解在类上使用,则表示类中的所有方法都支持事务;若 @Transactional 注解在方法上使用,则表示当前方法支持事务。
Spring 在容器中查找所有使用了 @Transactional 注解的 Bean,并自动为它们添加事务通知,通知的事务属性则是通过 @Transactional 注解的属性来定义的。
@Transactional 注解包含多个属性,其中常用属性如下表。
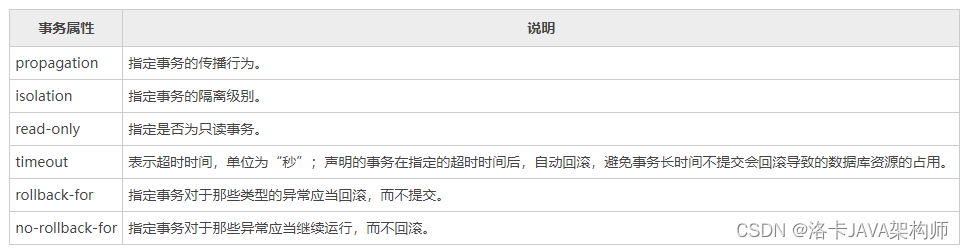
示例 1
下面,我们就通过一个实例来演示下如何通过注解实现声明式事务,步骤如下。
- 在 MySQL 数据库中新建一个名为 spring-tx-db 的数据库实例,并在这个数据库中执行以下 SQL 语句。
DROP TABLE IF EXISTS account;
CREATE TABLE account (
id bigint NOT NULL AUTO_INCREMENT COMMENT ‘id’,
user_id bigint DEFAULT NULL COMMENT ‘用户id’,
total decimal(10,0) DEFAULT NULL COMMENT ‘总额度’,
used decimal(10,0) DEFAULT NULL COMMENT ‘已用余额’,
residue decimal(10,0) DEFAULT ‘0’ COMMENT ‘剩余可用额度’,
PRIMARY KEY (id)
) ENGINE=InnoDB AUTO_INCREMENT=2 DEFAULT CHARSET=utf8;
INSERT INTO account VALUES (‘1’, ‘1’, ‘1000’, ‘0’, ‘1000’);
DROP TABLE IF EXISTS order;
CREATE TABLE order (
id bigint NOT NULL AUTO_INCREMENT,
order_id varchar(200) NOT NULL,
user_id varchar(200) NOT NULL COMMENT ‘用户id’,
product_id varchar(200) NOT NULL COMMENT ‘产品id’,
count int DEFAULT NULL COMMENT ‘数量’,
money decimal(11,0) DEFAULT NULL COMMENT ‘金额’,
status int DEFAULT NULL COMMENT ‘订单状态:0:创建中;1:已完结’,
PRIMARY KEY (id)
) ENGINE=InnoDB DEFAULT CHARSET=utf8;
DROP TABLE IF EXISTS storage;
CREATE TABLE storage (
id bigint NOT NULL AUTO_INCREMENT,
product_id bigint DEFAULT NULL COMMENT ‘产品id’,
total int DEFAULT NULL COMMENT ‘总库存’,
used int DEFAULT NULL COMMENT ‘已用库存’,
residue int DEFAULT NULL COMMENT ‘剩余库存’,
PRIMARY KEY (id)
) ENGINE=InnoDB AUTO_INCREMENT=2 DEFAULT CHARSET=utf8;
INSERT INTO storage VALUES (‘1’, ‘1’, ‘100’, ‘0’, ‘100’);
通过以上 SQL 语句,我们共创建三张数据库表:order(订单表)、storage(商品库存表)、account(用户账户表)。
-
新建一个名为 my-spring-tx-demo 的 Java 工程,并将以下依赖项导入到工程中。
spring-beans-5.3.13.RELEASE.jar
spring-context-5.3.13.RELEASE.jar
spring-core-5.3.13.RELEASE.jar
spring-expression-5.3.13.RELEASE.jar
commons-logging-1.2.jar
spring-jdbc-5.3.13.RELEASE.jar
spring-tx-5.3.13.RELEASE.jar
spring-aop-5.3.13.jar
mysql-connector-java-8.0.23.jar
aspectjweaver-1.9.7.jar
spring-aspects-5.3.13.jar -
在 net.biancheng.c.entity 包下,创建一个名为 Order 的实体类,代码如下。
package net.biancheng.c.entity;
import java.math.BigDecimal;
public class Order {
//自增 id
private Long id;
//订单 id
private String orderId;
//用户 id
private String userId;
//商品 id
private String productId;
//订单商品数量
private Integer count;
//订单金额
private BigDecimal money;
//订单状态
private Integer status;
public Long getId() {
return id;
}
public void setId(Long id) {
this.id = id;
}
public String getOrderId() {
return orderId;
}
public void setOrderId(String orderId) {
this.orderId = orderId;
}
public String getUserId() {
return userId;
}
public void setUserId(String userId) {
this.userId = userId;
}
public String getProductId() {
return productId;
}
public void setProductId(String productId) {
this.productId = productId;
}
public Integer getCount() {
return count;
}
public void setCount(Integer count) {
this.count = count;
}
public BigDecimal getMoney() {
return money;
}
public void setMoney(BigDecimal money) {
this.money = money;
}
public Integer getStatus() {
return status;
}
public void setStatus(Integer status) {
this.status = status;
}
} -
在 net.biancheng.c.entity 包下,创建一个名为 Account 的实体类,代码如下。
package net.biancheng.c.entity;
import java.math.BigDecimal;
public class Account {
//自增 id
private Long id;
//用户 id
private String userId;
//账户总金额
private BigDecimal total;
//已用账户金额
private BigDecimal used;
//剩余账户金额
private BigDecimal residue;
public Long getId() {
return id;
}
public void setId(Long id) {
this.id = id;
}
public String getUserId() {
return userId;
}
public void setUserId(String userId) {
this.userId = userId;
}
public BigDecimal getTotal() {
return total;
}
public void setTotal(BigDecimal total) {
this.total = total;
}
public BigDecimal getUsed() {
return used;
}
public void setUsed(BigDecimal used) {
this.used = used;
}
public BigDecimal getResidue() {
return residue;
}
public void setResidue(BigDecimal residue) {
this.residue = residue;
}
} -
在 net.biancheng.c.entity 包下,创建一个名为 Storage 的实体类,代码如下。
package net.biancheng.c.entity;
public class Storage {
//自增 id
private Long id;
//商品 id
private String productId;
//商品库存总数
private Integer total;
//已用商品数量
private Integer used;
//剩余商品数量
private Integer residue;
public Long getId() {
return id;
}
public void setId(Long id) {
this.id = id;
}
public String getProductId() {
return productId;
}
public void setProductId(String productId) {
this.productId = productId;
}
public Integer getTotal() {
return total;
}
public void setTotal(Integer total) {
this.total = total;
}
public Integer getUsed() {
return used;
}
public void setUsed(Integer used) {
this.used = used;
}
public Integer getResidue() {
return residue;
}
public void setResidue(Integer residue) {
this.residue = residue;
}
} -
在 net.biancheng.net.dao 包下,创建一个名为 OrderDao 的接口,代码如下。
package net.biancheng.c.dao;
import net.biancheng.c.entity.Order;
public interface OrderDao {
/**- 创建订单
- @param order
- @return
/
int createOrder(Order order);
/* - 修改订单状态
- 将订单状态从未完成(0)修改为已完成(1)
- @param orderId
- @param status
*/
void updateOrderStatus(String orderId, Integer status);
}
-
在 net.biancheng.net.dao 包下,创建一个名为 AccountDao 的接口,代码如下。
package net.biancheng.c.dao;
import net.biancheng.c.entity.Account;
import java.math.BigDecimal;
public interface AccountDao {
/**- 根据用户查询账户金额
- @param userId
- @return
/
Account selectByUserId(String userId);
/* - 扣减账户金额
- @param userId
- @param money
- @return
*/
int decrease(String userId, BigDecimal money);
}
-
在 net.biancheng.net.dao 包下,创建一个名为 StorageDao 的接口,代码如下。
package net.biancheng.c.dao;
import net.biancheng.c.entity.Storage;
public interface StorageDao {
/**- 查询商品的库存
- @param productId
- @return
/
Storage selectByProductId(String productId);
/* - 扣减商品库存
- @param record
- @return
*/
int decrease(Storage record);
}
-
在 net.biancheng.c.dao.impl 包下,创建 OrderDao 的实现类 OrderDaoImpl,代码如下。
package net.biancheng.c.dao.impl;
import net.biancheng.c.dao.OrderDao;
import net.biancheng.c.entity.Order;
import org.springframework.beans.factory.annotation.Autowired;
import org.springframework.jdbc.core.JdbcTemplate;
import org.springframework.stereotype.Repository;
@Repository
public class OrderDaoImpl implements OrderDao {
@Autowired
private JdbcTemplate jdbcTemplate;
@Override
public int createOrder(Order order) {
String sql = “insert intoorder(order_id,user_id, product_id,count, money, status) values (?,?,?,?,?,?)”;
int update = jdbcTemplate.update(sql, order.getOrderId(), order.getUserId(), order.getProductId(), order.getCount(), order.getMoney(), order.getStatus());
return update;
}
@Override
public void updateOrderStatus(String orderId, Integer status) {
String sql = " updateorderset status = 1 where order_id = ? and status = ?;";
jdbcTemplate.update(sql, orderId, status);
}
} -
在 net.biancheng.c.dao.impl 包下,创建 AccountDao 的实现类 AccountDaoImpl,代码如下。
package net.biancheng.c.dao.impl;
import net.biancheng.c.dao.AccountDao;
import net.biancheng.c.entity.Account;
import net.biancheng.c.entity.Order;
import org.springframework.beans.factory.annotation.Autowired;
import org.springframework.jdbc.core.BeanPropertyRowMapper;
import org.springframework.jdbc.core.JdbcTemplate;
import org.springframework.stereotype.Repository;
import java.math.BigDecimal;
@Repository
public class AccountDaoImpl implements AccountDao {
@Autowired
private JdbcTemplate jdbcTemplate;
@Override
public Account selectByUserId(String userId) {
String sql = " select * from account where user_id = ?";
return jdbcTemplate.queryForObject(sql, new BeanPropertyRowMapper(Account.class), userId);
}
@Override
public int decrease(String userId, BigDecimal money) {
String sql = “UPDATE account SET residue = residue - ?, used = used + ? WHERE user_id = ?;”;
return jdbcTemplate.update(sql, money, money, userId);
}
} -
在 net.biancheng.c.dao.impl 包下,创建 StorageDao 的实现类 StorageDaoImpl,代码如下。
package net.biancheng.c.dao.impl;
import net.biancheng.c.dao.StorageDao;
import net.biancheng.c.entity.Storage;
import org.springframework.beans.factory.annotation.Autowired;
import org.springframework.jdbc.core.BeanPropertyRowMapper;
import org.springframework.jdbc.core.JdbcTemplate;
import org.springframework.stereotype.Repository;
@Repository
public class StorageDaoImpl implements StorageDao {
@Autowired
private JdbcTemplate jdbcTemplate;
@Override
public Storage selectByProductId(String productId) {
String sql = “select * from storage where product_id = ?”;
return jdbcTemplate.queryForObject(sql, new BeanPropertyRowMapper(Storage.class), productId);
}
@Override
public int decrease(Storage record) {
String sql = " update storage set used =? ,residue=? where product_id=?";
return jdbcTemplate.update(sql, record.getUsed(), record.getResidue(), record.getProductId());
}
} -
在 net.biancheng.c.service 包下,创建一个名为 OrderService 的接口,代码如下。
package net.biancheng.c.service;
import net.biancheng.c.entity.Order;
public interface OrderService {
/**- 创建订单
- @param order
- @return
*/
public void createOrder(Order order);
}
-
在 net.biancheng.c.service.impl 包下,创建 OrderService 的实现类 OrderServiceImpl,代码如下。
package net.biancheng.c.service.impl;
import net.biancheng.c.dao.AccountDao;
import net.biancheng.c.dao.OrderDao;
import net.biancheng.c.dao.StorageDao;
import net.biancheng.c.entity.Account;
import net.biancheng.c.entity.Order;
import net.biancheng.c.entity.Storage;
import net.biancheng.c.service.OrderService;
import org.springframework.beans.factory.annotation.Autowired;
import org.springframework.stereotype.Service;
import org.springframework.transaction.annotation.Isolation;
import org.springframework.transaction.annotation.Propagation;
import org.springframework.transaction.annotation.Transactional;
import java.text.SimpleDateFormat;
import java.util.Date;
@Service(“orderService”)
public class OrderServiceImpl implements OrderService {
@Autowired
private OrderDao orderDao;
@Autowired
private AccountDao accountDao;
@Autowired
private StorageDao storageDao;
/**- 在方法上使用 @Transactional 注解,
- @param order
*/
@Transactional(isolation = Isolation.DEFAULT, propagation = Propagation.REQUIRED, timeout = 10, readOnly = false)
@Override
public void createOrder(Order order) {
//自动生成订单 id
SimpleDateFormat df = new SimpleDateFormat(“yyyyMMddHHmmssSSS”);
String format = df.format(new Date());
String orderId = order.getUserId() + order.getProductId() + format;
System.out.println(“自动生成的订单 id 为:” + orderId);
order.setOrderId(orderId);
System.out.println(“开始创建订单数据,订单号为:” + orderId);
//创建订单数据
orderDao.createOrder(order);
System.out.println(“订单数据创建完成,订单号为:” + orderId);
System.out.println(“开始查询商品库存,商品 id 为:” + order.getProductId());
Storage storage = storageDao.selectByProductId(order.getProductId());
if (storage != null && storage.getResidue().intValue() >= order.getCount().intValue()) {
System.out.println(“商品库存充足,正在扣减商品库存”);
storage.setUsed(storage.getUsed() + order.getCount());
storage.setResidue(storage.getTotal().intValue() - storage.getUsed());
int decrease = storageDao.decrease(storage);
System.out.println(“商品库存扣减完成”);
} else {
System.out.println(“警告:商品库存不足,正在执行回滚操作!”);
throw new RuntimeException(“库存不足”);
}
System.out.println(“开始查询用户的账户金额”);
Account account = accountDao.selectByUserId(order.getUserId());
if (account != null && account.getResidue().intValue() >= order.getMoney().intValue()) {
System.out.println(“账户金额充足,正在扣减账户金额”);
accountDao.decrease(order.getUserId(), order.getMoney());
System.out.println(“账户金额扣减完成”);
} else {
System.out.println(“警告:账户余额不足,正在执行回滚操作!”);
throw new RuntimeException(“账户余额不足”);
}
System.out.println(“开始修改订单状态,未完成》》》》》已完成”);
orderDao.updateOrderStatus(order.getOrderId(), 0);
System.out.println(“修改订单状态完成!”);
}
}
-
在 src 目录下,创建一个配置文件 jdbc.properties,配置内容如下。
jdbc.driver=com.mysql.cj.jdbc.Driver
jdbc.url=jdbc:mysql://127.0.0.1:3306/spring-tx-db
jdbc.username=root
jdbc.password=root -
在 src 目录下创建一个 XML 配置文件 Beans.xml,配置内容如下。
tx:annotation-driven/
<context:component-scan base-package=“net.biancheng.c”></context:component-scan>
<context:property-placeholder location=“classpath:jdbc.properties”></context:property-placeholder>
-
在 net.biancheng.c 包下,创建一个名为 MainApp 的类,代码如下。
package net.biancheng.c;
import net.biancheng.c.entity.Order;
import net.biancheng.c.service.OrderService;
import org.springframework.context.ApplicationContext;
import org.springframework.context.support.ClassPathXmlApplicationContext;
import java.math.BigDecimal;
public class MainApp {
public static void main(String[] args) {
ApplicationContext context2 = new ClassPathXmlApplicationContext(“Beans.xml”);
OrderService orderService = context2.getBean(“orderService”, OrderService.class);
Order order = new Order();
//设置商品 id
order.setProductId(“1”);
//商品数量
order.setCount(30);
//商品金额
order.setMoney(new BigDecimal(600));
//设置用户 id
order.setUserId(“1”);
//订单状态为未完成
order.setStatus(0);
orderService.createOrder(order);
}
} -
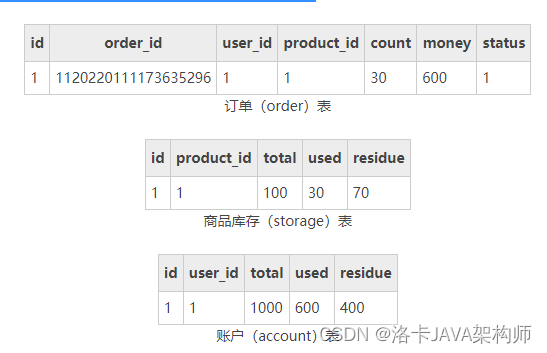
执行 MainApp 类中 main 方法,控制台输出如下。
自动生成的订单 id 为:1120220111173635296
开始创建订单数据,订单号为:1120220111173635296
订单数据创建完成,订单号为:1120220111173635296
开始查询商品库存,商品 id 为:1
商品库存充足,正在扣减商品库存
商品库存扣减完成
开始查询用户的账户金额
账户金额充足,正在扣减账户金额
账户金额扣减完成
开始修改订单状态,未完成》》》》》已完成
修改订单状态完成! -
分别查看订单(order)表、商品库存(storage)表和账户(account)表中的数据,结果如下。
-
再次执行 MainApp 中的 main 方法,控制台输出如下。
自动生成的订单 id 为:1120220111175556986
开始创建订单数据,订单号为:1120220111175556986
订单数据创建完成,订单号为:1120220111175556986
开始查询商品库存,商品 id 为:1
商品库存充足,正在扣减商品库存
商品库存扣减完成
开始查询用户的账户金额
警告:账户余额不足,正在执行回滚操作!
Exception in thread “main” java.lang.RuntimeException: 账户余额不足
at net.biancheng.c.service.impl.OrderServiceImpl.createOrder(OrderServiceImpl.java:61)
at sun.reflect.NativeMethodAccessorImpl.invoke0(Native Method)
at sun.reflect.NativeMethodAccessorImpl.invoke(NativeMethodAccessorImpl.java:62)
at sun.reflect.DelegatingMethodAccessorImpl.invoke(DelegatingMethodAccessorImpl.java:43)
at java.lang.reflect.Method.invoke(Method.java:498)
at org.springframework.aop.support.AopUtils.invokeJoinpointUsingReflection(AopUtils.java:344)
at org.springframework.aop.framework.ReflectiveMethodInvocation.invokeJoinpoint(ReflectiveMethodInvocation.java:198)
at org.springframework.aop.framework.ReflectiveMethodInvocation.proceed(ReflectiveMethodInvocation.java:163)
at org.springframework.transaction.interceptor.TransactionInterceptor 1. p r o c e e d W i t h I n v o c a t i o n ( T r a n s a c t i o n I n t e r c e p t o r . j a v a : 123 ) a t o r g . s p r i n g f r a m e w o r k . t r a n s a c t i o n . i n t e r c e p t o r . T r a n s a c t i o n A s p e c t S u p p o r t . i n v o k e W i t h i n T r a n s a c t i o n ( T r a n s a c t i o n A s p e c t S u p p o r t . j a v a : 388 ) a t o r g . s p r i n g f r a m e w o r k . t r a n s a c t i o n . i n t e r c e p t o r . T r a n s a c t i o n I n t e r c e p t o r . i n v o k e ( T r a n s a c t i o n I n t e r c e p t o r . j a v a : 119 ) a t o r g . s p r i n g f r a m e w o r k . a o p . f r a m e w o r k . R e f l e c t i v e M e t h o d I n v o c a t i o n . p r o c e e d ( R e f l e c t i v e M e t h o d I n v o c a t i o n . j a v a : 186 ) a t o r g . s p r i n g f r a m e w o r k . a o p . i n t e r c e p t o r . E x p o s e I n v o c a t i o n I n t e r c e p t o r . i n v o k e ( E x p o s e I n v o c a t i o n I n t e r c e p t o r . j a v a : 97 ) a t o r g . s p r i n g f r a m e w o r k . a o p . f r a m e w o r k . R e f l e c t i v e M e t h o d I n v o c a t i o n . p r o c e e d ( R e f l e c t i v e M e t h o d I n v o c a t i o n . j a v a : 186 ) a t o r g . s p r i n g f r a m e w o r k . a o p . f r a m e w o r k . J d k D y n a m i c A o p P r o x y . i n v o k e ( J d k D y n a m i c A o p P r o x y . j a v a : 215 ) a t c o m . s u n . p r o x y . 1.proceedWithInvocation(TransactionInterceptor.java:123) at org.springframework.transaction.interceptor.TransactionAspectSupport.invokeWithinTransaction(TransactionAspectSupport.java:388) at org.springframework.transaction.interceptor.TransactionInterceptor.invoke(TransactionInterceptor.java:119) at org.springframework.aop.framework.ReflectiveMethodInvocation.proceed(ReflectiveMethodInvocation.java:186) at org.springframework.aop.interceptor.ExposeInvocationInterceptor.invoke(ExposeInvocationInterceptor.java:97) at org.springframework.aop.framework.ReflectiveMethodInvocation.proceed(ReflectiveMethodInvocation.java:186) at org.springframework.aop.framework.JdkDynamicAopProxy.invoke(JdkDynamicAopProxy.java:215) at com.sun.proxy. 1.proceedWithInvocation(TransactionInterceptor.java:123)atorg.springframework.transaction.interceptor.TransactionAspectSupport.invokeWithinTransaction(TransactionAspectSupport.java:388)atorg.springframework.transaction.interceptor.TransactionInterceptor.invoke(TransactionInterceptor.java:119)atorg.springframework.aop.framework.ReflectiveMethodInvocation.proceed(ReflectiveMethodInvocation.java:186)atorg.springframework.aop.interceptor.ExposeInvocationInterceptor.invoke(ExposeInvocationInterceptor.java:97)atorg.springframework.aop.framework.ReflectiveMethodInvocation.proceed(ReflectiveMethodInvocation.java:186)atorg.springframework.aop.framework.JdkDynamicAopProxy.invoke(JdkDynamicAopProxy.java:215)atcom.sun.proxy.Proxy13.createOrder(Unknown Source)
at net.biancheng.c.MainApp.main(MainApp.java:25) -
再次对数据库表进行查询,发现三张数据库表都没有任何改变,说明在扣减账户发生异常后,事务回滚了