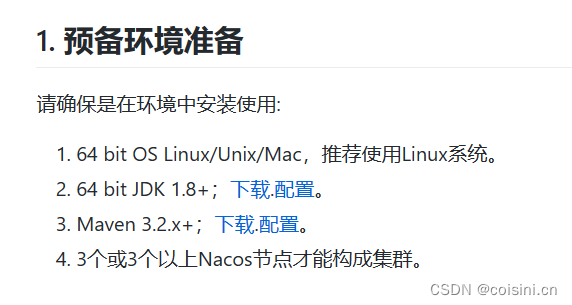
准备环境
前提环境准备:
JDK安装及环境配置,参考
MySQL安装及环境配置,参考
Maven安装及环境配置,参考
Nacos2.0.4集群搭建
1. 下载
新建目录
mkdir /usr/local/nacos-cluster
进入目录
cd /usr/local/nacos-cluster
在线下载
wget https://github.com/alibaba/nacos/releases/download/2.0.4/nacos-server-2.0.4.tar.gz
2. 解压
因为在同一台机器,伪集群,所以就改端口,
(1) 解压、重命名区分(也可以先配置好一台,然后再拷贝两份,改下端口就行)
至于为啥没8848,因为集群启动报错,提示8848端口占用....
至于为啥端口设置的这么离谱,问就是官方设置端口占用有偏移量1000±,然后(主要是我看不到到底是那个端口被占用了,去查又没有…搞玄学来的,,之前设置8840、8850、8860这种连续端口,启动的时候报一堆错,差点没把我送走,折腾了好久。后来实在不甘心,随便整个端口跑一下,结果就跑起来了。总结:不要使用连续端口)
Caused by: io.grpc.netty.shaded.io.netty.channel.unix.Errors$NativeIoException: bind(…) failed: Address already in use
tar -zxvf nacos-server-2.0.4.tar.gz
mv nacos nacos8140
(2)
tar -zxvf nacos-server-2.0.4.tar.gz
mv nacos nacos8550
(3)
tar -zxvf nacos-server-2.0.4.tar.gz
mv nacos nacos8960

3.修改配置
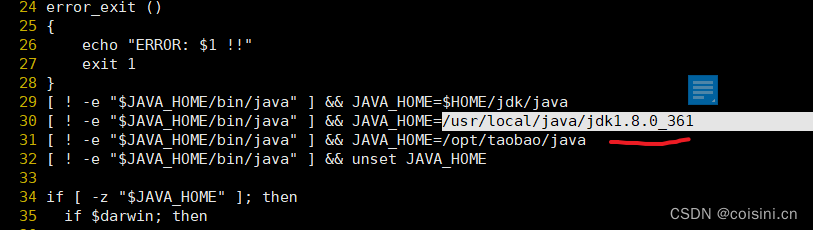
3.1分别修改下启动类中JDK路径以及启动大小
vi /usr/local/nacos-cluster/nacos8140/bin/startup.sh
ESC状态下
:set number可以显示行号
30行 jdk路径
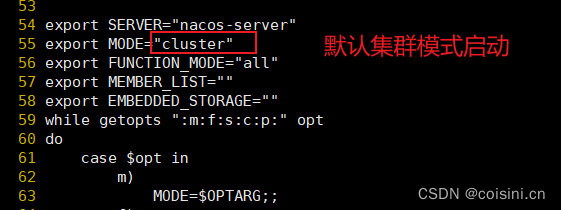
55 行 默认集群模式启动
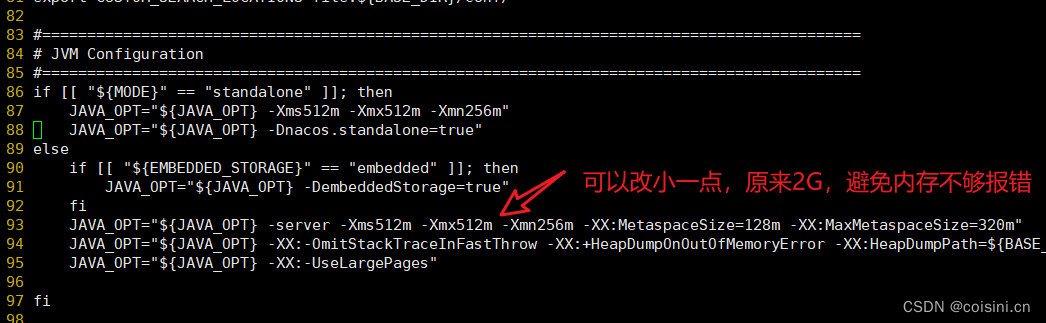
93行 启动大小,可以自行修改
ESC :wq保存并退出
另外两台替换一下:
cp /usr/local/nacos-cluster/nacos8140/bin/startup.sh /usr/local/nacos-cluster/nacos8550/bin/
cp /usr/local/nacos-cluster/nacos8140/bin/startup.sh /usr/local/nacos-cluster/nacos8960/bin/
3.2 分别配置数据源
vi /usr/local/nacos-cluster/nacos8140/conf/application.properties
vi /usr/local/nacos-cluster/nacos8550/conf/application.properties
vi /usr/local/nacos-cluster/nacos8960/conf/application.properties
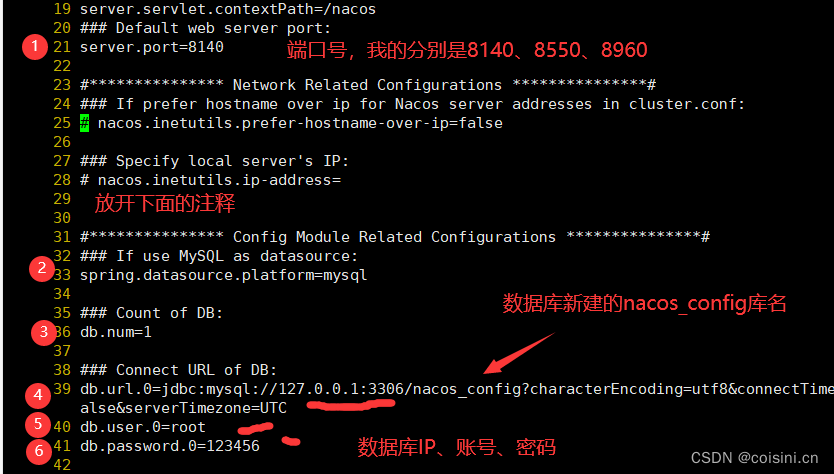
#修改端口
server.port=8140
#去掉前面的#注释(修改数据库地址、数据库用户名、密码)
###If use MySQL as datasource:
spring.datasource.platform=mysql
###Count of DB:
db.num=1
###Connect URL of DB:
db.url.0=jdbc:mysql://192.168.20.128:3306/nacos_config?characterEncoding=utf8&connectTimeout=1000&socketTimeout=3000&autoReconnect=true&useUnicode=true&useSSL=false&serverTimezone=UTC
db.user.0=root
db.password.0=123456
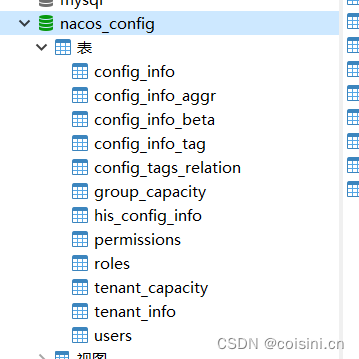
3.3 创建nacos数据库
新建
nacos_config库
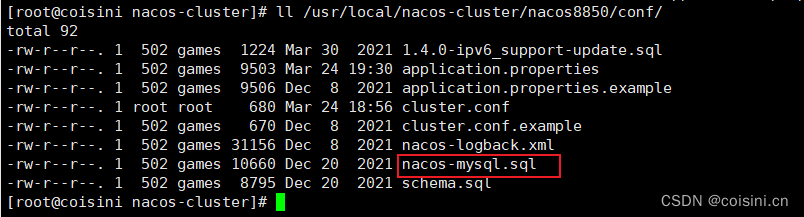
sql脚本在对应的conf目录下,放到本地创建数据库,执行一下,导入到新建的数据库中
例如:/usr/local/nacos-cluster/nacos8140/conf
3.4 修改cluster.conf配置
就是将 conf目录下的cluster.conf.example 文件改为cluster.conf文件
然后修改文件里的集群地址
3.4.1 复制并修改
cp /usr/local/nacos-cluster/nacos8140/conf/cluster.conf.example /usr/local/nacos-cluster/nacos8140/conf/cluster.conf
3.4.2 编辑文件,修改三台主机地址
vi /usr/local/nacos-cluster/nacos8140/conf/cluster.conf

ESC :wq保存并退出
3.4.3 分别放入另外两个nacos的conf目录下:
cp /usr/local/nacos-cluster/nacos8140/conf/cluster.conf /usr/local/nacos-cluster/nacos8550/conf
cp /usr/local/nacos-cluster/nacos8140/conf/cluster.conf /usr/local/nacos-cluster/nacos8960/conf
4. 启动集群
记得开放端口或者直接关闭防火墙:
firewall-cmd --zone=public --add-port=3306/tcp --permanent
--zone# 作用域
--add-port=3306/tcp# 添加端口,格式为:端口/通讯协议
--permanent# 永久生效,没有此参数重启后失效
查看开放的端口:
cat /etc/firewalld/zones/public.xml
或者直接
停止防火墙
systemctl stop firewalld
永久关闭防火墙
systemctl disable firewalld
防火墙状态
systemctl status firewalld
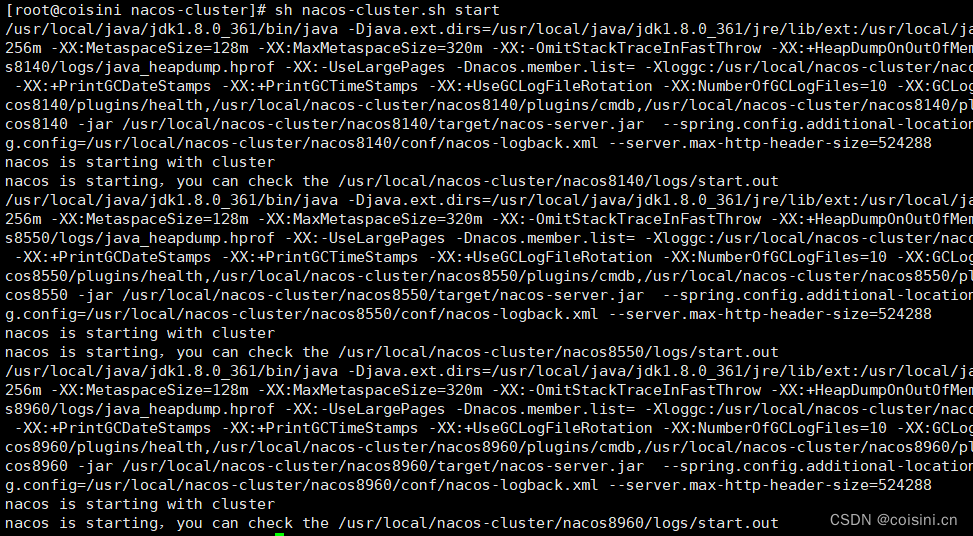
sh /usr/local/nacos-cluster/nacos8140/bin/startup.sh
sh /usr/local/nacos-cluster/nacos8550/bin/startup.sh
sh /usr/local/nacos-cluster/nacos8960/bin/startup.sh
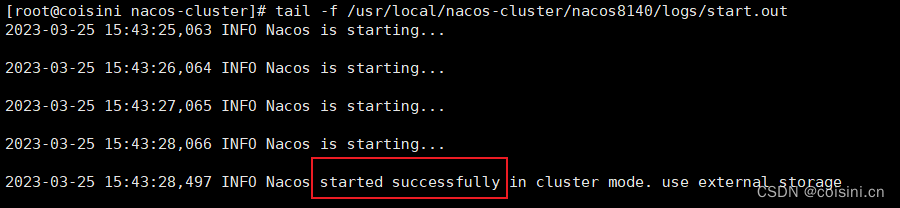
可查看对应启动日志:
tail -f /usr/local/nacos-cluster/nacos8140/logs/start.out
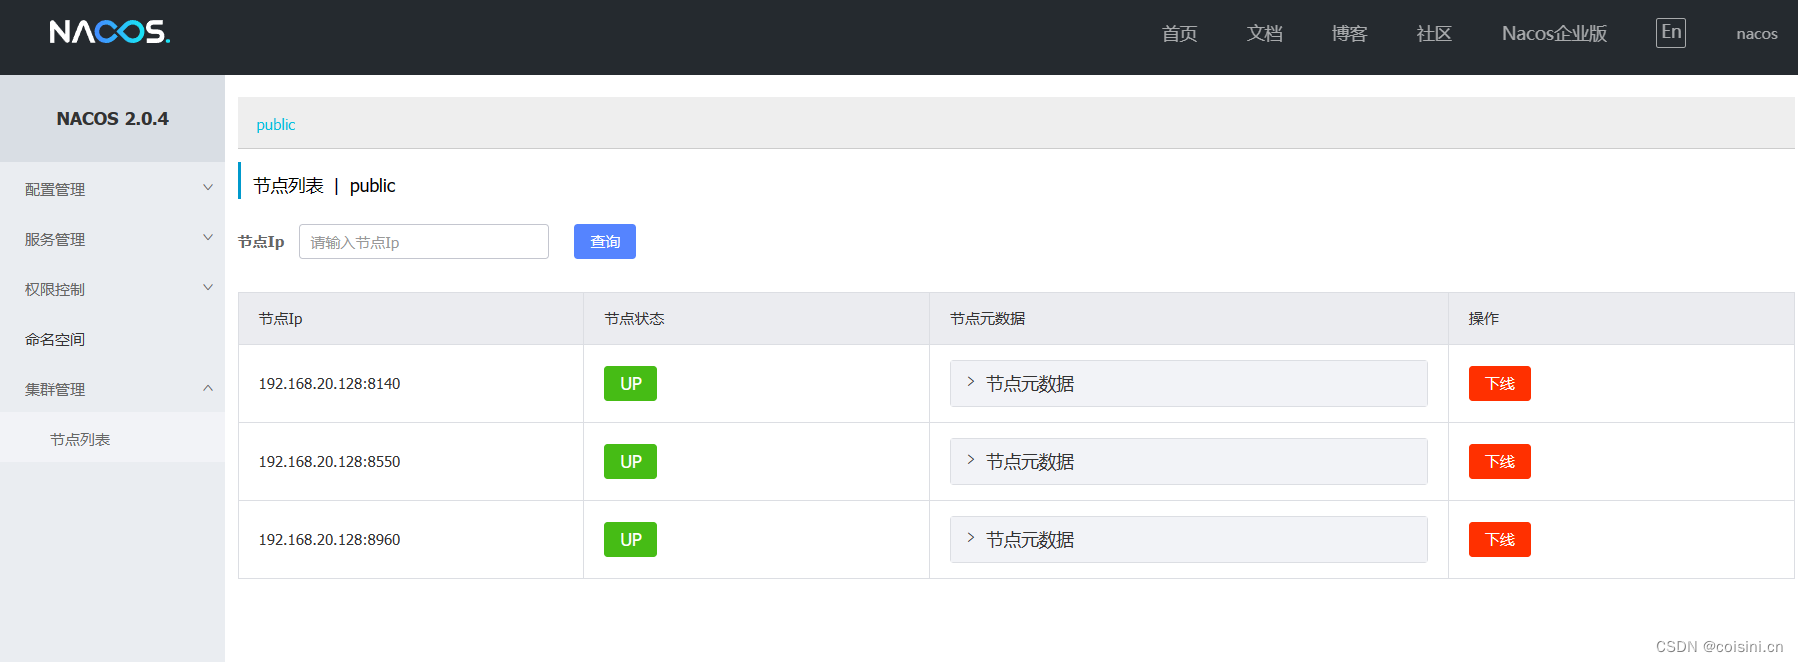
访问地址:http://IP:端口/nacos/
例如:http://192.168.20.128:8140/nacos/
相关命令
非集群:
单机启动sh startup.sh -m standalone
集群模式:
使用内置数据源
sh startup.sh -p embedded
使用外置数据源
sh startup.sh
5. 设置服务开机启动
5.1 创建脚本:
vi nacos-cluster.sh
5.2 添加内容:
#!/bin/bash
case $1 in
"start" )
#echo ========= 启动nacos集群 =========
#echo ========= 启动nacos8140 =========
sh /usr/local/nacos-cluster/nacos8140/bin/startup.sh
#echo ========= 启动nacos8550=========
sh /usr/local/nacos-cluster/nacos8550/bin/startup.sh
#echo ========= 启动nacos8960 =========
sh /usr/local/nacos-cluster/nacos8960/bin/startup.sh
;;
"stop" )
#echo ========= 停止nacos集群 =========
#echo========= 停止nacos8140 =========
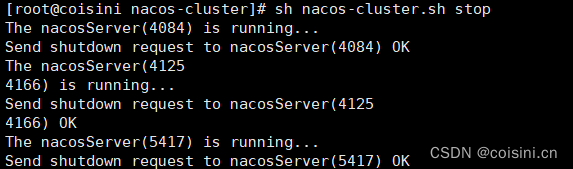
/usr/local/nacos-cluster/nacos8140/bin/shutdown.sh
#echo========= 停止nacos8550=========
/usr/local/nacos-cluster/nacos8550/bin/shutdown.sh
#echo ========= 停止nacos8960 =========
/usr/local/nacos-cluster/nacos8960/bin/shutdown.sh
;;
esac
5.3 赋权:
chmod u+x nacos-cluster.sh
脚本单独使用命令
启动:sh nacos-cluster.sh start
停止:sh nacos-cluster.sh stop
5.4 开机自启
准备设置一个.service,开机执行这个脚本文件,以此实现自启效果
系统启动脚本目录 /etc/systemd/system/
新建服务文件
vi /etc/systemd/system/nacos-cluster.service
添加内容:
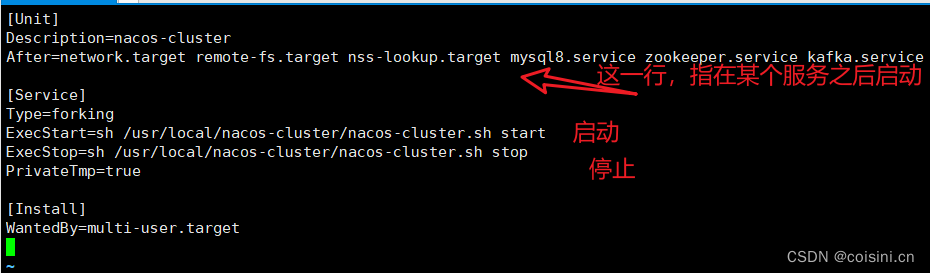
[Unit]
Description=nacos-cluster
After=network.target remote-fs.target nss-lookup.target mysql8.service zookeeper.service kafka.service

[Service]
Type=forking
ExecStart=sh /usr/local/nacos-cluster/nacos-cluster.sh start
ExecStop=sh /usr/local/nacos-cluster/nacos-cluster.sh stop
PrivateTmp=true

[Install]
WantedBy=multi-user.target
按ESC :wq保存并退出
赋权:
chmod 754 /etc/systemd/system/nacos-cluster.service
设置开机自启:
systemctl enable nacos-cluster.service
重载配置
systemctl daemon-reload
重启尝试脚本可行性(reboot)
重启后等待一会,nacos启动要点世界
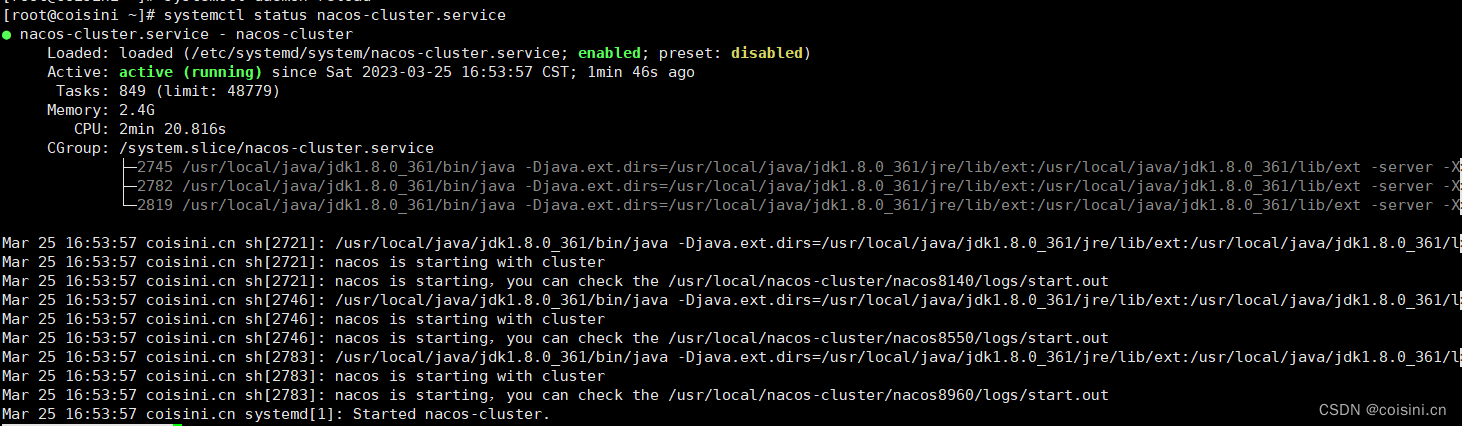
systemctl status nacos-cluster.service
6. OpenResty
通过使用Lua扩展NGINX的可扩展Web平台
中文官网:http://openresty.org/cn/
支持的lua模块: http://openresty.org/cn/components.html
下载页面:http://openresty.org/cn/download.html
下载链接:https://openresty.org/download/openresty-1.21.4.1.tar.gz
6.1 下载
cd /usr/local/
yum install -y wget
wget https://openresty.org/download/openresty-1.21.4.1.tar.gz
6.2 解压
tar -zxvf openresty-1.21.4.1.tar.gz
6.3 进入目录
cd /usr/local/openresty-1.21.4.1
6.4 执行configure命令
默认安装目录
--prefix=/usr/local/openresty
必要环境:
yum -y install gcc gcc-c++ perl make kernel-headers kernel-devel
yum -y install pcre-devel
执行命令:
./configure --prefix=/usr/local/openresty --with-luajit --with-http_stub_status_module --with-pcre --with-pcre-jit --with-http_gzip_static_module --with-http_ssl_module
执行命令:
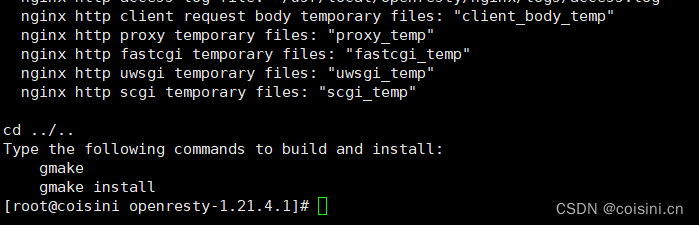
make
make install
6.5 配置nginx.conf文件
vi /usr/local/openresty/nginx/conf/nginx.conf
添加内容:
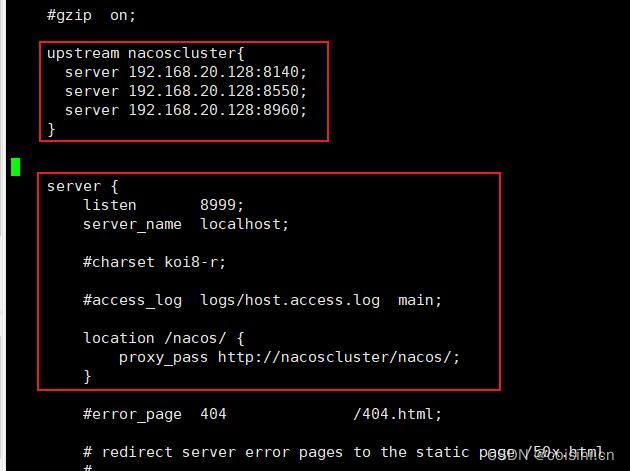
    upstream nacoscluster{


      server 192.168.20.128:8140;
      server 192.168.20.128:8550;
      server 192.168.20.128:8960;
    }
    server {


        # post
        listen       8999;
        server_name  localhost;
    location /nacos/{


        proxy_pass http://nacoscluster/nacos/;
        }
    }
ESC :wq保持并退出
cd /usr/local/openresty/nginx/sbin/
openresty启动命令:
./nginx
6.6 重新加载配置文件
./nginx -s reload
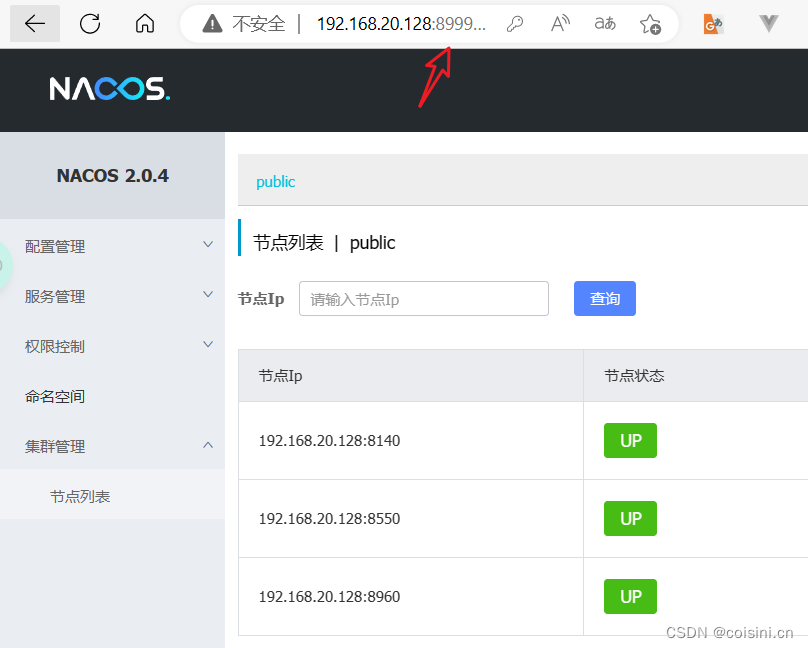
服务调用访问地址:http://192.168.20.128:8999/nacos/
6.7 设置服务开机自启:
vi /etc/systemd/system/open-resty.service
添加:
[Unit]
Description=open-resty
After=network.target remote-fs.target nss-lookup.target mysql8.service zookeeper.service kafka.service nacos-cluster.service

[Service]
Type=forking
ExecStart=/usr/local/openresty/nginx/sbin/nginx -c /usr/local/openresty/nginx/conf/nginx.conf
PrivateTmp=true

[Install]
WantedBy=multi-user.target
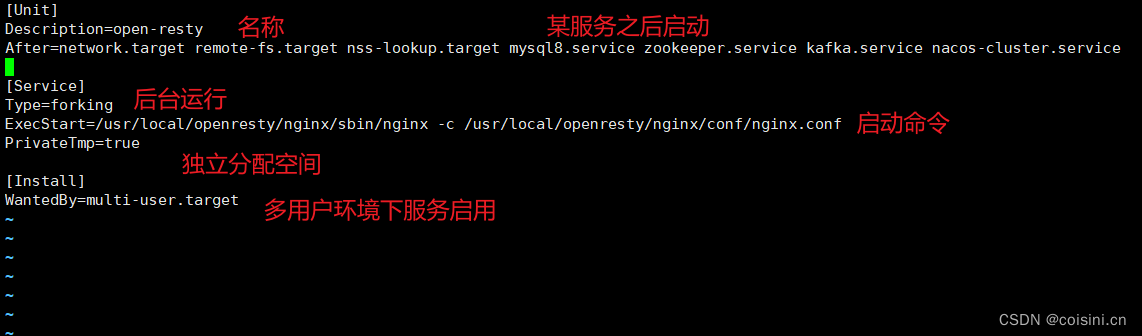
ESC :wq保存并退出
6.8 设置开机自启:
systemctl enable open-resty.service

相关命令记录:
禁止开机启动:systemctl disable open-resty.service
启动服务:systemctl start open-resty.service
停止服务:systemctl stop open-resty.service
重启服务:systemctl restart open-resty.service
查看服务状态:systemctl status open-resty.service
查看所有已启动的服务:systemctl list-units --type=service
部署完毕,感谢阅览~
END