基于Pierre Dellacherie算法实现俄罗斯方块的人工智能(python实现)《一》
1. 文章结构
本系列文章包括三部分:
1. 用python实现俄罗斯方块:《一》
2. 个性化功能的添加:游戏结束的动画,ad广告板等:《二》
3. 基于Pierre Dellacherie算法实现俄罗斯方块的人工智能:《三》
2. 项目介绍
- 主要根据pygame 俄罗斯方块-lovetianyats的代码改成更彻底的面向对象的形式,然后加入个性化功能,最后增加人工智能算法,让电脑自己玩俄罗斯方块
- github地址:https://github.com/Charming2015/TetrisAI-By-Charming
3. 代码讲解
- 本次俄罗斯方块只要是在python的pygame上实现的,不了解pygame 的语法的同学可以先去了解一波,学过前端canvas的童鞋估计学得比较快。
- 代码主要参考pygame 俄罗斯方块-lovetianyats,以及这位作者的github代码:pygame开发小游戏
- 大家可以先下载这位作者的代码阅读,懂的话可以跳过。
- 名词解释:
- 方块:就是任意一个俄罗斯方块的意思
- 方格:一个俄罗斯方块由四个小方格组成
- 形状(shape):就是俄罗斯方块的形状,有
'I', 'J', 'L', 'O', 'S', 'T', 'Z'这么多种形状- 形态(dir or station):就是一个俄罗斯方块经过旋转之后的形态
下面是正式的代码讲解:
开始部分
# 引入包就不说了
import pygame
import random
import os

#pygame的开始
pygame.init()

#定义各自的宽度,行列方向的格子数量
GRID_WIDTH = 20
GRID_NUM_WIDTH = 15
GRID_NUM_HEIGHT = 25
#根据格子数量计算可视框的宽度和高度
WIDTH, HEIGHT = GRID_WIDTH * GRID_NUM_WIDTH, GRID_WIDTH * GRID_NUM_HEIGHT
SIDE_WIDTH = 200
SCREEN_WIDTH = WIDTH + SIDE_WIDTH
# 定义常用颜色
WHITE = (0xff, 0xff, 0xff)
BLACK = (0, 0, 0)
LINE_COLOR = (0x33, 0x33, 0x33)
# 定义颜色矩阵,主要用于生成不用颜色的俄罗斯方块
CUBE_COLORS = [
    (0xcc, 0x99, 0x99), (0xff, 0xff, 0x99), (0x66, 0x66, 0x99),
    (0x99, 0x00, 0x66), (0xff, 0xcc, 0x00), (0xcc, 0x00, 0x33),
    (0xff, 0x00, 0x33), (0x00, 0x66, 0x99), (0xff, 0xff, 0x33),
    (0x99, 0x00, 0x33), (0xcc, 0xff, 0x66), (0xff, 0x99, 0x00)
]
# 设置可视窗的宽高
screen = pygame.display.set_mode((SCREEN_WIDTH, HEIGHT))
# 设置标题
pygame.display.set_caption("俄罗斯方块")
# 根据帧数限制游戏运行速度
clock = pygame.time.Clock()
# 帧数
FPS = 30
# 分数和等级
score = 0
level = 1

# 储存每个格子的状态,若未填充格子则为None,已填充的话会变成该方块的颜色值
screen_color_matrix = [[None] * GRID_NUM_WIDTH for i in range(GRID_NUM_HEIGHT)]

# 设置游戏的根目录为当前文件夹
base_folder = os.path.dirname(__file__)- 封装一个函数方便显示文字(后期我的代码改了这个位置)
def show_text(surf, text, size, x, y, color=WHITE):
    font_name = os.path.join(base_folder, 'font/font.ttc')
    font = pygame.font.Font(font_name, size)
    text_surface = font.render(text, True, color)
    text_rect = text_surface.get_rect()
    text_rect.midtop = (x, y)
    surf.blit(text_surface, text_rect)
- 下面的代码比较长,是一个方块的类
class CubeShape(object):
    # 储存方块的名字的list
    SHAPES = ['I', 'J', 'L', 'O', 'S', 'T', 'Z']
    I = [[(0, -1), (0, 0), (0, 1), (0, 2)],
         [(-1, 0), (0, 0), (1, 0), (2, 0)]]
    J = [[(-2, 0), (-1, 0), (0, 0), (0, -1)],
         [(-1, 0), (0, 0), (0, 1), (0, 2)],
         [(0, 1), (0, 0), (1, 0), (2, 0)],
         [(0, -2), (0, -1), (0, 0), (1, 0)]]
    L = [[(-2, 0), (-1, 0), (0, 0), (0, 1)],
         [(1, 0), (0, 0), (0, 1), (0, 2)],
         [(0, -1), (0, 0), (1, 0), (2, 0)],
         [(0, -2), (0, -1), (0, 0), (-1, 0)]]
    O = [[(0, 0), (0, 1), (1, 0), (1, 1)]]
    S = [[(-1, 0), (0, 0), (0, 1), (1, 1)],
         [(1, -1), (1, 0), (0, 0), (0, 1)]]
    T = [[(0, -1), (0, 0), (0, 1), (-1, 0)],
         [(-1, 0), (0, 0), (1, 0), (0, 1)],
         [(0, -1), (0, 0), (0, 1), (1, 0)],
         [(-1, 0), (0, 0), (1, 0), (0, -1)]]
    Z = [[(0, -1), (0, 0), (1, 0), (1, 1)],
         [(-1, 0), (0, 0), (0, -1), (1, -1)]]
    # 储存方块各种形态(各种变形)的对象
    SHAPES_WITH_DIR = {
        'I': I, 'J': J, 'L': L, 'O': O, 'S': S, 'T': T, 'Z': Z
}- 这里说明一下,各个方块都是根据中心点的坐标来生成的,以
(0,0)为中心点,在x、y轴加减1则是其他方格的坐标,这个好处就是只要确定中心点坐标,其他的方格位置就能随即生成。看图就懂↓

- 继续说代码
- 初始化函数,设置形状(shape),中心点(center),形态(dir),颜色(color)为类的自身属性
- 其中颜色和形态都是随机生成的
    def __init__(self):
        self.shape = self.SHAPES[random.randint(0, len(self.SHAPES) - 1)]
        # 骨牌所在的行列
        self.center = (2, GRID_NUM_WIDTH // 2)
        self.dir = random.randint(0, len(self.SHAPES_WITH_DIR[self.shape]) - 1)
        self.color = CUBE_COLORS[random.randint(0, len(CUBE_COLORS) - 1)]
- 根据中心点坐标获取其他位置的点的坐标
    def get_all_gridpos(self, center=None):
        curr_shape = self.SHAPES_WITH_DIR[self.shape][self.dir]
        if center is None:
            center = [self.center[0], self.center[1]]

        return [(cube[0] + center[0], cube[1] + center[1])
                for cube in curr_shape]
- 碰撞检测,原理是根据中心点找到其他点的位置,看看其他点是否合法,合法的准则是:
- 是否超出边界
- 是否已有元素
    def conflict(self, center):
        for cube in self.get_all_gridpos(center):
            # 超出屏幕之外,说明不合法
            if cube[0] < 0 or cube[1] < 0 or cube[0] >= GRID_NUM_HEIGHT or\
                    cube[1] >= GRID_NUM_WIDTH:
                return True

            # 不为None,说明之前已经有小方块存在了,也不合法
            if screen_color_matrix[cube[0]][cube[1]] is not None:
                return True

        return False
- 旋转,要存储旧的形态(dir)是因为不知道新的形态是否合法,不合法则倒退
    def rotate(self):
        new_dir = self.dir + 1
        new_dir %= len(self.SHAPES_WITH_DIR[self.shape])
        old_dir = self.dir
        self.dir = new_dir
        if self.conflict(self.center):
            self.dir = old_dir
            return False
- 下落,中心点x轴坐标+1
    def down(self):
        # import pdb; pdb.set_trace()
        center = (self.center[0] + 1, self.center[1])
        if self.conflict(center):
            return False

        self.center = center
        return True
- 左移和右移
    def left(self):
        center = (self.center[0], self.center[1] - 1)
        if self.conflict(center):
            return False
        self.center = center
        return True

    def right(self):
        center = (self.center[0], self.center[1] + 1)
        if self.conflict(center):
            return False
        self.center = center
        return True
- 绘制一个方块
    def draw(self):
        for cube in self.get_all_gridpos():
           # 绘制小方格的颜色,实心正方形
            pygame.draw.rect(screen, self.color,
                             (cube[1] * GRID_WIDTH, cube[0] * GRID_WIDTH,
                              GRID_WIDTH, GRID_WIDTH))
           # 增加美观性,为每个小方格绘制一个白边,空心正方形
            pygame.draw.rect(screen, WHITE,
                             (cube[1] * GRID_WIDTH, cube[0] * GRID_WIDTH,
                              GRID_WIDTH, GRID_WIDTH),
1)- 以上就是方块类的全部
==========================================
- 下面继续说其他
- 绘制背景方格
def draw_grids():
    for i in range(GRID_NUM_WIDTH):
        pygame.draw.line(screen, LINE_COLOR,
                         (i * GRID_WIDTH, 0), (i * GRID_WIDTH, HEIGHT))

    for i in range(GRID_NUM_HEIGHT):
        pygame.draw.line(screen, LINE_COLOR,
                         (0, i * GRID_WIDTH), (WIDTH, i * GRID_WIDTH))

    pygame.draw.line(screen, WHITE,
                     (GRID_WIDTH * GRID_NUM_WIDTH, 0),
                     (GRID_WIDTH * GRID_NUM_WIDTH, GRID_WIDTH * GRID_NUM_HEIGHT))
- 根据颜色矩阵绘制图像
def draw_matrix():
    for i, row in zip(range(GRID_NUM_HEIGHT), screen_color_matrix):
        for j, color in zip(range(GRID_NUM_WIDTH), row):
            if color is not None:
                pygame.draw.rect(screen, color,
                            (j * GRID_WIDTH, i * GRID_WIDTH,
                             GRID_WIDTH, GRID_WIDTH))
                pygame.draw.rect(screen, WHITE,
                            (j * GRID_WIDTH, i * GRID_WIDTH,
                             GRID_WIDTH, GRID_WIDTH), 2)
- 写分
def draw_score():
    show_text(screen, u'得分:{}'.format(score), 20, WIDTH + SIDE_WIDTH // 2, 100)
- 满行消除和计分
def remove_full_line():
    global screen_color_matrix
    global score
    global level
    new_matrix = [[None] * GRID_NUM_WIDTH for i in range(GRID_NUM_HEIGHT)]
    index = GRID_NUM_HEIGHT - 1
    n_full_line = 0
    for i in range(GRID_NUM_HEIGHT - 1, -1, -1):
        is_full = True
        for j in range(GRID_NUM_WIDTH):
            if screen_color_matrix[i][j] is None:
                is_full = False
                continue
        if not is_full:
            new_matrix[index] = screen_color_matrix[i]
            index -= 1
        else:
            n_full_line += 1
    score += n_full_line
    # 计算等级
    level = score // 20 + 1
    # 消除一行之后的新的矩阵赋值给矩阵
    screen_color_matrix = new_matrix
- 欢迎界面
def show_welcome(screen):
    show_text(screen, u'俄罗斯方块', 30, WIDTH / 2, HEIGHT / 2)
show_text(screen, u'按任意键开始游戏', 20, WIDTH / 2, HEIGHT / 2 + 50)- 下面是游戏的主要逻辑程序
- 这个
counter的意义在于当counter % (FPS // level) == 0时,执行一次下落的操作,这就有点像定时器,以level=1,FPS=30为例,每当counter是30的倍数的时候会执行一次下落,而方块变换的速度还是30帧一次 - 如果这里不这样设置,则会变换的速度和下落的速度是一样的,变换快则下落也快,反应不过来,下落慢则变换也慢,体验不好
- 不知道说清楚没有,大家可以体验一下
running = True
gameover = True
counter = 0
live_cube = None
while running:
    clock.tick(FPS)
    for event in pygame.event.get():
        if event.type == pygame.QUIT:
            running = False
        elif event.type == pygame.KEYDOWN:
            # 一开始进来显示欢迎界面
            if gameover:
                gameover = False
                live_cube = CubeShape()
                break
            # 上下左右的键盘操作
            if event.key == pygame.K_LEFT:
                live_cube.left()
            elif event.key == pygame.K_RIGHT:
                live_cube.right()
            elif event.key == pygame.K_DOWN:
                live_cube.down()
            elif event.key == pygame.K_UP:
                live_cube.rotate()
            # 按空格则是快速下落,一直执行while循环直到不能再下落
            elif event.key == pygame.K_SPACE:
                while live_cube.down() == True:
                    pass
            remove_full_line()

    # level 是为了方便游戏的难度,level 越高 FPS // level 的值越小
    # 这样屏幕刷新的就越快,难度就越大
    if gameover is False and counter % (FPS // level) == 0:
        # down 表示下移骨牌,返回False表示下移不成功,可能超过了屏幕或者和之前固定的
        # 小方块冲突了
        if live_cube.down() == False:
            for cube in live_cube.get_all_gridpos():
                screen_color_matrix[cube[0]][cube[1]] = live_cube.color
            live_cube = CubeShape()
            if live_cube.conflict(live_cube.center):
                gameover = True
                score = 0
                live_cube = None
                screen_color_matrix = [[None] * GRID_NUM_WIDTH for i in range(GRID_NUM_HEIGHT)]
        # 消除满行
        remove_full_line()
    # 每次执行while循环,计时器+1
    counter += 1
    # 更新屏幕
    screen.fill(BLACK)
    draw_grids()
    draw_matrix()
    draw_score()
    if live_cube is not None:
        live_cube.draw()
    if gameover:
        show_welcome(screen)
    # 刷新一下屏幕
pygame.display.update()- 说完,到这里就是
lovetianyats同学的俄罗斯方块的全部内容
修改为面向对象的俄罗斯方块
- 其实上面的代码也算是面向对象,只是不是很彻底,比如说绘制分数,绘制背景这些还是面向过程的。
- 下面直接根据上面的代码改成面向对象的形式,关于俄罗斯方块的面向对象的设计,大家可以看一下 用面向对象方法进行俄罗斯方块游戏设计- bruesz,这个说得很清晰。
- 我在bruesz的基础上,把Wall类和House类整合到了一起。
- 下面是我的uml类图:
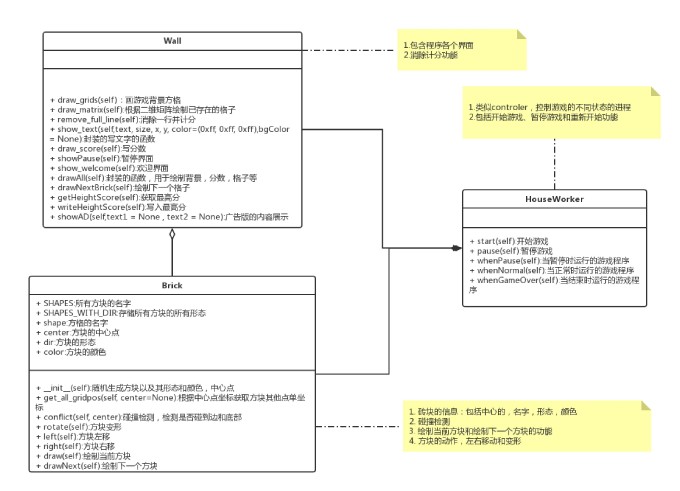
- 由于改成面向对象时代码没有保存好,代码说明和下一篇增加自定义功能的代码一起说明,深感抱歉。