目录
1 拉取 nginx 镜像
使用如下命令拉取 nginx 镜像:
$ docker pull nginx2 启动 nginx 容器
使用如下命令启动一个名为 nginx 的容器:
$ docker run --rm -d --name=nginx -p 80:80 nginx

# 输出:
# dded31ed40abcca70b7eacf9cc4c7ee24b6a15054a02c01c45bf1174b073458f
参数说明:
- --rm:停止容器后自动删除容器
- -d:启动后的容器在后台运行
- --name:给容器命名
- -p:进行宿主机和容器的端口映射
可以使用如下命令进入 nginx 的容器:
$ docker exec -it nginx /bin/bash

# 执行后切换为:
# root@dded31ed40ab:/#
验证:输入网址 localhost:<port> 或者 <nginx's ip>:80,得到下图,成功!

因为我们进行了端口映射,所以可以通过宿主机的 ip 和 port 访问到容器的相应端口。此外,由于我们映射的是 80 端口,而 80 端口又是 http 的默认端口,因此上图是要输入服务器的 ip 地址即可。如果端口设置的不是 80,则在输入网址时需要手动修改一下。
3 构建 web 服务器镜像
在本文中,我们将使用 python3 提供的服务来启动三个简易的 web 服务器。现在,我们编写一个 Dockerfile,安装需要使用到的 python3 等工具:
FROM ubuntu:22.04

RUN apt-get update
RUN apt-get install -y iperf3 iproute2 iptables vim python3
内容说明:
- 基础镜像为 ubuntu:22.04
- -y 参数在 install 时自动填写 yes
实际上装个 python3 就行了,上面的环境是我之前上课时需要使用的。
使用如下命令构建镜像 ready,路径不要写错了,名字可以随便取:
$ docker build -f ./Dockerfile -t ready .4 启动 web 服务器容器
使用如下命令启动 web01、web02、web03 三个容器,python3 -m http.server 8000 命令帮助我们启动一个简易的 web 服务器,端口号可以自定义:
# 用带python的容器启三个web服务器
docker run -d --name=web01 ready python3 -m http.server 8000
docker run -d --name=web02 ready python3 -m http.server 8000
docker run -d --name=web02 ready python3 -m http.server 8000
现在来查看这三个容器的 ip 地址,到时候在修改 nginx 配置文件时需要使用到:
# 查看服务器的ip地址,从而修改配置文件
docker inspect web01
docker inspect web02
docker inspect web03
如下图所示,但我这里看的是 nginx 容器:
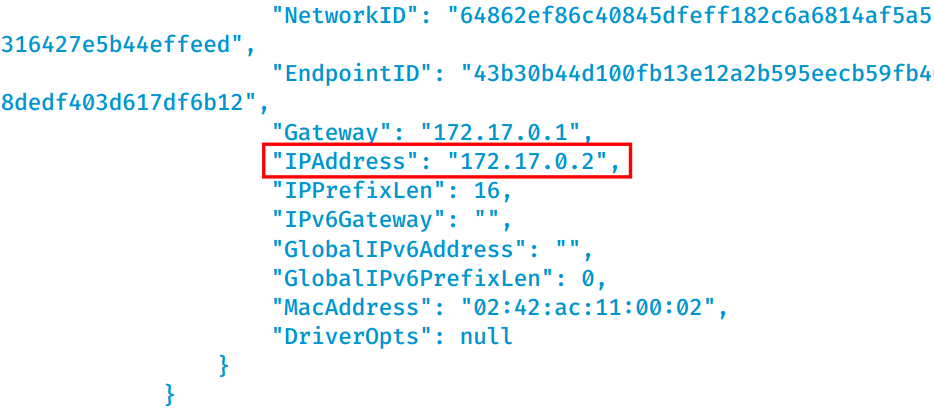
使用同样的方法,分别得到运行 web 服务器的容器的 ip 地址为:172.17.0.3、172.17.0.4 和 172.17.0.5 。
5 编写 nginx 配置文件
使用如下命令进入 nginx 的容器:
$ docker exec -it nginx /bin/bash

# 执行后切换为:
# root@240c8bbb4891:/#
使用如下命令查看 nginx 配置文件的位置:
root@240c8bbb4891:/# nginx -t

nginx: the configuration file /etc/nginx/nginx.conf syntax is ok
nginx: configuration file /etc/nginx/nginx.conf test is successful
得到文件位置后,我们 exit 退出回到宿主机,使用如下命令将配置文件拷贝出来。注意这里需要自己新建一个文件夹存放配置文件,我的是 /home/envoutante/nginx,会自动创建 nginx.conf:
$ docker cp nginx:/etc/nginx/nginx.conf /home/envoutante/nginx/nginx.conf得到配置文件的拷贝以后,我们使用任意 IDE 将其打开,内容如下:
user  nginx;
worker_processes  auto;

error_log  /var/log/nginx/error.log notice;
pid        /var/run/nginx.pid;


events {
    worker_connections  1024;
}


http {
    include       /etc/nginx/mime.types;
    default_type  application/octet-stream;

    log_format  main  '$remote_addr - $remote_user [$time_local] "$request" '
                      '$status $body_bytes_sent "$http_referer" '
                      '"$http_user_agent" "$http_x_forwarded_for"';

    access_log  /var/log/nginx/access.log  main;

    sendfile        on;
    #tcp_nopush     on;

    keepalive_timeout  65;

    #gzip  on;

    include /etc/nginx/conf.d/*.conf;
}
添加我们自己的配置信息后如下:
user  nginx;
worker_processes  auto;

error_log  /var/log/nginx/error.log notice;
pid        /var/run/nginx.pid;


events {
    worker_connections  1024;
}


http {
    include       /etc/nginx/mime.types;
    default_type  application/octet-stream;

    log_format  main  '$remote_addr - $remote_user [$time_local] "$request" '
                      '$status $body_bytes_sent "$http_referer" '
                      '"$http_user_agent" "$http_x_forwarded_for"';

    access_log  /var/log/nginx/access.log  main;

    sendfile        on;
    #tcp_nopush     on;

    keepalive_timeout  65;

    #gzip  on;

    #include /etc/nginx/conf.d/*.conf;
    #配置信息
    #------------------------------------------
    server {
        listen      80;
        server_name localhost;

        location /web01 {
            proxy_pass http://172.17.0.3:8000/;
        }
        location /web02 {
            proxy_pass http://172.17.0.4:8000/;
        }
        location /web03 {
            proxy_pass http://172.17.0.5:8000/;
        }
    }
    #------------------------------------------
}
特别注意:
① 一定要将 include /etc/nginx/conf.d/.conf 这一行先注释掉,因为 /etc/nginx/conf.d/.conf 里面有一个 default.conf 默认配置,如果不注释掉,那么还是会使用默认配置。
② server_name 后面填写域名,可以是 ip 地址,也可以是域名,但是一定要在宿主机中记录 ip 地址和域名之间的映射关系。
# 在该文件中进行添加
$ vim /etc/hosts
③ (这个问题把我坑惨了)在 nginx 中配置 proxy_pass 反向代理时,如果在 url 后面加上 "/",则相当于绝对根路径,则 nginx 不会把 location 中匹配的路径部分代理走;如果没有 "/",则会把 location 中匹配的路径部分代理走。比如:假设这里的 "http://172.17.0.3:8000/" 不加 "/",则会访问到 "http://172.17.0.5:8000/web01",然而并没有这个页面,因此会导致 404 Not Found 错误。
6 新启一个 nginx 容器
我们删除之前利用的 nginx 容器,重新新建一个 nginx 容器。特殊之处在于,我们把宿主机中存放配置文件的目录挂载到了容器的相应目录上:
$ docker run -d \
   --name nginx \
   -v /home/envoutante/nginx/nginx.conf:/etc/nginx/nginx.conf \
   -p 80:80 \
   nginx
进入容器,使用如下命令查看配置文件,不出意外,它就是我们刚刚修改过的的配置文件:
cat /etc/nginx/nginx.conf注意,每次修改完配置文件,我们需要重启 nginx 容器:
$ docker restart nginx下一步,我们通过访问网页来验证 nginx 反向代理是否搭建成功。
7 访问网页
输入网址:localhost:<port>/web01/ 或者 <nginx's ip>:80/web01/,访问成功!

使用如下命令查看运行 web 服务器的容器的日志:
# 查看日志
docker logs -f web01
docker logs -f web02
docker logs -f web03
如下图所示,如果配置文件中的路径写错了,则如 ① 所示;如果配置文件正确,则如 ② 所示:

p.s. 如果 nginx 代理彻底搭建失败,则运行 web 服务器的容器根本接收不到请求,所以日志记录也不会新增。
本来以为搭建 nginx 代理和搭建 haproxy 代理一样简单,结果发现虽然思路一样,但是踩了好多坑 TT