使用 Google Colab 训练LSTM自动编码器
文章目录
参考教程:
Kaggle 数据集上传到 Google Colab 上
如何将 kaggle 中的数据导入到谷歌提供的 colab
一、导入数据集到 Google Colab
本节使用的导入数据集的方法是利用 Kaggle,以解决 Google Colab 上传数据慢的问题。
(一)、上传数据集到 Kaggle
若使用的数据集在 kaggle 上并不存在,那么就需要把数据集上传到自己的 kaggle 账号下。
①准备好数据集,并压缩


②到 kaggle 上传压缩好的数据集

(二)、上传数据集到 Google Colab
①找到自己的kaggle账号头像,点击Account

②在页面上找到 Create New API Token,点击下载一个json文件


③用记事本打开 json 文件,并复制里面的内容
④复制数据集的 API

找到右边三个小点点,点开,点击 Copy API command
⑤在 Google Colab 中下载数据集
由于 Google Colab 笔记本在关闭后,临时数据会被清理,如果不想被清理,建议将数据下载到 MyDrive 下,并将工作路径设置到 MyDrive 下,为了方便整理,我在 MyDrive 下创建了一个名为 lstmautoencoder 的文件夹,用来存储此项目的数据集和模型文件。
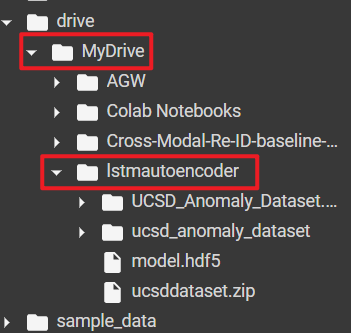
完成上述步骤后,将当前路径设置为此文件夹的路径:
cd /content/drive/MyDrive/lstmautoencoder
然后把复制的 API command 粘贴到代码的第五行,别忘了在 API command 前加上感叹号「!」
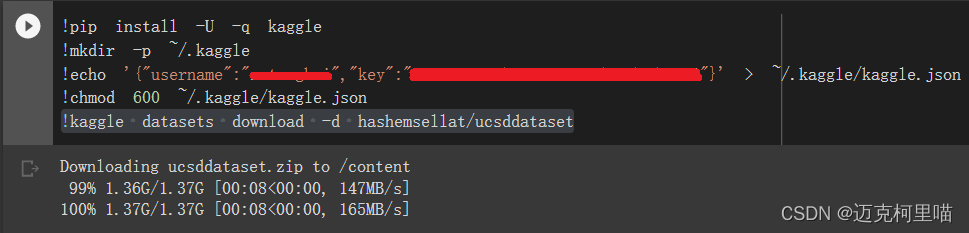
完整的代码如下(需要提前把json 文件的内容插入到第三行代码中):
!pip install -U -q kaggle
!mkdir -p ~/.kaggle
!echo '{"username":"xxx","key":"xxx"}' > ~/.kaggle/kaggle.json
!chmod 600 ~/.kaggle/kaggle.json
!kaggle datasets download -d hashemsellat/ucsddataset
最后点击运行这段代码,就可以将数据集下载到 Google Colab 中,速度超过 100 MB/s,非常快。
(三)、数据集解压缩
参考教程:
如果下载到 Google Colab 中的数据集仍为压缩包形式,可能需要解压缩,代码如下:
import zipfile
z=zipfile.ZipFile('/content/drive/MyDrive/lstmautoencoder/ucsddataset.zip','r')  # 需要解压的文件的路径
z.extractall(path=r'/content/drive/MyDrive/lstmautoencoder')  # 解压到的路径
z.close
二、运行代码
代码来源:
Anomaly Detection in Videos using LSTM Convolutional Autoencoder
逐块运行以下代码:
!pip install keras-layer-normalization
class Config:
  DATASET_PATH = "/content/drive/MyDrive/lstmautoencoder/UCSD_Anomaly_Dataset.v1p2/UCSDped1/Train"
  SINGLE_TEST_PATH = "/content/drive/MyDrive/lstmautoencoder/UCSD_Anomaly_Dataset.v1p2/UCSDped1/Test/Test032"
  BATCH_SIZE = 4
  EPOCHS = 3
  MODEL_PATH = "/content/drive/MyDrive/lstmautoencoder/model.hdf5"
from os import listdir
from os.path import isfile, join, isdir
from PIL import Image
import numpy as np
import shelve
def get_clips_by_stride(stride, frames_list, sequence_size):
    """ For data augmenting purposes.
    Parameters
    ----------
    stride : int
        The desired distance between two consecutive frames
    frames_list : list
        A list of sorted frames of shape 256 X 256
    sequence_size: int
        The size of the desired LSTM sequence
    Returns
    -------
    list
        A list of clips , 10 frames each
    """
    clips = []
    sz = len(frames_list)
    clip = np.zeros(shape=(sequence_size, 256, 256, 1))
    cnt = 0
    for start in range(0, stride):
        for i in range(start, sz, stride):
            clip[cnt, :, :, 0] = frames_list[i]
            cnt = cnt + 1
            if cnt == sequence_size:
                clips.append(np.copy(clip))
                cnt = 0
    return clips


def get_training_set():
    """
    Returns
    -------
    list
        A list of training sequences of shape (NUMBER_OF_SEQUENCES,SINGLE_SEQUENCE_SIZE,FRAME_WIDTH,FRAME_HEIGHT,1)
    """
    #####################################
    # cache = shelve.open(Config.CACHE_PATH)
    # return cache["datasetLSTM"]
    #####################################
    clips = []
    # loop over the training folders (Train000,Train001,..)
    for f in sorted(listdir(Config.DATASET_PATH)):
        if isdir(join(Config.DATASET_PATH, f)):
            all_frames = []
            # loop over all the images in the folder (0.tif,1.tif,..,199.tif)
            for c in sorted(listdir(join(Config.DATASET_PATH, f))):
                if str(join(join(Config.DATASET_PATH, f), c))[-3:] == "tif":
                    img = Image.open(join(join(Config.DATASET_PATH, f), c)).resize((256, 256))
                    img = np.array(img, dtype=np.float32) / 256.0
                    all_frames.append(img)
            # get the 10-frames sequences from the list of images after applying data augmentation
            for stride in range(1, 3):
                clips.extend(get_clips_by_stride(stride=stride, frames_list=all_frames, sequence_size=10))
    return clips
import keras
from keras.layers import Conv2DTranspose, ConvLSTM2D, BatchNormalization, TimeDistributed, Conv2D, LayerNormalization
from keras.models import Sequential, load_model
def get_model(reload_model=True):
    """
    Parameters
    ----------
    reload_model : bool
        Load saved model or retrain it
    """
    if not reload_model:
        return load_model(Config.MODEL_PATH,custom_objects={

    'LayerNormalization': LayerNormalization})
    training_set = get_training_set()
    training_set = np.array(training_set)
    training_set = training_set.reshape(-1,10,256,256,1)
    seq = Sequential()
    seq.add(TimeDistributed(Conv2D(128, (11, 11), strides=4, padding="same"), batch_input_shape=(None, 10, 256, 256, 1)))
    seq.add(LayerNormalization())
    seq.add(TimeDistributed(Conv2D(64, (5, 5), strides=2, padding="same")))
    seq.add(LayerNormalization())
    # # # # #
    seq.add(ConvLSTM2D(64, (3, 3), padding="same", return_sequences=True))
    seq.add(LayerNormalization())
    seq.add(ConvLSTM2D(32, (3, 3), padding="same", return_sequences=True))
    seq.add(LayerNormalization())
    seq.add(ConvLSTM2D(64, (3, 3), padding="same", return_sequences=True))
    seq.add(LayerNormalization())
    # # # # #
    seq.add(TimeDistributed(Conv2DTranspose(64, (5, 5), strides=2, padding="same")))
    seq.add(LayerNormalization())
    seq.add(TimeDistributed(Conv2DTranspose(128, (11, 11), strides=4, padding="same")))
    seq.add(LayerNormalization())
    seq.add(TimeDistributed(Conv2D(1, (11, 11), activation="sigmoid", padding="same")))
    print(seq.summary())
    seq.compile(loss='mse', optimizer=keras.optimizers.Adam(lr=1e-4, decay=1e-5, epsilon=1e-6))
    seq.fit(training_set, training_set,
            batch_size=Config.BATCH_SIZE, epochs=Config.EPOCHS, shuffle=False)
    seq.save(Config.MODEL_PATH)
    return seq
def get_single_test():
    sz = 200
    test = np.zeros(shape=(sz, 256, 256, 1))
    cnt = 0
    for f in sorted(listdir(Config.SINGLE_TEST_PATH)):
        if str(join(Config.SINGLE_TEST_PATH, f))[-3:] == "tif":
            img = Image.open(join(Config.SINGLE_TEST_PATH, f)).resize((256, 256))
            img = np.array(img, dtype=np.float32) / 256.0
            test[cnt, :, :, 0] = img
            cnt = cnt + 1
    return test
import matplotlib.pyplot as plt
def evaluate():
model = get_model(False)
print("got model")
test = get_single_test()
print(test.shape)
sz = test.shape[0] - 10 + 1
sequences = np.zeros((sz, 10, 256, 256, 1))
# apply the sliding window technique to get the sequences
for i in range(0, sz):
clip = np.zeros((10, 256, 256, 1))
for j in range(0, 10):
clip[j] = test[i + j, :, :, :]
sequences[i] = clip
print("got data")
# get the reconstruction cost of all the sequences
reconstructed_sequences = model.predict(sequences,batch_size=4)
sequences_reconstruction_cost = np.array([np.linalg.norm(np.subtract(sequences[i],reconstructed_sequences[i])) for i in range(0,sz)])
sa = (sequences_reconstruction_cost - np.min(sequences_reconstruction_cost)) / np.max(sequences_reconstruction_cost)
sr = 1.0 - sa
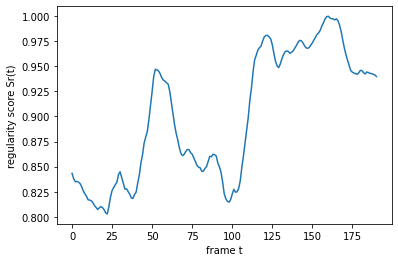
# plot the regularity scores
plt.plot(sr)
plt.ylabel('regularity score Sr(t)')
plt.xlabel('frame t')
plt.show()
evaluate()
运行结果:
got model
(200, 256, 256, 1)
got data