多线程代码实现方法1
代码如下
package thread;

/**
 * Created with IntelliJ IDEA.
 * Description:
 * User: wuyulin
 * Date: 2023-07-22
 * Time: 14:01
 */
//多线程编程方法1
class HelloThread extends Thread{
    @Override
    public void run() {
//        System.out.println("hello thread");
        while (true){
            System.out.println("hello thread");
            try {
                Thread.sleep(1000); //休眠多少毫秒
            } catch (InterruptedException e) {
                throw new RuntimeException(e);
            }
        }
    }
}
public class Demo1 {
    public static void main(String[] args) {
        HelloThread helloThread=new HelloThread();
        //调用start()方法相当于开启一个新的线程,会调动操作系统创建线程的api,在系统内核中将线程对应的pcb给创建出来并管理好
        //新的线程执行的程序便是run()方法中的程序
        helloThread.start();
        //直接调用run方法就相当于调用一个普通的方法,就不会调用操作系统创建线程的api,不会创建出一个线程
//        helloThread.run();
        while (true){
            System.out.println("hello main");
            try {
                Thread.sleep(1000);
            } catch (InterruptedException e) {
                throw new RuntimeException(e);
            }
        }
    }
}
以上实现了一个多线程的程序
要点
代码主要的要点是创建一个类继承Thread类,重写其中的run()方法,run()方法中便是线程要执行的程序,重写完run()方法后,在main函数中实例化一个具体的对象,再由这个对象调用start()方法创建一个具体的线程运行run()方法中的程序,便完成了一个最简单的多线程程序。
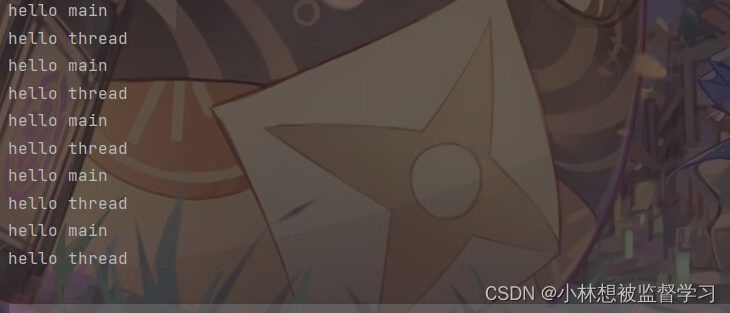
在上述代码中有很多是用来检验,观察多线程的,在run()方法中我们写了一个死循环打印hello thread,在main方法中我们写了一个死循环打印hello mian,并通过Thread.sleep(1000)来休眠1000毫秒来方便我们观察,实践上main和helloThread.start()是两个线程,main是主线程,我们运行上面的程序观察到打印hello mian和hello thread是交替执行的,这里便体现出了两个打印的操作是两个线程
疑问
有的人可能会有这样的疑问,我是否可以直接调用run()方法呢,于是进行实践后你会发现直接通过 helloThread.run()也可以打印出hello thread,但是打印的情况就变成这样了:
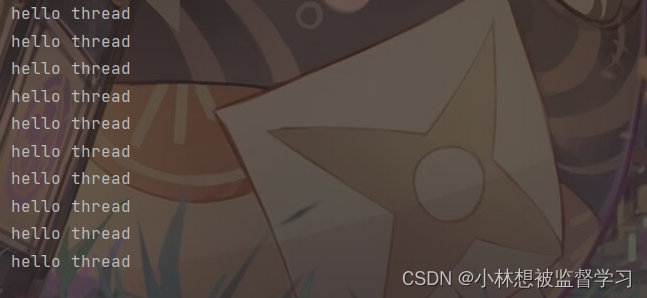
现在就只会打印hello thread不会打印hello mian说明已经没有多线程了,因为直接调用run()方法相当于调用一个普通的方法,虽然确实也可以执行其中的代码,但是并不会创建一个线程,因此只有main这个主线程,所以在进入死循环后根本到不了打印hello mian的位置,而调用start()方法这个操作才能在底层调用操作系统提供的“创建线程”的API,同时会在操作系统的内核中创建对应的pcb结构,并且加入到对应的链表中,此时,这个新创建出来的线程就会参与到cpu的调度中,这个线程要执行的工作,就是上面所写的run()方法。
多线程代码实现方法2
代码如下:
package thread;

/**
 * Created with IntelliJ IDEA.
 * Description:
 * User: wuyulin
 * Date: 2023-07-22
 * Time: 18:36
 */
//多线程编程方法2
class HelloRunnable implements Runnable{
    @Override
    public void run() {
        while (true){
            System.out.println("hello runnable");
            try {
                Thread.sleep(1000);
            } catch (InterruptedException e) {
                throw new RuntimeException(e);
            }
        }
    }
}
public class Demo2 {
    public static void main(String[] args) {
        HelloRunnable helloRunnable=new HelloRunnable();
        Thread thread=new Thread(helloRunnable);
        thread.start();
        while (true){
            System.out.println("hello main");
            try {
                Thread.sleep(1000);
            } catch (InterruptedException e) {
                throw new RuntimeException(e);
            }
        }
    }
}
要点
创建一个实现Runnable接口的类HelloRunnable,在该HelloRunnable类重写run()方法,run()方法中的程序便是线程要执行的程序,在main()方法中,实例化一个实现了Runnable接口的类HelloRunnable,然后将其作为参数传入Thread的构造方法中,实例化一个Thread的对象,再通过Thread类的对象调用start()方法创建一个进程(因为只有Thread类中定义了start()方法,所以要Thread类的对象才能调用start()方法)