restfultool使用
测试controller
@RestController
@RequestMapping("/api")
@Slf4j
public class ApiController {
@GetMapping("test1")
public String test1(@RequestParam String msg) {
return "hello world " + msg;
}
@GetMapping("test2/{msg}")
public String test2(@PathVariable String msg) {
return "hello world " + msg;
}
@PostMapping("test3")
public String test3(@RequestBody Body body) {
return "hello world " + body.name;
}
@Data
static class Body {
private String name;
private int age;
}
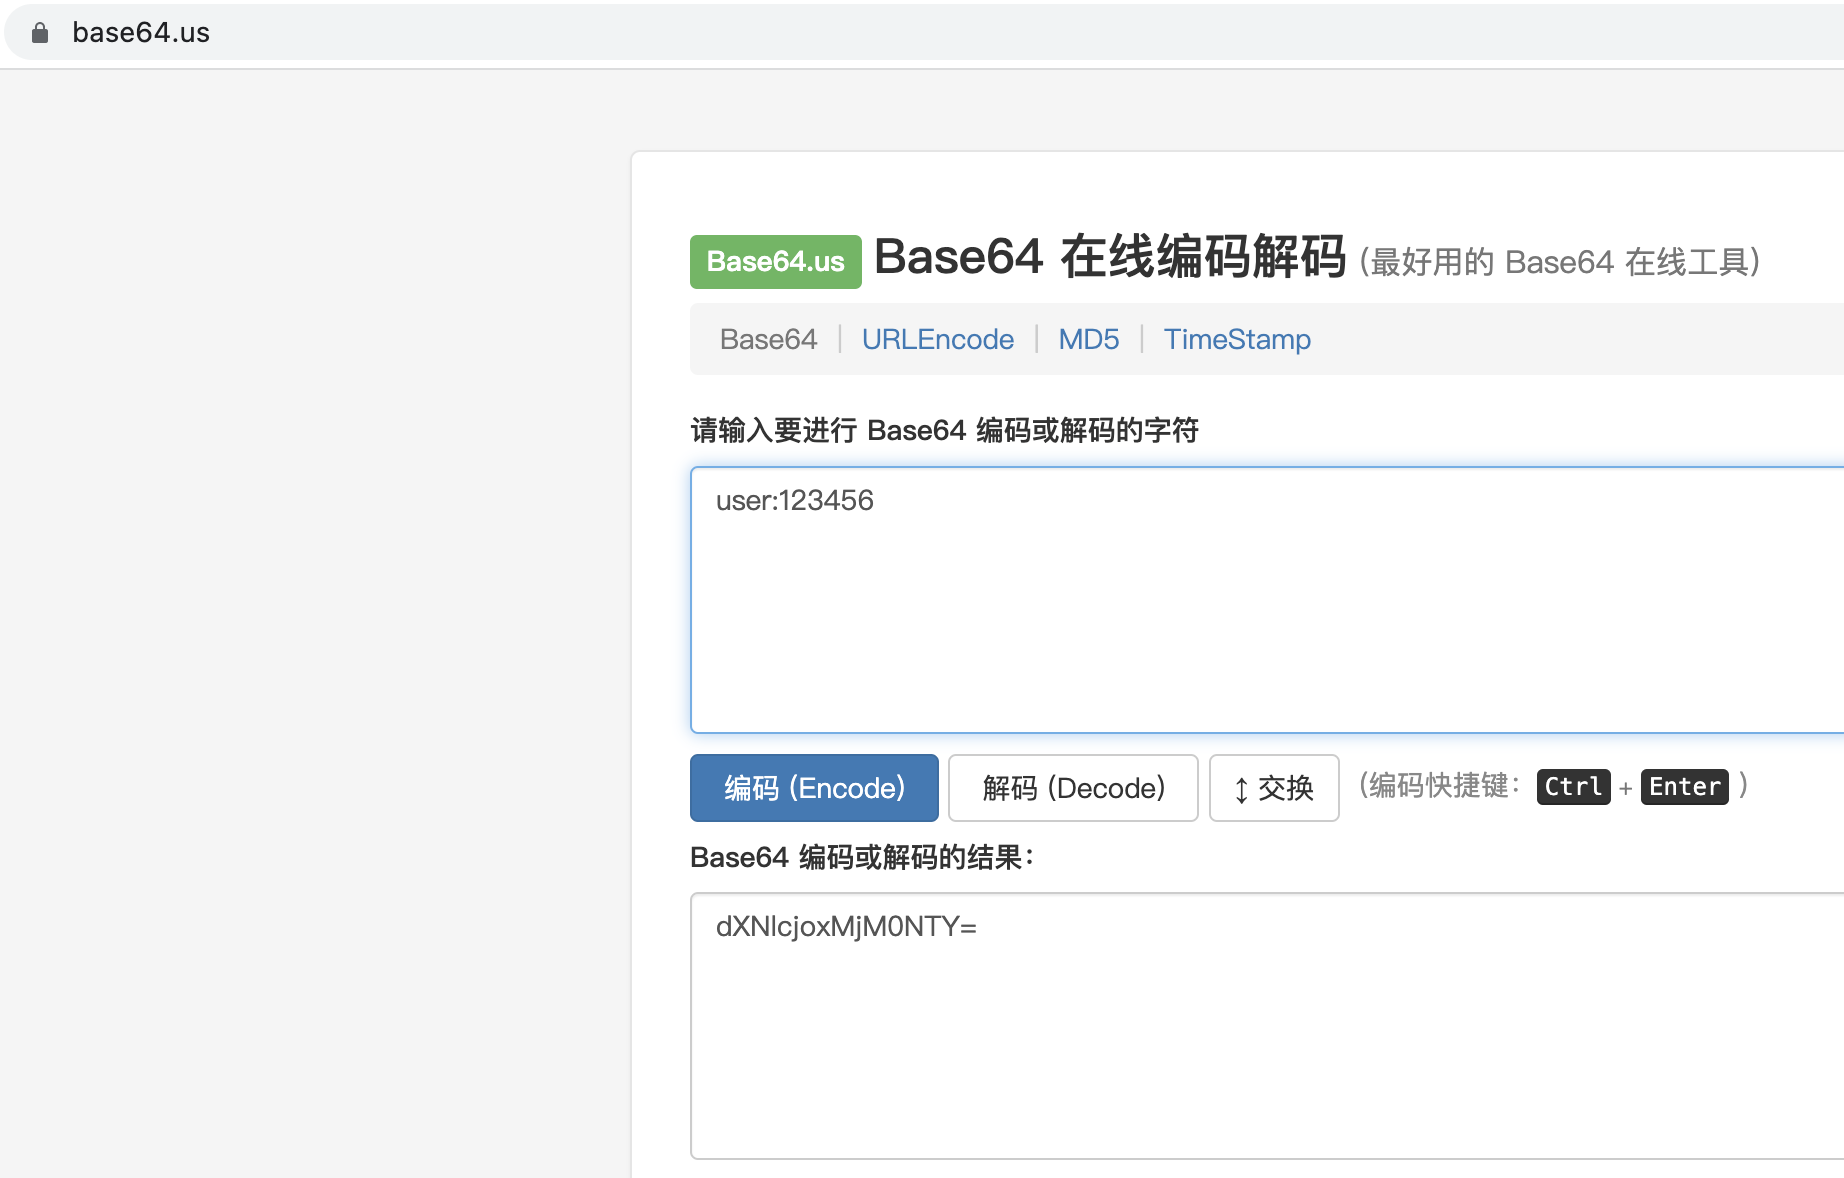
}请求头设置方法,base64加密
用户名为user,密码是123456,注意中间分号

httpclient使用
环境变量
环境变量的概念
根据官方文档知道,在项目内部是可以创建以下两个文件:
①rest-client.env.json(或http-client.env.json)是一个包含常规变量的普通文件。(该文件里可以定义用在整个项目上的所有常规变量)
②在rest-client.private.env.json(或http-client.private.env.json)是一个私有的文件,可能包括密码、令牌、证书、其他敏感信息。默认情况下,此文件被添加到VCS的ignore文件列表中。在http-client.private.env.json文件中指定的变量的值将覆盖环境文件中的值。因为它的优先级最高。
创建配置文件http-client.env.json
{
  "dev": {
    "user": "user",
    "password": "123456",
    "token": "dXNlcjoxMjM0NTY="
  },
  "prod": {
    "user": "user",
    "password": "123456",
    "token": "123"
  }
}
环境变量的具体使用
我们在环境变量中定义了一个dev和一个prd,在运行接口的时候,直接选择运行哪个环境即可。
如果有请求头,可以使用第一种都是明文的方式,也可以使用第二种token用base64加密的方式。
如果是post请求有请求体需要加上Content-Type: application/json,注意下面body需要空一行避免被当做url的一部分。
脚本检测,可以对返回值进行打印,断言等操作。
动态变量
每次您运行请求时,动态变量都会生成一个值:
$uuid:生成通用的唯一标识符(UUID-v4)
$timestamp:生成当前的UNIX时间戳
$randomInt:生成介于0和1000之间的随机整数。
例如:GET http://localhost:8080/api/test1?msg={ {$timestamp}}
###
GET http://localhost:8080/api/test1?msg=test1
#Authorization: Basic {

    {user}} {

    {password}}
Authorization: Basic {

    {token}}

> {%
client.log(JSON.stringify(response.body));
client.test("Request executed successfully", function() {
  client.assert(response.status === 200, "Response status is not 200");
});
%}

###
GET http://localhost:8080/api/test2/test2
Authorization: Basic {

    {token}}

> {%
client.test("Headers option exists", function() {
  client.assert(response.body.hasOwnProperty("headers"), "Cannot find 'headers' option in response");
});
%}

###
POST http://localhost:8080/api/test3
Authorization: Basic {

    {token}}
Content-Type: application/json

{
"name":"test3",
"age":"18"
}

> {%
client.test("Request executed successfully", function() {
  client.assert(response.status === 200, "Response status is not 200");
});

client.test("Response content-type is json", function() {
  const type = response.contentType.mimeType;
  client.assert(type === "application/json", "Expected 'application/json' but received '" + type + "'");
});
%}
管理 Cookies
Cookies存储在.idea/httpRequests/目录下的HTTP-client.cookies文件中。
最多存储300个Cookies。
@注释
@name
给API接口取名,否则IDEA默认以#1开始编排。
# @name apiName@no-log
返回结果不记录在.idea/httpRequests/文件夹下,适用于一些不适合保存的敏感数据。
# @no-log@no-cookie-jar
请求时不携带Cookies。
# @no-cookie-jar@no-redirect
服务端返回301等重定向状态码时,不请求重定向后的地址,直接返回301的结果。
# @no-redirect@use-os-credentials
# @use-os-credentials转换成 cURL
方法一
将光标点击到需要转换的HTTP请求上,点击顶部Convert to cURL and Copy,即可将HTTP Client中声明的请求复制成cURL并且拷贝到粘贴板中。
方法二
将光标点击到需要转换的HTTP请求上,按下Alt+Enter快捷键,选择Convert to cURL and copy to clipboard,即可将HTTP Client中声明的请求复制成cURL并且拷贝到粘贴板中。
更多用法
HTTP Client还支持:GraphQL、WebSocket。
===:分割WebSocket的每条信息。
=== wait-for-server:等待WebSocket服务端返回信息。
参考
https://www.jetbrains.com/help/idea/exploring-http-syntax.html
视频讲解
https://www.bilibili.com/video/BV1Xa411978P