在我们日常开发中为了避免一次性数据加载量过大,而导致页面加载缓慢,运行卡顿。通常会使用懒加载进行按需加载,在提高项目运行流畅度的同时也可以增加用户体验。懒加载有很多场景很多方式,那么今天就教大家如何一个原生js实现页面懒加载的方式,也就是当滚动到页面最底部时会触发回调去请求数据。
当原生的理解后,对于我们后续使用框架开发的遇到类似情况也会更加容易变通和实现。
看代码
引入Axios
<script src="https://cdn.bootcdn.net/ajax/libs/axios/1.1.3/axios.min.js"></script>CSS部分
<style>
        * {
            padding: 0;
            margin: 0 auto;
            list-style: none;
            transition: all 0.5s ease;
        }

        body {
            background-color: #475164;
            background-image: url(http://zhongguose.com/img/texture.png);
            padding-bottom: 50px;
        }

        h2 {
            text-align: center;
            margin: 20px 0;
        }

        .row {
            width: 1290px;
        }

        .list_contrant {
            width: 100%;
            overflow: hidden;
        }

        .cidPage_Separate {
            width: 300px;
            height: 400px;
            /* background-color: aqua; */
            background-color: white;
            margin-right: 30px;
            margin-bottom: 30px;
            border-radius: 10px;
            padding: 0 15px;
            box-sizing: border-box;
            float: left;
        }

        .cidPage_Separate:hover {
            transform: translateX(-5px) translateY(-5px);
            -webkit-box-shadow: 6px 6px 13px -2px rgba(0, 0, 0, 0.7);
            -moz-box-shadow: 6px 6px 13px -2px rgba(0, 0, 0, 0.7);
            box-shadow: 6px 6px 13px -2px rgba(0, 0, 0, 0.7);
            cursor: pointer;
        }

        .cidPage_Separate:nth-child(4n) {
            margin-right: 0;
        }

        .groundFloor_imgUrl {
            height: 170px;
            margin-top: 15px;
            overflow: hidden;
            border-radius: 8px;
        }

        .groundFloor_imgUrl img {
            width: 100%;
            height: 100%;
        }

        .hero_name {
            height: 40px;
            line-height: 40px;
            margin: 15px 0;
            font-size: 20px;
            font-weight: 700;
        }

        .hero_introduce {
            height: 125px;
            line-height: 22px;
            margin-bottom: 20px;
        }

        .base_Anime {
            width: 100%;
            height: 50px;
            /* background-color: aqua; */
            position: relative;
            display: none;
            /* visibility: visible; */
        }

        .Loading_animation {
            display: block;
            width: 30px;
            height: 30px;
            /* background-color: #475164; */
            position: absolute;
            top: 50%;
            left: 50%;
            transform: translateX(-50%) translateY(-50%);
            background-image: url("https://gimg2.baidu.com/image_search/src=http%3A%2F%2Fimg.zcool.cn%2Fcommunity%2F01ccee5cf75dc1a801205e4b392210.gif&refer=http%3A%2F%2Fimg.zcool.cn&app=2002&size=f9999,10000&q=a80&n=0&g=0n&fmt=auto?sec=1670245718&t=3f172a26acf6f2d501151ac5b63d45da");
            background-size: 300%;
            background-position: center center;
        }

        h6 {
            text-align: center;
            display: none;
        }
    </style>
HTML+Javascript部分
<body>
<h2>王者英雄列表</h2>
<div class="row">
<ul class="list_contrant">
</ul>
<div class="base_Anime">
<i class="Loading_animation"></i>
</div>
<h6>暂无更多数据</h6>
</div>
<script>
const General = document.querySelector(".list_contrant"); // 获取ul
const base_Anime = document.querySelector(".base_Anime"); // 获取加载元素
const noData = document.querySelector("h6"); // 暂无数据
let requestNumeric = 1; // 每次请求数据的id值
let jointSum = ""; // li内容
async function getHeroInfo(requestNumeric) {
let data = (await axios({
method: "get",
url: `http://localhost:3000/posts/${requestNumeric}` // ${requestNumeric} 请求数据的id
})).data
data.data.forEach(element => {
jointSum +=
`
<li class="cidPage_Separate ">
<div class="groundFloor_imgUrl">
<img src=${element.img_url} alt="">
</div>
<div class="hero_name">${element.hero_name}</div>
<p class="hero_introduce"><b>英雄台词:</b>${element.hero_introduce}</p>
</li>
`
});
General.innerHTML = ""; // 先将原来的ul中内容置空
General.innerHTML = jointSum; // 加入新的内容
base_Anime.style.display = "none"; // 将动画元素隐藏
}
getHeroInfo(1); // 第一次加载时默认调用一次
let flat = true; // 设置节流的开关阀门
window.addEventListener("scroll", () => { // 监听浏览器窗口滚动
if (requestNumeric > 6) { // 请求id大于6时已经没有数据,则停止请求
base_Anime.style.display = "none"; // 关闭 -- 加载动画
noData.style.display = "block"; // 打开 -- 暂无数据文字
return;
};
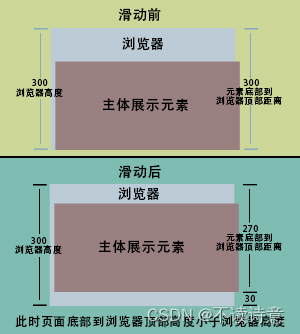
if (General.getBoundingClientRect().bottom < document.documentElement.clientHeight) { // 当页面主元素底部到浏览器顶部高度位置小于浏览器总高度
if (!flat) return; // 节流 -- 判断阀门是否开着
flat = false; // 进来后关闭阀门
setTimeout(() => {
requestNumeric++; // 增加下次请求的id
getHeroInfo(requestNumeric); // 调用请求数据的函数
flat = true; // 每过1秒开启一次阀门(允许请求加载数据)
}, 1000)
base_Anime.style.display = "block"; // 显示加载动画
}
})
</script>
</body>看效果

总结以下知识重点
getBoundingClientRect() 获取当前元素在页面中的所有距离信息
- bottom:对象底部距离浏览器当前可视顶部的距离
- height: 该对象的高度
- left: 对象距离浏览器可视最左侧的距离
- right: 对象距离浏览器可视最右侧的距离
- Top: 对象顶部距离当前浏览器可视顶部的距离
- width: 当前对象宽度
- x: 对象左侧距离浏览器可视左侧距离
- y: 对象顶部距离浏览器可视顶部水平
General.getBoundingClientRect().bottom // 获取元素底部到浏览器顶部的距离
< document.documentElement.clientHeight // 获取浏览器高度
// 当页面主元素底部到浏览器顶部高度位置小于浏览器总高度,则触发回调去加载数据
看图更能理解滚动距离监听
如果没有接口的也阔以看我上一篇json-serve的介绍,可以自己写一个小的数据库接口供测试使用,以上的数据便是使用json-serve写的,非常方便且利于理解。
希望能够有所帮助!