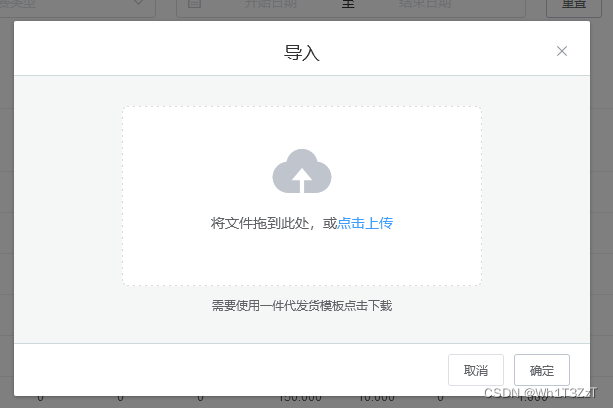
实现效果

一、先创建一个Dialog对话框进行存放
<template>
    <!-- 导入遮罩层 -->
    <el-dialog
      :title="$t('to_lead')"
      :visible.sync="BatchAdd"
      custom-class="BatcchAdd"
      width="30%"
      :before-close="CloseBatcchAdd">
			<span>这是一段信息</span>
      <span slot="footer" class="dialog-footer">
        <el-button @click="BatchAdd = false">{

    {

    $t('Cancel')}}</el-button>
        <el-button type="primary" @click="Batch_Add">{

    {

    $t('determine')}}</el-button>
      </span>
    </el-dialog>
</template>
<script>
	data(){


	    return{


	    	BatchAdd:false, //控制批量添加遮罩
	    }
	  },
	methods:{


		Batch_Add(){

      //导入遮罩打开
			this.BatchAdd = true
		},
		CloseBatcchAdd(){

     //导入遮罩关闭
      		this.BatchAdd = false
    	},
	}
</script>

<style>
.BatcchAdd{


  text-align: center;
}
</style>
二、加入Upload 上传组件
1.HTML
<!-- 导入遮罩层 -->
<el-dialog
:title="$t('to_lead')"
:visible.sync="BatchAdd"
custom-class="BatcchAdd"
width="30%"
:before-close="CloseBatcchAdd">
<el-upload
class="upload-demo"
drag
action="#"
ref="upload"
:on-remove="removefile"
:auto-upload="false"
:on-change="file">
<i class="el-icon-upload"></i>
<div class="el-upload__text">{
{
$t('Drag_the_file_here') }},{
{
$t('or') }}<em>{
{
$t('Click_Upload') }}</em></div>
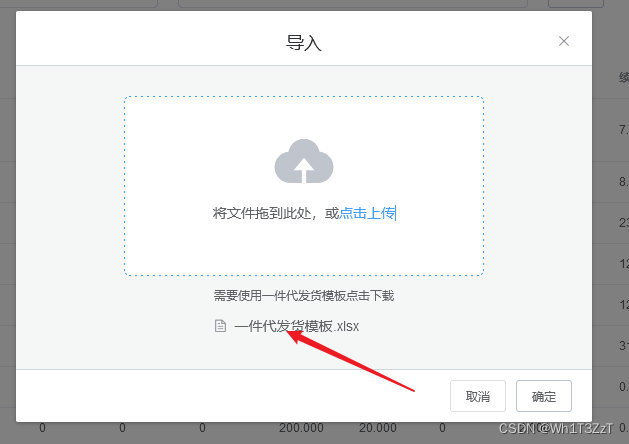
<div class="el-upload__tip" slot="tip">{
{
$t('You_need_to_use_a_consignment_template') }}</div>
</el-upload>
<span slot="footer" class="dialog-footer">
<el-button @click="BatchAdd = false">{
{
$t('Cancel')}}</el-button>
<el-button type="primary" @click="Batch_Add">{
{
$t('determine')}}</el-button>
</span>
</el-dialog>
drag: 支持拖拽上传
action:必选参数,上传的地址
ref:这里主要是用于文件上传完成后清除文件的
on-remove:文件列表移除文件时的钩子
auto-upload:是否在选取文件后立即进行上传
on-change:文件状态改变时的钩子,添加文件、上传成功和上传失败时都会被调用
注:这里使用的{
{$t(‘to_lead’)}}是i18n语言切换的语法,如果没有配置这里会报错,不需要可以直接换成自己想要的字段
2.JavaScript
<script>
	data(){


	    return{


			BatchAdd:false, //控制批量添加遮罩
			BatchAddfile:[],  //批量添加文件
	    }
	  },
	methods:{


    Batch_Add(){

      //导入
      if (!this.BatchAdd) {


        this.BatchAdd = true
        return
      }
      if (this.BatchAddfile == '') {


        this.$message.warning('文件为空')
        return
      }
      let formdata = new FormData()
      formdata.append('files',this.BatchAddfile)
      this.$api.upload('url',formdata,{

    loading:true}).then((res) => {


        console.log(res);
        if (res.return_codes == 0) {


          this.BatchAddfile = []
          this.$refs.upload.clearFiles()
          this.$message.success(res.return_msg)
          this.BatchAdd = false
        }
      })
    },
    removefile(){

     //移除文件
      this.BatchAddfile = []
    },
    file(file){


      this.BatchAddfile = file.raw
    },
    CloseBatcchAdd(){

     //导入遮罩关闭
      this.BatchAdd = false
    },
	}
</script>
Batch_Add:
此处的逻辑是先判断遮罩是否打开,没打开则只进行打开操作
接着判断是否有传入文件
在接下来就通过文件流的方式将数据传给后台,文件流名称为’files’
最后在上传成功后清空数据已经列表,并且关闭遮罩
总结
主要有一点需要注意,就是在文件上传完成后,文件依旧存在页面当中。
此处就是通过绑定的ref,然后使用this.$refs.upload.clearFiles()进行清除