目录
1.概述
1.1.计算机的IO模型
在聊IO之前一定要了解计算机的IO模型,因为编程语言的所有和IO有关的API,本质上一定是对于计算机IO模型的抽象。
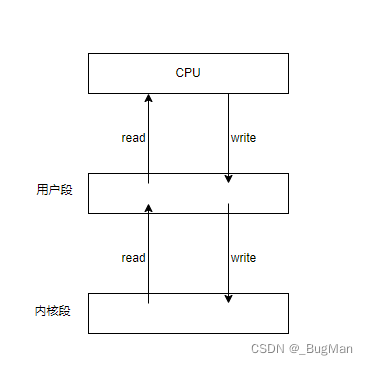
计算机的IO其实就是在内存中为各个IO设备分配了属于它的一块内存,向这块内存中进行读写即可完成IO。这块内存是位于计算机内存中的内核段中的。
一次完整的IO过程是:
1.CPU执行IO指令
2.将内核段中数据读到用户段
3.用户段中数据交给CPU
4.CPU的执行结果写回用户段
5.用户段中存的结果写回内核段
如果对计算机的内存分段、IO等相关概念不熟悉的同学,可以移步博主的另一篇文章,里面详细介绍了相关内容:
1.2.NIO概述
NIO,non-blocking IO,从JDK1.4版本开始引入,其直观的特点就是非阻塞,深入一点来看的话,NIO推出之前的JAVA BIO只是对TCP进行了简单的封装,用户只能对进行简单的IO,而整个计算机底层,在内存中的IO过程是被封装成了黑盒的。NIO对计算机底层的IO过程做了抽象,开放出来了内存粒度的API,让使用者可以更加细粒度的从计算机内存的角度来控制IO。
如果不是很了解BIO的同学可以移步作者的另一篇文章,其中详细讲解了BIO:
NIO有三大核心:
- channel
- buffer
- selector
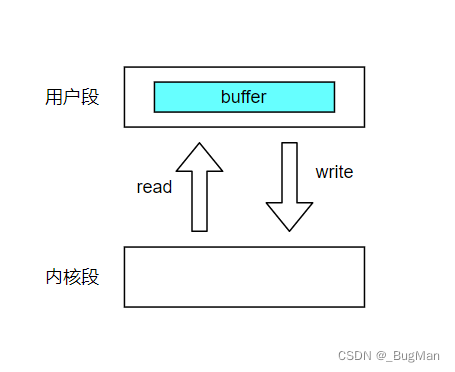
1.buffer:
可以理解为用户段的内存的抽象。
2.channel:
可以理解为用户段和内核段IO区的连接的抽象,当然直接理解为内核段的IO区的抽象其实也可以。
3.selector:
NIO实现非阻塞式IO的核心,其可以基于事件监听的方式,选择准备好的channel,再去其中将数据读到buffer中,然后去操作buffer中的数据。这里要是有点晕,不要紧,后文在selector章节,会详细介绍。
2.buffer
2.1.概述
buffer,理解为用户段中一块内存的抽象即可。
既然是一块内存,那么其本质上就是用来进行数据读写的一个容器,由java.nio包定义,顶级接口为Buffer,定义了一套API用来管理缓 冲区中的数据针对存储不同的数据类型,有不同的buffer:
- ByteBuffer
- CharBuffer
- ShortBuffer
- IntBuffer
- LongBuffer
- FloatBuffer
- DoubleBuffer
buffer具有以下几个基本属性:
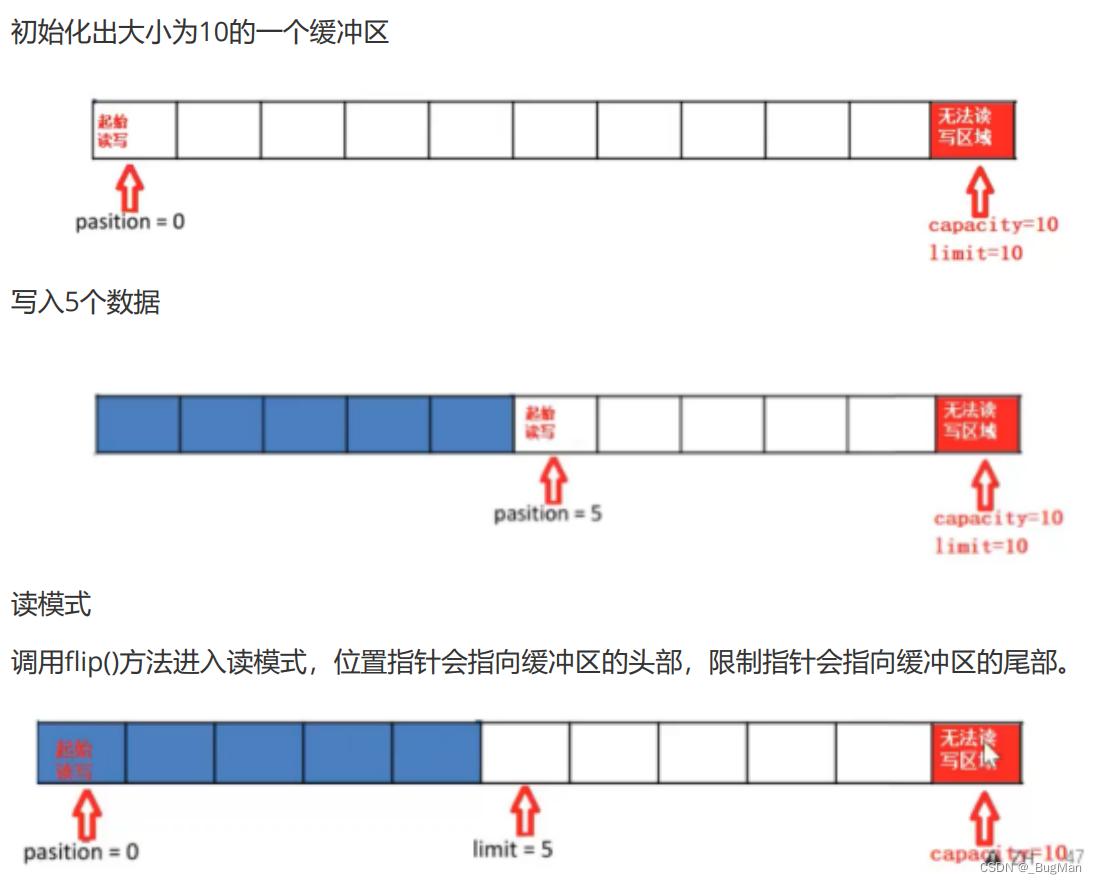
- 容量(capacity),buffer的大小,buffer创建后,容量不能更改。
- 限制(limit) ,buffer可用的大小,limit之后的区域无法进行读写。
- 位置(position) 表示接下来要读写的数据的所在位置。
- 标记(mark) 标记一个位置的索引,调用reset()方法可以回到该位置上
图示:
2.2.API
- Buffer clear() 清空缓冲区并返回对缓冲区的引用
- Buffer flip()为 将缓冲区的界限设置为当前位置,并将当前位置充值为 0 0
- int capacity() 返回 Buffer 的 capacity 大小
- boolean hasRemainingO) 判断缓冲区中是否还有元素
- int Timit0 返回 Buffer 的界限(Timit) 的位置
- Buffer limit(int n) 将设置缓冲区界限为 n,并返回一个具有新 imit 的缓冲区对象
- Buffer mark() 对缓冲区设置标记
- int position() 返回缓冲区的当前位置 position
- Buffer position(int n) 将设置缓冲区的当前位置为 n ,并返回修改后的 Buffer 对象
- int remaining() 返回 position 和 imit 之间的元素个数
- Buffer reset() 将位置 position 转到以前设置的 mark 所在的位置
- Buffer rewind() 将位置设为为 0, 取消设置的 mark
- get() : 读取单个字节get(byte[] dst): 批量读取多个字节到 dst 中
- get(int index): 读取指定索引位置的字节(不会移动 position)
- put(byte b): 将给定单个字节写入缓冲区的当前位置
- put(byte[] src): 将 src 中的字节写入缓冲区的当前位置
- put(int index,byte b): 将指定字节写入缓冲区的索引位置(不会移动 position)
2.3.代码示例
由于buffer其实就是一块内存的抽象,是一个数据容器,所以核心其实就是put、get。
此处以byteBuffer为例,其它相同。
byte[] resources = "hello".getBytes();
//初始化
ByteBuffer byteBuffer = ByteBuffer.allocate(1024);
System.out.println(byteBuffer.capacity());
System.out.println(byteBuffer.position());
System.out.println(byteBuffer.limit());
//写
byteBuffer.put(resources);
System.out.println(byteBuffer.capacity());
System.out.println(byteBuffer.position());
System.out.println(byteBuffer.limit());
//读
//不开读模式,读不到任何数据
System.out.println(byteBuffer.get());
System.out.println(byteBuffer.get());
//开起读模式才能读到数据
byteBuffer.flip();
System.out.println(byteBuffer.get());
System.out.println(byteBuffer.get());

//读取全部
System.out.println(new String(byteBuffer.array()));
3.channel
3.1.概述
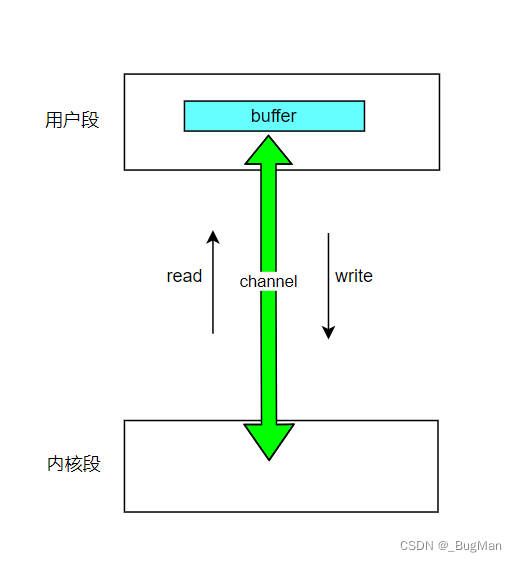
Channel,通道,由java.nio.channel包下定义,用来向buffer中读写数据,可以理解为内核段和用户段之间进行数据传输的一条逻辑通道,甚至可以直接理解为内核段中内存的一个抽象。
通道具有以下特性:
- 全双工,读写可以同时进行,即可以向缓冲区中写,又可以向缓冲区中读
- 支持异步
Channel是一个顶级父接口,针对需要传输的数据格式的不同分为:
- FileChannel 用于读取、写入、映射操作文件
- DatagramChannel 用于通过UDP读写网络中的数据
- SocketChannel 通过TCP读写网络中的数据
- ServerSocketChannel SocketChannel的升级版,可以自动监听新的TCP连接,每一条新连接创建一个SocketChannel。
可以从以下地方获取不同的通道:
- FileInputStream
- FileOutStream
- RandomAccessFile
- Socket ServerSocket
3.2.API
3.2.1.读写
用channel将buffer中的数据写出来:
       try {
            FileOutputStream fos = new FileOutputStream( "nio_channel/data01.txt");
            //获取file类型的channel
            FileChannel channel=fos.getChannel();
            //准备好要写出的内容
            ByteBuffer buffer=ByteBuffer.allocate(1024);
            buffer.put("helloWorld!".getBytes());
            //将buffer切换成读模式
            buffer.flip();
            //写出
            channel.write(buffer);
            channel.close();
        } catch (Exception e) {
            e.printStackTrace();
        }
用channel将数据读进buffer:
        try {
            FileInputStream is=new FileInputStream("data01.txt");
            FileChannel channel = is.getChannel();
            ByteBuffer buffer=ByteBuffer.allocate(1024);
            //用channel将数据读到buffer中
            channel.read(buffer);
            System.out.println(new String(buffer.array()));
        } catch (IOException e) {
            e.printStackTrace();
        }
3.2.2.文件复制
在JAVA NIO中有两种方式可以实现文件的复制:
- 非零拷贝,即一个通道向buffer中写,另一个通道去buffer中读,数据要走用户段。
- 零拷贝,直接从磁盘的一个地方拷贝到磁盘的另一个地方,数据不用走用户段。
这里要是对零拷贝不了解的同学,可以移步博主的另一篇文章,对零拷贝进行了详细讲解:
1.非零拷贝:
一个channel向buffer中写,另一个channel去buffer中读。
        try {
            File srcFile=new File("data01.txt");
            File targetFile=new File("data02.txt");
            FileInputStream fis=new FileInputStream(srcFile);
            FileOutputStream fos=new FileOutputStream(targetFile);

            FileChannel isChannel=fis.getChannel();
            FileChannel osChannel=fos.getChannel();

            ByteBuffer buffer=ByteBuffer.allocate(1024);
            while (true){
                //读数据
                int flag=isChannel.read(buffer);
                if(flag==-1){
                    break;
                }
                //读模式
                buffer.flip();
                //写数据
                osChannel.write(buffer);
                //清空buffer
                buffer.clear();
            }
        } catch (IOException e) {
            e.printStackTrace();
        }
2.零拷贝:
当使用Java NIO进行文件传输时,提供了两个底层使用零拷贝的API,一个是transferTo、一个是transferFrom。可以通过transferTo方法将数据从一个Channel传输到另一个Channel,也可以使用transferFrom方法将数据从一个Channel传输到另一个Channel。
// 定义源文件和目标文件路径
String sourceFilePath = "path/to/source/file.txt";
String targetFilePath = "path/to/target/file.txt";

// 创建源文件和目标文件的RandomAccessFile对象
try (RandomAccessFile sourceFile = new RandomAccessFile(sourceFilePath, "r");
RandomAccessFile targetFile = new RandomAccessFile(targetFilePath, "rw")) {

// 获取源文件和目标文件的FileChannel
FileChannel sourceChannel = sourceFile.getChannel();
FileChannel targetChannel = targetFile.getChannel();

// 使用transferTo()方法将数据从源文件传输到目标文件
// 从源文件的位置0开始,传输全部文件内容到目标文件
long transferredBytes = sourceChannel.transferTo(0, sourceChannel.size(), targetChannel);
System.out.println("文件传输成功,传输了 " + transferredBytes + " 字节数据。");
// 使用transferFrom()方法将数据从目标文件传输回源文件
// 从目标文件的位置0开始,传输全部文件内容回源文件
transferredBytes = targetChannel.transferFrom(sourceChannel, 0, sourceChannel.size());
System.out.println("数据回传成功,传输了 " + transferredBytes + " 字节数据。");
} catch (IOException e) {
  e.printStackTrace();
}
3.2.3.分散读写、聚集写入
4.selector
4.1.概述
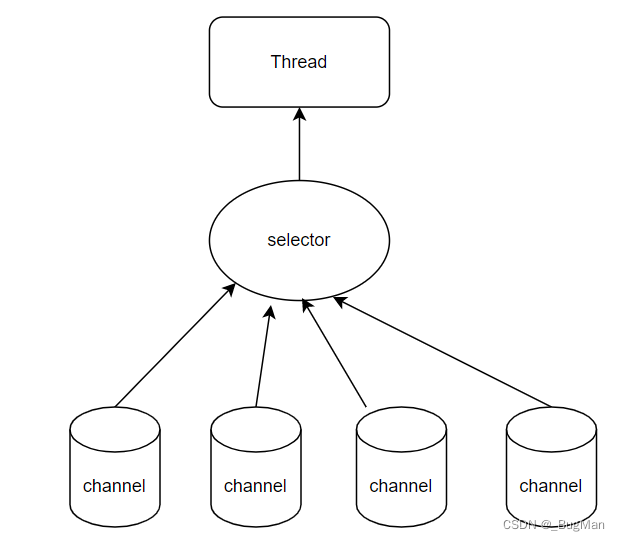
selector,NIO实现非阻塞式IO的核心,它的功能很简单,就是用事件机制来监听channel,挑选出触发事件的channel。
我们知道,如果线程中有IO操作,IO没有完成,资源没有准备好之前,线程是会进入阻塞状态的。我们可以用单线程起一个selector去监听channel是否准备好数据,将准备好数据的channel挑选出来交给其它线程去处理,这样就不会因为IO资源没准备好导致线程阻塞。
我猜大家看到这里会有一个疑惑,什么时候会有上面描述的这种用线程去并发的处理IO?
网络通信的时候
如果用BIO的方式通信一进来就给一个线程去处理,那么就会有可能因为数据包还没收完,IO等待、阻塞,造成线程阻塞。而用NIO的话就可以用selector挑选出数据包收完的IO出来处理,不会有线程阻塞:
selector的事件监听:
通道的监听事件一共有如下类型:
既可以用常量表示,也可以用数字表示。
- 读 SelectionKey.OP_READ 1
- 写 SelectionKey.OP_WRITE 4
- 连接 SelectionKey.OP_CONNECT 8
- 接收 SelectionKey.OP_ACCEPT 16
- 复合 若不止一个事件时,使用或操作符连接
4.2.代码示例
以下是用NIO进行非阻塞式网络通信的代码示例。
服务端:
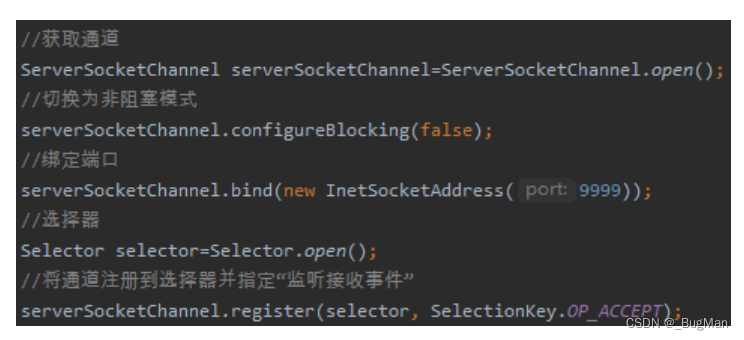
//获取通道
ServerSocketChannel serverSocketChannel= ServerSocketChannel.open();
//切换为非阻塞模式
serverSocketChannel.configureBlocking(false);
//绑定连接的端口
serverSocketChannel.bind(new InetSocketAddress(9999));
//获取选择器
Selector selector=Selector.open();
//将通道注册到选择器上,并开始指定监听接收事件
serverSocketChannel.register(selector, SelectionKey.OP_ACCEPT);
//轮询监听
while(selector.select()>0){
    Iterator<SelectionKey> iterator=selector.selectedKeys().iterator();
    while (iterator.hasNext()){
        SelectionKey selectionKey=iterator.next();
        //判当前socket的事件
        //1.接收事件(表示socket接收到了数据)
        if(selectionKey.isAcceptable()){
            SocketChannel socketChannel=serverSocketChannel.accept();
            //切换为非阻塞模式
            socketChannel.configureBlocking(false);
            //将通道以读就绪的事件重新注册到选择器
            socketChannel.register(selector,SelectionKey.OP_READ);
        }
        //2.读就绪事件
        if(selectionKey.isReadable()){
            SocketChannel socketChannel=(SocketChannel)selectionKey.channel();
            //读取数据
            ByteBuffer byteBuffer=ByteBuffer.allocate(1024);
            int length=0;
            while((length=socketChannel.read(byteBuffer))>0){
                byteBuffer.flip();
                System.out.println(new String(byteBuffer.array(),0,length));
                byteBuffer.clear();
            }
        }
        //事件处理完成,移除事件
        iterator.remove();
    }
}
客户端:
//获取通道
SocketChannel socketChannel=SocketChannel.open(new InetSocketAddress("127.0.0.1",9999));
//切换成非阻塞模式
socketChannel.configureBlocking(false);
//分配缓冲区
ByteBuffer byteBuffer=ByteBuffer.allocate(1024);
//发送数据
Scanner scanner=new Scanner(System.in);
while(true){
    String msg=scanner.nextLine();
    byteBuffer.put(msg.getBytes());
    byteBuffer.flip();
    socketChannel.write(byteBuffer);
    byteBuffer.clear();
}