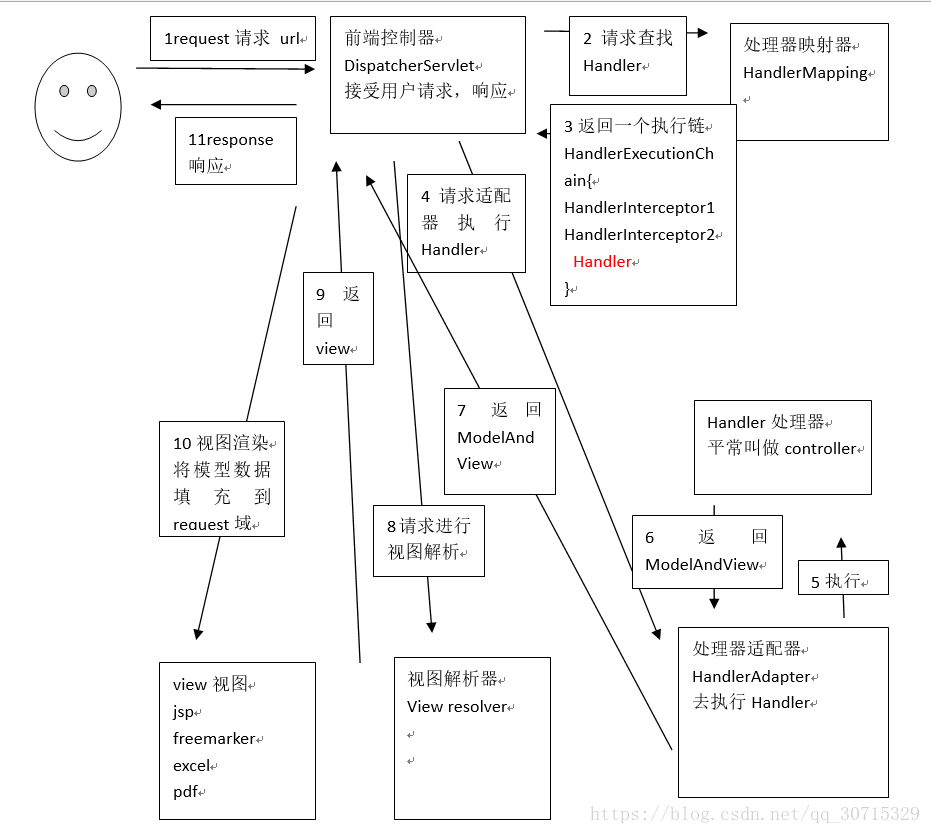
一、SpringMVC 框架原理
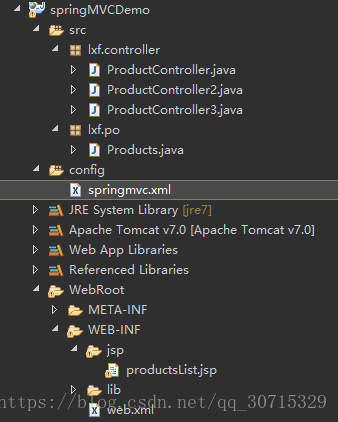
二、入门程序:
1). web.xml
<?xml version="1.0" encoding="UTF-8"?>
<web-app xmlns:xsi="http://www.w3.org/2001/XMLSchema-instance"
         xmlns="http://java.sun.com/xml/ns/javaee"
         xmlns:web="http://java.sun.com/xml/ns/javaee/web-app_2_5.xsd"
         xsi:schemaLocation="http://java.sun.com/xml/ns/javaee http://java.sun.com/xml/ns/javaee/web-app_2_5.xsd" id="WebApp_ID" version="2.5">

<!-- spring前端控制器 -->
<servlet>
<servlet-name>springMVC</servlet-name>
<servlet-class>org.springframework.web.servlet.DispatcherServlet</servlet-class>
<init-param>
<!-- contextConfigLocation 配置 springmvc 加载的配置文件(配置处理器映射器,适配器,视图解析器等)
如果不配置 contextConfigLocation,默认加载的是:/WEB-INF/spring名称-servlet.xml -->
<param-name>contextConfigLocation</param-name>
<param-value>classpath:springmvc.xml</param-value>
</init-param>
</servlet>

<servlet-mapping>
<servlet-name>springMVC</servlet-name>
<!--
1.*.action :访问以 *.action 结尾由 DispatcherServlet 进行解析。
2./ : 所有访问的地址都由 DispatcherServlet 进行解析,对于静态页面的解析需要配置 不让 DispatcherServlet 解析,
使用这种方法可以实现 RESTful 风格的 url。
3./* : 错误的配置。 原因:当使用此种配置时,最后转发到的 jsp 页面 由 DispatcherServlet 解析不出处理器 Handler。
 -->
<url-pattern>*.action</url-pattern>
</servlet-mapping>

</web-app>
2). springmvc.xml:
<beans xmlns="http://www.springframework.org/schema/beans"
	xmlns:xsi="http://www.w3.org/2001/XMLSchema-instance" xmlns:mvc="http://www.springframework.org/schema/mvc"
	xmlns:context="http://www.springframework.org/schema/context"
	xmlns:aop="http://www.springframework.org/schema/aop" xmlns:tx="http://www.springframework.org/schema/tx"
	xsi:schemaLocation="http://www.springframework.org/schema/beans
		http://www.springframework.org/schema/beans/spring-beans-3.2.xsd
		http://www.springframework.org/schema/mvc
		http://www.springframework.org/schema/mvc/spring-mvc-3.2.xsd
		http://www.springframework.org/schema/context
		http://www.springframework.org/schema/context/spring-context-3.2.xsd
		http://www.springframework.org/schema/aop
		http://www.springframework.org/schema/aop/spring-aop-3.2.xsd
		http://www.springframework.org/schema/tx
		http://www.springframework.org/schema/tx/spring-tx-3.2.xsd ">

<!-- 处理器映射器 HandlerMapper
将 bean 的name 作为 url 进行查找,需要在配置Handler时 指定name(即 url)
-->
<bean class="org.springframework.web.servlet.handler.BeanNameUrlHandlerMapping"/>


<!-- 另一个映射器:简单url 映射 -->
<bean class="org.springframework.web.servlet.handler.SimpleUrlHandlerMapping">
	<property name="mappings">
	<props>
	  	<prop key="/queryPro2.action">productController1</prop>
	  	<prop key="/queryPro3.action">productController1</prop>
	  	<prop key="/queryPro4.action">productController2</prop>
	</props>
	</property>
</bean>


<!-- 配置Handler -->
<bean id="productController1" name="/queryPro.action" class="lxf.controller.ProductController"/>
<bean id="productController2" class="lxf.controller.ProductController2" />


<!-- 处理器适配器 HandlerAdapter
所有处理器适配器都必须实现 HandlerAdapter 接口
-->
<bean class="org.springframework.web.servlet.mvc.SimpleControllerHandlerAdapter"/>


<!-- 另一个适配器-->
<bean class="org.springframework.web.servlet.mvc.HttpRequestHandlerAdapter"/>


<!-- 注解 适配器-->
<bean class="org.springframework.web.servlet.mvc.method.annotation.RequestMappingHandlerAdapter"/>
<!-- 注解 映射器 -->
<bean class="org.springframework.web.servlet.mvc.method.annotation.RequestMappingHandlerMapping"/>
<!-- 注解组件扫描 -->
<context:component-scan base-package="lxf.controller"/>


<!-- 使用<mvc:annotation-driven> 就可以不用配置
 RequestMappingHandlerAdapter 和  RequestMappingHandlerMapping
 组件扫描器也可以省略了。
而且 它还默认加载很多的参数绑定方法,比如: json 转换解析器
 -->
<!-- <mvc:annotation-driven></mvc:annotation-driven> -->


<!-- 页面解析器
解析 jsp,默认使用 jstl 标签,classPath 下要有 jstl 包
-->
<bean class="org.springframework.web.servlet.view.InternalResourceViewResolver" />
</beans>
3). products.java:
package lxf.po;

import java.util.Date;

public class Products {
	private Integer id;

	private String name, detail, pic;

	private Float price;

	private Date createTime;

	public Integer getId() {
		return id;
	}

	public void setId(Integer id) {
		this.id = id;
	}

	public String getName() {
		return name;
	}

	public void setName(String name) {
		this.name = name;
	}

	public String getDetail() {
		return detail;
	}

	public void setDetail(String detail) {
		this.detail = detail;
	}

	public String getPic() {
		return pic;
	}

	public void setPic(String pic) {
		this.pic = pic;
	}

	public Float getPrice() {
		return price;
	}

	public void setPrice(Float price) {
		this.price = price;
	}

	public Date getCreateTime() {
		return createTime;
	}

	public void setCreateTime(Date createTime) {
		this.createTime = createTime;
	}

	@Override
	public String toString() {
		return "Products [id=" + id + ", name=" + name + ", detail=" + detail + ", pic=" + pic + ", price=" + price
				+ ", createTime=" + createTime + "]";
	}

}
4.1). SimpleControllerHandlerAdapter处理器适配器的Handler:
package lxf.controller;

import java.util.ArrayList;
import java.util.Date;
import java.util.List;

import javax.servlet.http.HttpServletRequest;
import javax.servlet.http.HttpServletResponse;

import org.springframework.web.servlet.ModelAndView;
import org.springframework.web.servlet.mvc.Controller;

import lxf.po.Products;

public class ProductController implements Controller{

	/*
	 * 查询产品列表
	 */
	@Override
	public ModelAndView handleRequest(HttpServletRequest arg0, HttpServletResponse arg1) throws Exception {
		// 构造假数据
		List<Products> proList = new ArrayList<Products>();
		Products pro1 = new Products();
		Products pro2 = new Products();
        pro1.setId(1);
        pro1.setName("cup");
        pro1.setPrice(43f);
        pro1.setCreateTime(new Date());
        pro2.setId(2);
        pro2.setName("mouse");
        pro2.setPrice(320f);
        pro2.setCreateTime(new Date());

        proList.add(pro1);
        proList.add(pro2);
        ModelAndView modelv = new ModelAndView();
        modelv.addObject("proList", proList);
        modelv.setViewName("/WEB-INF/jsp/productsList.jsp");

        return modelv;
	}

}
4.2)HttpRequestHandlerAdapter处理器适配器的Handler:
package lxf.controller;

import java.io.IOException;
import java.util.ArrayList;
import java.util.Date;
import java.util.List;

import javax.servlet.ServletException;
import javax.servlet.http.HttpServletRequest;
import javax.servlet.http.HttpServletResponse;

import org.springframework.web.HttpRequestHandler;

import lxf.po.Products;

public class ProductController2 implements HttpRequestHandler{

	@Override
	public void handleRequest(HttpServletRequest request, HttpServletResponse response) throws ServletException, IOException {
		       // 构造假数据
				List<Products> proList = new ArrayList<Products>();
				Products pro1 = new Products();
				Products pro2 = new Products();
		        pro1.setId(1);
		        pro1.setName("cup");
		        pro1.setPrice(43f);
		        pro1.setCreateTime(new Date());
		        pro2.setId(2);
		        pro2.setName("mouse");
		        pro2.setPrice(320f);
		        pro2.setCreateTime(new Date());

		        proList.add(pro1);
		        proList.add(pro2);

		        //设置模型数据
		        request.setAttribute("proList", proList);

		        //
		        request.getRequestDispatcher("/WEB-INF/jsp/productsList.jsp").forward(request, response);

	}
虽然上面的这种方法是 原始的 servlet 转发模式,没有 modelAndView 便利。但此种方法可以通过修改 response,设置响应的数据格式,比如响应 json 数据:
response.setCharacterEncoding("utf-8");
response.setContentType("application/json;charset=utf-8");
response.getWriter().write("json串");
4.3)注解Handler:
package lxf.controller;

import java.util.ArrayList;
import java.util.Date;
import java.util.List;

import org.springframework.stereotype.Controller;
import org.springframework.web.bind.annotation.RequestMapping;
import org.springframework.web.servlet.ModelAndView;

import lxf.po.Products;

//使用 Controller 标识,它是一个控制器
@Controller
public class ProductController3 {

	/*
	 * 查询产品列表
	 * @RequestMapping 实现 对queryProducts方法 和 url 进行映射,一个方法对应一个 url
	 * 一般建议将 url 和方法名 一样
	 */
	@RequestMapping("/queryProducts")
	public ModelAndView queryProducts() throws Exception {
		// 构造假数据
		List<Products> proList = new ArrayList<Products>();
		Products pro1 = new Products();
		Products pro2 = new Products();
        pro1.setId(1);
        pro1.setName("cup");
        pro1.setPrice(43f);
        pro1.setCreateTime(new Date());
        pro2.setId(2);
        pro2.setName("mouse");
        pro2.setPrice(320f);
        pro2.setCreateTime(new Date());

        proList.add(pro1);
        proList.add(pro2);
        ModelAndView modelv = new ModelAndView();
        modelv.addObject("proList", proList);
        modelv.setViewName("/WEB-INF/jsp/productsList.jsp");

        return modelv;
	}

}
5). productsList.jsp:
<%@ page language="java" contentType="text/html; charset=UTF-8"
    pageEncoding="UTF-8"%>
<%@ taglib uri="http://java.sun.com/jsp/jstl/core" prefix="c" %>
<%@ taglib uri="http://java.sun.com/jsp/jstl/fmt"  prefix="fmt"%>
<!DOCTYPE html PUBLIC "-//W3C//DTD HTML 4.01 Transitional//EN" "http://www.w3.org/TR/html4/loose.dtd">
<html>
<head>
<meta http-equiv="Content-Type" content="text/html; charset=UTF-8">
<title>查询商品列表</title>
</head>
<body>
商品列表:
<table width="100%" border=1>
<tr>
	<td>商品名称</td>
	<td>商品价格</td>
	<td>生产日期</td>
	<td>商品描述</td>
</tr>
<c:forEach items="${proList }" var="pro">
<tr>
	<td>${pro.name }</td>
	<td>${pro.price }</td>
	<td><fmt:formatDate value="${pro.createTime}" pattern="yyyy-MM-dd HH:mm:ss"/></td>
	<td>${pro.detail }</td>

</tr>
</c:forEach>

</table>
</body>

</html>
6). 运行结果:


三、小结:
- 多个映射器可以并存,前端控制器判断 url 能让哪些映射器映射,就让正确的映射器处理。
- 使用注解的映射器和注解的适配器: (注解的映射器和注解的适配器必须配对使用),不能使用非注解映射器进行映射。
- 实际开发用:<mvc:annotation-driven /> 来代替配对的注解映射器和适配器;
- 视图解析器配置前缀后缀:

那在 Controller 注解类中指定视图:
