1、判断网卡是否支持AP
不管是自带无线网卡、还是外接的usb无线网卡,要先配置为AP热点模式。需要看检查是否支持AP模式。
例如,这里插入 rtl8811c 的双频usb无线网卡,iwconfig查看网卡信息
nvidia@nvidia-desktop:~$ iwconfig
wlan0     unassociated  Nickname:"<WIFI@REALTEK>"
          Mode:Managed  Frequency=2.412 GHz  Access Point: Not-Associated
          Sensitivity:0/0
          Retry:off   RTS thr:off   Fragment thr:off
          Power Management:off
          Link Quality:0  Signal level:0  Noise level:0
          Rx invalid nwid:0  Rx invalid crypt:0  Rx invalid frag:0
          Tx excessive retries:0  Invalid misc:0   Missed beacon:0
如果插入网卡没有对应信息,可能需要安装驱动。
之后,我们使用命令 iw list 查看 "Supported interface modes:"支持的列表中是否有AP,如有则说明支持配置为AP热点。
nvidia@nvidia-desktop:~$ iw list
Wiphy phy1
        max # scan SSIDs: 9
        max scan IEs length: 2304 bytes
        max # sched scan SSIDs: 0
        max # match sets: 0
        max # scan plans: 1
        max scan plan interval: -1
        max scan plan iterations: 0
        Retry short limit: 7
        Retry long limit: 4
        Coverage class: 0 (up to 0m)
        Supported Ciphers:
                * WEP40 (00-0f-ac:1)
                * WEP104 (00-0f-ac:5)
                * TKIP (00-0f-ac:2)
                * CCMP-128 (00-0f-ac:4)
                * CMAC (00-0f-ac:6)
        Available Antennas: TX 0 RX 0
        Supported interface modes:
                 * IBSS
                 * managed
                 * AP
                 * P2P-client
                 * P2P-GO
                 * P2P-device
2、配置无线热点模式
利用hostapd和dhcpd在Ubuntu系统上建立无线热点。
2.1、安装 hostapd 和 dhcpd
安装sudo apt-get install hostapd
开机不需要启动这两个服务,建议关掉:
sudo update-rc.d -f hostapd remove
sudo apt-get install isc-dhcp-server ,修改如下两个文件(若有),注释掉 start on 行
sudo vim /etc/init/isc-dhcp-server.conf
sudo vim /etc/init/isc-dhcp-server6.conf
2.2、配置热点
2.2.1、修改/etc/hostapd/hostapd.conf
若没有改文件,直接添加一个即可。用于配置ap的接口,驱动,名称,密码等,如下:
# 选择的网口名称,我这里是wlan0。具体可以ifcofnig看下当前设备下偶那些网口
interface=wlan0
# 线驱动,一般有两种:wext/nl80211,wext版本较旧目前一般使用nl80211
driver=nl80211
# AP的名称,类似于我们的路由器名称
ssid=magicsky_uav
# 802.11g,一般三个模式: a,b,g。a->5GHZ,g->2.4GHZ
hw_mode=g
# wifi工作的信道,2.4GHZ(1~14)
channel=10
macaddr_acl=0
auth_algs=3
# 选择加密方式为WPA2,常用加解密方法是有WEP、WPA、WPA2、WPA3
wpa=2
# 密码
wpa_passphrase=12345678
# 加密方法和算法
wpa_key_mgmt=WPA-PSK
wpa_pairwise=TKIP CCMP
rsn_pairwise=TKIP CCMP
2.2.2、修改 /etc/dhcp/dhcpd.conf
在 /etc/dhcp/dhcpd.conf 末尾添加如下内容,用于配置ip地址池,路由网关,dns等。
subnet 192.168.9.0 netmask 255.255.255.0
{


  range 192.168.9.2 192.168.9.10;
  option routers 192.168.9.1;
  option domain-name-servers 192.168.9.1,114.114.114.114,8.8.8.8;
}
这里配置我们的无线网卡ap地址为 192.168.9.1, 连接该热点的可分配ip地址池为 192.168.9.(2~10),dns使用公用和网关ip。
2.3、服务配置
使用服务方式进行启动,省缺很多命令行的操作
2.3.1、服务启动脚本 ap-start.sh
#!/bin/bash
# 开启内核IP转发
bash -c "echo 1 > /proc/sys/net/ipv4/ip_forward"
# 开启防火墙NAT转发(如果本机使用eth0上网,则把ppp0改为eth0)
iptables -t nat -A POSTROUTING -o ppp0 -j MASQUERADE
# 关闭NetworkManager对无线网卡的控制
#nmcli nm wifi off
nmcli device set wlan0 managed no

# 设置并启动无线网卡
ifconfig wlan0 192.168.9.1 netmask 255.255.255.0
# 解锁无线设备,可以用rfkill list查看解锁结果.
rfkill unblock wlan
# 睡眠6秒,待rfkill解锁生效
sleep 6s
# 启动dhcpd和hostapd,如果hostapd无法启动请查看日志hostapd.log,查看这两个进程ps -ef|egrep "dhcpd|hostapd"
nohup hostapd /etc/hostapd/hostapd.conf > /var/log/hostapd.log 2>&1 &
dhcpd wlan0 -pf /var/run/dhcpd.pid
ps -ef|head -n1 && ps -ef|egrep "dhcpd|hostapd"
ps -ef|egrep “dhcpd|hostapd” 应该有两个进程,
nvidia@nvidia-desktop:~$ ps -ef|head -n1 && ps -ef|egrep "dhcpd|hostapd"
UID        PID  PPID  C STIME TTY          TIME CMD
root      6367     1  0 10:55 ?        00:00:00 hostapd /etc/hostapd/hostapd.conf
root      6369     1  0 10:55 ?        00:00:00 dhcpd wlan0 -pf /var/run/dhcpd.pid
nvidia    9718  9601  0 13:36 pts/0    00:00:00 grep -E --color=auto dhcpd|hostapd
可能出现无dhcp进程,手动执行 dhcpd wlan0 -pf /var/run/dhcpd.pid 可能报错如下,给权限即可,在该脚本前增加一行 chmod 777 /var/lib/dhcp/dhcpd.leases 。
Internet Systems Consortium DHCP Server 4.3.5
Copyright 2004-2016 Internet Systems Consortium.
All rights reserved.
For info, please visit https://www.isc.org/software/dhcp/
Config file: /etc/dhcp/dhcpd.conf
Database file: /var/lib/dhcp/dhcpd.leases
PID file: /var/run/dhcpd.pid
Can't open /var/lib/dhcp/dhcpd.leases for append.

If you think you have received this message due to a bug rather
than a configuration issue please read the section on submitting
bugs on either our web page at www.isc.org or in the README file
before submitting a bug.  These pages explain the proper
process and the information we find helpful for debugging..

exiting.
2.3.1、服务关闭脚本 ap-stop.sh
#!/bin/bash
killall hostapd dhcpd
bash -c "echo 0 > /proc/sys/net/ipv4/ip_forward"
#ifconfig wlan0 down
nmcli device set wlan0 managed yes
2.3.2、服务文件
暂时不写了。 直接将 服务启动脚本放在 自启动脚本中 /etc/rc.local中吧。
若没有可以通过如下方式添加sudo ln -s /lib/systemd/system/rc.local.service /etc/systemd/system/,之后添加文件sudo touch /etc/rc.local,给权限sudo chmod +x /etc/rc.local。 若不能自启动则需要通过systemctl status rc.local.service 判断状态,若未启动则需要enable。
3、测试
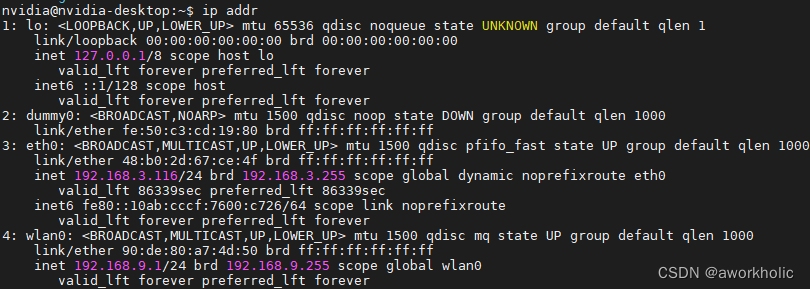
安装好无线网卡,配置好后重启,检查网路情况,wlan0配置为 192.168.9.1 了。
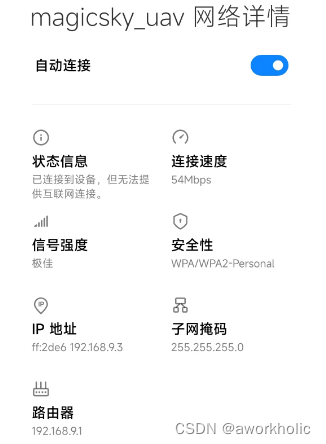
手机上也能搜索到ap热点,连接后自动分配了ip。
若不能ping通,通过 route -n 检查是否有路由表
$ route -n
Kernel IP routing table
Destination     Gateway         Genmask         Flags Metric Ref    Use Iface
0.0.0.0         192.168.3.254   0.0.0.0         UG    100    0        0 eth0
169.254.0.0     0.0.0.0         255.255.0.0     U     1000   0        0 eth0
172.17.0.0      0.0.0.0         255.255.0.0     U     0      0        0 docker0
192.168.3.0     0.0.0.0         255.255.255.0   U     100    0        0 eth0
192.168.9.0     0.0.0.0         255.255.255.0   U     0      0        0 wlan0
最后一行 说明 指向 192.168.9.0 网段的数据均经过接口 wlan0。若非正常,可以通过手动执行 sudo route add -net 192.168.9.0/24 dev wlan0添加。