使用Jetpack组件Navigation实现Android开发中页面跳转
目录
一、前言
1.概述
导航是指支持用户导航、进入和退出应用中不同内容片断的交互。Android Jetpack的导航组件可以帮助实现导航,无论是简单的按钮点击,还是应用栏和抽屉式导航栏等更为复杂的模式,该组件均可实现。
导航组件由以下三部分组成:
- 导航图:在一个集中位置包含所有导航相关信息的XML资源。这包括应用内所有单个内容区域(目标)以及用户可以通过应用获取的可能路径。
- NavHost:显示导航中目标的空白容器,导航组件包含一个默认NavHost实现(NavHostFragament),可显示Fragment目标。
- NavController:在NavHost中管理应用导航的对象。当用户在整个应用中移动时,NavController会安排NavHost中目标内容的交换。
2.导航图的创建(官网)
导航发生在应用中的各个目的地(即您的应用中用户可以导航到的任意位置)之间。这些目的地是通过操作连接的。
导航图是一种资源文件,其中包含您的所有目的地和操作。该图表会显示应用的所有导航路径。
图 1 直观显示了一个示例应用的导航图,该应用包含 6 个目的地(通过 5 个操作连接)。每个目的地均由一个预览缩略图表示,连接操作由箭头表示,该箭头表示用户可以如何从一个目的地导航到另一个目的地。
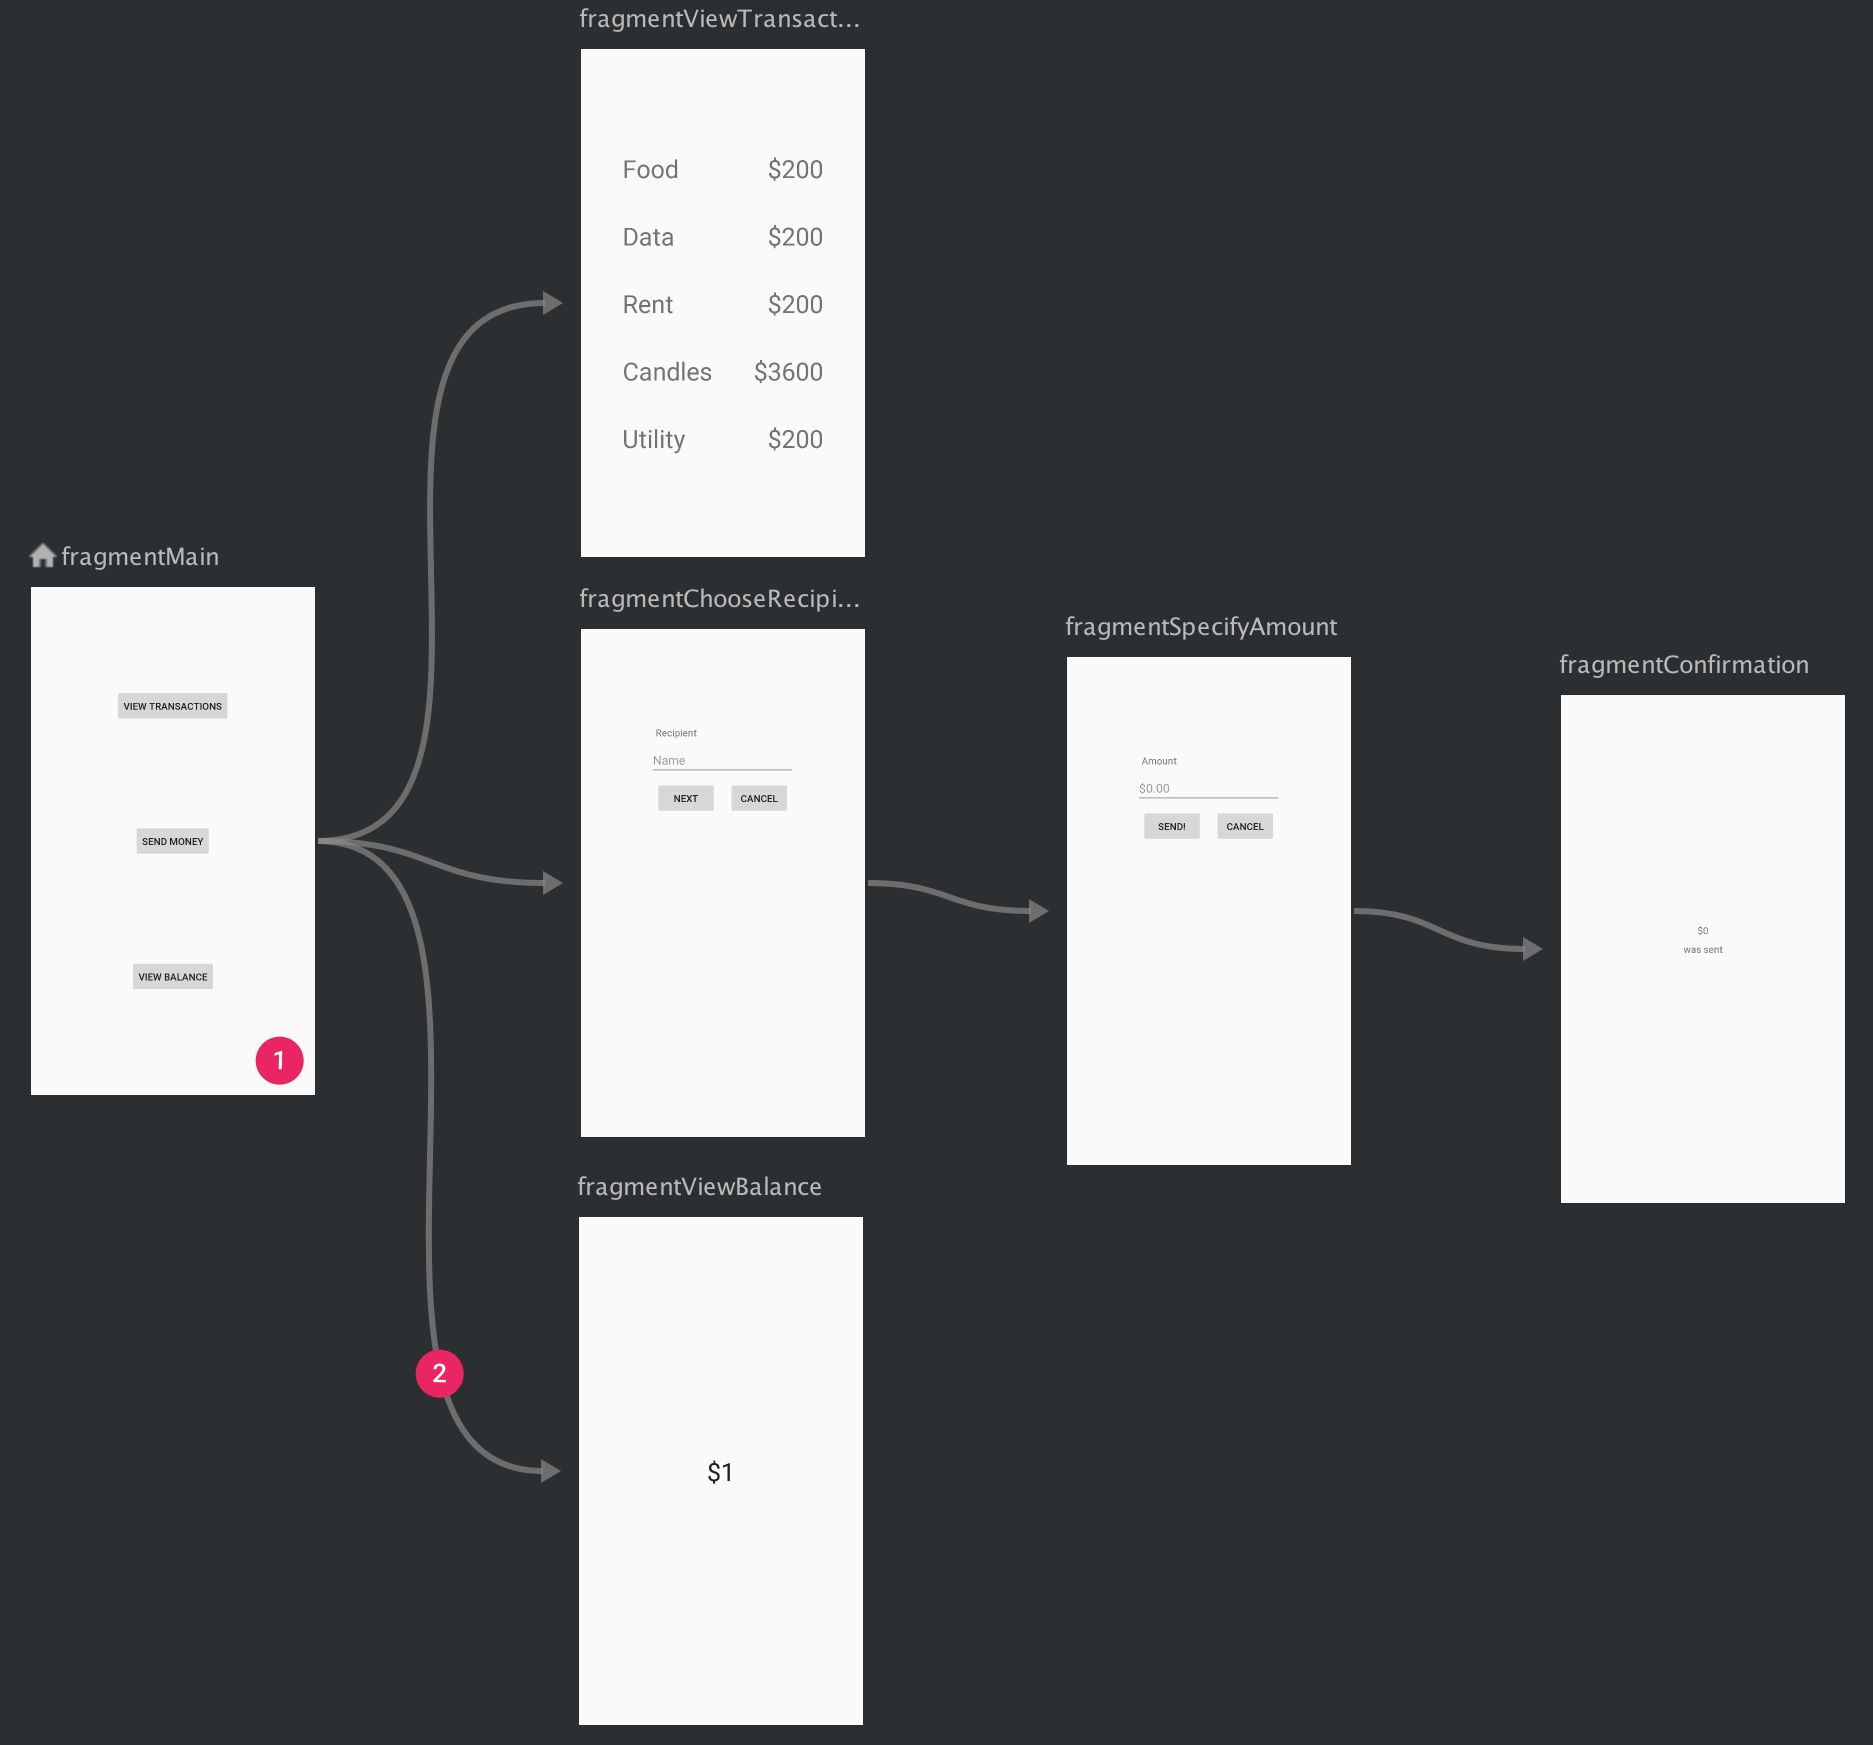
**图 1. **一个导航图,显示了由 5 个操作连接的 6 个不同目的地的预览。
- “目的地”是指应用中的不同内容区域。
- “操作”是指目的地之间的逻辑连接,表示用户可以采取的路径。
如需向项目添加导航图,请执行以下操作:
- 在“Project”窗口中,右键点击
res目录,然后依次选择 New > Android Resource File 。此时系统会显示 New Resource File 对话框。 - 在 File name 字段中输入名称,例如“nav_graph”。
- 从 Resource type 下拉列表中选择 Navigation ,然后点击 OK 。
当您添加首个导航图时,Android Studio 会在 res 目录内创建一个 navigation 资源目录。该目录包含您的导航图资源文件(例如 nav_graph.xml)。
注意 :向您的项目添加导航图时,如果您尚未将导航依赖项添加到应用的
build.gradle文件中,Android Studio 会显示一条提示,并为您提供添加依赖项的选项。但请注意,Android Studio 3.4 添加了非 KTX 1.0.0 版本的依赖项,因此,如果您使用的是 Kotlin 或打算使用 2.0.0 或更高版本,请务必替换这些值。
二、基本使用
1.依赖配置
注意:Navigation 组件需要 Android Studio 3.3 或更高版本,并且依赖于 Java 8 语言功能。
首先我们要在项目中使用Navigation组件,需要在build.gradel中添加依赖。(以kotlin为例)
def nav_version = "2.5.3"

    //kotlin
    implementation ("androidx.navigation:navigation-fragment-ktx:$nav_version")
    implementation ("androidx.navigation:navigation-ui-ktx:$nav_version")

    //Feature module Support
    implementation("androidx.navigation:navigation-dynamic-features-fragment:$nav_version")

    //Testing Navigation
    androidTestImplementation("androidx.navigation:navigation-testing:$nav_version")
2.具体实例:使用Navigation实现页面的跳转。
2.1.class的创建
(1)首先我们需要创建一个文件夹Fragment其中包含三个class,分别为LoginFragment、RegisterFragment、ForgetFragment。然后创建一个BaseFragment继承Fragment。
BaseFragment
package com.example.myapplication.base

import android.os.Bundle
import android.view.LayoutInflater
import android.view.View
import android.view.ViewGroup
import androidx.fragment.app.Fragment

//设置为抽象类
  abstract class BaseFragment : Fragment() {

    override fun onCreateView(
        inflater: LayoutInflater,
        container: ViewGroup?,
        savedInstanceState: Bundle?
    ): View? {
        //加载View
        val rootView = inflater.inflate(getLayoutResId(),container,false)
        //初始化
        initView(rootView)
        return rootView
    }

      open fun initView(rootView: View) {

      }

    //创建一个抽象方法,返回值为int类型
      abstract fun getLayoutResId() : Int
  }
2.2 、页面布局文件的创建
(2)在layout中创建三个页面的布局文件fragment_login.xml、fragment_register.xml、fragment_forget.xml。最后在对应的class中返回布局文件的id。
fragment_login.xml
<?xml version="1.0" encoding="utf-8"?>
<LinearLayout xmlns:android="http://schemas.android.com/apk/res/android"
    android:orientation="vertical"
    android:layout_width="match_parent"
    android:layout_height="match_parent"
    android:gravity="center">

    <TextView
        android:layout_width="wrap_content"
        android:layout_height="wrap_content"
        android:text="登录界面"/>


</LinearLayout>
fragment_register.xml
<?xml version="1.0" encoding="utf-8"?>
<LinearLayout xmlns:android="http://schemas.android.com/apk/res/android"
    android:orientation="vertical"
    android:layout_width="match_parent"
    android:layout_height="match_parent"
    android:gravity="center">

    <TextView
        android:layout_width="wrap_content"
        android:layout_height="wrap_content"
        android:text="注册界面"/>

</LinearLayout>
fragment_forget.xml
<?xml version="1.0" encoding="utf-8"?>
<LinearLayout xmlns:android="http://schemas.android.com/apk/res/android"
    android:orientation="vertical"
    android:layout_width="match_parent"
    android:layout_height="match_parent"
    android:gravity="center">

    <TextView
        android:layout_width="wrap_content"
        android:layout_height="wrap_content"
        android:text="找回密码界面"/>

</LinearLayout>
return R.layout.fragment_login//布局文件的id
2.3 向 Activity 添加 NavHost
(3)接着在主布局文件中挖坑。在res中创建一个导航文件的配置清单navigation/nav_config,xml.
请注意以下几点:(官网)
android:name属性包含NavHost实现的类名称。app:navGraph属性将NavHostFragment与导航图相关联。导航图会在此NavHostFragment中指定用户可以导航到的所有目的地。app:defaultNavHost="true"属性确保您的NavHostFragment会拦截系统返回按钮。请注意,只能有一个默认NavHost。如果同一布局(例如,双窗格布局)中有多个宿主,请务必仅指定一个默认NavHost。
您也可以使用布局编辑器向 activity 添加 NavHostFragment,具体操作步骤如下:
- 在项目文件列表中,双击 Activity 的布局 XML 文件,以在 Layout Editor 中将其打开。
- 在 Palette 窗格内,选择 Containers 类别,或者搜索“NavHostFragment”。
- 将
NavHostFragment视图拖动到您的 Activity 上。 - 接下来,在随即显示的 Navigation Graphs 对话框中,选择需要与此
NavHostFragment相关联的相应导航图,然后点击 OK 。
<?xml version="1.0" encoding="utf-8"?>
<FrameLayout xmlns:android="http://schemas.android.com/apk/res/android"
    xmlns:app="http://schemas.android.com/apk/res-auto"
    xmlns:tools="http://schemas.android.com/tools"
    android:layout_width="match_parent"
    android:layout_height="match_parent"
    tools:context=".MainActivity">

    <androidx.fragment.app.FragmentContainerView
        android:layout_width="match_parent"
        android:layout_height="match_parent"
        android:name="androidx.navigation.fragment.NavHostFragment"
        android:id="@+id/fragment_container_view"
        app:navGraph="@navigation/nav_config"
        app:defaultNavHost="true"/>

</FrameLayout>
2.4导航文件的配置清单
(4)接下来做配置文件nav_config.xml。
<?xml version="1.0" encoding="utf-8"?>
<navigation xmlns:android="http://schemas.android.com/apk/res/android"
    xmlns:app="http://schemas.android.com/apk/res-auto"
    app:startDestination="@id/login_fragment"
    android:id="@+id/nav_config">//默认显示login_fragment

    <fragment
        android:id="@+id/login_fragment"
        android:name="com.example.myapplication.fragment.LoginFragment">


    </fragment>

    <fragment
        android:id="@+id/forget_fragment"
        android:name="com.example.myapplication.fragment.ForgetFragment">

    </fragment>

    <fragment
        android:id="@+id/register_fragment"
        android:name="com.example.myapplication.fragment.RegisterFragment">

    </fragment>
</navigation>
2.5、按钮的布局
(5)现在来做页面之间的跳转
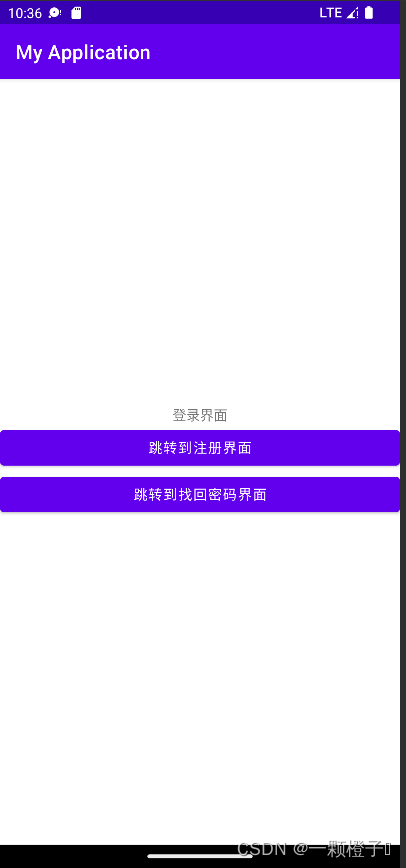
现在初始界面fragment_login中加入两个按钮。
<Button
        android:layout_width="match_parent"
        android:layout_height="wrap_content"
        android:id="@+id/toRegisterPage"
        android:text="跳转到注册界面"/>

    <Button
        android:layout_width="match_parent"
        android:layout_height="wrap_content"
        android:id="@+id/toForgetPage"
        android:text="跳转到找回密码界面"/>
布局预览
2.6、最终实现页面跳转
(6)按钮有了之后我们就要通过点击按钮来实现跳转。在LoginFragment中覆写initView方法。
rootView.buttonId失败的话需要在module的build中添加依赖
apply plugin: 'kotlin-android-extensions'
override fun initView(rootView: View) {
        super.initView(rootView)
        rootView.toRegisterPage.setOnClickListener {
            //跳转到注册界面
            findNavController().navigate(R.id.to_register_fragment)
        }

        rootView.toForgetPage.setOnClickListener {
            //跳转到找回密码界面
            findNavController().navigate(R.id.to_forget_fragment)
        }
    }
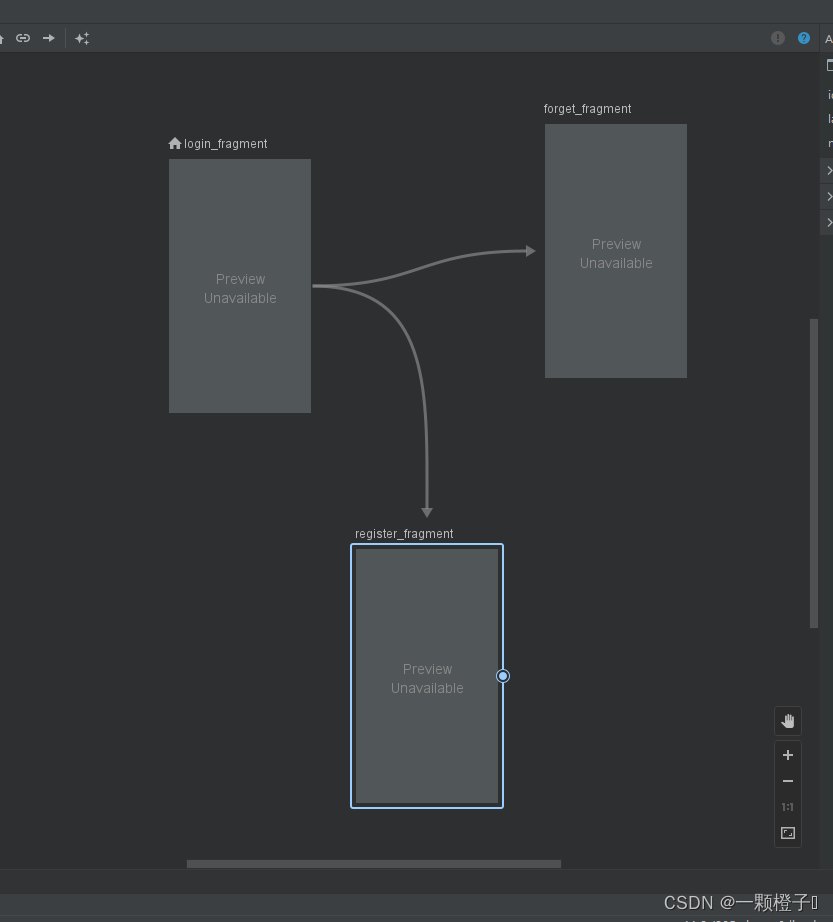
我们要从fragment_login界面跳转到fragment_register和fragment_forget界面,需要在nav_config配置文件中login_fragmentd fragment中加入两个action。该操作有一个 ID 和一个目的地属性(其中包含下一个目的地的 ID)。
action属性:
- Type 字段包含“Action”
- ID 字段包含该操作的 ID。
- Destination 字段包含目的地 Fragment 或 Activity 的 ID。
<action android:id="@+id/to_register_fragment"
            app:destination="@id/register_fragment"/>
        <action android:id="@+id/to_forget_fragment"
            app:destination="@id/forget_fragment"/>
这时候就可以看到login_fragment两条线分别连接到register_fragment和forget_fragment,说明了它有两个去处。
3.导航图的预览
这就说明我们的页面跳转功能实现已经完成了,结果如下。
4.最终实现预览
1670134973313
原文作者:一颗橙子
原文链接:https://blog.csdn.net/qq_52967092/article/details/128144618?spm=1001.2014.3001.5502