作者:vivo 互联网服务器团队 - Wang Zhi
Redis 作为互联网业务首选的远程缓存工具而被大面积使用,作为访问客户端的 Jedis 同样被大面积使用。本文主要分析 Redis3.x 版本集群模式发生主从切换场景下 Jedis 的参数设置不合理引发服务雪崩的过程。
一、背景介绍
Redis作为互联网业务首选的远程缓存工具而被被大家熟知和使用,在客户端方面涌现了Jedis、Redisson、Lettuce等,而Jedis属于其中的佼佼者。
目前笔者的项目采用Redis的3.x版本部署的集群模式(多节点且每个节点存在主从节点),使用Jedis作为Redis的访问客户端。
日前Redis集群中的某节点因为宿主物理机故障导致发生主从切换,在主从切换过程中触发了Jedis的重试机制进而引发了服务的雪崩。
本文旨在剖析Redis集群模式下节点发生主从切换进而引起服务雪崩的整个过程,希望能够帮助读者规避此类问题。
二、故障现场记录
消息堆积告警
【MQ-消息堆积告警】
告警时间:2022-11-29 23:50:21
检测规则: 消息堆积阈值:-》异常( > 100000)
告警服务:xxx-anti-addiction
告警集群:北京公共
告警对象:xxx-login-event-exchange
/xxx-login-event-queue
异常对象(当前值): 159412
说明:
2022-11-29 23:50:21收到一条RMQ消息堆积的告警,正常情况下服务是不会有这类异常告警,出于警觉性开始进入系统排查过程。
排查的思路基本围绕系统相关的指标:系统的请求量,响应时间,下游服务的响应时间,线程数等指标。
说明:
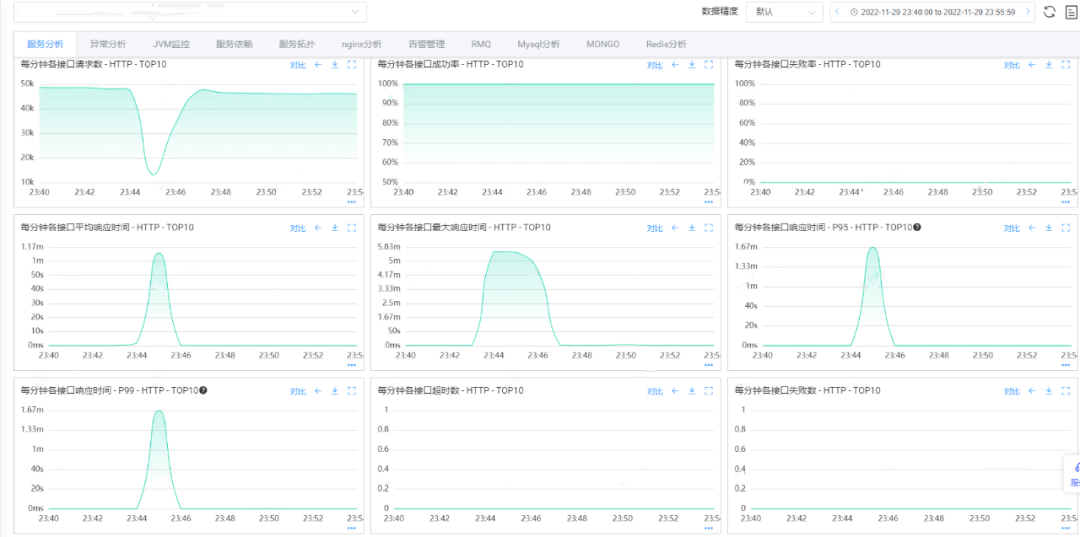
排查系统监控之后发现在故障发生时段服务整体的请求量有大幅下跌,响应的接口的平均耗时接近1分钟。
服务整体出于雪崩状态,请求耗时暴涨导致服务不可用,进而导致请求量下跌。

说明:
排查服务的下游应用发现故障期间Redis的访问量大幅下跌,已趋近于0。
项目中较长用的Redis的响应耗时基本上在2s。

说明:
排查系统对应的线程数,发现在故障期间处于wait的线程数大量增加。

说明:
事后运维同学反馈在故障时间点Redis集群发生了主从切换,整体时间和故障时间较吻合。
综合各方面的指标信息,判定此次服务的雪崩主要原因应该是Redis主从切换导致,但是引发服务雪崩原因需要进一步的分析。
三、故障过程分析
在进行故障的过程分析之前,首先需要对目前的现象进行分析,需要回答下面几个问题:
接口响应耗时增加为何会引起请求量的陡增?
Redis主从切换期间大部分的耗时为啥是2s?
接口的平均响应时间为啥接近60s?
3.1 流量陡降
说明:
通过nginx的日志可以看出存在大量的connection timed out的报错,可以归因为由于后端服务的响应时间过程导致nginx层和下游服务之间的读取超时。
由于大量的读取超时导致nginx判断为后端的服务不可用,进而触发了no live upstreams的报错,ng无法转发到合适的后端服务。
通过nginx的日志可以将问题归因到后端服务异常导致整体请求量下跌。
3.2 耗时问题
说明:
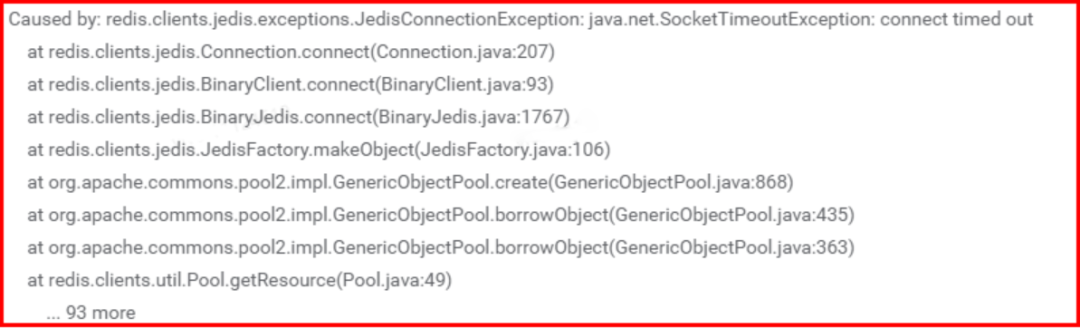
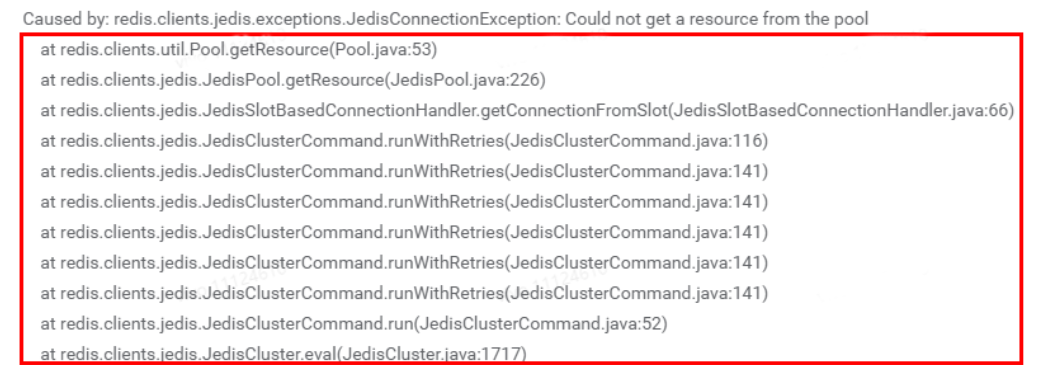
通过报错日志定位到Jedis在获取连接的过程中抛出了connect timed out的异常。
通过定位Jedis的源码发现默认的设置连接超时时间 DEFAULT_TIMEOUT = 2000。
<redis-cluster name="redisCluster" timeout="3000" maxRedirections="6"> // 最大重试次数为6<properties><property name="maxTotal" value="20" /><property name="maxIdle" value="20" /><property name="minIdle" value="2" /></properties></redis-cluster>
说明:
通过报错日志定位Jedis执行了6次重试,每次重试耗时参考设置连接超时默认时长2s,单次请求约耗时12s。
排查部分对外接口,发现一次请求内部总共访问的Redis次数有5次,那么整体的响应时间会达到1m=60s。
结合报错日志和监控指标,判定服务的雪崩和Jedis的连接重试机制有关,需要从Jedis的源码进一步进行分析。
四、Jedis 执行流程
4.1 流程解析
说明:
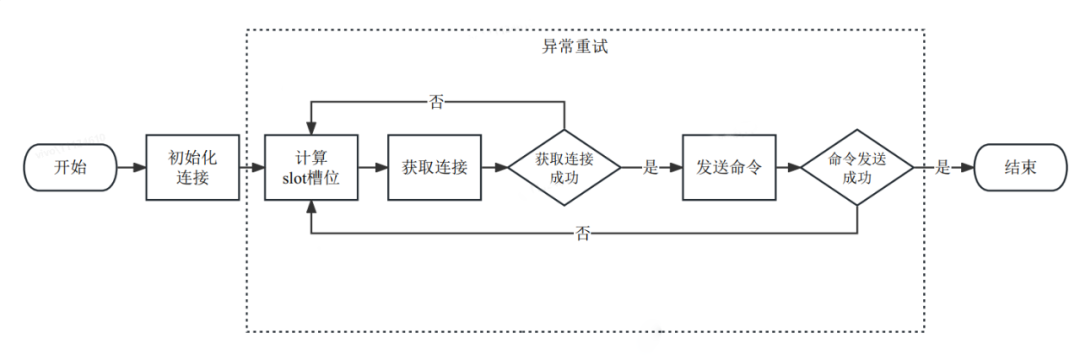
Jedis处理Redis的命令请求如上图所示,整体在初始化连接的基础上根据计算的slot槽位获取连接后发送命令进行执行。
在获取连接失败或命令发送失败的场景下触发异常重试,重新执行一次命令。
异常重试流程中省略了重新获取Redis集群分布的逻辑,避免复杂化整体流程。
4.2 源码解析
(1)整体流程
public class JedisCluster extends BinaryJedisCluster implements JedisCommands,MultiKeyJedisClusterCommands, JedisClusterScriptingCommands {public String set(final String key, final String value, final String nxxx, final String expx,final long time) {return new JedisClusterCommand<String>(connectionHandler, maxAttempts) {public String execute(Jedis connection) {// 真正发送命令的逻辑return connection.set(key, value, nxxx, expx, time);}}.run(key); // 通过run触发命令的执行}}public abstract class JedisClusterCommand<T> {public abstract T execute(Jedis connection);public T run(String key) {// 执行带有重试机制的方法return runWithRetries(SafeEncoder.encode(key), this.maxAttempts, false, false);}}public abstract class JedisClusterCommand<T> {private T runWithRetries(byte[] key, int attempts, boolean tryRandomNode, boolean asking) {Jedis connection = null;try {if (asking) {// 省略相关的代码逻辑} else {if (tryRandomNode) {connection = connectionHandler.getConnection();} else {// 1、尝试获取连接connection = connectionHandler.getConnectionFromSlot(JedisClusterCRC16.getSlot(key));}}// 2、执行JedisClusterCommand封装的execute命令return execute(connection);} catch (JedisNoReachableClusterNodeException jnrcne) {throw jnrcne;} catch (JedisConnectionException jce) {// 省略代码} finally {releaseConnection(connection);}}}
说明:
以JedisCluster执行set命令为例,封装成JedisClusterCommand对象通过run触发runWithRetries进而执行set命令的execute方法。
runWithRetries方法封装了具体的重试逻辑,内部通过connectionHandler.getConnectionFromSlot
获取对应的Redis节点的连接。
(2)计算槽位
public final class JedisClusterCRC16 {public static int getSlot(byte[] key) {int s = -1;int e = -1;boolean sFound = false;for (int i = 0; i < key.length; i++) {if (key[i] == '{' && !sFound) {s = i;sFound = true;}if (key[i] == '}' && sFound) {e = i;break;}}if (s > -1 && e > -1 && e != s + 1) {return getCRC16(key, s + 1, e) & (16384 - 1);}return getCRC16(key) & (16384 - 1);}}
说明:
Redis集群模式下通过计算slot槽位来定位具体的Redis节点的连接,Jedis通过JedisClusterCRC16.getSlot(key)来获取slot槽位。
Redis的集群模式的拓扑信息在Jedis客户端同步维护了一份,具体的slot槽位计算在客户端实现。
(3)连接获取
public class JedisSlotBasedConnectionHandler extends JedisClusterConnectionHandler {public Jedis getConnectionFromSlot(int slot) {JedisPool connectionPool = cache.getSlotPool(slot);if (connectionPool != null) {// 尝试获取连接return connectionPool.getResource();} else {renewSlotCache();connectionPool = cache.getSlotPool(slot);if (connectionPool != null) {return connectionPool.getResource();} else {return getConnection();}}}}class JedisFactory implements PooledObjectFactory<Jedis> {public PooledObject<Jedis> makeObject() throws Exception {// 1、创建Jedis连接final HostAndPort hostAndPort = this.hostAndPort.get();final Jedis jedis = new Jedis(hostAndPort.getHost(), hostAndPort.getPort(), connectionTimeout,soTimeout, ssl, sslSocketFactory, sslParameters, hostnameVerifier);try {// 2、尝试进行连接jedis.connect();} catch (JedisException je) {jedis.close();throw je;}return new DefaultPooledObject<Jedis>(jedis);}}public class Connection implements Closeable {public void connect() {if (!isConnected()) {try {socket = new Socket();socket.setReuseAddress(true);socket.setKeepAlive(true); // Will monitor the TCP connection issocket.setTcpNoDelay(true); // Socket buffer Whetherclosed, tosocket.setSoLinger(true, 0); // Control calls close () method,// 1、设置连接超时时间 DEFAULT_TIMEOUT = 2000;socket.connect(new InetSocketAddress(host, port), connectionTimeout);// 2、设置读取超时时间socket.setSoTimeout(soTimeout);outputStream = new RedisOutputStream(socket.getOutputStream());inputStream = new RedisInputStream(socket.getInputStream());} catch (IOException ex) {broken = true;throw new JedisConnectionException(ex);}}}}
说明:
Jedis通过connectionPool维护和Redis的连接信息,在可复用的连接不够的场景下会触发连接的建立和获取。
创建连接对象通过封装成Jedis对象并通过connect进行连接,在Connection的connect的过程中设置连接超时connectionTimeout和读取超时soTimeout。
建立连接过程中如果异常会抛出
JedisConnectionException异常,注意这个异常会在后续的分析中多次出现。
(4)发送命令
public class Connection implements Closeable {protected Connection sendCommand(final Command cmd, final byte[]... args) {try {// 1、必要时尝试连接connect();// 2、发送命令Protocol.sendCommand(outputStream, cmd, args);pipelinedCommands++;return this;} catch (JedisConnectionException ex) {broken = true;throw ex;}}private static void sendCommand(final RedisOutputStream os, final byte[] command,final byte[]... args) {try {// 按照redis的命令格式发送数据os.write(ASTERISK_BYTE);os.writeIntCrLf(args.length + 1);os.write(DOLLAR_BYTE);os.writeIntCrLf(command.length);os.write(command);os.writeCrLf();for (final byte[] arg : args) {os.write(DOLLAR_BYTE);os.writeIntCrLf(arg.length);os.write(arg);os.writeCrLf();}} catch (IOException e) {throw new JedisConnectionException(e);}}}
说明:
Jedis通过sendCommand向Redis发送Redis格式的命令。
发送过程中会执行connect连接动作,逻辑和获取连接时的connect过程一致。
发送命令异常会抛出JedisConnectionException的异常信息。
(5)重试机制
public abstract class JedisClusterCommand<T> {private T runWithRetries(byte[] key, int attempts, boolean tryRandomNode, boolean asking) {Jedis connection = null;try {if (asking) {} else {if (tryRandomNode) {connection = connectionHandler.getConnection();} else {// 1、尝试获取连接connection = connectionHandler.getConnectionFromSlot(JedisClusterCRC16.getSlot(key));}}// 2、通过连接执行命令return execute(connection);} catch (JedisNoReachableClusterNodeException jnrcne) {throw jnrcne;} catch (JedisConnectionException jce) {releaseConnection(connection);connection = null;// 4、重试到最后一次抛出异常if (attempts <= 1) {this.connectionHandler.renewSlotCache();throw jce;}// 3、进行第一轮重试return runWithRetries(key, attempts - 1, tryRandomNode, asking);} finally {releaseConnection(connection);}}}
说明:
Jedis执行Redis的命令时按照先获取connection后通过connection执行命令的顺序。
在获取connection和通过connection执行命令的过程中如果发生异常会进行重试且在达到最大重试次数后抛出异常。
以attempts=5为例,如果在获取connection过程中发生异常,那么最多重试5次后抛出异常。
综合上述的分析,在使用Jedis的过程中需要合理设置参数包括connectionTimeout & soTimeout & maxAttempts。
maxAttempts:出现异常最大重试次数。
connectionTimeout:表示连接超时时间。
soTimeout:读取数据超时时间。
五、总结
本文通过线上故障现场记录和分析,并最终引申到Jedis源码的底层逻辑分析,剖析了Jedis的不合理参数设置包括连接超时和最大重试次数导致服务雪崩的整个过程。
在Redis本身只作为缓存且后端的MySQL等DB能够承载非高峰期流量的场景下,建议合理设置Jedis超时参数进而减少Redis主从切换访问Redis的耗时,避免服务雪崩。
线上环境笔者目前的连接和读取超时时间设置为100ms,最大重试次数为2,按照现有的业务逻辑如遇Redis节点故障访问异常最多耗时1s,能够有效避免服务发生雪崩。
END
猜你喜欢
本文分享自微信公众号 - vivo互联网技术(vivoVMIC)。
如有侵权,请联系 [email protected] 删除。
本文参与“OSC源创计划”,欢迎正在阅读的你也加入,一起分享。