(193条消息) 第 3 章 使用 Vue 脚手架_qq_40832034的博客-CSDN博客
初始化脚手架
说明
1.Vue脚手架是Vue官方提供的标准化开发工具(开发平台)
2.最新的版本是4.x
3.文档Vue CLI脚手架(命令行接口)
具体步骤
1.如果下载缓慢请配置npm淘宝镜像npm config set registry http://registry.npm.taobao.org
2.全局安装@vue/cli npm install -g @vue/cli
3.切换到创建项目的目录,使用命令创建项目 vue create vue_test
4.选择使用vue的版本建议使用2.0
5.启动项目npm run serve
6.打包项目npm run build
7.暂停项目Ctrl+C
Vue脚手架隐藏了所有webpack相关的配置,若想查看具体的webpack配置,请执行vue inspect > output.js
脚手架文件结构
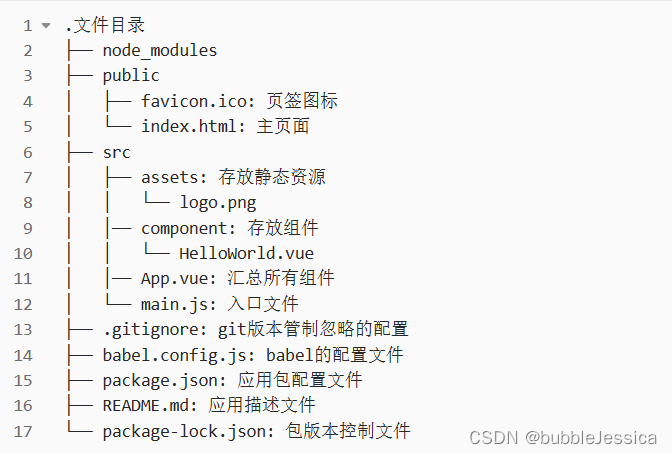
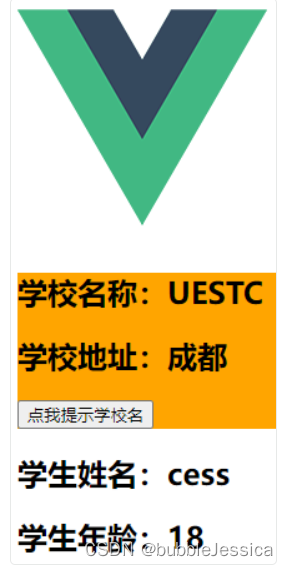
src/components/School.Vue
<template>
    <div class="demo">
        <h2>学校名称:{

   {name}}</h2>
        <h2>学校地址:{

   {address}}</h2>
    </div>
</template>

<script>
    export default {
        name: "School",
        data(){
            return{
                name:"UESTC",
                address:"成都",
            };
        },
        methods:{
            showName(){
                alert(this.name);
            }
        }
    };
</script>

<style>
    .demo{
        background-color: orange;
    }
</style>
src/components/Student.Vue
<template>
    <div>
        <h2>学生姓名:{

   {name}}</h2>
        <h2>学生年龄:{

   {age}}</h2>
    </div>
</template>

<script>
    export default {
        name: "Student",
        data(){
            return{
                name:"cess",
                age:18,
            };
        }
    };
</script>
src/App.vue
<template>
  <div id="app">
    <img alt="Vue logo" src="./assets/logo.png">
    <School></School>
    <Student></Student>
  </div>
</template>

<script>
import School from './components/School.vue'
import Student from './components/Student.vue'


export default {
  name: 'App',
  components: {
    School,
    Student
  }
}
</script>

<style>
#app {
  font-family: Avenir, Helvetica, Arial, sans-serif;
  -webkit-font-smoothing: antialiased;
  -moz-osx-font-smoothing: grayscale;
  text-align: center;
  color: #2c3e50;
  margin-top: 60px;
}
</style>
src/main.js
/*
  该文件是整个项目的入口文件
*/
// 引入Vue
// 引入App组件,它是所有组件的父组件
import Vue from 'vue'
import App from './App.vue'
// 关闭vue的生产提示
Vue.config.productionTip = false

// 创建Vue实例对象---vm
new Vue({
  el:'#app',
  // reder函数完成了这个功能:将App组件放入容器中
  render: h => h(App),
})//.$mount('#app')
public/index.html
<!DOCTYPE html>
<html lang="">
  <head>
    <meta charset="utf-8">
    <!-- 针对IE浏览器的一个特殊配置,含义是让IE浏览器以最高的渲染级别渲染页面 -->
    <meta http-equiv="X-UA-Compatible" content="IE=edge">
    <!-- 开启移动端的理想视口 -->
    <meta name="viewport" content="width=device-width,initial-scale=1.0">
    <!-- 配置页签图标 -->
    <link rel="icon" href="<%= BASE_URL %>favicon.ico">
    <!-- 配置网页标题 -->
    <title><%= htmlWebpackPlugin.options.title %></title>
  </head>
  <body>
    <!-- 当浏览器不支持js时noscript中的元素就会被渲染 -->
    <noscript>
      <strong>We're sorry but <%= htmlWebpackPlugin.options.title %> doesn't work properly without JavaScript enabled. Please enable it to continue.</strong>
    </noscript>
    <!-- 容器 -->
    <div id="app"></div>
    <!-- built files will be auto injected -->
  </body>
</html>
结果显示
render函数
/*
  该文件是整个项目的入口文件
*/
// 引入Vue
// 引入App组件,它是所有组件的父组件
import Vue from 'vue'
import App from './App.vue'
// 关闭vue的生产提示
Vue.config.productionTip = false

// 创建Vue实例对象---vm
new Vue({
  el: '#app',
  // reder函数完成了这个功能:将App组件放入容器中
  // 简写形式
  render: h => h(App),

  // 完整形式
  // render(createElement){
  //   return createElement(App)
  // }
})//.$mount('#app')
这里引用的vue是vue.runtime.esm.js,不是完整版的,所以不能渲染template配置项,需要使用 render 配合,
使用vue.runtime.xxx.js好处:就能使得不用引用完整版的vue,省空间。
关于不同版本的Vue:
vue.js与vue.runtime.xxx.js的区别:
(1).vue.js是完整版的Vue,包含:核心功能+模板解析器。
(2).vue.runtime.xxx.js是运行版的Vue,只包含:核心功能;没有模板解析器。
因为vue.runtime.xxx.js没有模板解析器,所以不能使用template配置项,需要使用render函数接收到的createElement函数去指定具体内容。
vue.config.js配置文件
使用
vue inspect > output.js可以查看到Vue脚手架的默认配置。
使用
vue.config.js可以对脚手架进行个性化定制,详情见:https://cli.vuejs.org/zh