手把手撸一个小而美的日历组件
前言
日历是前端开发中常见的业务组件之一,虽然现在有很多现成的日历组件,但是呢很多时候需要定制的时候就需要我们自己造一个,此时我们便需要了解日历的生成原理。其实也没有想象中的那么复杂。
今天我给大家带来手把手带你撸一个日历组件的教程,本教程使用Vue开发一个小而美的日历,主要讲解实现日历的基本思路,觉得有用的小伙伴记得三连一波啊。
环境准备
使用vue脚手架搭建的vue2.0项目,css预处理器选择scss即可
上手开撕
1.构思日历原型
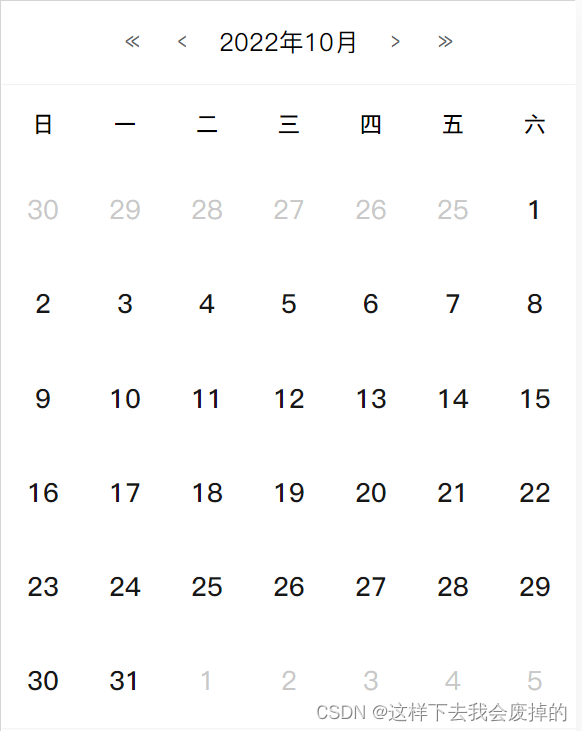
画出日历草图,构建出日历常见的骨架。当然啦,也可以借鉴一些已有的日历的外观,这里我采用较为常见的外观,包含基本的日期展示,切换月份和年份,以及显示当前月份的功能。
首先我们新建一个组件,随便起个名,写好基本结构,这里不讲样式,所以先把所有的样式代码放上:
<template>
  <div class="calendar">
  	<div class="header"></div>
  	<div class="body"></div>
  </div>
</template>

<script>
export default {


  name: "DemoCalendar",
};
</script>

<style lang="scss" scoped>
$primary-color: #3464e0;

.calendar {


  background-color: #fff;
}

.header {


  padding: 0 12px;
  display: flex;
  justify-content: center;
  border-bottom: 1px solid #eee;

  .current-date {


    text-align: center;
    font-size: 17px;
    padding: 16px 8px;
    color: #030303;
  }

  .btn-group {


    display: flex;
    align-items: center;
    justify-content: center;

    .btn {


      display: flex;
      align-items: center;
      justify-content: center;
      background: #fff;
      color: #606266;
      text-align: center;
      box-sizing: border-box;
      font-weight: 500;
      width: 34px;
      height: 26px;
      font-size: 18px;
    }
  }
}

.body {


  border-bottom: 1px solid #eee;

  .weeks {


    display: flex;
    font-size: 15px;
    padding: 16px 0;

    .week-item {


      flex: 1;
      text-align: center;
      font-weight: bold;
    }
  }

  .day-list {


    display: flex;
    flex-wrap: wrap;

    .day-item {


      display: flex;
      justify-content: center;
      align-items: center;
      width: 14.285%;
      height: 40px;
      text-align: center;
      padding: 12px 0;
      font-size: 18px;
      color: #c8c8c8;

      &.current-month-day {


        display: flex;
        align-items: center;
        justify-content: center;
        color: #171717;
        font-weight: bold;
      }

      &.active {


        .text {


          display: flex;
          align-items: center;
          justify-content: center;
          width: 40px;
          height: 40px;
          border-radius: 100%;
          box-sizing: border-box;
          background-color: #ddd;
          padding: 14px 0;
        }
      }

      &.active {


        .text {


          position: relative;
        }
      }
    }
  }
}
</style>
页面整体可分为两大部分,我起类名为header和body
header部分代码:
<div class="header">
  <div class="btn-group">
    <div class="btn btn-prev">
      <span>«</span>
    </div>
    <div class="btn btn-prev">
      <span>‹</span>
    </div>
    <div class="current-date">10月24日</div>
    <div class="btn btn-next">
      <span>›</span>
    </div>
    <div class="btn btn-next">
      <span>»</span>
    </div>
  </div>
</div>
body的话又可以分为星期标题和日期列表,这两部分都采用循环比较合适,当然了,由于标题是不变的,也可以直接写死。
<!--写死-->
<div class="weeks">
  <div class="week-item">日</div>
  <div class="week-item">一</div>
  <div class="week-item">二</div>
  <div class="week-item">三</div>
  <div class="week-item">四</div>
  <div class="week-item">五</div>
  <div class="week-item">六</div>
</div>

<!--循环-->
<div class="weeks">
  <div class="week-item" v-for="week in weeks" :key="week">
    {

   { week }}
  </div>
</div>
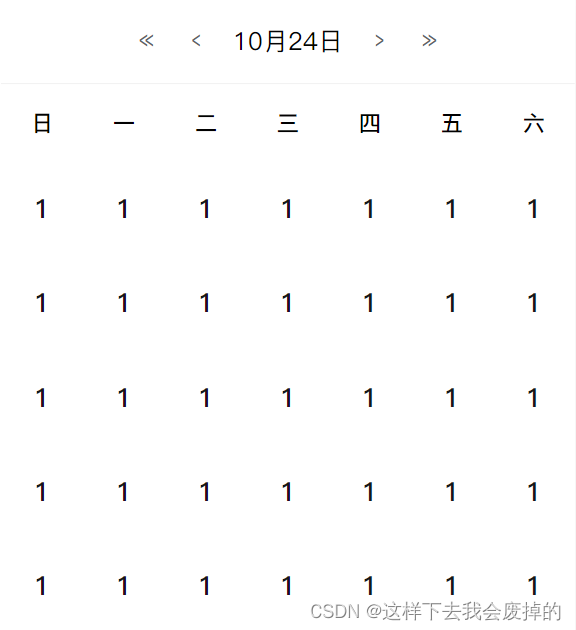
接下来就是设计日期列表了,我们依旧先写死即可
<div class="day-list">
  <div class="day-item" v-for="i of 35" :key="i">
    <span class="text">{

   { i }}</span>
  </div>
</div>
好了,到这里我们实现了一个这样的日历
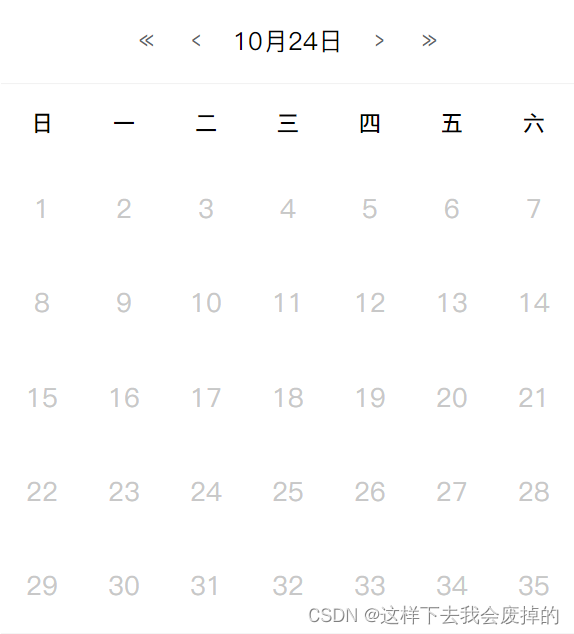
此时我们的日期颜色的暗色的,为了凸显当前显示的月份的颜色,我们可以添加个类名,例如current-month-day,效果如下所示:
<div class="day-list">
  <div class="day-item current-month-day" v-for="i of 35" :key="i">
    <span class="text">{

   { i }}</span>
  </div>
</div>
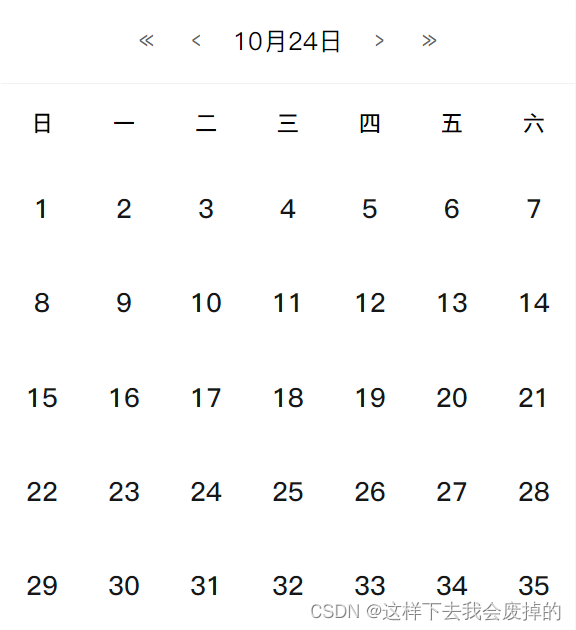
为了动态控制这个状态,我们每个日期最好设计成一个对象,这样可以存储更多的信息:
{


	type: "current-month-day", // 日期类型,取值为[pre|current|next]-month-day,表示[上|今|下]月的日期
	day: 1 // 日期数字
}
因此,我们改造这个循环:
<div class="day-list">
  <div
    class="day-item"
    :class="[day.type]"
    v-for="(day, index) in dayList"
    :key="index"
  >
    <span class="text">{

   { day.day }}</span>
  </div>
</div>
到这里,我们的代码为:
<template>
<div class="calendar">
<div class="header">
<div class="btn-group">
<div class="btn btn-prev">
<span>«</span>
</div>
<div class="btn btn-prev">
<span>‹</span>
</div>
<div class="current-date">10月24日</div>
<div class="btn btn-next">
<span>›</span>
</div>
<div class="btn btn-next">
<span>»</span>
</div>
</div>
</div>
<div class="body">
<div class="weeks">
<div class="week-item" v-for="week in weeks" :key="week">
{
{ week }}
</div>
</div>
<div class="day-list">
<div
class="day-item"
:class="[day.type]"
v-for="(day, index) in dayList"
:key="index"
>
<span class="text">{
{ day.day }}</span>
</div>
</div>
</div>
</div>
</template>
<script>
export default {
name: "ACalendar",
data() {
return {
dayList: [], // 获取需要渲染的日期列表
weeks: ["日", "一", "二", "三", "四", "五", "六"], // 星期数组
};
},
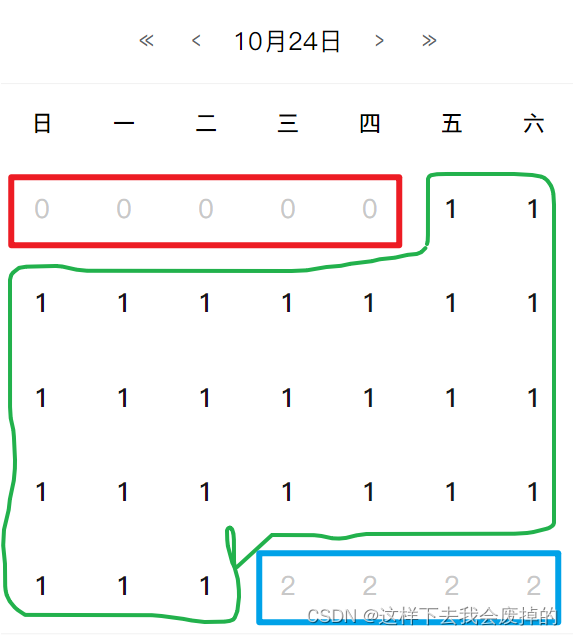
created() {
// 填充测试数据
this.dayList = this.dayList.concat(
new Array(5).fill({
day: 0, type: "prev-month-day" })
);
this.dayList = this.dayList.concat(
new Array(26).fill({
day: 1, type: "current-month-day" })
);
this.dayList = this.dayList.concat(
new Array(4).fill({
day: 2, type: "next-month-day" })
);
console.log(this.dayList);
},
methods: {
},
};
</script>
<style lang="scss" scoped>
/* 参考上面已给出的代码 */
</style>
2.构思日期列表
上一步我们已经把日历的雏形构建出来了,这一步我们需要实现日期列表的生成算法,大体思路也不难,无非就是:
- 生成上月月末日期列表,push到日期列表中
- 生成本月日期列表,push到日期列表中
- 生成下月月初日期列表,push到日期列表中
在这三个列表中,生成生成上月月末日期列表和 生成下月月初日期列表是难点。
我们该如何确定上月月末的日期列表从几号开始生成,如何知道月末是28,29,30,31号中的哪一个,以及如何确定下月月初日期列表生成到几号。
对于生成上月月末的日期列表而言,我们可以采取以下步骤:
- 获取上个月月末是M号
- 获取这个月1号是星期N
- 从这个星期日到星期N循环N次,从M-N号生成到M号码
例如,本月1号是星期五,则索引是5,星期日生成到星期五则是 5-0=5,需要生成5个日期,上月月末是31号,则生成的日期列表是[27, 28, 29, 30, 31],用循环表示则是:
for(let i = week(当前月第一天是星期几) - 1(减一是因为要少一次循环); i >= 0; i--) {


	dayList.push(i)
}
同理下月月初的日期列表也是按这种规律生成:
for (let i = week(当前月最后一天是星期几) + 1; i <= 6; i++) {


	dayList.push(i)
}
当然了,以上的代码只是演示下思路,具体实现我们接着讲讲:
根据上诉规则,我们可以写几个工具方法,通过传入当前年月,从而获取日期的计算结果,为我们构造日期列表提供便利,它们分别是:
- 根据当前年月获取上个月的年月
- 根据当前年月获取下个月的年月
- 获取某年某月最后一天
 /**
  * 根据当前年月获取上个月的年月
  * @param {Object} year 年
  * @param {Object} month 月
  */
 getPrevMonthInfo(year, month) {


   let prevMonthYear = year;
   let prevMonth = month - 1;

   if (prevMonth < 1) {


     prevMonth = 12;
     prevMonthYear -= 1;
   }

   return {


     prevMonthYear,
     prevMonth,
   };
 },

 /**
  * 根据当前年月获取下个月的年月
  * @param {Object} year 年
  * @param {Object} month 月
  */
 getNextMonthInfo(year, month) {


   let nextMonthYear = year;
   let nextMonth = month + 1;

   if (nextMonth > 12) {


     nextMonth = 1;
     nextMonthYear += 1;
   }

   return {


     nextMonthYear,
     nextMonth,
   };
 },

 /**
  * 获取某年某月最后一天
  * @param year 年
  * @param month 月
  * @returns {number}
  */
 getMonthLastDay(year, month) {


   // 获取下个月的年月
   const {

     nextMonthYear, nextMonth } = this.getNextMonthInfo(year, month);
   // 获取下个月1号的时间戳
   const firstDayTimeStamp = new Date(
     `${

      nextMonthYear}/${

      nextMonth}/1`
   ).getTime();
   // 一天24小时的毫秒数
   const oneDayTimeStamp = 24 * 60 * 60 * 1000;
   // 当月最后一天即为下个月一号减去一天的时间
   return new Date(firstDayTimeStamp - oneDayTimeStamp).getDate();
 },
3. 生成日期列表
有了上诉算法和工具方法,我们就可以着手实现了
3.1 生成上个月月末的日期列表
/**
  * 获取上个月月末的日期列表
  * @param {Object} year 年
  * @param {Object} month 月
  */
getPrevMonthDays(year, month) {


  // 获取上个月的年月
  const {

     prevMonthYear, prevMonth } = this.getPrevMonthInfo(year, month);
  // 获取上个月的最后一天
  const prevMonthLastDay = this.getMonthLastDay(prevMonthYear, prevMonth);
  // 获取这个月第一天
  const date = new Date(`${

      year}/${

      month}/1`);
  // 获取这个月第一天是星期几
  const week = date.getDay();

  const days = [];
  // 生成上个月月末的日期列表
  for (let i = week - 1; i >= 0; i--) {


    // 从头加入
    days.push({


      type: "prev-month-day", // 类型
      year: prevMonthYear, // 年
      month: prevMonth, // 月
      day: prevMonthLastDay - i, // 显示的日
    });
  }

  return days;
}
3.2 生成这个月的日期列表
这个比较简单,就是顺序从1号生成到本月最后一天即可
/**
  * 获取某年某月的日期列表
  * @param {Object} year 年
  * @param {Object} month 月
  */
getCurrentMonthDays(year, month) {


  // 获取当前月的最后一天
  const currentMonthLastDay = this.getMonthLastDay(year, month);
  const days = [];

  for (let i = 1; i <= currentMonthLastDay; i++) {


    days.push({


      type: "current-month-day", // 类型
      active: false, // 是否点击选中
      year, // 年
      month, // 月
      day: i, // 显示的日
    });
  }

  return days;
}
3.3 生成下个月月初的日期列表
/**
  * 获取下个月月初的日期列表
  * @param {Object} year 年
  * @param {Object} month 月
  */
 getNextMonthDays(year, month) {


   // 获取当前月的最后一天
   const currentMonthLastDay = this.getMonthLastDay(year, month);
   // 获取下个月的年和月
   const {

     nextMonthYear, nextMonth } = this.getNextMonthInfo(year, month);
   // 获取当前月最后一天是星期几
   const week = new Date(`${

      year}/${

      month}/${

      currentMonthLastDay}`).getDay();

   const days = [];
   let day = 0;
   // 生成下个月月初的日期列表
   for (let i = week + 1; i <= 6; i++) {


     day++;
     days.push({


       type: "next-month-day",
       year: nextMonthYear,
       month: nextMonth,
       day,
     });
   }

   return days;
 }
3.4 合并日期列表
生成完三个日期列表,合并一下即可,这里使用ES6的展开运算符,比较简洁美观
/**
  * 生成某年某月的日期列表
  * 由上个月的日期+这个月的日期+下个月的日期组成
  * @param {Object} year 年
  * @param {Object} month 月
  * @returns 数组[日期数组]
  */
getDayList(year, month) {


  // 生成上个月的日期列表
  const prevMonthDays = this.getPrevMonthDays(year, month);
  // 生成这个月的日期列表
  const currentMonthDays = this.getCurrentMonthDays(year, month);
  // 生成下个月的日期
  const nextMonthDays = this.getNextMonthDays(year, month);

  // 返回日期数组
  return [...prevMonthDays, ...currentMonthDays, ...nextMonthDays];
},
4. 渲染日期列表
由于我们有切换年月的功能,因此需要将当前的年月日缓存下来,于是在data添加几个字段
data() {


	return {


		// 此处省略已有的属性...
		year: null,
		month: null,
		day: null,
	}
}
由于这个方法每次切换日期都会用到,所以先抽离出来单独写成一个方法,在每次生成日期列表前先将当前日历显示的年月日缓存即可,日的话可以省略,但我这里没有省略
/**
  * 渲染日期列表
  * @param year 年
  * @param month 月
  * @param day 日
  */
renderDate(year = this.year, month = this.month, day = this.day) {


  // 将当前年月日设置为传入的年月日
  this.year = year;
  this.month = month;
  this.day = day;
  // 设置需要渲染的日期列表
  this.dayList = this.getDayList(year, month);
}
5. 简单测试
在created声明周期函数中测试是否能渲染当前月份
created() {


  const {

     year, month, day } = this.getCurrentDate(); // 获取今天所在的年月日
  this.renderDate(year, month, day); // 渲染日期列表
}
6. 补充其他细节
6.1 补充标题
采用计算属性即可:
html部分:
<div class="current-date">{

   { currentDate }}</div>
js部分:
computed: {


  currentDate() {


    const year = this.year;
    const month = this.month < 10 ? "0" + this.month : this.month;
    return `${

      year}年${

      month}月`;
  },
}
6.2 点击切换年份
补充两个工具方法:
- 根据当前年月获取上年的年月
- 根据当前年月获取下年的年月
/**
  * 根据当前年月获取上年的年月
  * @param {Object} year 年
  * @param {Object} month 月
  */
getPrevYearInfo(year, month) {


  return {


    prevYear: year - 1,
    month,
  };
},

/**
 * 根据当前年月获取下年的年月
 * @param {Object} year 年
 * @param {Object} month 月
 */
getNextYearInfo(year, month) {


  return {


    nextYear: year + 1,
    month,
  };
},
编写逻辑,非常简单易懂
/**
  * 点击上一年
  */
handleSwitchPrevYear() {


  const {

     prevYear, month } = this.getPrevYearInfo(this.year, this.month);
  this.renderDate(prevYear, month);
},

/**
 * 点击下一年
 */
 handleSwitchNextYear() {


   const {

     nextYear, month } = this.getNextYearInfo(this.year, this.month);
   this.renderDate(nextYear, month);
 },
6.3 点击切换月份
不用再编写工具方法,我们之前已经编写过,这就是日历组件的精妙之处,可以复用很多工具方法
编写逻辑,非常简单易懂
/**
  * 点击上个月
  */
handleSwitchPrevMonth() {


  const {

     prevMonthYear, prevMonth } = this.getPrevMonthInfo(
    this.year,
    this.month
  );
  this.renderDate(prevMonthYear, prevMonth);
},
/**
 * 点击下个月
 */
handleSwitchNextMonth() {


  const {

     nextMonthYear, nextMonth } = this.getNextMonthInfo(
    this.year,
    this.month
  );
  this.renderDate(nextMonthYear, nextMonth);
},
6.4 添加点击事件
切换年月的方法写完了,把事件加上即可
<div class="header">
  <div class="btn-group">
     <div class="btn btn-prev" @click="handleSwitchPrevYear()">
       <span>«</span>
     </div>
     <div class="btn btn-prev" @click="handleSwitchPrevMonth()">
       <span>‹</span>
     </div>
     <div class="current-date">{

   { currentDate }}</div>
     <div class="btn btn-next" @click="handleSwitchNextMonth()">
       <span>›</span>
     </div>
     <div class="btn btn-next" @click="handleSwitchNextYear()">
       <span>»</span>
     </div>
   </div>
 </div>
7. 代码汇总
<template>
  <div class="calendar">
    <div class="header">
      <div class="btn-group">
        <div class="btn btn-prev" @click="handleSwitchPrevYear()">
          <span>«</span>
        </div>
        <div class="btn btn-prev" @click="handleSwitchPrevMonth()">
          <span>‹</span>
        </div>
        <div class="current-date">{

   { currentDate }}</div>
        <div class="btn btn-next" @click="handleSwitchNextMonth()">
          <span>›</span>
        </div>
        <div class="btn btn-next" @click="handleSwitchNextYear()">
          <span>»</span>
        </div>
      </div>
    </div>
    <div class="body">
      <div class="weeks">
        <div v-for="week in weeks" :key="week" class="week-item">
          {

   { week }}
        </div>
      </div>
      <div class="day-list">
        <div
          v-for="(day, index) in dayList"
          :key="index"
          :class="[day.type]"
          class="day-item"
        >
          <span class="text">{

   { day.day }}</span>
        </div>
      </div>
    </div>
  </div>
</template>

<script>
export default {


  name: "StaticCalendar",
  data() {


    return {


      year: null,
      month: null,
      day: null,
      dayList: [], // 获取需要渲染的日期列表
      weeks: ["日", "一", "二", "三", "四", "五", "六"], // 星期数组
    };
  },
  computed: {


    currentDate() {


      const year = this.year;
      const month = this.month < 10 ? "0" + this.month : this.month;
      return `${
        year}年${
        month}月`;
    },
  },
  created() {


    const {

       year, month, day } = this.getCurrentDate();
    this.renderDate(year, month, day);
  },
  methods: {


    /**
     * 渲染日期列表
     * @param year 年
     * @param month 月
     * @param day 日
     */
    renderDate(year = this.year, month = this.month, day = this.day) {


      // 将当期年月日设置为传入的年月日
      this.year = year;
      this.month = month;
      this.day = day;
      // 设置需要渲染的日期列表
      this.dayList = this.getDayList(year, month);
    },
    /**
     * 生成某年某月的日期列表
     * 由上个月的日期+这个月的日期+下个月的日期组成
     * @param {Object} year 年
     * @param {Object} month 月
     * @returns 数组[日期数组]
     */
    getDayList(year, month) {


      // 生成上个月的日期列表
      const prevMonthDays = this.getPrevMonthDays(year, month);
      // 生成这个月的日期列表
      const currentMonthDays = this.getCurrentMonthDays(year, month);
      // 生成下个月的日期
      const nextMonthDays = this.getNextMonthDays(year, month);

      // 返回日期数组
      return [...prevMonthDays, ...currentMonthDays, ...nextMonthDays];
    },
    /**
     * 获取某个日期的年月日
     * @returns 对象{年月日}
     */
    getCurrentDate(date = new Date()) {


      const year = date.getFullYear();
      const month = date.getMonth() + 1;
      const day = date.getDate();

      return {


        year,
        month,
        day,
      };
    },
    /**
     * 根据当前年月获取上年的年月
     * @param {Object} year 年
     * @param {Object} month 月
     */
    getPrevYearInfo(year, month) {


      return {


        prevYear: year - 1,
        month,
      };
    },
    /**
     * 根据当前年月获取下年的年月
     * @param {Object} year 年
     * @param {Object} month 月
     */
    getNextYearInfo(year, month) {


      return {


        nextYear: year + 1,
        month,
      };
    },
    /**
     * 根据当前年月获取上个月的年月
     * @param {Object} year 年
     * @param {Object} month 月
     */
    getPrevMonthInfo(year, month) {


      let prevMonthYear = year;
      let prevMonth = month - 1;

      if (prevMonth < 1) {


        prevMonth = 12;
        prevMonthYear -= 1;
      }

      return {


        prevMonthYear,
        prevMonth,
      };
    },
    /**
     * 根据当前年月获取下个月的年月
     * @param {Object} year 年
     * @param {Object} month 月
     */
    getNextMonthInfo(year, month) {


      let nextMonthYear = year;
      let nextMonth = month + 1;

      if (nextMonth > 12) {


        nextMonth = 1;
        nextMonthYear += 1;
      }

      return {


        nextMonthYear,
        nextMonth,
      };
    },
    /**
     * 获取某年某月最后一天
     * @param year 年
     * @param month 月
     * @returns {number}
     */
    getMonthLastDay(year, month) {


      // 获取下个月的年月
      const {

       nextMonthYear, nextMonth } = this.getNextMonthInfo(year, month);
      // 获取下个月1号的时间戳
      const firstDayTimeStamp = new Date(
        `${
        nextMonthYear}/${
        nextMonth}/1`
      ).getTime();
      // 一天24小时的毫秒数
      const oneDayTimeStamp = 24 * 60 * 60 * 1000;
      // 当月最后一天即为下个月一号减去一天的时间
      return new Date(firstDayTimeStamp - oneDayTimeStamp).getDate();
    },
    /**
     * 获取上个月月末的日期列表
     * @param {Object} year 年
     * @param {Object} month 月
     */
    getPrevMonthDays(year, month) {


      // 获取上个月的年月
      const {

       prevMonthYear, prevMonth } = this.getPrevMonthInfo(year, month);
      // 获取上个月的最后一天
      const prevMonthLastDay = this.getMonthLastDay(prevMonthYear, prevMonth);
      // 获取这个月第一天
      const date = new Date(`${
        year}/${
        month}/1`);
      // 获取这个月第一天是星期几
      const week = date.getDay();

      const days = [];
      // 生成上个月月末的日期列表
      for (let i = week - 1; i >= 0; i--) {


        // 从头加入
        days.push({


          type: "prev-month-day", // 类型
          year: prevMonthYear, // 年
          month: prevMonth, // 月
          day: prevMonthLastDay - i, // 显示的日
        });
      }

      return days;
    },
    /**
     * 获取某年某月的日期列表
     * @param {Object} year 年
     * @param {Object} month 月
     */
    getCurrentMonthDays(year, month) {


      // 获取当前月的最后一天
      const currentMonthLastDay = this.getMonthLastDay(year, month);
      const days = [];

      for (let i = 1; i <= currentMonthLastDay; i++) {


        days.push({


          type: "current-month-day", // 类型
          active: false, // 是否点击选中
          year, // 年
          month, // 月
          day: i, // 显示的日
        });
      }

      return days;
    },
    /**
     * 获取下个月月初的日期列表
     * @param {Object} year 年
     * @param {Object} month 月
     */
    getNextMonthDays(year, month) {


      // 获取当前月的最后一天
      const currentMonthLastDay = this.getMonthLastDay(year, month);
      // 获取下个月的年和月
      const {

       nextMonthYear, nextMonth } = this.getNextMonthInfo(year, month);
      // 获取当前月最后一天是星期几
      const week = new Date(`${
        year}/${
        month}/${
        currentMonthLastDay}`).getDay();

      const days = [];
      let day = 0;
      // 生成下个月月初的日期列表
      for (let i = week + 1; i <= 6; i++) {


        day++;
        days.push({


          type: "next-month-day",
          year: nextMonthYear,
          month: nextMonth,
          day,
        });
      }

      return days;
    },
    /**
     * 点击上一年
     */
    handleSwitchPrevYear() {


      const {

       prevYear, month } = this.getPrevYearInfo(this.year, this.month);
      this.renderDate(prevYear, month);
    },
    /**
     * 点击下一年
     */
    handleSwitchNextYear() {


      const {

       nextYear, month } = this.getNextYearInfo(this.year, this.month);
      this.renderDate(nextYear, month);
    },
    /**
     * 点击上个月
     */
    handleSwitchPrevMonth() {


      const {

       prevMonthYear, prevMonth } = this.getPrevMonthInfo(
        this.year,
        this.month
      );
      this.renderDate(prevMonthYear, prevMonth);
    },
    /**
     * 点击下个月
     */
    handleSwitchNextMonth() {


      const {

       nextMonthYear, nextMonth } = this.getNextMonthInfo(
        this.year,
        this.month
      );
      this.renderDate(nextMonthYear, nextMonth);
    },
  },
};
</script>

<style lang="scss" scoped>
$primary-color: #3464e0;

.calendar {


  background-color: #fff;
}

.header {


  padding: 0 12px;
  display: flex;
  justify-content: center;
  border-bottom: 1px solid #eee;

  .current-date {


    text-align: center;
    font-size: 17px;
    padding: 16px 8px;
    color: #030303;
  }

  .btn-group {


    display: flex;
    align-items: center;
    justify-content: center;

    .btn {


      display: flex;
      align-items: center;
      justify-content: center;
      background: #fff;
      color: #606266;
      text-align: center;
      box-sizing: border-box;
      font-weight: 500;
      width: 34px;
      height: 26px;
      font-size: 18px;
    }
  }
}

.body {


  border-bottom: 1px solid #eee;

  .weeks {


    display: flex;
    font-size: 15px;
    padding: 16px 0;

    .week-item {


      flex: 1;
      text-align: center;
      font-weight: bold;
    }
  }

  .day-list {


    display: flex;
    flex-wrap: wrap;

    .day-item {


      display: flex;
      justify-content: center;
      align-items: center;
      width: 14.285%;
      height: 40px;
      text-align: center;
      padding: 12px 0;
      font-size: 18px;
      color: #c8c8c8;

      &.current-month-day {


        display: flex;
        align-items: center;
        justify-content: center;
        color: #171717;
        font-weight: bold;
      }

      &.active {


        .text {


          display: flex;
          align-items: center;
          justify-content: center;
          width: 40px;
          height: 40px;
          border-radius: 100%;
          box-sizing: border-box;
          background-color: #ddd;
          padding: 14px 0;
        }
      }

      &.active {


        .text {


          position: relative;
        }
      }
    }
  }
}
</style>
总结
好了,到此就完成了一个小而美的日历组件,坚持看完的小伙伴记得给个三连啊~