我这里案例是 通过 IPC 传递对象 (以DemoBean类为例)
- 如下:
AIDL 使用一种简单语法,允许您通过一个或多个方法(可接收参数和返回值)来声明接口。参数和返回值可为任意类型,甚至是 AIDL 生成的其他接口。
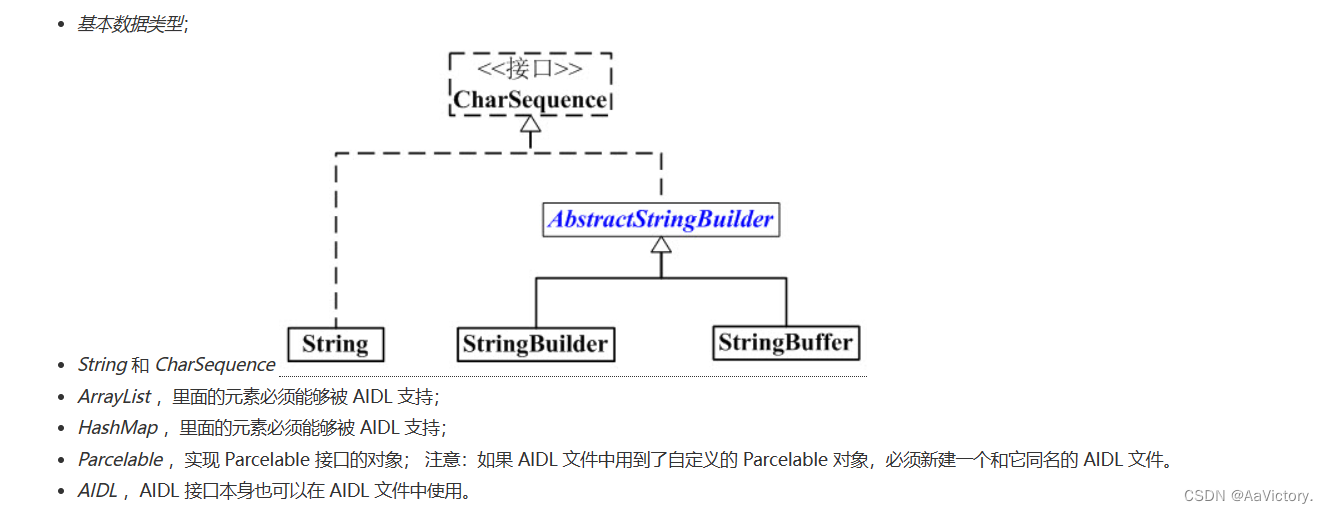
AIDL 支持下列数据类型:
使用详情
- 以下面这两个app为例:

aidlapplication2(服务端)中的代码实现
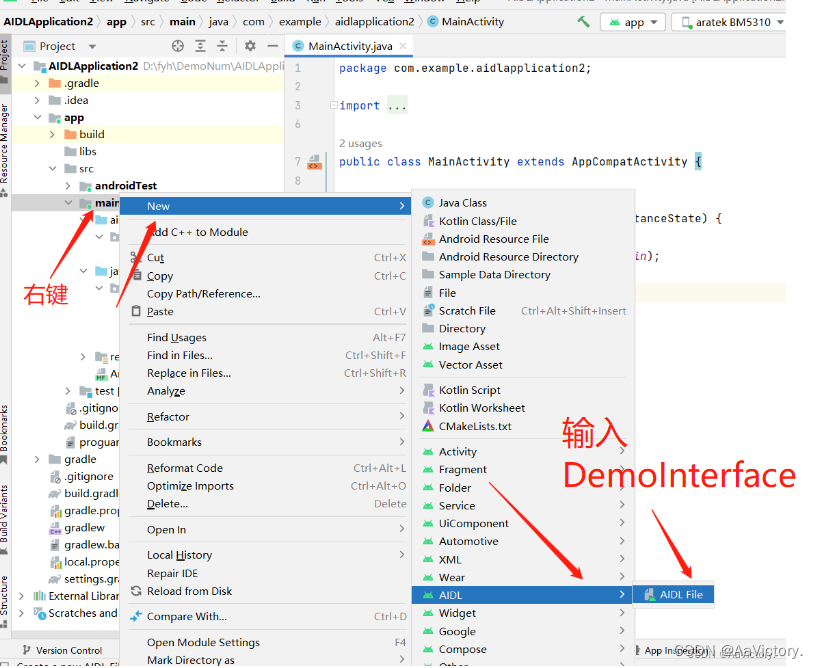
- 1、创建 DemoInterface.aidl
- 2、创建一个DemoBean类
类必须支持 Parcelable 接口。支持 Parcelable 接口很重要,因为 Android 系统能通过该接口将对象分解成可编组至各进程的原语。
public class DemoBean implements Parcelable {


    private String name;
    private int age;

    public String getName() {


        return name;
    }

    public void setName(String name) {


        this.name = name;
    }

    public int getAge() {


        return age;
    }

    public void setAge(int age) {


        this.age = age;
    }

    public DemoBean(String name, int age) {


        this.name = name;
        this.age = age;
    }
    protected DemoBean(Parcel in) {


        name = in.readString();
        age = in.readInt();
    }

    public static final Creator<DemoBean> CREATOR = new Creator<DemoBean>() {


        @Override
        public DemoBean createFromParcel(Parcel in) {


            return new DemoBean(in);
        }

        @Override
        public DemoBean[] newArray(int size) {


            return new DemoBean[size];
        }
    };

    @Override
    public int describeContents() {


        return 0;
    }

    @Override
    public void writeToParcel(@NonNull Parcel parcel, int i) {


        parcel.writeString(name);
        parcel.writeInt(age);
    }
}
- 3、在DemoInterface.aidl中创建方法 - - 我这里写了两个 一个写入,一个获取
parcelable DemoBean; 导包需要手写,注意这里面是没有提示的!!!
parcelable 的 p是小写
写完方法后别忘了 Rebuild project 重新编译一下项目!!!
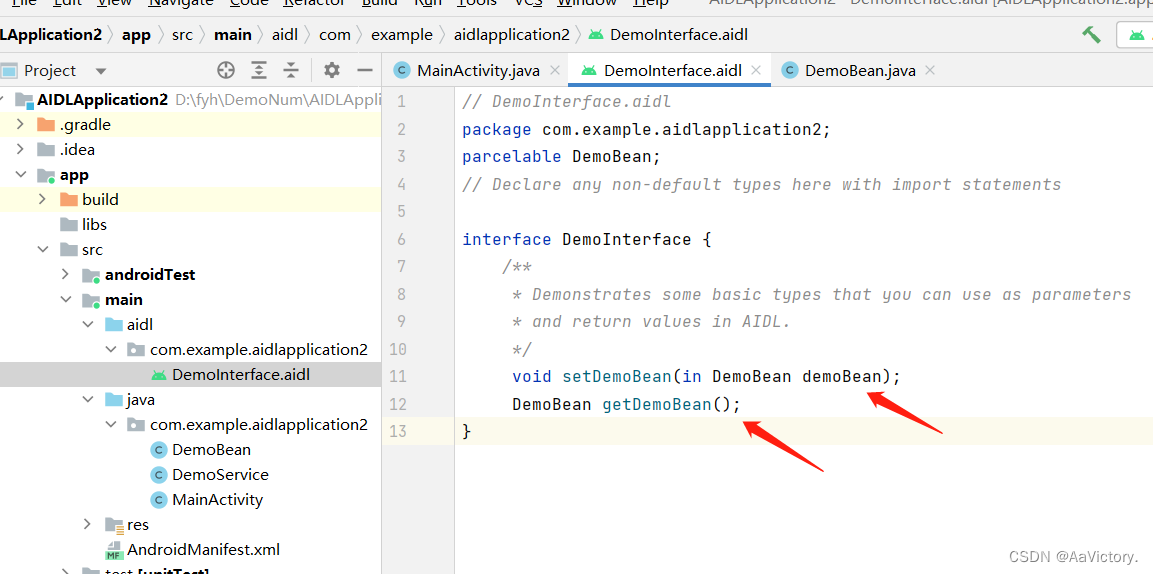
// DemoInterface.aidl
package com.example.aidlapplication2;
parcelable DemoBean;
// Declare any non-default types here with import statements

interface DemoInterface {


    /**
     * Demonstrates some basic types that you can use as parameters
     * and return values in AIDL.
     */
     void setDemoBean(in DemoBean demoBean);
     DemoBean getDemoBean();
}
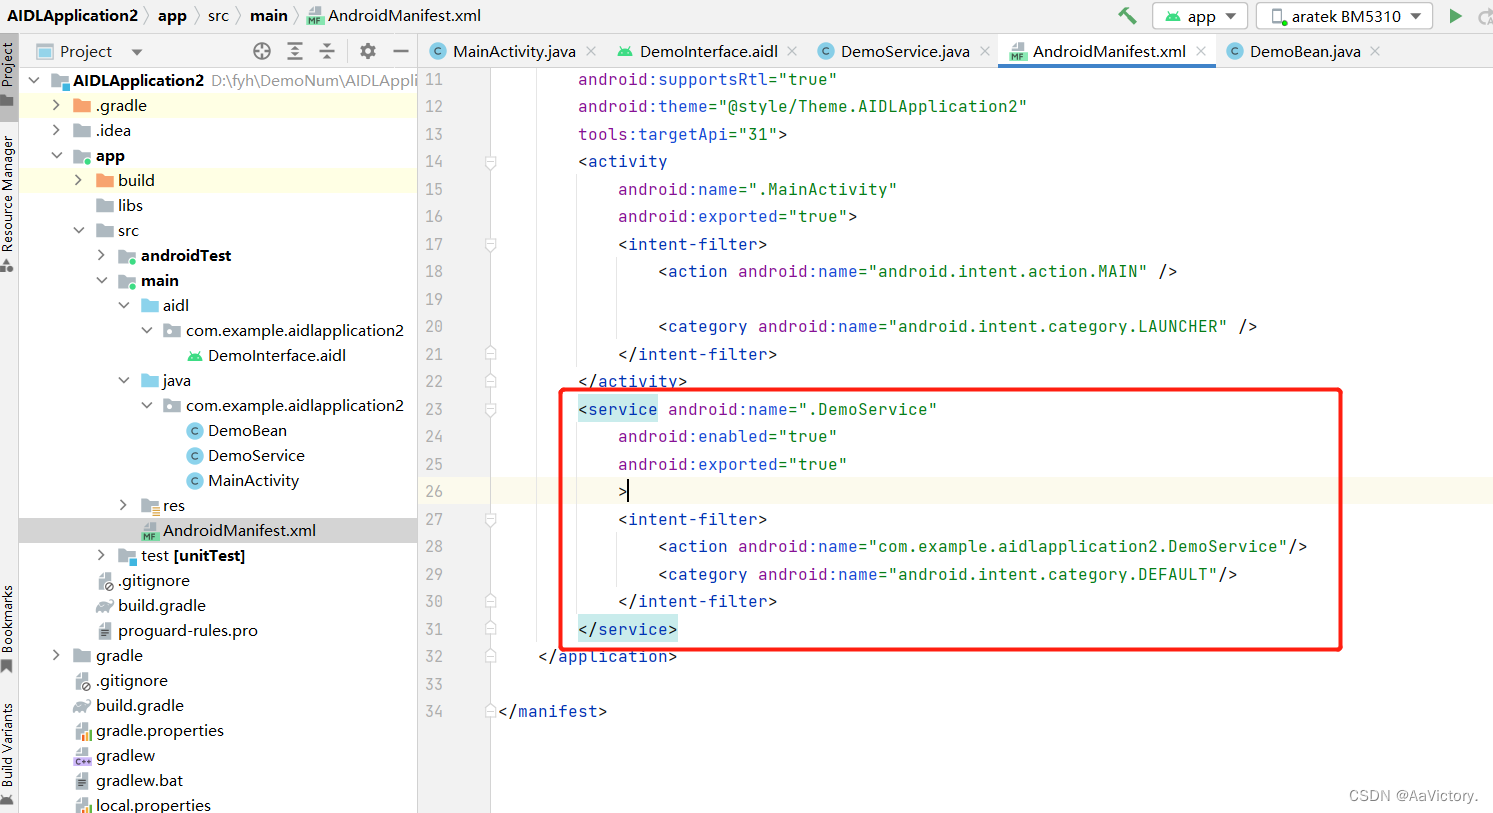
- 4、 创建服务端 DemoService
public class DemoService extends Service {


    @Nullable
    @Override
    public IBinder onBind(Intent intent) {


        return binder;
    }
    private DemoInterface.Stub binder=new DemoInterface.Stub(){


        private DemoBean demoBean;
        @Override
        public void setDemoBean(DemoBean demoBean) throws RemoteException {


            Log.e("TAG","测试名字---"+demoBean.getName());
            this.demoBean=demoBean;
        }
        @Override
        public DemoBean getDemoBean() throws RemoteException {


            return demoBean;
        }
    };
}
- 5、 启动服务
aidlapplication1(客户端)中的代码实现
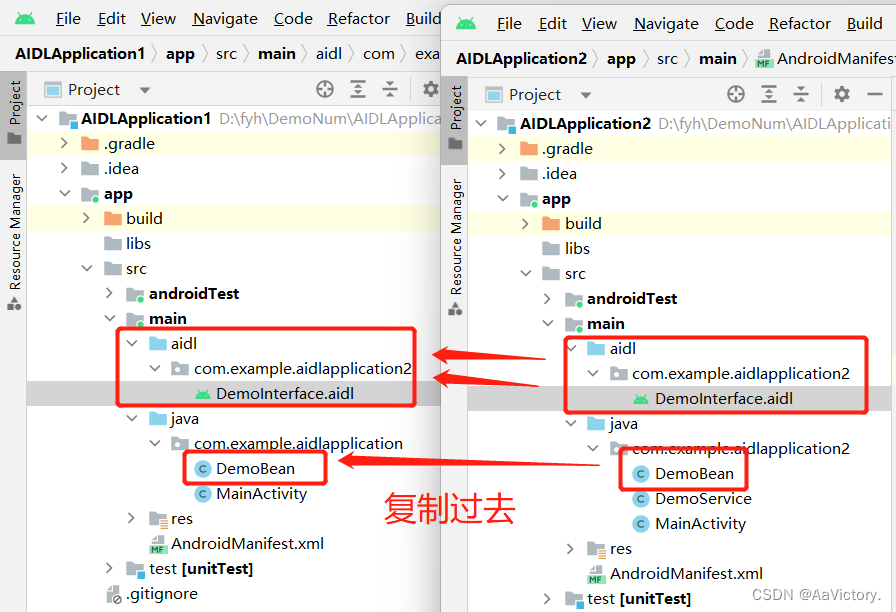
- 1、复制 DemoInterface.aidl ,直接复制,DemoInterface.aidl的包名以及里面的内容必须一样
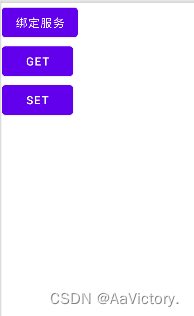
- 2、这里我给了三个点击事件
<?xml version="1.0" encoding="utf-8"?>
<LinearLayout xmlns:android="http://schemas.android.com/apk/res/android"
    xmlns:app="http://schemas.android.com/apk/res-auto"
    xmlns:tools="http://schemas.android.com/tools"
    android:layout_width="match_parent"
    android:layout_height="match_parent"
    android:orientation="vertical"
    tools:context=".MainActivity">
    <Button
        android:onClick="btn0"
        android:text="绑定服务"
        android:layout_width="wrap_content"
        android:layout_height="wrap_content"
        />
    <Button
        android:onClick="btn1"
        android:text="get"
        android:layout_width="wrap_content"
        android:layout_height="wrap_content"
        />
    <Button
        android:onClick="btn2"
        android:text="set"
        android:layout_width="wrap_content"
        android:layout_height="wrap_content"
        />
</LinearLayout>
- 3、MainActivity 的处理
public class MainActivity extends AppCompatActivity {


    private DemoServiceConnection demoServiceConnection;
    private DemoInterface demoInterface;
    @Override
    protected void onCreate(Bundle savedInstanceState) {


        super.onCreate(savedInstanceState);
        setContentView(R.layout.activity_main);
    }
    private class DemoServiceConnection implements ServiceConnection{


        @Override
        public void onServiceConnected(ComponentName componentName, IBinder iBinder) {


            demoInterface=DemoInterface.Stub.asInterface(iBinder);
        }
        @Override
        public void onServiceDisconnected(ComponentName componentName) {


        }
    }
    //点击绑定服务
    public void btn0(View view){


        Intent intent=new Intent();
        intent.setAction("com.example.aidlapplication2.DemoService");
        intent.setPackage("com.example.aidlapplication2");//包名
        demoServiceConnection=new DemoServiceConnection();
        bindService(intent,demoServiceConnection,BIND_AUTO_CREATE);//绑定服务
    }
    //点击获取数据
    public void btn1(View view){


        try {


            DemoBean demoBean = demoInterface.getDemoBean();
            Log.e("TAG","get---"+demoBean.getName());
        } catch (RemoteException e) {


            throw new RuntimeException(e);
        }
    }
    //点击写入数据
    public void btn2(View view){


        try {


            demoInterface.setDemoBean(new DemoBean("花花",6));
        } catch (RemoteException e) {


            throw new RuntimeException(e);
        }
    }

}