-
作用:实现祖与后代组件间通信
-
套路:父组件有一个
provide选项来提供数据,后代组件有一个inject选项来开始使用这些数据 -
具体写法:
- 祖组件中:
setup(){


	......
    let car = reactive({

    name:'奔驰',price:'40万'})
    provide('car',car)
    ......
}
- 后代组件中:
setup(props,context){


	......
    const car = inject('car')
    return {

    car}
	......
}
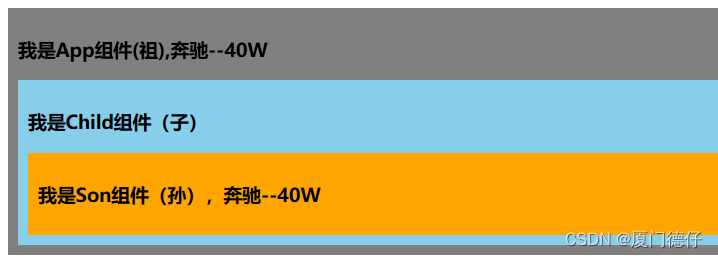
App.vue
<template>
	<div class="app">
		<h3>我是App组件(祖),{

    {

    name}}--{

    {

     price }}</h3>
		<Child></Child>
	</div>
</template>

<script>
	import {

    reactive,toRefs,provide} from 'vue'
	import Child from './components/Child.vue'
	export default {


		name: 'App',
		components:{

    Child},
		setup() {


			let car=reactive({

    name:'奔驰',price:'40W'})
			provide('car',car) //给自己的后代组件传递数据
			return {

    ...toRefs(car)}
		}
	}
</script>
<style scoped>
	.app{


		background-color: gray;
		padding: 10px;
	}
</style>
Child.vue
<template>
	<div class="child">
		<h3>我是Child组件(子)</h3>
		<Son/>
	</div>
</template>

<script>
	import {

    inject} from 'vue'
	import Son from './Son.vue'
	export default {


		name:'Child',
		components:{

    Son},
		/* setup(){
			let x = inject('car')
			console.log(x,'Child-----')
		} */
	}
</script>

<style>
	.child{


		background-color: skyblue;
		padding: 10px;
	}
</style>
son.vue
<template>
	<div class="son1">
		<h3>我是Son组件(孙),{

    {

    car.name}}--{

    {

     car.price }}</h3>
	</div>
</template>

<script>
	import {

    inject} from 'vue'
	export default {


		name:'Son',
		setup(){


			let car = inject('car')
			console.log('@@@',car)
			return {

    car}
		}
	}
</script>

<style>
	.son1{


		background-color: orange;
		padding: 10px;
	}
</style>