本文为慕课网《Android App压力测试》的学习笔记,视频地址
http://www.imooc.com/video/13007
Monkey是发送伪随机用户事件的工具。
MonkeyScript实现自动测试的脚本,是一组可以被Monkey识别的命令集合,可以完成重复固定的操作。不支持截屏。
MonkeyRunner提供一系列api操作。
Monkey与MonkeyRunner的区别:
- Monkey:在adb shell中,生产用户或系统的伪随机事件
- MonkeyRunner:通过API定义特定命令和事件控制设备
MonkeyRunner APIs
MonkeyRunner:用来连接设备或模拟器
MonkeyDevice:提供安装、卸载应用,发送模拟事件
MonkeyImage:完成图像保存,及对比的操作
MonkeyRunner的测试类型 :多设备控制, 功能测试, 回归测试
实践:(需配置android sdk和python环境)
第一步:usb数据线连接手机与电脑
第二步:cmd窗口输入adb devices,若显示类似下图则连接成功

第三步:安装测试app
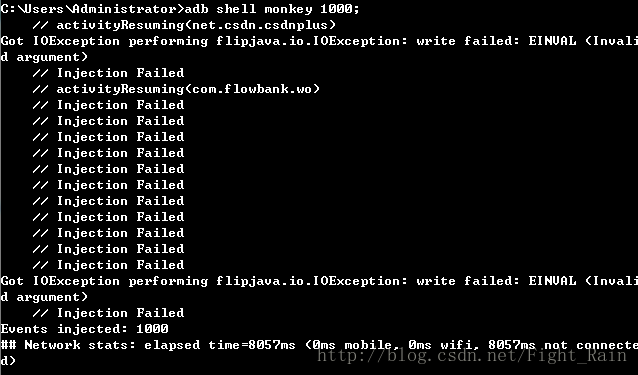
第四步:发送压力指令,adb shell monkey 1000(随机完成1000个指令)
显示如下:
第五步:获取测试应用包名
adb logcat | grep START(获取app执行的log信息作为下一个抓取日志中包括start标签的输出的输入,grep 是linux下的命令,windows系统可以使用 findstr 替代 grep。或者执行adb shell进入到手机,在手机系统下,执行logcat | grep START。android系统是linux的,所以支持grep)
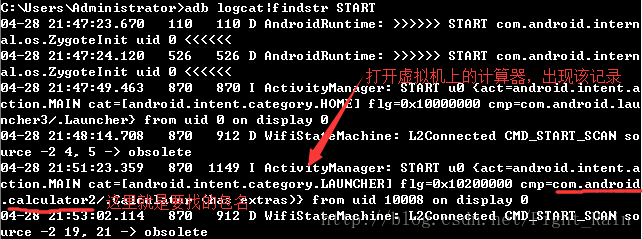
真机测试图,与视频中不一样,所以建议用虚拟机
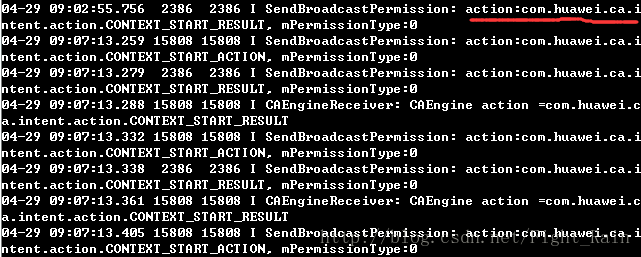
红色记号表示隐式intent的action,其命名规范是包名+intent.action+自定义。
虚拟机测试图,输出会跟着操作而更新
第六步:给指定包打压力
adb shell monkey -p 包名 1000
monkey高级参数的应用(参数均在包名后,可组合使用)
throttle参数,指定命令间隔
adb shell monkey - -throttle < milliseconds >
如C:\Users\Administrator>adb shell monkey -p com.android.calculator2 –throttle 1000 10seed参数,指定随机生成数的seed值,指定该值可让生成同样命令
adb shell monkey -s< seed >< event-count >
如:C:\Users\Administrator>adb shell monkey -p com.android.calculator2 -s 100 50
ps:视频中多次执行,效果基本一样,而且执行耗费时间只相差几ms,但本人测试时效果大致一样,耗费时间有的相差300ms,应该是电脑性能的问题
事件均能组合使用,百分比之和<=100即可
点击事件,设定点击事件百分比
adb shell monkey - -pct-touch< percent >
如percent设为100,表示Monkey只执行点击事件
C:\Users\Administrator>adb shell monkey -v (可以把执行的具体操作打印出来)-p com.android.calculator2 –pct-touch 100 100动作事件,设定动作事件百比
adb shell monkey - -pct-motion< percent >基本导航事件,设置基本导航事件百分比,输入设备的上,下,左,右
adb shell monkey - -pct-nav< percent >主要导航事件,设置主要导航事件百分比,兼容中间键,返回键,菜单按键
adb shell monkey - -pct-majornav< percent >系统导航事件,设置系统导航事件百分比,HOME,BACK,拨号键,音量键
adb shell monkey –pct-syskeys< percent >启动activity事件,设置启动activity事件百分比
adb shell monkey –pct-appswitch< percent >不常用事件,设置不常用事件百分比
adb shell monkey –pct-anyevent< percent >崩溃事件,忽略崩溃和异常,否则遇到就停止测试
adb shell monkey –ignore-crashes< event-count >超时事件,忽略ANR,否则遇到就停止测试
adb shell monkey –ignore-timeouts< event-count >
CRASH结果析取
以crash开头,具体内容和android studio里一样
ANR 结果析取
以anr开头,或者adb shell,cd /data/anr/ ,ls可以看到traces.txt的文件,more traces.txt可以查看详细信息
MonkeyScript常用命令介绍
执行monkey脚本的命令
adb shell monkey -f< scriptfile >< event-count>
脚本命令:
- DispatchTrackball 轨迹球事件,配对使用
DispatchTrackball(long downtime,long eventide,int action,float x, float y,float pressure,float size,int metastate,float xprecision,float yprecision,int divice,int edgeflags)
action 0代表按下,1代表弹起,x,y代表坐标点 DispatchPointer 点击事件 ,配对使用
DispatchTrackball(long downtime,long eventide,int action,float x, float y,float pressure,float size,int metastate,float xprecision,float yprecision,int divice,int edgeflags)
action 0代表按下,1代表弹起,x,y代表坐标点DispatchString命令 输入字符串事件
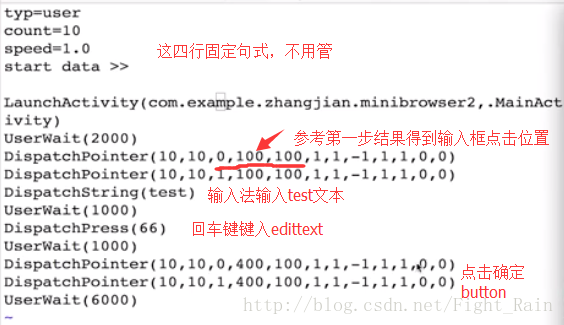
DispatchString(String text)LaunchActivity命令 启动应用
LaunchActivity(package,Activity)UserWait 等待事件
UserWait (millseconds)DispatchPress 按下键值
DispatchPress(int keycode) 如keycode 66=回车键
实例:
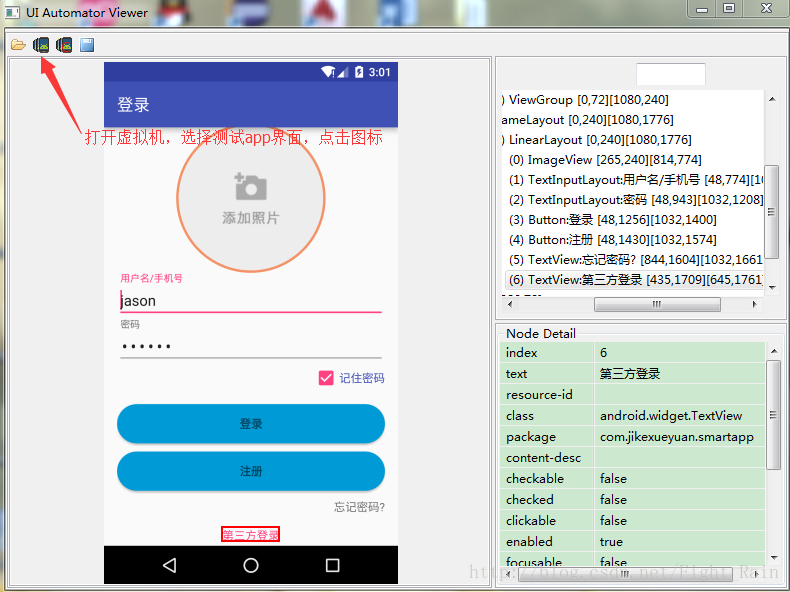
1.使用android sdk/tools/uiautomatorviewer.bat工具对要测试的应用界面进行测量,得到控件在界面的左上点坐标,右下点坐标
2.编写脚本(保存为script文件)
图中LaunchActivity中第二个参数要把activity的action名写全,即com.xxx.xxx.xxx.MainActivity
3.由于脚本在电脑里,monkey在手机里,所以要先把脚本复制到手机里
adb push mooc.script /data/local/tmp/
可以进入目录下,ls查看目录,ll查看文件创建时间
3.测试(此时在手机中,不用加adb shell)
monkey -f mooc.script 2
ps:要想能够启动对应应用,其activity在AndroidManifest文件中的exported属性要设置为true,才能在外部被打开!!!
MonkeyRunner常用API(能截屏)
1.alert 警告框
void alert (String message,String title,String okTitle)
#!/user/bin/python
#-*- UTF-8 -*-

from com.android.monkeyrunner import MonkeyRunner
MonkeyRunner.alert("Hello","title","OK")
cmd进入Android sdk/tools目录下,输入monkeyrunner demo.py,(此时已经把demo.py放在了该目录下,否则需加上路径,如monkeyrunner D:\xx\demo.py)得到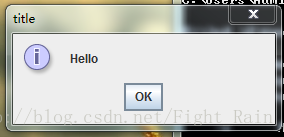
2.waitForConnection 等待设备连接,有多个device id,需指明具体哪个设备
3.drag 拖动(tuple类似point)
drag(tuple start,tuple end,float duration,integer steps)
4.press 按键
press(String keycode,dictionary type)
5.startActivity 启动应用
startActivity (package+’/’+activity)
6.touch 点击
touch(integer x,integer y,integer type)
7.type 输入
type(String message)
8.takeSnapShot 截屏
MonkeyImage API
1.sameAs 图像对比
boolean sameAs(MonkeyImage other,float percent)
2.writetoFile 图像保存
void writeToFile (String path,String format)
实践
#!/usr/bin/python
#-*- UTF-8 -*-

from com.android.monkeyrunner import MonkeyRunner,MonkeyDevice,MonkeyImage
#连接设备,设备名adb devices可以获取
device=MonkeyRunner.waitForConnection(3,"192.168.56.101:5555")
#启动App,sleep里单位是秒
device.startActivity("com.jikexueyuan.animationartdemo/com.jikexueyuan.animationartdemo.MainActivity")
MonkeyRunner.sleep(2)
#点击
device.touch(100,100,"DOWN_AND_UP")
MonkeyRunner.sleep(1)
....
#截屏
image=device.takeSnapshot()
image.writeToFile('./test.png','png')
若要能循环测试,需要python脚本,并不会。。。。。。