首先看一下我们拿到的数据sku数据和商品数据先实现
//商品数据
specs:
[{
name: "颜色",
values:[{name: "黑色"},{,name: "蓝色",}]
},
{
name:"尺寸"
values:[{name: "黑色"},{name: "蓝色"}]
},
{
name:"产地"
values:[{name: "中国"},{name: "日本"}]
}]
//对应的sku
skus = [
{
inventory: 999965,//库存
oldPrice: "200.00",//原价
picture:
price: "166.00",//优惠价
skuCode: "guo-100001",
spuce: [
{ name: "颜色", valueName: "黑色" },
{ name: "尺寸", valueName: "20cm" },
{ name: "产地", valueName: "中国" },
],
},
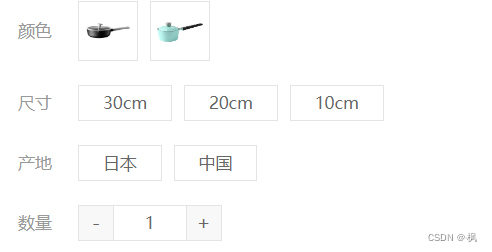
];好的,现在拿到了数据我们可以先把今天效果实现,先实现静态后面相对比较容易理解
<template>
  <div class="goods-sku">
    <dl v-for="item in goods.specs" :key="item.id">
      <dt>{

   { item.name }}</dt>
      <dd>
        <template v-for="val in item.values" :key="val.name">
          <img
            :class="{ selected: val.selected, disabled: val.disabled }"
            @click="clickSpecs(item, val)"
            v-if="val.picture"
            :src="val.picture"
            :title="val.name"
          />
          <span
            :class="{ selected: val.selected, disabled: val.disabled }"
            @click="clickSpecs(item, val)"
            v-else
            >{

   { val.name }}</span
          >
        </template>
      </dd>
    </dl>
  </div>
</template>
//css
<style scoped lang="less">
.sku-state-mixin () {
  border: 1px solid #e4e4e4;
  margin-right: 10px;
  cursor: pointer;
  &.selected {
    border-color: @CjColor;
  }
  &.disabled {
    opacity: 0.6;
    border-style: dashed;
    cursor: not-allowed;
  }
}
.goods-sku {
  padding-left: 10px;
  padding-top: 20px;
  dl {
    display: flex;
    padding-bottom: 20px;
    align-items: center;
    dt {
      width: 50px;
      color: #999;
    }
    dd {
      flex: 1;
      color: #666;
      > img {
        width: 50px;
        height: 50px;
        .sku-state-mixin ();
      }
      > span {
        display: inline-block;
        height: 30px;
        line-height: 28px;
        padding: 0 20px;
        .sku-state-mixin ();
      }
    }
  }
}
</style>
好的,接下来我们可以一步步的走逻辑,首先的话肯定是要先拿到所有sku的路径字典,拿到路径字典来判断选择项目是否可以进行选择
/**
 * Find power-set of a set using BITWISE approach.
 *
 * @param {*[]} originalSet
 * @return {*[][]}
 */
export default function bwPowerSet(originalSet) {
  const subSets = [];
  const numberOfCombinations = 2 ** originalSet.length;
  for (
    let combinationIndex = 0;
    combinationIndex < numberOfCombinations;
    combinationIndex += 1
  ) {
    const subSet = [];

    for (
      let setElementIndex = 0;
      setElementIndex < originalSet.length;
      setElementIndex += 1
    ) {
      if (combinationIndex & (1 << setElementIndex)) {
        subSet.push(originalSet[setElementIndex]);
      }
    }

    subSets.push(subSet);
  }

  return subSets;
}
这个是幂集算法根据这个可以拿到所需要的sku路径字典
接下啦我们使用这个方法拿到所有有库存的sku路径,用特殊字符串拼接每一项
  // 拿到路径字典
  const pathMap = getPathMap(props.goods.skus);
    const spliter = "★"; //特殊符号可以自己随便定义
// 根据skus数据得到路径字典对象
const getPathMap = (skus) => {
  const pathMap = {};
  // 对skus数组进行遍历
  skus.forEach((sku) => {
    // 1. 过滤出有库存有效的sku
    if (sku.inventory) {
      // 2. 得到sku属性值数组(sku的name,(例如黑色,30,中国))
      const specs = sku.specs.map((spec) => spec.valueName);
      // 3. 得到sku属性值数组的子集 (这个函数就是上面写的幂集算法)
      const powerSet = getPowerSet(specs);
      // 4. 设置给路径字典对象
      powerSet.forEach((set) => {
        const key = set.join(spliter);
        // 我们用得到的路径来当对象的key
        if (pathMap[key]) {
          // 已经有key往数组追加(因为黑色,20厘米,肯定不止一个,中国有,日本也有,所有如果key存在那么就往数组内添加他的id)
          pathMap[key].push(sku.id);
        } else {
          // 没有key设置一个数组
          pathMap[key] = [sku.id];
        }
      });
    }
  });
  return pathMap;
    //现在我们就得到了路径字典
};
*我直接再代码里用注释讲解每一次,更容易理解*
太长了分两篇讲解,下篇地址