SSM框架专题-Spring从零入门笔记
- 一、什么是spring
- 二、IOC控制反转
- 三、AOP面向切面编程
-
- 1.概念
- 2.手写AOP框架
- 3. Spring支持的AOP的实现
- 4. AOP常用的术语
- 5. 什么是AspectJ框架
- 6. AspectJ常见通知类型
- 7. AspectJ的切入点表达式(掌握)
- 8. AspectJ的前置通知@Before
- 9.改为注解方式下的@before前置通知
- 10.JoinPoint详解
- 11.后置通知@AfterReturning
- 12.环绕通知@Around
- 13. 最终通知@After
- 14.给切入点表达式起别名
- 15.spring的两种事务处理方式
- 16.spring中事务的五大隔离级别
- 28.为什么添加事务管理器
- 29.Spring事务的传播特性
- 30.声明式事务的实现
一、什么是spring
它是一个容器,它是整合其他框架的框架,它的核心是IOC和AOP,他在很多领域都是优秀的
1.代码解耦合
spring的主要作用是为代码解耦合,降低代码间的耦合度。
任何一个地方发生异常,可以针对这个地方修改,不会牵一发动全身
使用ioc降低业务对象的耦合度
2.spring特点
- 轻量级,由20多个模块构成,每个jar包都很小,小于1M,核心包也就3M左右。对代码无污染
- 面向接口编程,使用接口就是面向灵活,项目的可扩展性,可维护性都极高,接口不关心实现类的类型,使用时使用实现类即可切换整个功能
- AOP:面向切面编程,就是将公共的、通用的、重复的代码单独开发,在需要的时候反之回去,底层的原理是动态代理
- 整合其他框架,他整合后使其他框架更易用
二、IOC控制反转
是一个概念,是一种思想
由spring容器进行对象的创建和依赖注入,程序员在使用时直接取出使用
正转:由程序员进行对象的创建和依赖注入称为正转,程序员说了算
Student stu = new Student();   ====>程序员创建对象
stu.setName("张三");				===>程序员进行赋值
stu.setAge(22);
反转:将控制权交给spring容器,由spring容器创建对象和依赖注入称为反转
<bean id="stu" class="com.powernode.pojo.Student">
	<property name="name" value="张三"> ===>spring容器负责对象创建
	<property name="age" value="22"> ===>spring容器依赖注入值
</bean>
    @Test
    public void test(){


        //正转,程序员自己操作:
        Student stu = new Student();
        System.out.println(stu);
    }
    @Test
    public void testIOC(){


        //反转,spring帮你操作:
        ApplicationContext ac = new ClassPathXmlApplicationContext("applicationContext.xml");
        Student stu = (Student) ac.getBean("stu");
        System.out.println(stu);
    }
2.1 简单类型注入
简单类型注入:value
引用类型注入:ref
注意:不论是简单类型注入还是引用类型注入,都需要在pojo类中写对应的setXXX方法
    <bean id="school" class="com.powernode.spring.pojo.School">
        <property name="name" value="第一职业中学"/>
        <property name="address" value="北京市市中心"/>
    </bean>

    <bean id="stu" class="com.powernode.spring.pojo.Student">
        <!--简单类型注入-->
        <property name="name" value="哈比"/>
        <!--简单类型注入-->
        <property name="age" value="6"/>
        <!--这里用到引用类型注入 ref="填上面school bean的id"-->
        <property name="school" ref="school"/>
    </bean>
2.2 简单mvc结构
接下来通过将一个例子从普通三层架构升级成spring架构,从而更好的理解spring
新建mvc架构的简单例子:
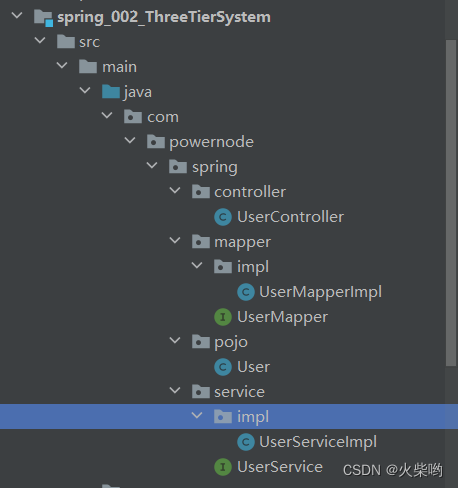
- 新建实体化类,pojo包下User类
public class User {


    private String name;
    private Integer age;

    public User() {


    }

    public User(String name, Integer age) {


        this.name = name;
        this.age = age;
    }

    public String getName() {


        return name;
    }

    public void setName(String name) {


        this.name = name;
    }

    public Integer getAge() {


        return age;
    }

    public void setAge(Integer age) {


        this.age = age;
    }

    @Override
    public String toString() {


        return "User{" +
                "name='" + name + '\'' +
                ", age=" + age +
                '}';
    }
}
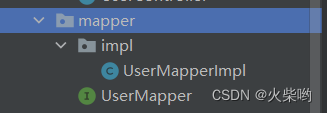
- 新建持久化层,UserMapper以及实现类
public interface UserMapper {


    /**
     * 插入一条用户数据
     * @param user
     * @return
     */
    int insert(User user);
}
public class UserMapperImpl implements UserMapper {


    @Override
    public int insert(User user) {


        System.out.println("用户"+user+"数据插入成功!");
        return 1;
    }
}
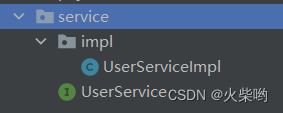
- 新建业务层UserService以及其实现类
public interface UserService {


    /**
     * 插入一条用户数据的业务类
     * @param user
     * @return
     */
    int insert(User user);
}
public class UserServiceImpl implements UserService {


    UserMapper userMapper = new UserMapperImpl();
    @Override
    public int insert(User user) {


        int count = userMapper.insert(user);
        return count;
    }
}
- 新建控制层,负责接收前端来的数据,并调用业务层处理,完成后返回前端数据

public class UserController {


    public void insert(User user){


        UserService userService = new UserServiceImpl();
        int insert = userService.insert(user);
        System.out.println(insert);
    }
}
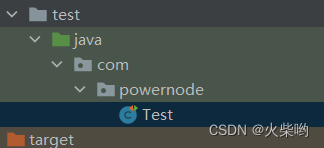
- 新建测试类,模拟前端向后端发送数据情况
2.3 通过spring改造
把其他类中的new对象全部删除,然后在resources目录下新建spring配置文件,spring接管对象创建
<?xml version="1.0" encoding="UTF-8"?>
<beans xmlns="http://www.springframework.org/schema/beans"
       xmlns:xsi="http://www.w3.org/2001/XMLSchema-instance"
       xsi:schemaLocation="http://www.springframework.org/schema/beans http://www.springframework.org/schema/beans/spring-beans.xsd">

    <!--持久化层-->
    <bean id="uMapper" class="com.powernode.spring.mapper.impl.UserMapperImpl"/>
    <!--业务层-->
    <bean id="uService" class="com.powernode.spring.service.impl.UserServiceImpl">
        <property name="userMapper" ref="uMapper"/>
    </bean>
    <!--控制层-->
    <bean id="uController" class="com.powernode.spring.controller.UserController">
        <property name="userService" ref="uService"/>
    </bean>

</beans>
2.4 构造方法注入
constructor-arg表示构造方法参数
    public User(String name, Integer age) {


        this.name = name;
        this.age = age;
    }
    <bean id="stu" class="com.powernode.spring.pojo.User">
        <constructor-arg name="age" value="30"/>
        <constructor-arg name="name" value="哈哈"/>
    </bean>
2.5 下标注入法
    <!--构造方法:下标注入-->
    <bean id="stu2" class="com.powernode.spring.pojo.User">
        <constructor-arg index="1" value="30"/>
        <constructor-arg index="0" value="哈哈"/>
    </bean>
2.6 构造方法默认注入
    <!--构造方法:默认注入-->
    <bean id="stu3" class="com.powernode.spring.pojo.User">
        <constructor-arg value="哈哈6"/>
        <constructor-arg value="6"/>
    </bean>
2.7 基于注解的IOC
@Component:可以创建任意对象,创建的对象默认名称是类名的驼峰命名法,也可以指定对象的名称@Component(“指定名称”)
@Value:可以给属性赋值
@Autowired:在所有bean中查找同源类
:在有父子类的情况下,如果使用按类型注入就意味着有多个可注入的对象,此时选与该属性名相同的对象进行注入
@Qualifier(“school”):在同源类中查找对象名为school的对象
@Repository:专门用来创建数据访问层的对象
@Service:专门用来创建业务逻辑层的对象
@Controller:专门用来创建控制器的对象
2.8 添加包扫描的方式
-
单个包扫描(推荐使用)

-
多个包扫描

-
扫描根包(不推荐)

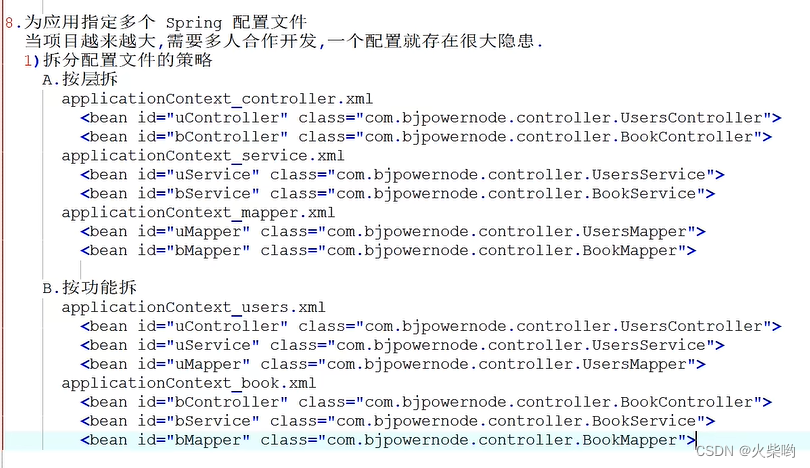
2.9 spring配置文件的拆分
- 按层拆(控制层、业务层、持久层)
applicationContext_controller.xml
applicationContext_servicexml
applicationContext_mapper.xml - 按功能拆
applicationContext_users.xml
applicationContext_book.xml
2.10 spring的配置文件导入
total.xml
<?xml version="1.0" encoding="UTF-8"?>
<beans xmlns="http://www.springframework.org/schema/beans"
       xmlns:xsi="http://www.w3.org/2001/XMLSchema-instance"
       xsi:schemaLocation="http://www.springframework.org/schema/beans http://www.springframework.org/schema/beans/spring-beans.xsd">
    <!--单个导入-->
    <!--<import resource="applicationContext_controller.xml"></import>-->
    <!--<import resource="applicationContext_mapper.xml"></import>-->
    <!--<import resource="applicationContext_service.xml"></import>-->
    <!--<import resource="applicationContext_other.xml"></import>-->

    <!--批量导入-->
    <import resource="applicationContext_*.xml"></import>
</beans>
三、AOP面向切面编程
1.概念
AOP(Aspect Orient Programming),面向切面编程
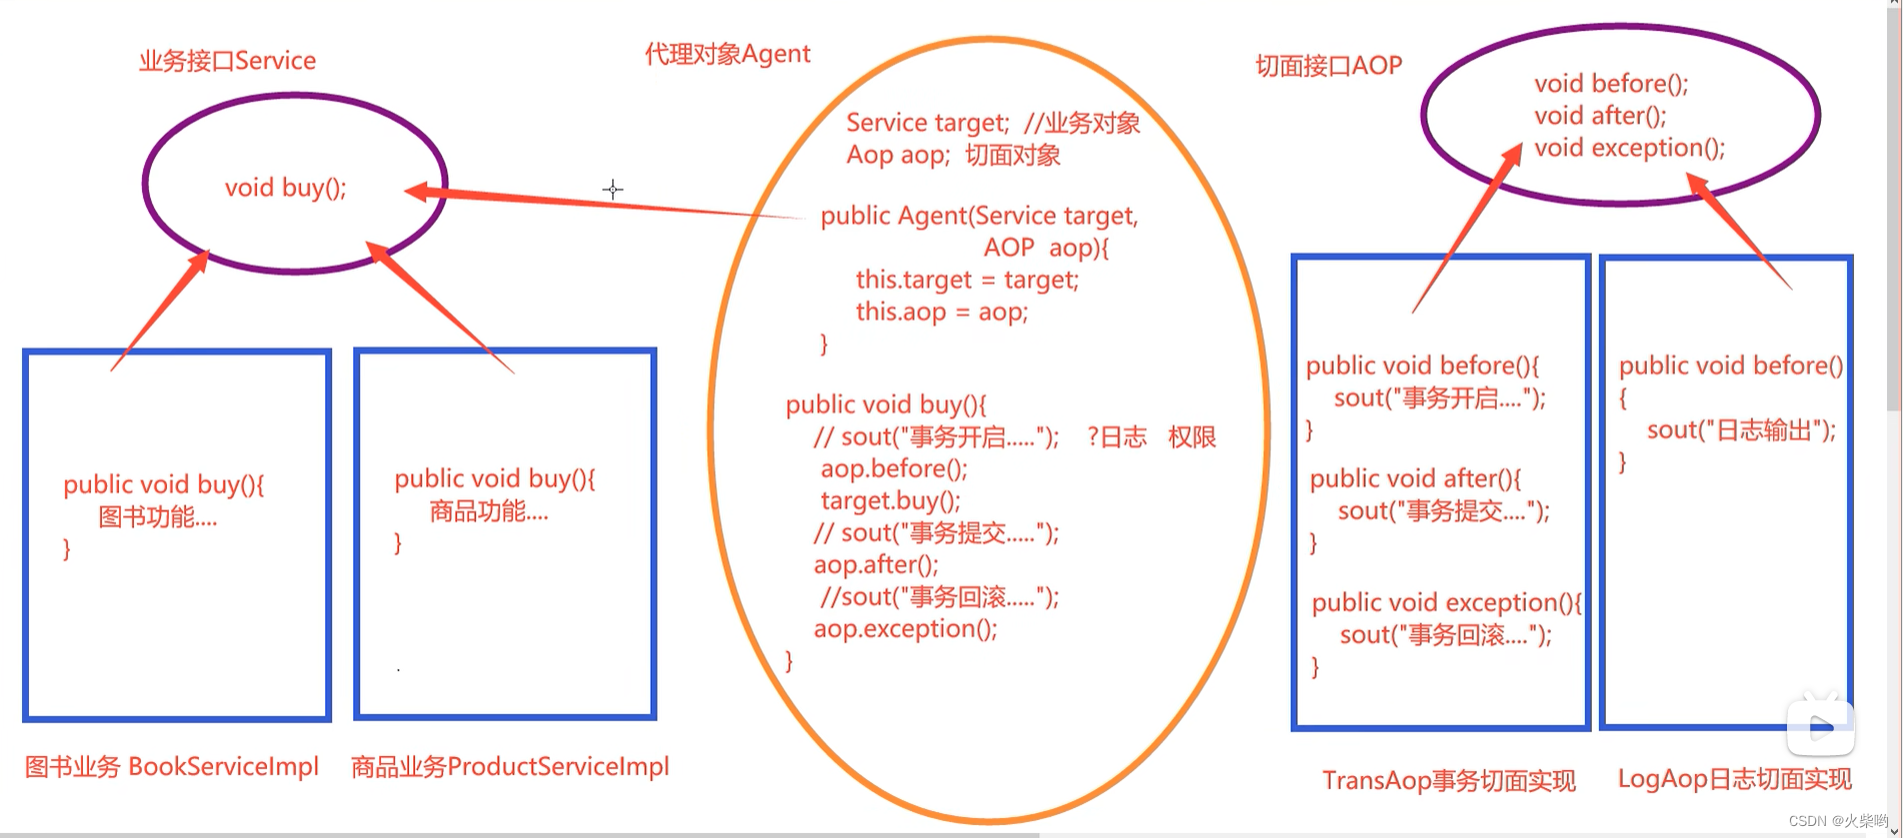
切面:公共的、通用的、重复的功能被称为切面,面向切面编程就是将切面提取出来,单独开发,在需要调用的方法中通过动态代理的方式进行置入
2.手写AOP框架
业务:图书购买业务
切面:事务
1:第一个版本:业务和切面紧耦合在一起,没有拆分
2:第二个版本:使用子类代理的方式拆分业务和切面
3:第三个版本:使用静态代理拆分业务和切面,业务和业务接口已拆分,此时切面紧耦合在业务中
4:第四个版本:使用静态代理拆分业务和业务接口,切面和切面接口
5:第五个版本:使用动态代理完成第四个版本的优化
第五个版本:(改造Agent)
public class ProxyFactory {


    public static Object getProxy(Service service,Aop aop){


        return Proxy.newProxyInstance(
                service.getClass().getClassLoader(),
                service.getClass().getInterfaces(),
                new InvocationHandler() {


                    @Override
                    public Object invoke(Object proxy, Method method, Object[] args) throws Throwable {


                        Object invoke = null;
                        try {


                            //切面
                            aop.before();
                            //业务
                            invoke = method.invoke(service, args);
                            //切面
                            aop.after();
                        } catch (Exception e) {


                            aop.exception();
                        }
                        return invoke;
                    }
                });
    }
}
3. Spring支持的AOP的实现

4. AOP常用的术语

5. 什么是AspectJ框架
AspectJ是一个面向切面的框架,它扩展了Java语言。AspectJ定义了AOP语法,它有一个专门的编译器用来生成遵守Java字节编码规范的Class文件。
6. AspectJ常见通知类型
AspectJ常用四种类型:
- 前置通知@Before
- 后置通知@AfterReturning
- 环绕通知@Around
- 最终通知@After
- 定义切入点@Pointcut(了解)
7. AspectJ的切入点表达式(掌握)
规范的公式:
execution(访问权限 方法返回值 方法声明(参数) 异常类型)
用到的符号:
* 代码任意个字符(通配符)
.. 如果出现在方法的参数中,则代表任意参数
   如果出现在路径中,则代表本路径及其所有子路径
示例:
execution(public * (…)):公共访问权限的任意方法
execution( set*(…)):任何一个以"set"开始的方法
execution(* com.xyz.service.impl..(…)):任意的返回值类型,在com.xyz.service.impl包下的任意类的任意方法
execution(* com.xyz.service….(…)):任意的返回值类型,在com.xyz.service及其子包下的任意方法的任意参数
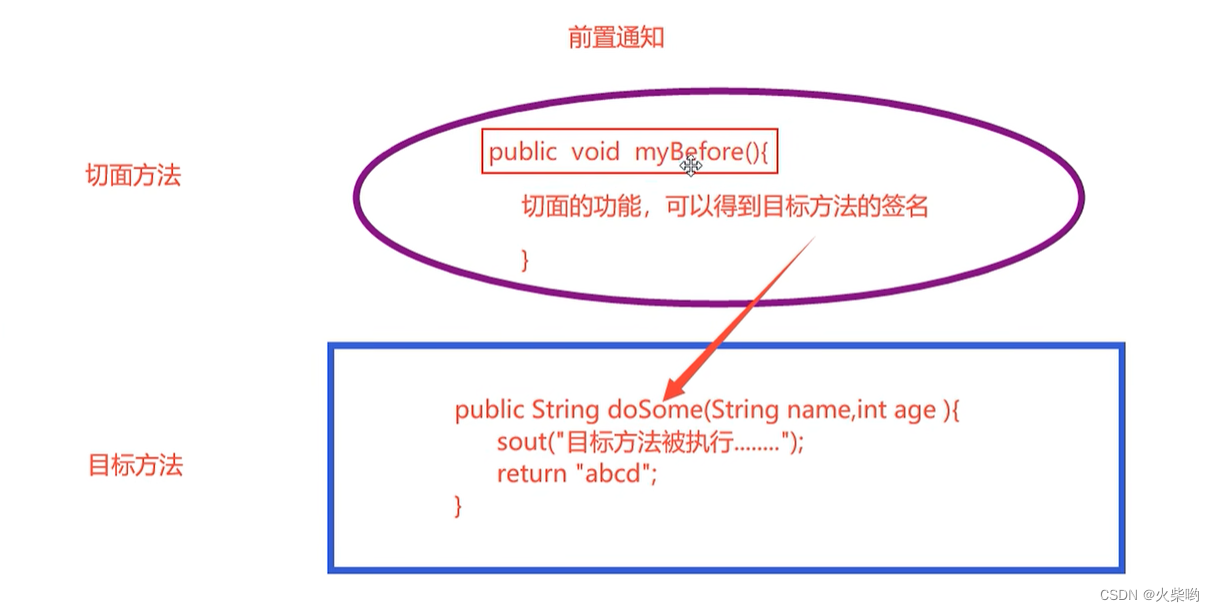
8. AspectJ的前置通知@Before
在目标方法执行前切入切面功能,在切面方法中不可以获得目标方法的返回值,只能得到目标方法的签名
applicationContext.xml中,3个步骤
    <!--目标方法-->
    <bean name="serviceSome" class="com.powernode.spring1.ServiceSome"></bean>
    <!--切入方法-->
    <bean name="myAspect" class="com.powernode.spring1.MyAspect"></bean>
    <!--绑定-->
    <aop:aspectj-autoproxy></aop:aspectj-autoproxy>
public class ServiceSome implements Service{


    @Override
    public String doSome(String name,Integer age) {


        System.out.println("目标方法实现。。");
        return name+"你给我看看你都"+age+"岁了";
    }
}
/**
 * @author huochai
 * @date 2022/10/21 20:52
 * 切入方法
 */
@Aspect
public class MyAspect {


    /**
     * 前置切入规范:
     * 必须是公共、无返回值、方法名任意、无参
     */
    @Before(value = "execution(public String com.powernode.spring1.ServiceSome.doSome(String,Integer))")
    public void aspect(){


        System.out.println("前置通知执行。。。");
    }
}
9.改为注解方式下的@before前置通知
- 在目标方法类中添加注解@Component
@Component
public class ServiceSome implements Service{


    @Override
    public String doSome(String name,Integer age) {


        System.out.println("目标方法实现。。");
        return name+"你给我看看你都"+age+"岁了";
    }
}
- 在切入方法类中添加注解@Component
@Aspect
@Component
public class MyAspect {


    /**
     * 前置切入规范:
     * 必须是公共、无返回值、方法名任意、无参
     */
    @Before(value = "execution(public String com.powernode.spring1.ServiceSome.doSome(String,Integer))")
    public void aspect(){


        System.out.println("前置通知执行。。。");
    }
}
- 添加包扫描
    <!--添加包扫描-->
    <context:component-scan base-package="com.powernode.spring1"></context:component-scan>
10.JoinPoint详解
    @Before(value = "execution(public String com.powernode.spring1.ServiceSome.doSome(String,Integer))")
    public void aspect(JoinPoint jp){


        System.out.println("方法的签名:"+jp.getSignature());
        System.out.println("方法的参数:"+ Arrays.toString(jp.getArgs()));
        System.out.println("前置通知执行。。。");
    }
11.后置通知@AfterReturning
后置通知带参数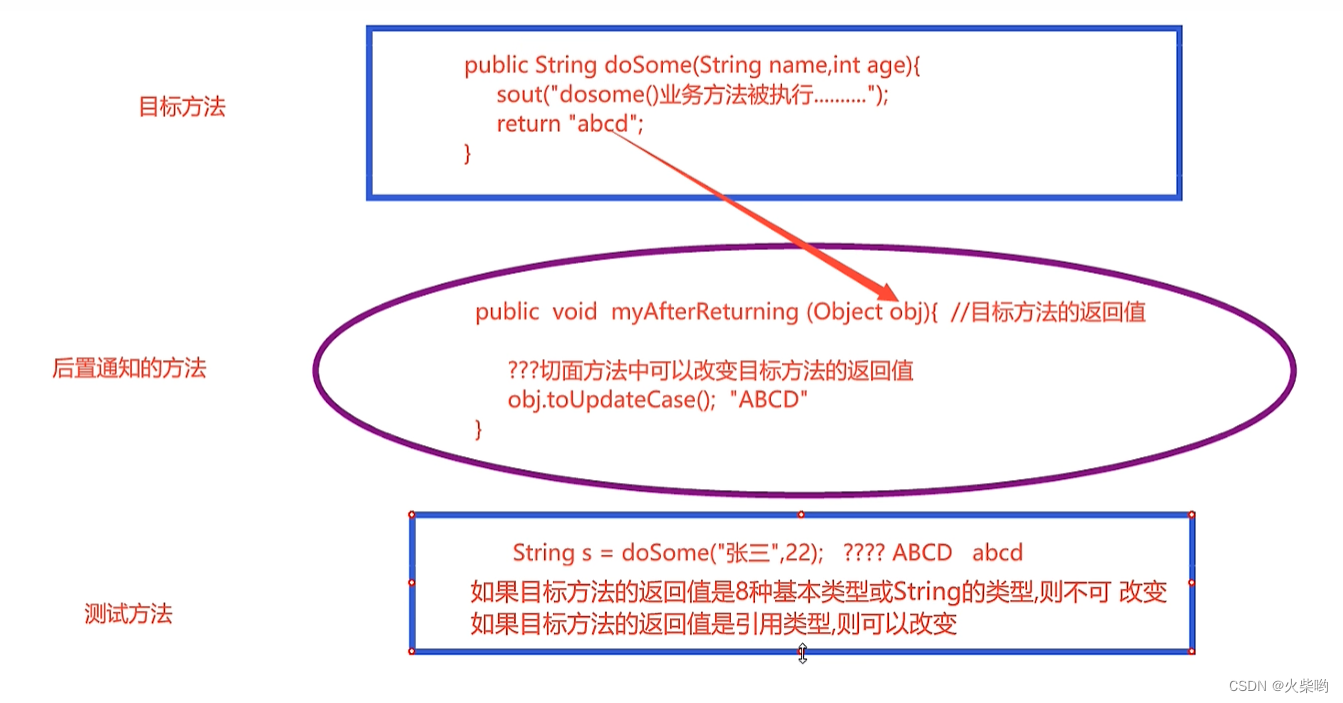
    /**
     * 后置通知的规范:
     * public void *(Object)
     * 带有的参数是目标方法的返回值
     * @param obj
     */
    @AfterReturning(
            //切入点位置
            value = "execution(* com.powernode.spring1.ServiceSome.*(..))",
            //返回值类型
            returning = "obj"
    )
    public void afterReturning(Object obj){


        if (obj instanceof String){


            System.out.println(obj.toString()+"被我捕获到了");
        }
        if (obj instanceof Student){


            ((Student)obj).setName("改了个哈");
        }
    }
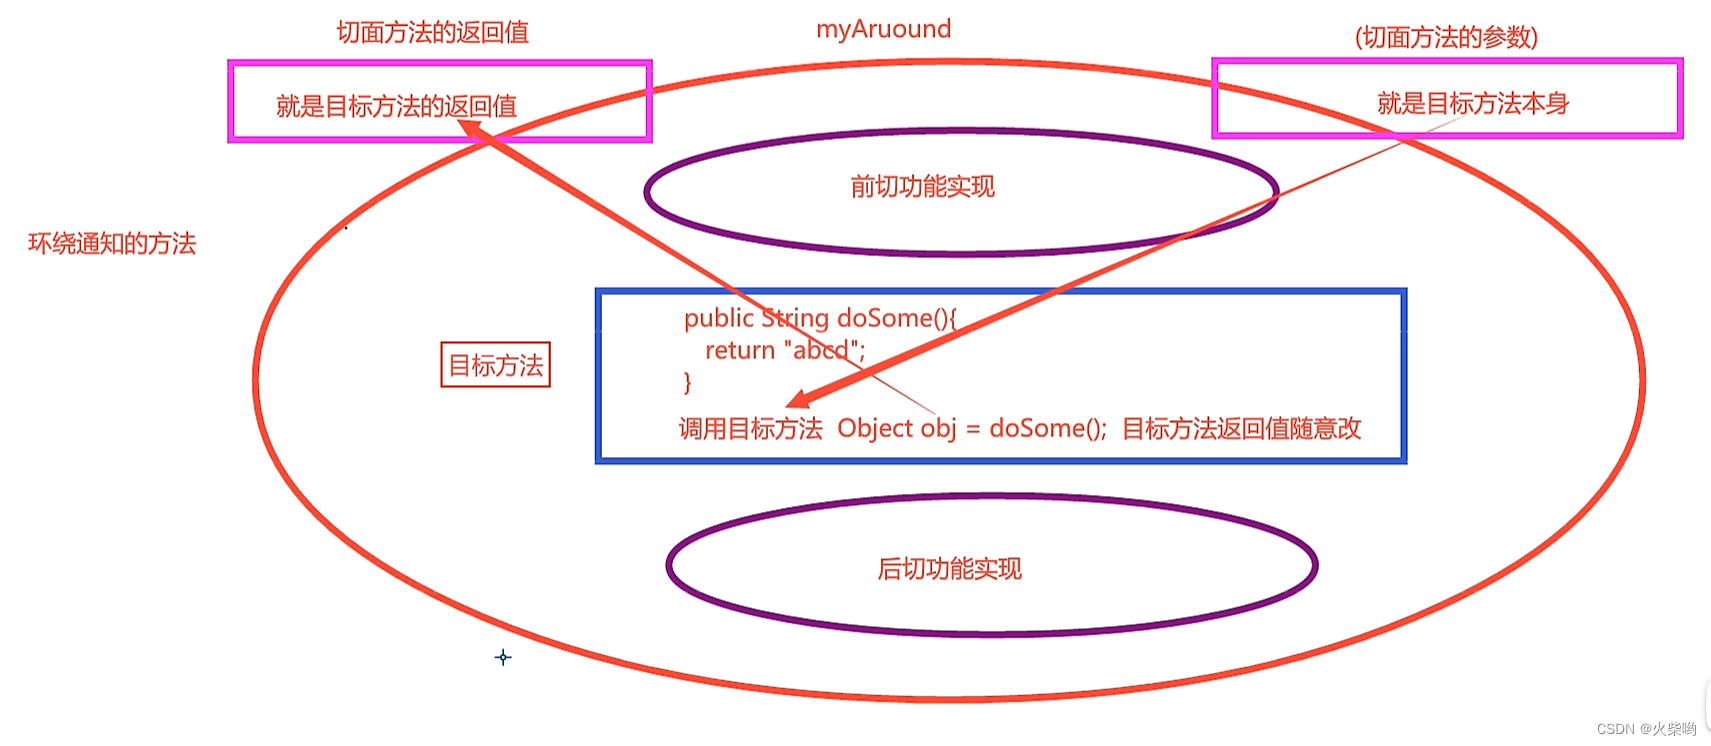
12.环绕通知@Around
功能最强大的通知,可以吧目标方法拦住,随便修改值
@Service
public class SomeServiceImpl implements SomeService{


    @Override
    public String doSome(String name, Integer age) {


        System.out.println("目标方法实现.");
        return "你好,"+age+"岁的"+name;
    }
}
@Aspect
@Component
public class MyAspect {


    @Around(value = "execution(public String com.powernode.spring3.SomeServiceImpl.doSome(String,Integer))")
    public Object myAround(ProceedingJoinPoint pjp) throws Throwable {


        //切面前置方法
        System.out.println("切面前置方法执行");
        //目标方法
        Object obj = pjp.proceed(pjp.getArgs());
        //切面后置方法
        System.out.println("切面后置方法执行");
        return obj.toString().replaceAll("你好","滚啊");
    }
}
public class TestAround {


    @Test
    public void test1(){


        ApplicationContext ac = new ClassPathXmlApplicationContext("applicationContext3.xml");
        SomeService service = (SomeService) ac.getBean("someServiceImpl");
        String str = service.doSome("小明", 50);
        System.out.println(str);
    }
}
13. 最终通知@After
不论报不报异常,都会执行切入方法
@Aspect
@Component
public class MyAspect {


    /**
     * 最终通知的规范:
     * public void aspect()
     * 若是有参数,也是JoinPoint
     */
    @After(value = "execution(public String com.powernode.spring4.SomeServiceImpl.doSome(String,Integer))")
    public void aspect(){


        System.out.println("最终通知执行");
    }
}
14.给切入点表达式起别名
    //这边的切入点表达式直接使用别名即可
    @After(value = "qiMing()")
    public void aspect(){


        System.out.println("最终通知执行");
    }

    //这个空方法负责给,切入点表达式起别名,
    @Pointcut(value = "execution(public String com.powernode.spring4.SomeServiceImpl.doSome(String,Integer))")
    public void qiMing(){

    }
15.spring的两种事务处理方式
- 注解式的事务
使用@Transactional注解完成事务控制,此注解可添加到类上,或者方法上 - 声明式事务(必须掌握),在配置文件中添加一次,整个目录遵循事务的设定
16.spring中事务的五大隔离级别
- 未提交读(Read Uncommitted):允许脏读,也就是可能读取到其他会话中未提交事务修改的数据
- 提交读(Read Committed):只能读取到已经提交的数据。Oracle等多数数据库默认都是该级别(不重复读)
- 可重复读(Repeated Read):可重复读。在同一个事务内的查询都是事务开始时刻一致的,InnoDB默认级别。在S0L标准中,该隔离级别消除了不可重复读,但是还存在幻象读,但是innoDB解决了幻读
- 串行读(Serializable):完全串行化的读,每次读都需要获得表级共享锁,读写相互都会阻塞
- 使用数据库默认的隔离级别isolation = Isolation.DEFAULT
MySQL:mysql 默认的事务处理级别是REPEATABLE-READ,也就是可重复读
28.为什么添加事务管理器
事务管理器用来生成相应技术的连接+执行语句的对象
如果使用MyBatis框架,必须使用DataSourceTransactionManager类完成处理
<bean id="transactionManager"class="org.springEramework.jdbc.datasource.DataSourceTransactionManager">
<!--因为事务必须关联数据库处理,所以要配置数据源-->
<property name="dataSource"ref="dataSource"></property>
</bean>
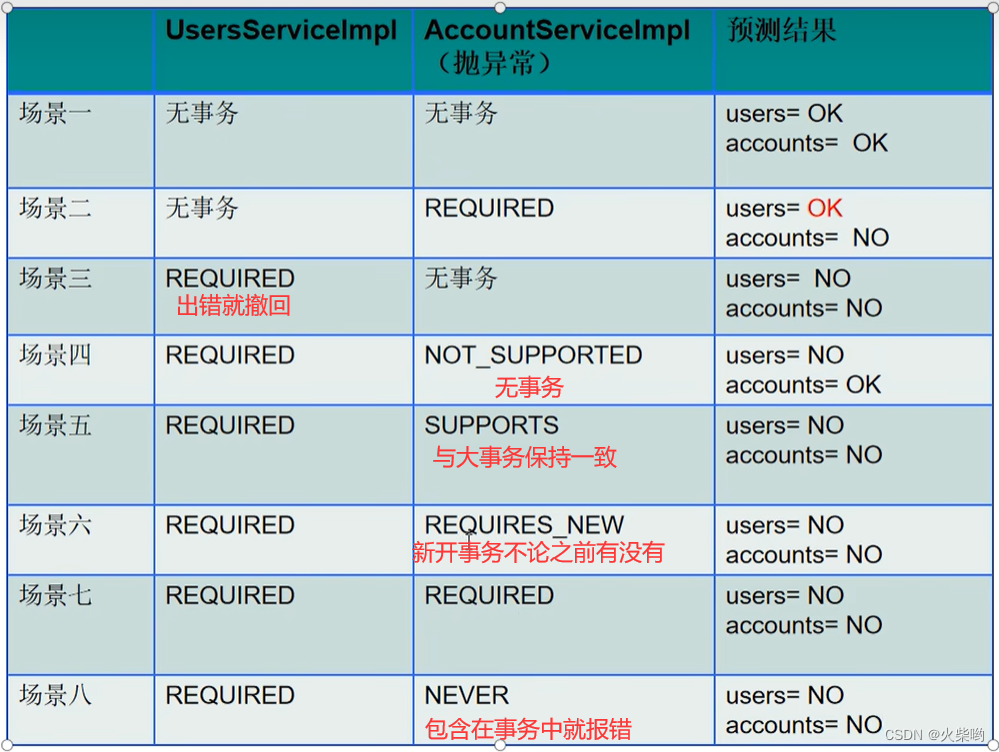
29.Spring事务的传播特性
多个事务之间的合并,互斥等都可以通过设置事务的传播特性来解决
常用:
- PROPAGATION_REQUIRED:必被包含事务(增删改必用)
- PROPAGATION_REQUIRES_NEW:自己新开事务,不管之前是否有事务
- PROPAGAPIONSUPPORTS:支持事务,如果加入的方法有事务,则支持事务,如果没有,不单开事务
- PROPAGATION_NEVER:不能运行中事务中,如果包在事务中,抛异常
- PROPAGATION_NOT_SUPPORTED:不支持事务,运行在非事务的环境
不常用:
PROPAGATION_MANDATORY:必须包在事务中,没有事务川抛异常
PROPAGATION NESTED:嵌套事务
30.声明式事务的实现
<?xml version="1.0" encoding="UTF-8"?>
<beans xmlns="http://www.springframework.org/schema/beans"
       xmlns:xsi="http://www.w3.org/2001/XMLSchema-instance"
       xmlns:context="http://www.springframework.org/schema/context" xmlns:tx="http://www.springframework.org/schema/tx"
       xmlns:aop="http://www.springframework.org/schema/aop"
       xsi:schemaLocation="http://www.springframework.org/schema/beans http://www.springframework.org/schema/beans/spring-beans.xsd http://www.springframework.org/schema/context https://www.springframework.org/schema/context/spring-context.xsd http://www.springframework.org/schema/tx http://www.springframework.org/schema/tx/spring-tx.xsd http://www.springframework.org/schema/aop https://www.springframework.org/schema/aop/spring-aop.xsd">


    <!--此配置文件与applicationContext service.xml的功能一样,只是事务配置不同-->

    <!--导入applicationContext_mapper.xml-->
    <import resource="applicationContext_mapper.xml" ></import>
    <!--添加包扫描-->
    <context:component-scan base-package="com.powernode.spring.service.impl"></context:component-scan>
    <!--添加事务管理器-->
    <bean id="transactionManager" class="org.springframework.jdbc.datasource.DataSourceTransactionManager">
        <property name="dataSource" ref="dataSource"></property>
    </bean>
    <!--配置事务切面-->
    <tx:advice id="myadvice" transaction-manager="transactionManager">
        <tx:attributes>
            <tx:method name="*select*" read-only="true"/>
            <tx:method name="*find*" read-only="true"/>
            <tx:method name="*search*" read-only="true"/>
            <tx:method name="*get*" read-only="true"/>
            <tx:method name="*insert*" propagation="REQUIRED"/>
            <tx:method name="*add*" propagation="REQUIRED"/>
            <tx:method name="*save*" propagation="REQUIRED"/>
            <tx:method name="*set*" propagation="REQUIRED"/>
            <tx:method name="*update*" propagation="REQUIRED"/>
            <tx:method name="*modify*" propagation="REQUIRED"/>
            <tx:method name="*delete*" propagation="REQUIRED"/>
            <tx:method name="*remove*" propagation="REQUIRED"/>
            <tx:method name="*drop*" propagation="REQUIRED"/>
            <tx:method name="*clear*" propagation="REQUIRED"/>
            <tx:method name="*" propagation="SUPPORTS"/>
        </tx:attributes>
    </tx:advice>
    <!--绑定切面和切入点-->
    <aop:config>
        <aop:pointcut id="mycut" expression="execution(* com.powernode..service.impl.*.*(..))"/>
        <aop:advisor advice-ref="myadvice" pointcut-ref="mycut"></aop:advisor>
    </aop:config>
</beans>