ArduPilot开源代码之AP_Logger
1. 源由
日志对于程序来说相辅相成,历史由来已久。
鉴于传感器数据高速采集和存储器的慢速存储问题,尤其在实际日志记录过程中,重点是针对问题或者关注的数据进行记录,不太可能将所有的数据都记录下来(也没有必要)。
ArduPilot的日志模块部分,这里从整体做个介绍,以便大家对日志有更像详细的了解。
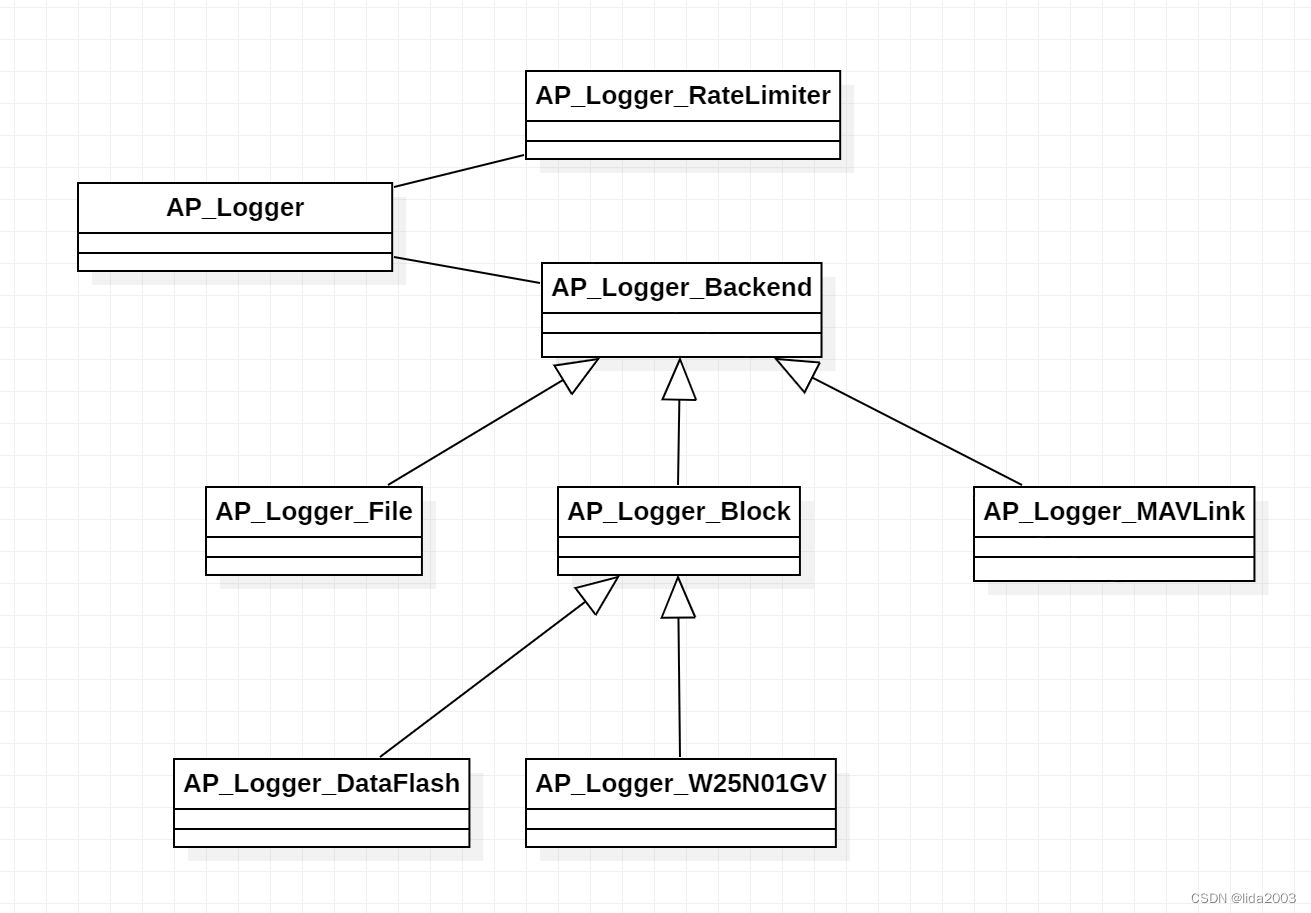
2. Logger类
- AP_Logger
- AP_Logger_RateLimiter
- AP_Logger_Backend
- AP_Logger_File
- AP_Logger_MAVLink
- AP_Logger_Block
- AP_Logger_DataFlash
- AP_Logger_W25N01GV
2.1 Copter初始化
应用类的初始化总是有个init函数处理,启动过程可参考:ArduPilot飞控启动&运行过程简介。
AP_Vehicle::setup
 └──> init_ardupilot
     └──> Copter::log_init
         └──> AP_Logger::Init
初始化最终要根据硬件芯片进行特定的初始化逻辑,鉴于H743 Dual BIM270这块板子使用的是W25N01GV,详见配置文件。

AP_Logger::Init
 ├──> _params.file_bufsize.convert_parameter_width(AP_PARAM_INT8)  //convert from 8 bit to 16 bit LOG_FILE_BUFSIZE
 ├──> <hal.util->was_watchdog_armed()>
 │   ├──> GCS_SEND_TEXT(MAV_SEVERITY_INFO, "Forcing logging for watchdog reset")
 │   └──> _params.log_disarmed.set(LogDisarmed::LOG_WHILE_DISARMED)
 ├──> <CONFIG_HAL_BOARD == HAL_BOARD_SITL>
 │   ├──> validate_structures(structures, num_types)
 │   └──> dump_structures(structures, num_types)
 ├──> <Backend_Type::BLOCK> AP_Logger_W25N01GV::probe
 ├──> backends[i]->Init
 ├──> start_io_thread
 └──> EnableWrites(true)
注1:如果Backend_Type是FILESYSTEM则需要使用AP_Logger_File::probe;若Backend_Type是MAVLINK则需要使用AP_Logger_MAVLink::probe。
// start the update thread
void AP_Logger::start_io_thread(void)
{
    WITH_SEMAPHORE(_log_send_sem);

    if (_io_thread_started) {
        return;
    }

    if (!hal.scheduler->thread_create(FUNCTOR_BIND_MEMBER(&AP_Logger::io_thread, void), "log_io", HAL_LOGGING_STACK_SIZE, AP_HAL::Scheduler::PRIORITY_IO, 1)) {
        AP_HAL::panic("Failed to start Logger IO thread");
    }

    _io_thread_started = true;
    return;
}
注2:这里start_io_thread开启了一个io线程来处理存储任务AP_Logger::io_thread,后面我们会对其做简单的介绍。
2.2 Copter任务
- Copter::ten_hz_logging_loop
- Copter::twentyfive_hz_logging
- AP_Logger::periodic_tasks
这里看出,实际日志记录使用有两处与设备应用紧密结合,而常规AP_Logger应用处理的是periodic_tasks。
#if LOGGING_ENABLED == ENABLED
    SCHED_TASK(ten_hz_logging_loop,   10,    350, 114),
    SCHED_TASK(twentyfive_hz_logging, 25,    110, 117),
    SCHED_TASK_CLASS(AP_Logger,            &copter.logger,              periodic_tasks, 400, 300, 120),
#endif
3. 实例理解
根据日志应用的情况展开研读和讨论,希望从应用场景进而理解日志类的继承和实现。
3.1 Copter设备应用任务
3.1.1 Copter::ten_hz_logging_loop
AP_Scheduler保证10Hz遍历,并在标志位的作用下,记录相关飞行数据。
Copter::ten_hz_logging_loop
 ├──> <should_log(MASK_LOG_ATTITUDE_MED) && !should_log(MASK_LOG_ATTITUDE_FAST) && !copter.flightmode->logs_attitude()>
 │   └──> Log_Write_Attitude
 ├──> <!should_log(MASK_LOG_ATTITUDE_FAST) && !copter.flightmode->logs_attitude()>
 │   └──> Log_Write_PIDS
 ├──> <!should_log(MASK_LOG_ATTITUDE_FAST)>
 │   └──> Log_Write_EKF_POS
 ├──> <should_log(MASK_LOG_MOTBATT)>
 │   └──> motors->Log_Write
 ├──> <should_log(MASK_LOG_RCIN)>
 │   ├──> logger.Write_RCIN
 │   └──> <rssi.enabled()>
 │       └──> logger.Write_RSSI
 ├──> <should_log(MASK_LOG_RCOUT)>
 │   └──> logger.Write_RCOUT
 ├──> <should_log(MASK_LOG_NTUN) && (flightmode->requires_GPS() || landing_with_GPS() || !flightmode->has_manual_throttle())>
 │   └──> pos_control->write_log
 ├──> <should_log(MASK_LOG_IMU) || should_log(MASK_LOG_IMU_FAST) || should_log(MASK_LOG_IMU_RAW)>
 │   └──> AP::ins().Write_Vibration
 ├──> <should_log(MASK_LOG_CTUN)>
 │   ├──> attitude_control->control_monitor_log
 │   ├──> <HAL_PROXIMITY_ENABLED> g2.proximity.log
 │   └──> <AP_BEACON_ENABLED> g2.beacon.log
 ├──> <FRAME_CONFIG == HELI_FRAME> Log_Write_Heli
 └──> <AP_WINCH_ENABLED> <should_log(MASK_LOG_ANY)> g2.winch.write_log
3.1.2 Copter::twentyfive_hz_logging
AP_Scheduler保证25Hz遍历,并在标志位的作用下,记录相关飞行数据。
Copter::twentyfive_hz_logging
 ├──> <should_log(MASK_LOG_ATTITUDE_FAST)>
 │   └──> Log_Write_EKF_POS
 ├──> <should_log(MASK_LOG_IMU) && !(should_log(MASK_LOG_IMU_FAST))>
 │   └──> AP::ins().Write_IMU()
 ├──> <MODE_AUTOROTATE_ENABLED == ENABLED> <should_log(MASK_LOG_ATTITUDE_MED) || should_log(MASK_LOG_ATTITUDE_FAST)>
 │   └──> g2.arot.Log_Write_Autorotation
 └──> <HAL_GYROFFT_ENABLED> <should_log(MASK_LOG_FTN_FAST)>
     └──> gyro_fft.write_log_messages
3.2 AP_Logger应用类任务
3.2.1 AP_Logger::periodic_tasks
AP_Scheduler保证400Hz遍历,并在标志位的作用下,记录相关飞行数据。
AP_Logger::periodic_tasks
 ├──> <HAL_BUILD_AP_PERIPH> handle_log_send
 └──> FOR_EACH_BACKEND(periodic_tasks())
3.2.2 AP_Logger::io_thread
使用OS线程进行1KHz的频率对存储系统进行相关任务操作。
AP_Logger::io_thread
 └──> loop(1)
     ├──> [delay MAX(1000 - (now - last_run_us), 250)]
     ├──> FOR_EACH_BACKEND(io_timer())
     ├──> <now - last_stack_us > 100000U> hal.util->log_stack_info()
     ├──> <!done_crash_dump_save && now - last_crash_check_us > 5000000U> check_crash_dump_save
     └──> file_content_update
4. H743 Dual - W25N01GV
由于H743 Dual BIM270这块板子使用的是W25N01GV,接下来我们看下AP_Logger_W25N01GV重要的几个具体实现。
4.1 AP_Logger_W25N01GV::probe
C++对象new一个实例出来,把该设备对象创建出来,用于后续的硬件设备管理。
    static AP_Logger_Backend  *probe(AP_Logger &front,
                                     LoggerMessageWriter_DFLogStart *ls) {
        return new AP_Logger_W25N01GV(front, ls);
    }
4.2 AP_Logger_W25N01GV::Init
通过定义的SPI总线,对SPI-Flash芯片进行硬件检测和芯片初始化。
void AP_Logger_W25N01GV::Init()
{
    dev = hal.spi->get_device("dataflash");
    if (!dev) {
        AP_HAL::panic("PANIC: AP_Logger W25N01GV device not found");
        return;
    }

    dev_sem = dev->get_semaphore();

    if (!getSectorCount()) {
        flash_died = true;
        return;
    }

    flash_died = false;

    // reset the device
    WaitReady();
    {
        WITH_SEMAPHORE(dev_sem);
        uint8_t b = JEDEC_DEVICE_RESET;
        dev->transfer(&b, 1, nullptr, 0);
    }
    hal.scheduler->delay(W25N01G_TIMEOUT_RESET_MS);

    // disable write protection
    WriteStatusReg(W25N01G_PROT_REG, 0);
    // enable ECC and buffer mode
    WriteStatusReg(W25N01G_CONF_REG, W25N01G_CONFIG_ECC_ENABLE|W25N01G_CONFIG_BUFFER_READ_MODE);

    printf("W25N01GV status: SR-1=0x%x, SR-2=0x%x, SR-3=0x%x\n",
        ReadStatusRegBits(W25N01G_PROT_REG),
        ReadStatusRegBits(W25N01G_CONF_REG),
        ReadStatusRegBits(W25N01G_STATUS_REG));

    AP_Logger_Block::Init();
}
4.4 AP_Logger_Block::Init
SPI属于块设备,需要进行相应的一些块设备初始化。该函数在AP_Logger_W25N01GV::Init中调用。
void AP_Logger_Block::Init(void)
{
    // buffer is used for both reads and writes so access must always be within the semaphore
    buffer = (uint8_t *)hal.util->malloc_type(df_PageSize, AP_HAL::Util::MEM_DMA_SAFE);
    if (buffer == nullptr) {
        AP_HAL::panic("Out of DMA memory for logging");
    }

    //flash_test();

    if (CardInserted()) {
        // reserve space for version in last sector
        df_NumPages -= df_PagePerBlock;

        // determine and limit file backend buffersize
        uint32_t bufsize = _front._params.file_bufsize;
        if (bufsize > 64) {
            bufsize = 64;
        }
        bufsize *= 1024;

        // If we can't allocate the full size, try to reduce it until we can allocate it
        while (!writebuf.set_size(bufsize) && bufsize >= df_PageSize * df_PagePerBlock) {
            DEV_PRINTF("AP_Logger_Block: Couldn't set buffer size to=%u\n", (unsigned)bufsize);
            bufsize >>= 1;
        }

        if (!writebuf.get_size()) {
            DEV_PRINTF("Out of memory for logging\n");
            return;
        }

        DEV_PRINTF("AP_Logger_Block: buffer size=%u\n", (unsigned)bufsize);
        _initialised = true;
    }

    WITH_SEMAPHORE(sem);

    if (NeedErase()) {
        EraseAll();
    } else {
        validate_log_structure();
    }
}
4.5 AP_Logger_Block::io_timer
定时循环对块设备进行相应的擦除,写入操作。这里非常类似Linux驱动创建了一个内核任务。
void AP_Logger_Block::io_timer(void)
{
    uint32_t tnow = AP_HAL::millis();
    io_timer_heartbeat = tnow;

    // don't write anything for the first 2s to give the dataflash chip a chance to be ready
    if (!_initialised || tnow < 2000) {
        return;
    }

    if (erase_started) {
        WITH_SEMAPHORE(sem);

        if (InErase()) {
            return;
        }
        // write the logging format in the last page
        StartWrite(df_NumPages+1);
        uint32_t version = DF_LOGGING_FORMAT;
        memset(buffer, 0, df_PageSize);
        memcpy(buffer, &version, sizeof(version));
        FinishWrite();
        erase_started = false;
        chip_full = false;
        status_msg = StatusMessage::ERASE_COMPLETE;
        return;
    }

    if (df_EraseFrom > 0) {
        WITH_SEMAPHORE(sem);

        const uint32_t sectors = df_NumPages / df_PagePerSector;
        const uint32_t block_size = df_PagePerBlock * df_PageSize;
        const uint32_t sectors_in_block = block_size / (df_PagePerSector * df_PageSize);
        uint32_t next_sector = get_sector(df_EraseFrom);
        const uint32_t aligned_sector = sectors - (((df_NumPages - df_EraseFrom + 1) / df_PagePerSector) / sectors_in_block) * sectors_in_block;
        while (next_sector < aligned_sector) {
            Sector4kErase(next_sector);
            io_timer_heartbeat = AP_HAL::millis();
            next_sector++;
        }
        uint16_t blocks_erased = 0;
        while (next_sector < sectors) {
            blocks_erased++;
            SectorErase(next_sector / sectors_in_block);
            io_timer_heartbeat = AP_HAL::millis();
            next_sector += sectors_in_block;
        }
        status_msg = StatusMessage::RECOVERY_COMPLETE;
        df_EraseFrom = 0;
    }

    if (!CardInserted() || new_log_pending || chip_full) {
        return;
    }

    // we have been asked to stop logging, flush everything
    if (stop_log_pending) {
        WITH_SEMAPHORE(sem);

        log_write_started = false;

        // complete writing any previous log, a page at a time to avoid holding the lock for too long
        if (writebuf.available()) {
            write_log_page();
        } else {
            writebuf.clear();
            stop_log_pending = false;
        }

    // write at most one page
    } else if (writebuf.available() >= df_PageSize - sizeof(struct PageHeader)) {
        WITH_SEMAPHORE(sem);

        write_log_page();
    }
}
5. 总结
通过AP_Logger模块的代码初步研读,整个日志的应用是如何初始化?如何日志记录?如何驱动更新数据?应该都能很好的找到入口点。
通过研读,希望能够从代码框架的角度,更好的理解设计。当我们需要新增一些内容的时候,可以有的放矢。
比如:
- 移植新的SPI-Flash芯片驱动
- 新增应用日志记录
- 调整日志记录频率
- 定位日志应用的异常问题
等等。。。 。。。
6. 参考资料
【1】ArduPilot开源飞控系统之简单介绍
【2】ArduPilot之开源代码框架
【3】ArduPilot飞控之ubuntu22.04-SITL安装
【4】ArduPilot飞控之ubuntu22.04-Gazebo模拟
【5】ArduPilot飞控之Mission Planner模拟
【6】ArduPilot飞控AOCODARC-H7DUAL固件编译
【7】ArduPilot之开源代码Library&Sketches设计
【8】ArduPilot之开源代码Sensor Drivers设计
【9】ArduPilot之开源代码基础知识&Threading概念
【10】ArduPilot之开源代码UARTs and the Console使用
【11】ArduPilot飞控启动&运行过程简介
【11】ArduPilot之开源代码Task介绍
【12】ArduPilot开源代码之AP_Param
【13】ArduPilot开源代码之AP_Scheduler
【14】ArduPilot开源代码之AP_VideoTX
【15】ArduPilot开源代码之AP_InertialSensor_Backend
【16】ArduPilot开源代码之AP_InertialSensor