shell脚本是什么?
Shell脚本与Windows/Dos下的批处理相似,也就是用各类命令预先
放入到一个文件中,方便一次性执行的一个程序文件,主要是方便
管理员进行设置或者管理用的。但是它比Windows下的批处理更强
大,比用其他编程程序编辑的程序效率更高,它使用了Linux/Unix下的命令。
shell和shell脚本的区别:
shell和shell脚本有什么区别?确切一点说,Shell就是一个命令行解释器,
它的作用就是遵循一定的语法将输入的命令加以解释并传给系统。它为用户
提供了一个向Linux发送请求以便运行程序的接口系统级程序,用户可以用
Shell来启动、挂起、停止甚至是编写一些程序。 Shell本身是一个用C语
言编写的程序,它是用户使用Linux的桥梁。Shell既是一种命令语言,又
是一种程序设计语言(就是你所说的shell脚本)。作为命令语言,它互动
式地解释和执行用户输入的命令;作为程序设计语言,它定义了各种变量和
参数,并提供了许多在高阶语言中才具有的控制结构,包括循环和分支。它
虽然不是 Linux系统内核的一部分,但它调用了系统内核的大部分功能来
执行程序、创建文档并以并行的方式协调各个程序的运行。
shell脚本的简介:
打开文本编辑器(可以使用vi/vim命令来创建文件),新建一个文件test.sh,扩展名为sh
(sh代表shell),扩展名并不影响脚本执行,见名知意就好,如果你用php写shell 脚本,扩展名就用php好了。
输入一些代码,第一行一般是这样:
#!/bin/bash
echo "Hello World !"
"#!" 是一个约定的标记,它告诉系统这个脚本需要什么解释器来执行,即使用哪一种Shell。
echo命令用于向窗口输出文本。
shell脚本与C,java相比的优缺点:
脚本语言是解释性语言,运行效率相对低。
c,java是描述型语言,直接将动作描述给系统,运行效率高,c是一门创造性语言。
shell脚本记录系统命令,可以使命令批量执行。
gcc是编译器,而vim编辑器
#!/bin/bash 幻数,脚本运行时先运行此程序。
以.sh结尾语法是高亮的。
脚本的简单练习:(包括c,shell脚本)
c脚本练习:
[root@localhost ~]# yum install gcc -y 安装gcc编译器
[root@localhost ~]# vim hello.c 编辑c语言文件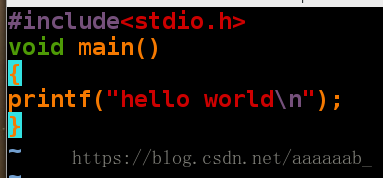
[root@localhost ~]# gcc hello.c  默认编译生成a.out文件
[root@localhost ~]# ls
anaconda-ks.cfg  Desktop    Downloads  ip_show.sh  Pictures  Templates
a.out            Documents  hello.c    Music       Public    Videos
[root@localhost ~]# ./a.out  执行编译之后的a.out文件
hello world
[root@localhost ~]# gcc hello.c -o hello -o表示编译成为自己想要的文件名字
[root@localhost ~]# ls
anaconda-ks.cfg  Desktop    Downloads  hello.c     Music     Public     Videos
a.out            Documents  hello      ip_show.sh  Pictures  Templates
[root@localhost ~]# ./hello  运行c脚本
hello world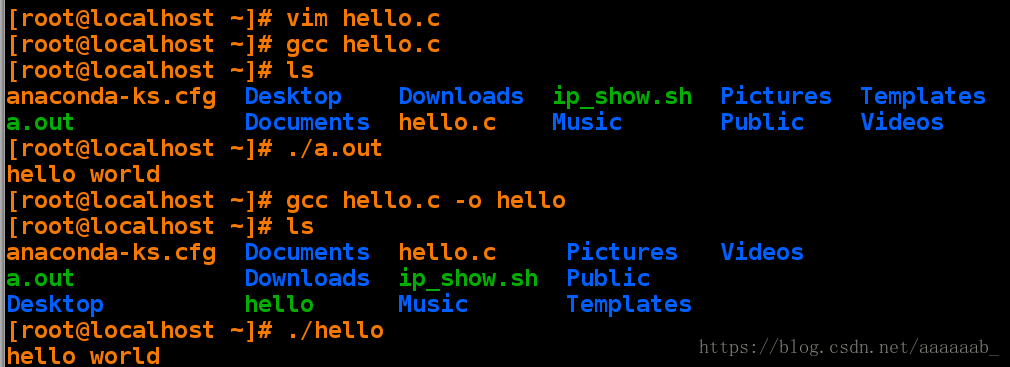
shell脚本练习:
[root@localhost ~]# vim ip_show.sh 编辑脚本,直接打印自己的IP,已知自己的IP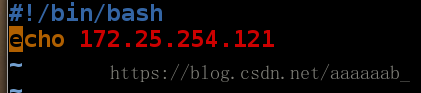
[root@localhost ~]# sh ip_show.sh   用sh方式调用
172.25.254.121
[root@localhost ~]# chmod +x ip_show.sh  赋予执行权限调用
[root@localhost ~]# pwd 查看当前路径
/root
[root@localhost ~]# /root/ip_show.sh  绝对方式调用脚本
172.25.254.121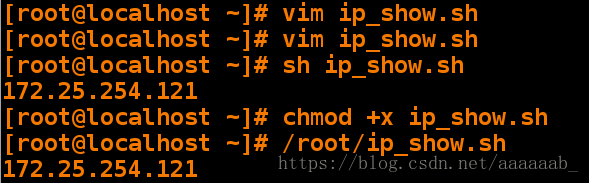
[root@localhost ~]# vim ip_show.sh 用命令ifconfig eth0显示ip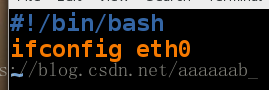
[root@localhost ~]# sh ip_show.sh  调用
eth0: flags=4163<UP,BROADCAST,RUNNING,MULTICAST>  mtu 1500
        inet 172.25.254.121  netmask 255.255.255.0  broadcast 172.25.254.255
        inet6 fe80::5054:ff:feed:2ec6  prefixlen 64  scopeid 0x20<link>
        ether 52:54:00:ed:2e:c6  txqueuelen 1000  (Ethernet)
        RX packets 2135  bytes 30343165 (28.9 MiB)
        RX errors 0  dropped 0  overruns 0  frame 0
        TX packets 1216  bytes 132752 (129.6 KiB)
        TX errors 0  dropped 0 overruns 0  carrier 0  collisions 0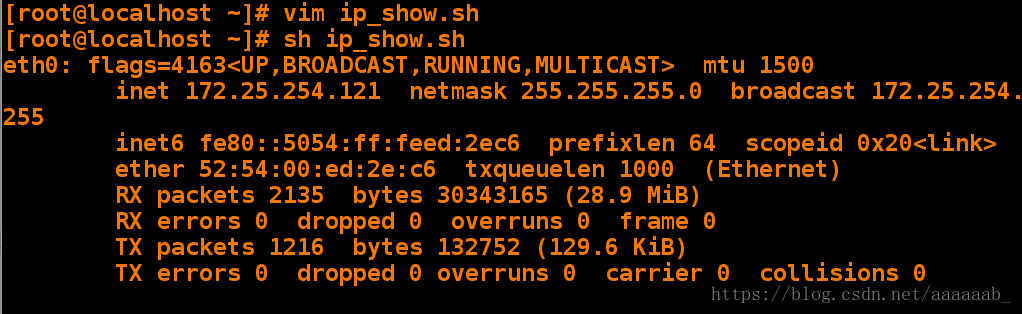
[root@localhost ~]# vim ip_show.sh 用命令ifconfig显示ip,避免网卡不一致
[root@localhost ~]# sh ip_show.sh  sh方式运行脚本
eth0: flags=4163<UP,BROADCAST,RUNNING,MULTICAST>  mtu 1500
        inet 172.25.254.121  netmask 255.255.255.0  broadcast 172.25.254.255
        inet6 fe80::5054:ff:fedf:3315  prefixlen 64  scopeid 0x20<link>
        ether 52:54:00:df:33:15  txqueuelen 1000  (Ethernet)
        RX packets 19824  bytes 31597005 (30.1 MiB)
        RX errors 0  dropped 0  overruns 0  frame 0
        TX packets 3369  bytes 286735 (280.0 KiB)
        TX errors 0  dropped 0 overruns 0  carrier 0  collisions 0

eth1: flags=4163<UP,BROADCAST,RUNNING,MULTICAST>  mtu 1500
        ether 52:54:00:ce:c4:da  txqueuelen 1000  (Ethernet)
        RX packets 15808  bytes 1115166 (1.0 MiB)
        RX errors 0  dropped 0  overruns 0  frame 0
        TX packets 0  bytes 0 (0.0 B)
        TX errors 0  dropped 0 overruns 0  carrier 0  collisions 0

lo: flags=73<UP,LOOPBACK,RUNNING>  mtu 65536
        inet 127.0.0.1  netmask 255.0.0.0
        inet6 ::1  prefixlen 128  scopeid 0x10<host>
        loop  txqueuelen 0  (Local Loopback)
        RX packets 27  bytes 2540 (2.4 KiB)
        RX errors 0  dropped 0  overruns 0  frame 0
        TX packets 27  bytes 2540 (2.4 KiB)
        TX errors 0  dropped 0 overruns 0  carrier 0  collisions 0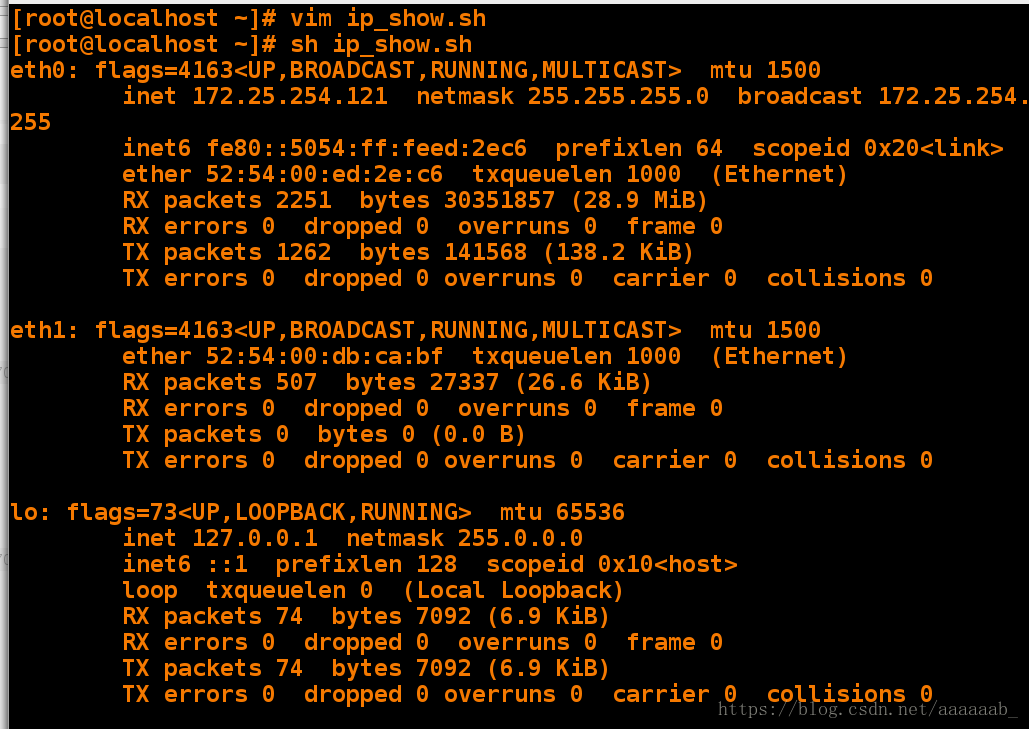
[root@localhost ~]# cd /mnt
[root@localhost mnt]# ls
[root@localhost mnt]# vim hello.sh 编写shell脚本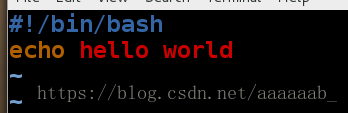
[root@localhost mnt]# sh hello.sh  sh调用
hello world
[root@localhost mnt]# chmod +x hello.sh  赋予权限
[root@localhost mnt]# /mnt/hello.sh  绝对路径调用
hello world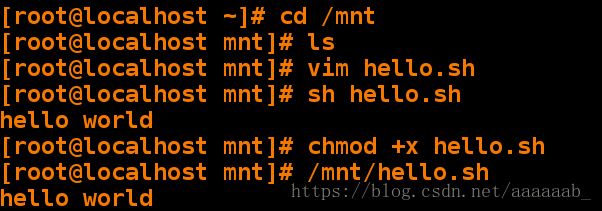
自动给shell脚本赋予头文件以及解释信息:
[root@localhost mnt]# vim /etc/vimrc 编辑主配置文件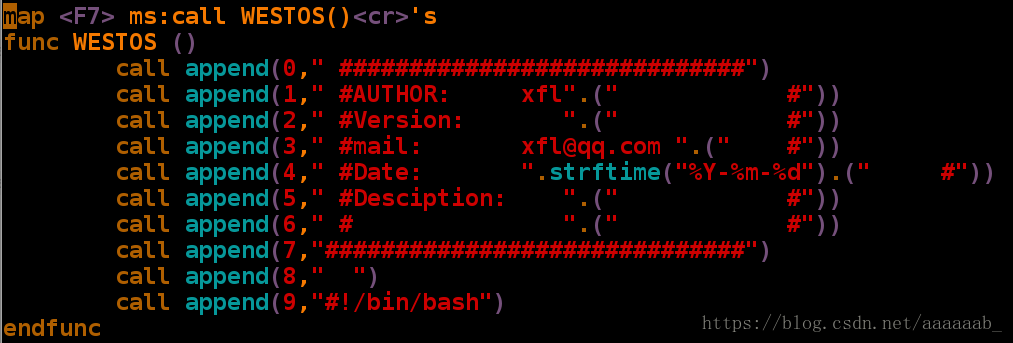
[root@localhost mnt]# vim aa.sh 进入sh结尾的文件按F7会出来我们所显示的信息,但是每次这样按键特别麻烦打开文件为空白:
按一下F7(这里的按键是由我们自己设置的,找一个电脑空着的快捷键):
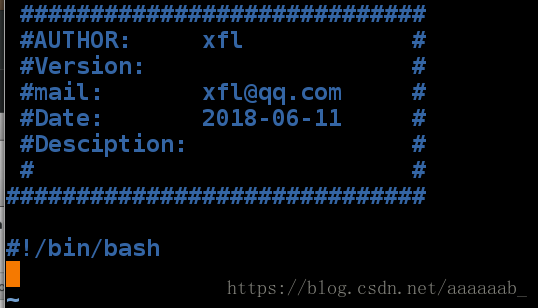
[root@localhost mnt]# vim /etc/vimrc  编辑主配置文件,自动给sh结尾的新文件添加信息。
注释按键行只需要在行首一个双引号即可。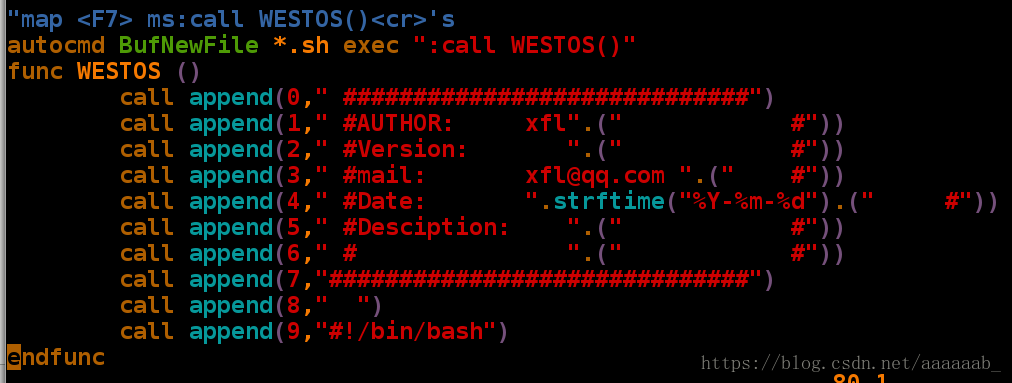
[root@localhost mnt]# vim bb.sh   以sh结尾的新文件才会显示信息
[root@localhost mnt]# cat bb.sh
 #############################
 #AUTHOR:     xfl            #
 #Version:                   #
 #mail:       [email protected]     #
 #Date:       2018-06-09     #
 #Desciption:                #
 #                           #
##############################

#!/bin/bash
[root@localhost mnt]# vim bb.sh 再次编辑因为不是新文件,只会生成一次
[root@localhost mnt]# cat bb.sh
 #############################
 #AUTHOR:     xfl            #
 #Version:                   #
 #mail:       [email protected]     #
 #Date:       2018-06-09     #
 #Desciption:                #
 #                           #
##############################

#!/bin/bash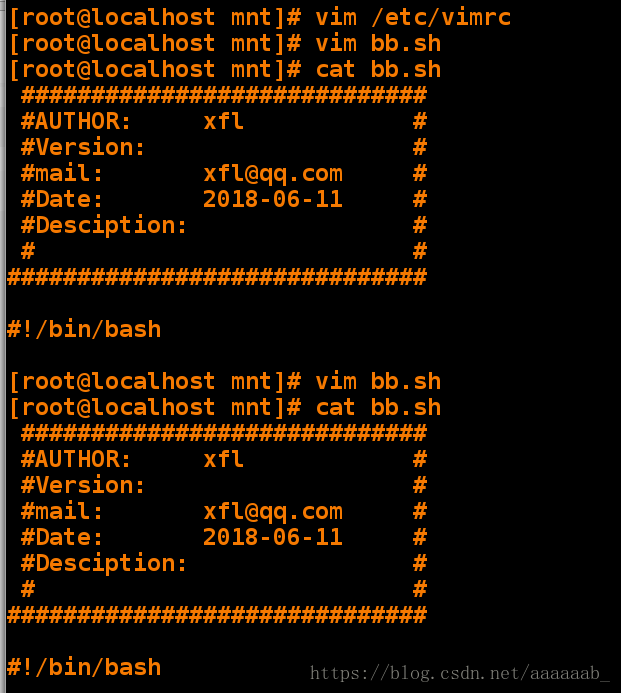
[root@localhost mnt]# vim cc.sh  编辑新文件会再次生成
[root@localhost mnt]# cat cc.sh
 #############################
 #AUTHOR:     xfl            #
 #Version:                   #
 #mail:       [email protected]     #
 #Date:       2018-06-09     #
 #Desciption:                #
 #                           #
##############################

#!/bin/bash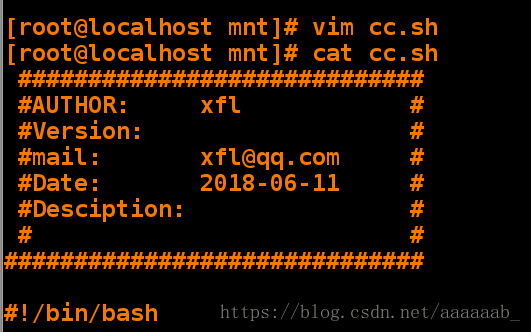
shell的常用命令操作:
[root@localhost mnt]# ls
[root@localhost mnt]# vim westos  编辑两个不同的文件
[root@localhost mnt]# cat westos
hello 123
westos
[root@localhost mnt]# vim westos1
[root@localhost mnt]# cat westos1
hello 123
[root@localhost mnt]# diff westos westos1 比较
2d1   意思是将第一个文件的第二行删除就变成第二个文件
< westos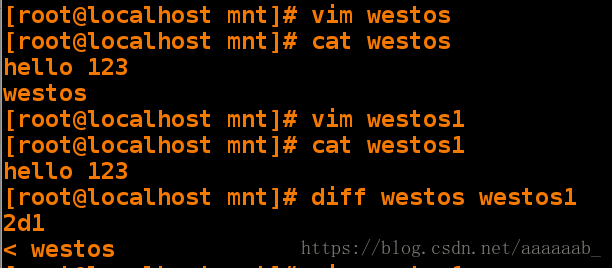
[root@localhost mnt]# vim westos1
[root@localhost mnt]# cat westos1
hello 123
linux
[root@localhost mnt]# diff westos westos1  比较
2c2  意思就是将第一个文件的第二行改变就变成第二个文件
< westos
---
> linux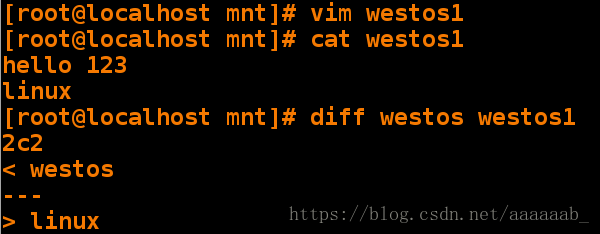
[root@localhost mnt]# vim westos
[root@localhost mnt]# cat westos
hello 123
[root@localhost mnt]# diff westos westos1 比较
1a2 意思就是第一个文件添加linux就变成第二个文件
> linux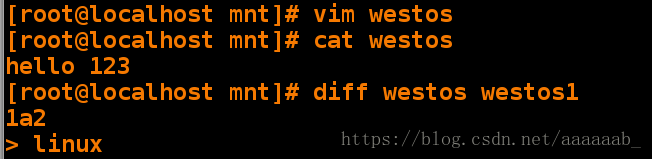
[root@localhost mnt]# ls
westos  westos1
[root@localhost mnt]# diff -u westos westos1  创建补丁文件
--- westos  2018-06-09 22:47:10.397772937 -0400
+++ westos1 2018-06-09 22:46:44.134772937 -0400
@@ -1 +1,2 @@
 hello 123
+linux
[root@localhost mnt]# diff -u westos westos1 > westos.path 将补丁文件重定向到westos.path
[root@localhost mnt]# cat westos.path  查看补丁保存文件
--- westos  2018-06-09 22:47:10.397772937 -0400
+++ westos1 2018-06-09 22:46:44.134772937 -0400
@@ -1 +1,2 @@
 hello 123
+linux
[root@localhost mnt]# yum install patch -y 安装补丁命令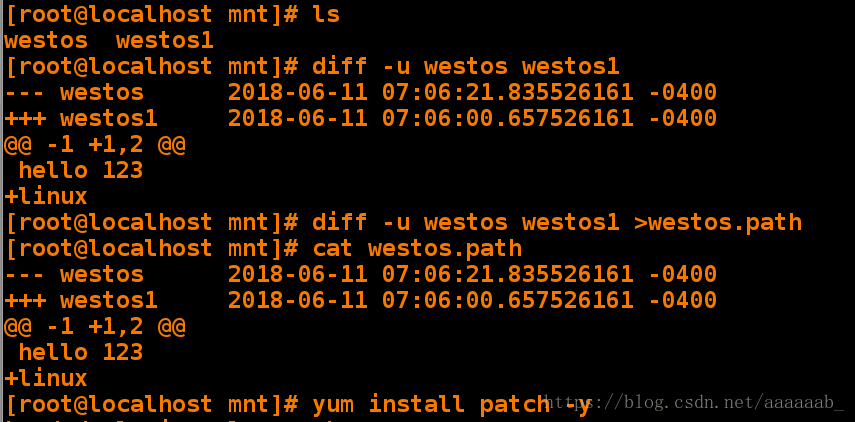
[root@localhost mnt]# ls
westos  westos1  westos.path
[root@localhost mnt]# patch westos westos.path 执行补丁文件
patching file westos
[root@localhost mnt]# ls
westos  westos1  westos.path
[root@localhost mnt]# cat westos 两个文件通过补丁操作变成一样的
hello 123
linux
[root@localhost mnt]# cat westos1
hello 123
linux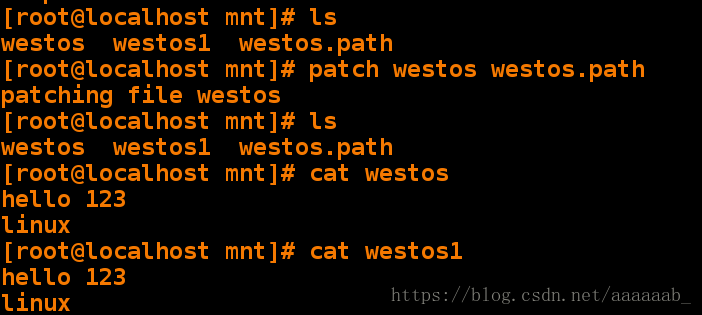
[root@localhost mnt]# vim westos  更改成不一样的两个文件
[root@localhost mnt]# cat westos
hello 123
[root@localhost mnt]# patch -b westos westos.path 保存源文件
patching file westos
[root@localhost mnt]# ls
westos  westos1  westos.orig  westos.path
[root@localhost mnt]# cat westos.orig  源文件
hello 123
[root@localhost mnt]# cat westos
hello 123
linux
[root@localhost mnt]# ls
westos  westos1  westos.orig  westos.path
[root@localhost mnt]# mkdir linux unix
[root@localhost mnt]# touch linux/aa
[root@localhost mnt]# touch unix/bb
[root@localhost mnt]# diff -r linux/ unix/ 比较目录
Only in linux/: aa
Only in unix/: bb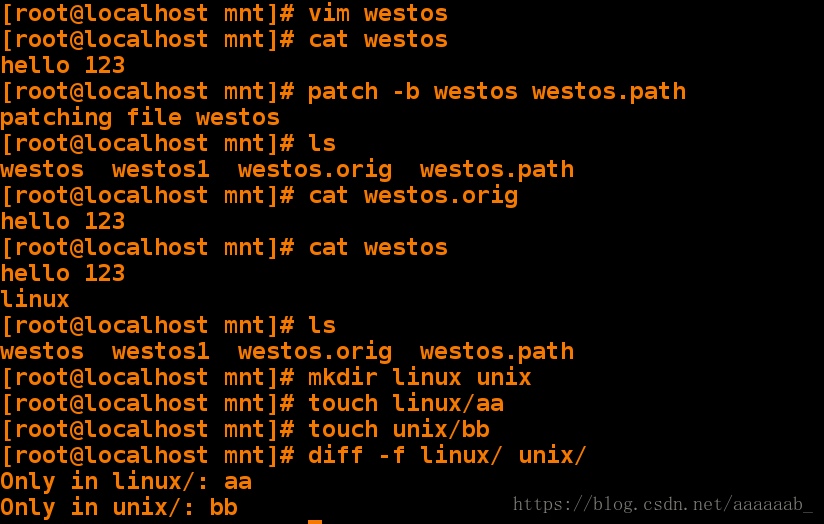
cut命令:多用于字符截取:
cut -d 指定分隔符
cut -f   1,7|1-7 指定截取的列
cut -c   1,4|1-4 指定截取的字符位置
cut命令用法演示:
[root@localhost mnt]# rm -fr *
[root@localhost mnt]# cp /etc/passwd .
[root@localhost mnt]# ls
passwd
[root@localhost mnt]# vim passwd
[root@localhost mnt]# cat passwd
root:x:0:0:root:/root:/bin/bash
bin:x:1:1:bin:/bin:/sbin/nologin
[root@localhost mnt]# cut -d : -f 1 passwd -d指定分隔符
root
bin
[root@localhost mnt]# cut -d : -f 1,2 passwd  -f指定截取的列
root:x
bin:x
[root@localhost mnt]# cut -d : -f 1-3 passwd
root:x:0
bin:x:1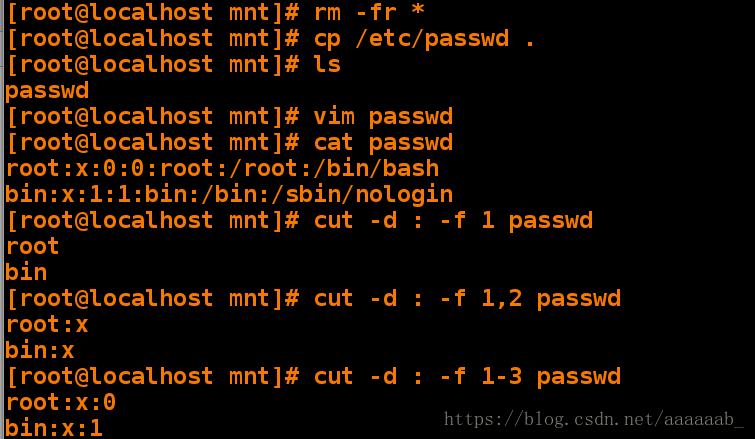
[root@localhost mnt]# cut -d : -f 1- passwd
root:x:0:0:root:/root:/bin/bash
bin:x:1:1:bin:/bin:/sbin/nologin
[root@localhost mnt]# cut -d : -f 3- passwd
0:0:root:/root:/bin/bash
1:1:bin:/bin:/sbin/nologin
[root@localhost mnt]# cut -c 1,3 passwd   -c指定截取的字符位置
ro
bn
[root@localhost mnt]# cut -c 1-3 passwd
roo
bin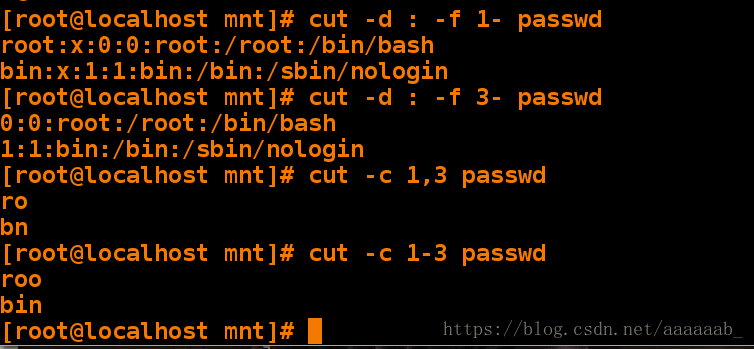
脚本1显示自己电脑的IP:
[root@localhost mnt]# vim ipshow.sh 编辑脚本文件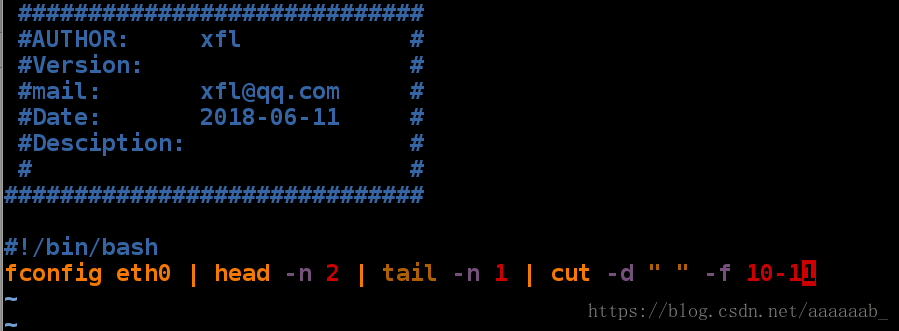
[root@localhost mnt]# sh ipshow.sh 直接显示自己的IP
172.25.254.121 
脚本2显示自己电脑的IP:
[root@localhost mnt]# vim ipshow.sh 编辑脚本文件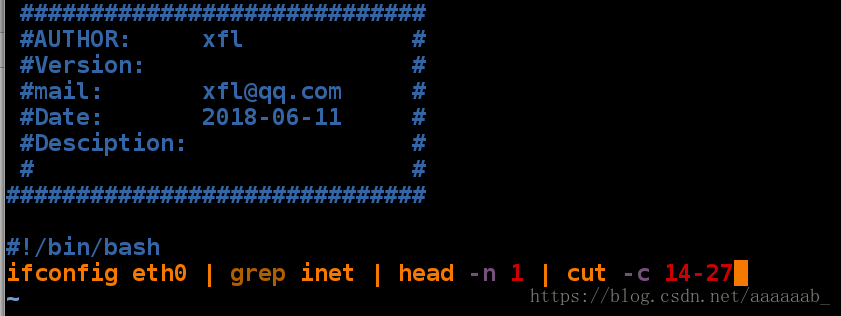
[root@localhost mnt]# sh ipshow.sh 直接显示自己的IP
172.25.254.121 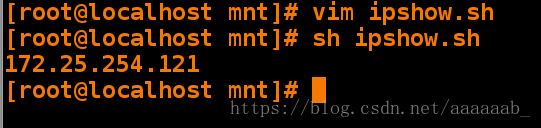
脚本3显示自己电脑的IP:
[root@localhost mnt]# vim ipshow.sh 编辑脚本文件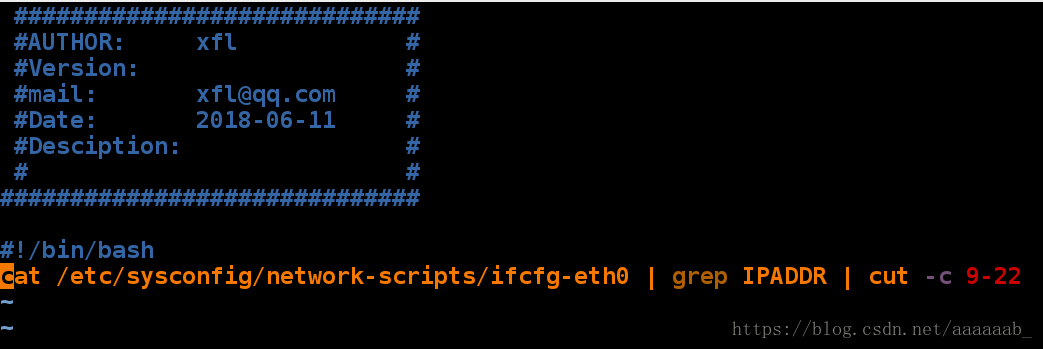
[root@localhost mnt]# sh ipshow.sh 直接显示自己的IP
172.25.254.121 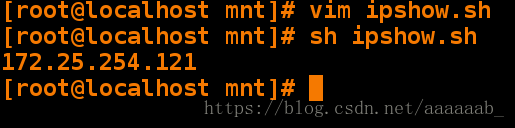
但是这三个脚本都存在BUG:
脚本4显示自己电脑的IP:(用awk命令呈现)
[root@localhost mnt]# vim ipshow.sh 编辑脚本文件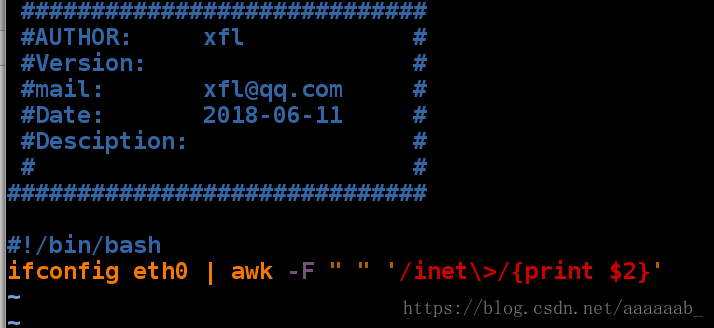
[root@localhost mnt]# sh ipshow.sh  调用脚本文件
172.25.254.121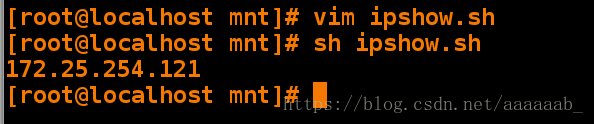
脚本出错的检测:
[root@localhost mnt]# vim ipshow.sh
[root@localhost mnt]# sh ipshow.sh  脚本出错的检测
ipshow.sh: line 11: ifconfg: command not found   ifconfig命令写错
[root@localhost mnt]# sh -x ipshow.sh  -x检测脚本
+ ifconfg eth0
ipshow.sh: line 11: ifconfg: command not found
+ awk -F ' ' '/inet\>/{print $2}'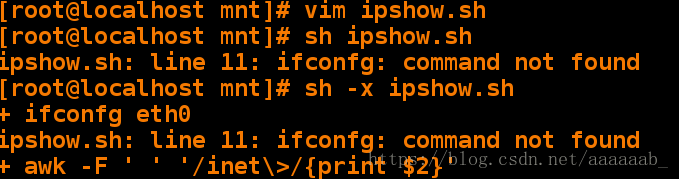
[root@localhost mnt]# vim ipshow.sh  修改之后检测
[root@localhost mnt]# sh -x ipshow.sh  已经有了运行结果
+ ifconfig eth0
+ awk -F ' ' '/inet\>/{print $2}'
172.25.254.121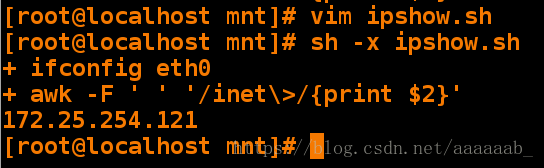
&&和||命令:
&&用来执行条件成立后执行的命令
||用来执行条件不成立后执行的命令
c次数,w等待时间[root@localhost mnt]# ping -c1 -w1 172.25.254.121 &> /dev/null
[root@localhost mnt]# ping -c1 -w1 172.25.254.121 &> /dev/null && echo 172.25.254.121 is up || echo 172.25.254.121 is down 意思就是满足条件输出172.25.254.121 is up,不满足条件输出172.25.254.121 is down
172.25.254.121 is up
[root@localhost mnt]# ping -c1 -w1 172.25.254.333 &> /dev/null && echo 172.25.254.333 is up || echo 172.25.254.333 is down 意思就是满足条件输出172.25.254.333 is up,不满足条件输出172.25.254.333 is down
172.25.254.333 is down
检测ip是否运行脚本:
[root@localhost mnt]# vim check_ip.sh 编写脚本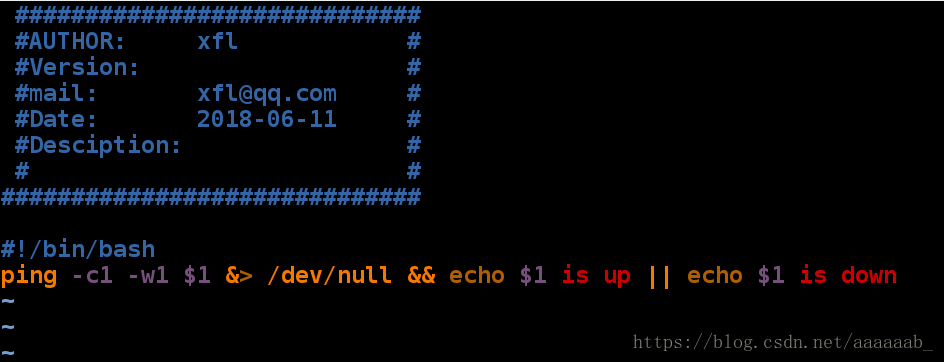
[root@localhost mnt]# sh check_ip.sh 172.25.254.111 调用脚本检测(这里还有一种后面不加IP的BUG,后面来解决输出为空的情况)
172.25.254.111 is up
[root@localhost mnt]# sh check_ip.sh 172.25.254.232
172.25.254.232 is down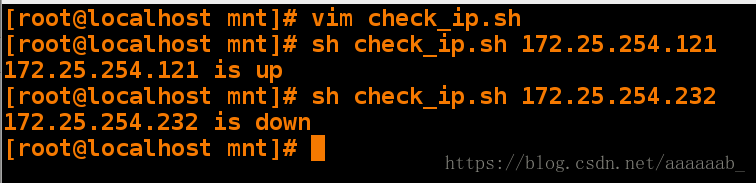
sort命令多用于字符排序:
sort -n   纯数字排序
sort -r   倒序
sort -u   去掉重复数字
sort -o   输出到指定文件中
sort -t   指定分隔符
sort -k   指定要排序的列
uniq命令对重复字符做相应的处理
uniq -u  显示唯一的行
uniq -d  显示重复的行
uniq -c  每行显示一次并统计重复次数
sort和uniq命令经常一起使用:
[root@localhost mnt]# rm -fr *
[root@localhost mnt]# ls
[root@localhost mnt]# vim westos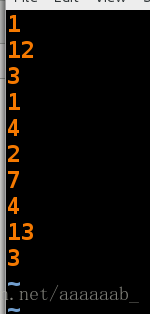
[root@localhost mnt]# sort westos 只会对第一行排序
1
1
12
13
2
3
3
4
4
7
[root@localhost mnt]# sort -n westos 纯数字排序
1
1
2
3
3
4
4
7
12
13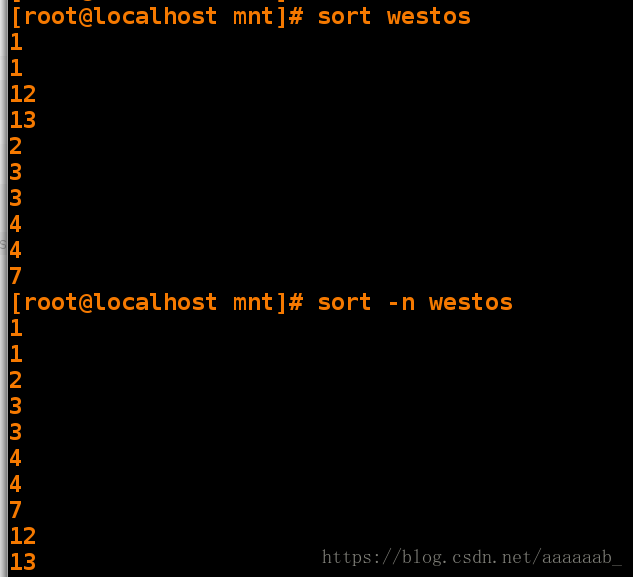
[root@localhost mnt]# sort -rn westos 纯数字倒序排序
13
12
7
4
4
3
3
2
1
1
[root@localhost mnt]# sort -rnu westos  纯数字倒序排序去掉重复数字
13
12
7
4
3
2
1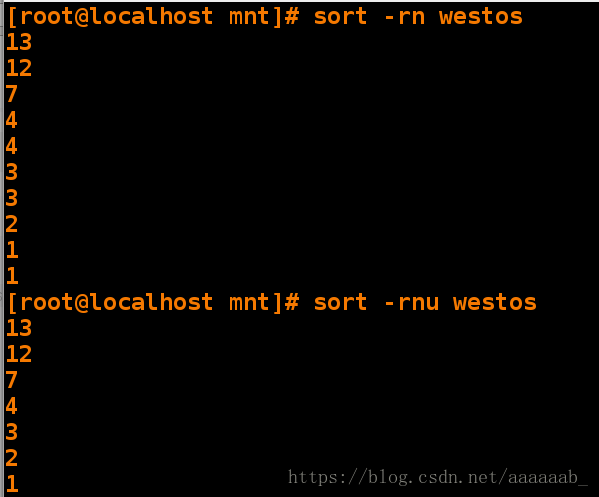
[root@localhost mnt]# sort -rnu westos -o file 纯数字倒序排序去掉重复数字重定向到文件中
[root@localhost mnt]# cat file
13
12
7
4
3
2
1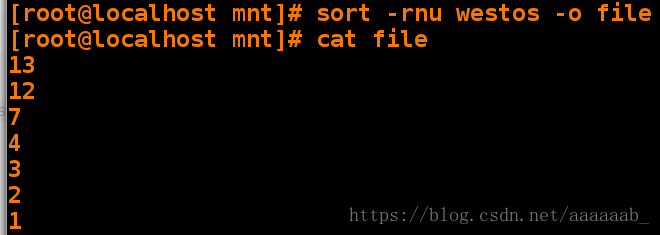
[root@localhost mnt]# vim westos 写入分隔符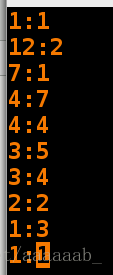
[root@localhost mnt]# sort -rn westos  有分隔符单纯无法排列,只对第一行排序
13:5
12:2
7:1
4:7
4:4
3:5
3:4
2:2
1:3
1:1
[root@localhost mnt]# sort -rn westos -t : -k 2 指定分隔符为:指定列数为第二列进行排序
4:7
3:5
13:5
4:4
3:4
1:3
2:2
12:2
7:1
1:1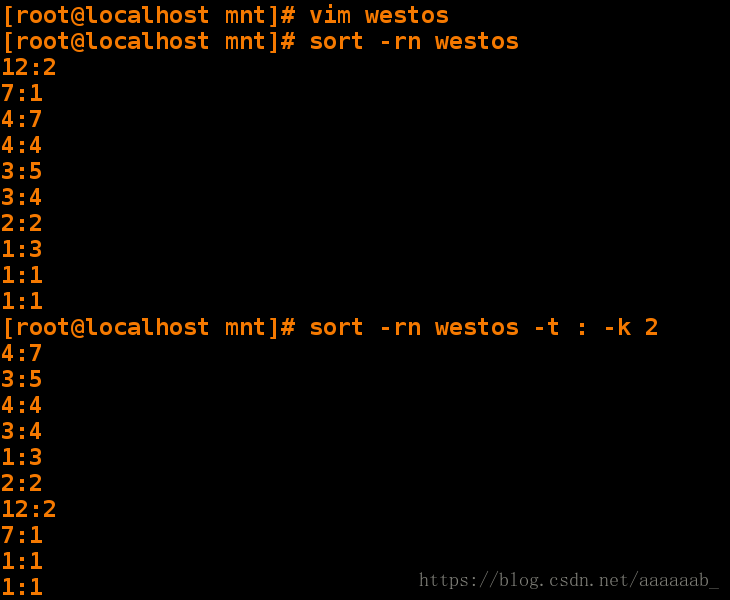
[root@localhost mnt]# vim westos 随即编写一串数字,演示uniq命令和sort命令的结合
[root@localhost mnt]# sort -n westos | uniq -u  显示唯一的行
6
7
[root@localhost mnt]# sort -n westos | uniq -d  显示重复的行
2
3
4
5
[root@localhost mnt]# sort -n westos | uniq -c 每行显示一次并统计重复次数,前边是字符出现的次数
      3 2
      2 3
      2 4
      2 5
      1 6
      1 7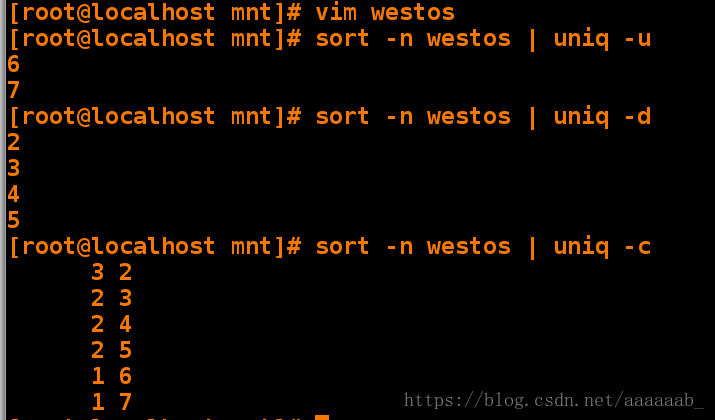
编写脚本列出/mnt目录中最大文件的名称:
[root@localhost mnt]# vim check_file.sh 编辑脚本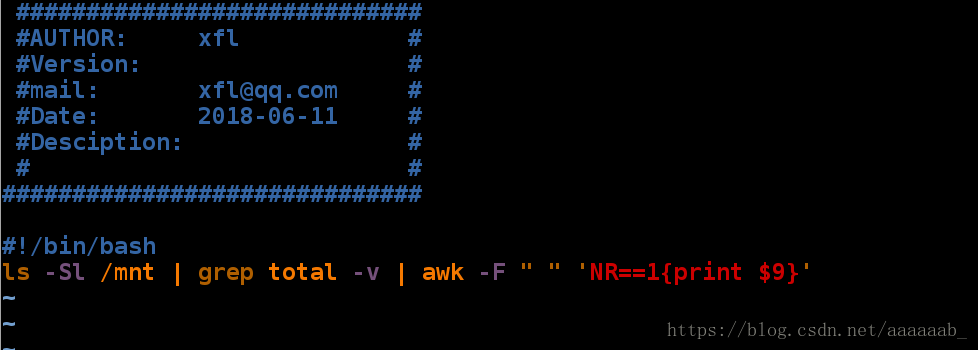
[root@localhost mnt]# ls -Sl /mnt     /mnt目录中文件大小不同
total 12
-rw-r--r-- 1 root root 322 Jun 11 08:03 check_file.sh
-rw-r--r-- 1 root root 278 Jun 11 08:03 bb.sh
-rw-r--r-- 1 root root 272 Jun 11 08:02 aa.sh
[root@localhost mnt]# sh check_file.sh    调用脚本可以找到最大的文件
check_file.sh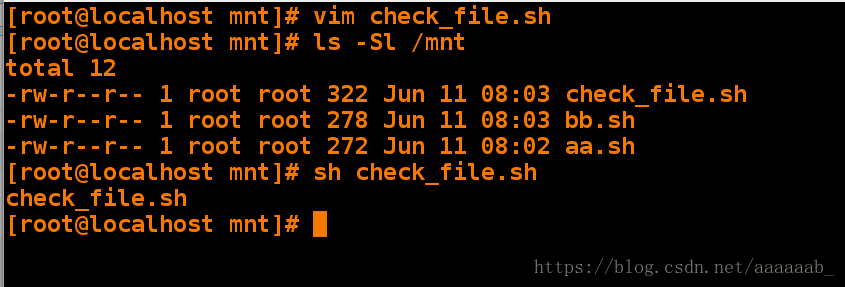
test 命令:
test命令和[]等同
test "$A" == "$B" 等同[ "$A" == "$B" ]
[ "$A" = "$B" ] 等于
[ "$A" = "$B" ] 不等于
[ "$A" -eq "$B" ] 等于
[ "$A" -ne "$B" ] 不等于
[ "$A" -le "$B" ] 小于等于
[ "$A" -lt "$B" ] 小于
[ "$A" -ge "$B" ] 大于等于
[ "$A" -gt "$B" ] 大于
-a代表与操作
-o代表或操作
-z为空[ -z "$A" ]
-n不为空 [ -n "$A" ]
用test命令解决测试ip时不输入IP出现的bug
[root@localhost mnt]# vim ip_show.sh 编写脚本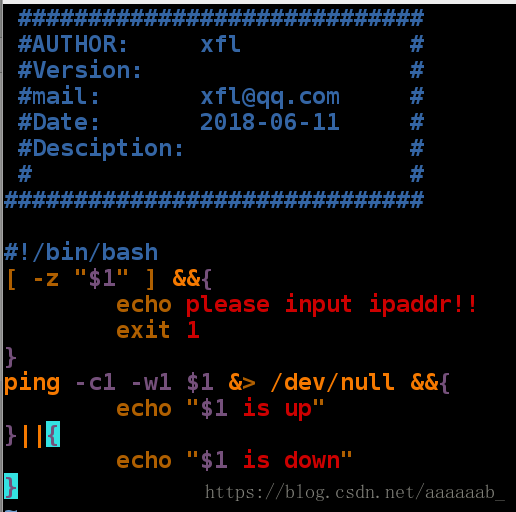
[root@localhost mnt]# chmod +x /mnt/ip_show.sh  赋予权限
[root@localhost mnt]# /mnt/ip_show.sh   运行脚本
please input ipaddr!!
[root@localhost mnt]# /mnt/ip_show.sh 172.25.254.111  调用脚本
172.25.254.111 is down
判断一个数字是否在1到10之间:
[root@localhost mnt]# vim nm_check.sh 编写脚本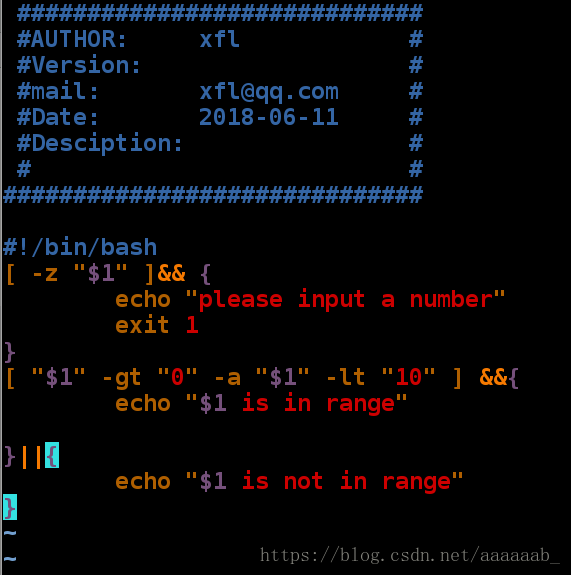
[root@localhost mnt]# chmod +x nm_check.sh  赋予执行权限
[root@localhost mnt]# /mnt/nm_check.sh   调用
please input a number
[root@localhost mnt]# /mnt/nm_check.sh 44
44 is not in range
[root@localhost mnt]# /mnt/nm_check.sh 4
4 is in range
ef,nt,ot命令:
ef表示互为硬连接
nt表示新的时间
ot表示旧的时间[root@localhost mnt]# ls
[root@localhost mnt]# touch file
[root@localhost mnt]# ln /mnt/file /mnt/file1 ln命令代表建立同样的链接
[root@localhost mnt]# ll
total 0
-rw-r--r-- 2 root root 0 Jun 10 02:59 file
-rw-r--r-- 2 root root 0 Jun 10 02:59 file1
[root@localhost mnt]# ls -li * 两个文件完全相同
11786435 -rw-r--r-- 2 root root 0 Jun 10 02:59 file
11786435 -rw-r--r-- 2 root root 0 Jun 10 02:59 file1
[root@localhost mnt]# [ "/mnt/file" -ef "/mnt/file1" ]&& echo yes || echo no 文件完全相同互为硬链接返回yes
yes
[root@localhost mnt]# [ "/mnt/file" -ef "/etc/passwd" ]&& echo yes || echo no 文件不相同不为硬链接返回no
no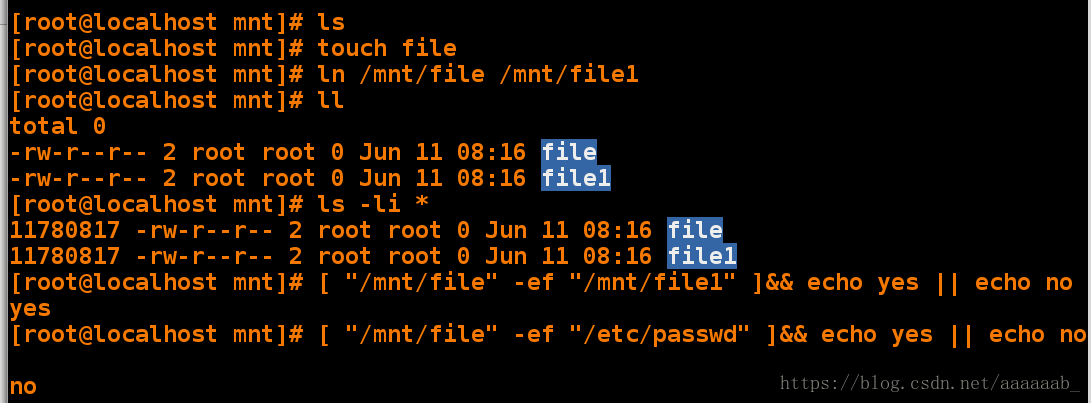
[root@localhost mnt]# ls
file  file1
[root@localhost mnt]# rm -fr file1
[root@localhost mnt]# ll
total 0
-rw-r--r-- 1 root root 0 Jun 10 02:59 file
[root@localhost mnt]# touch file1   建立文件
[root@localhost mnt]# ll
total 0
-rw-r--r-- 1 root root 0 Jun 10 02:59 file
-rw-r--r-- 1 root root 0 Jun 10 03:02 file1   建立时间晚于file
[root@localhost mnt]# [ "file" -ot "file1" ]&& echo yes || echo no  file1建立时间晚于file,用ot返回yes
yes
[root@localhost mnt]# [ "file" -nt "file1" ]&& echo yes || echo no file1建立时间晚于file,用nt返回no
no
test 命令:
[ -e "file" ]是否存在
[ -f "file" ]是否为普通文件
[ -L "file" ]是否为软链接
[ -S "file" ]是否为套接字
[ -b "file" ]是否为块设备
[ -d "file" ]是否为目录
[ -c "file" ]是否为字符设备[root@localhost mnt]# vim file.sh 建立脚本方便文件类型的测试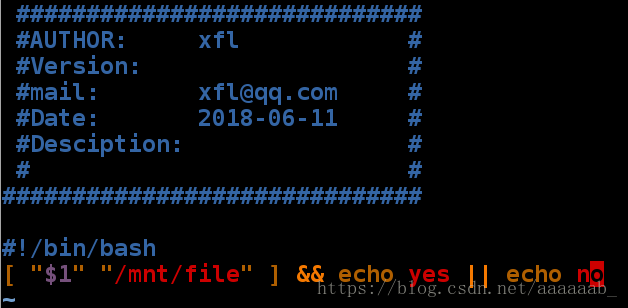
[root@localhost mnt]# ls
file  file1  file.sh
[root@localhost mnt]# rm -fr file file1
[root@localhost mnt]# ls
file.sh
[root@localhost mnt]# sh file.sh -e  文件不存在,为no
no
[root@localhost mnt]# touch file     建立文件
[root@localhost mnt]# sh file.sh -e  文件存在,为yes
yes
[root@localhost mnt]# sh file.sh -f  file为普通文件
yes
[root@localhost mnt]# sh file.sh -L  不是软链接
no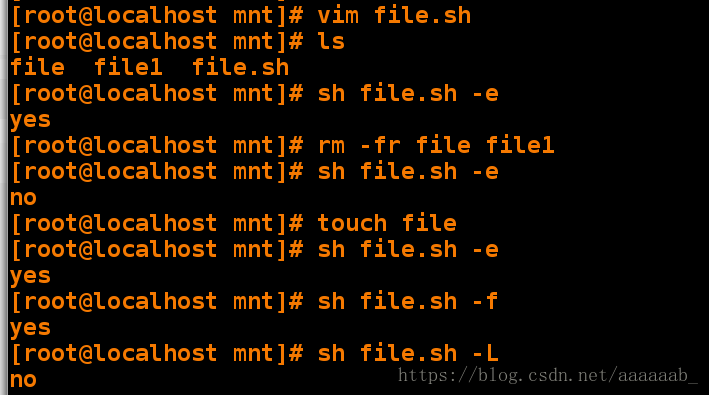
[root@localhost mnt]# ls
file  file.sh
[root@localhost mnt]# rm -fr file
[root@localhost mnt]# ln -s /mnt/file.sh /mnt/file 制作软链接
[root@localhost mnt]# ll
total 4
lrwxrwxrwx 1 root root  12 Jun 10 03:31 file -> /mnt/file.sh
-rw-r--r-- 1 root root 300 Jun 10 03:29 file.sh
[root@localhost mnt]# sh file.sh -L   file为软链接
yes
[root@localhost mnt]# sh file.sh -S   fle不是套接字
no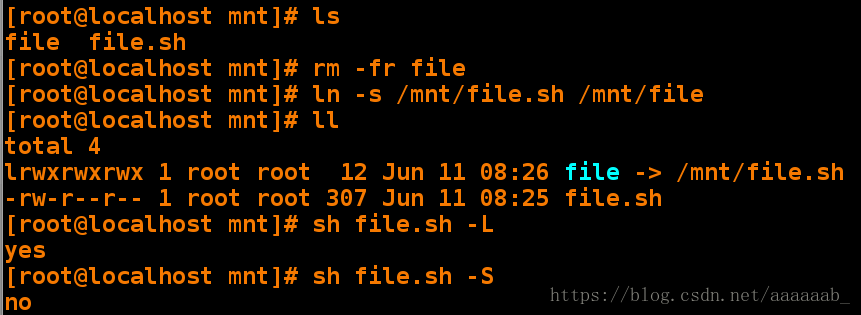
[root@localhost mnt]# yum install mariadb-server.x86_64  -y 安装数据库服务
[root@localhost mnt]# systemctl start mariadb 开启数据库服务
[root@localhost mnt]# ll /var/lib/mysql/ mysql.sock就是套接字
srwxrwxrwx 1 mysql mysql 0 Jun 11 08:28 /var/lib/mysql/mysql.sock
[root@localhost mnt]# rsync -D /var/lib/mysql/mysql.sock /mnt/file 远程传输套接字
[root@localhost mnt]# ll
total 4
srwxrwxrwx 1 root root   0 Jun 10 03:35 file
-rw-r--r-- 1 root root 300 Jun 10 03:29 file.sh
[root@localhost mnt]# sh file.sh -S  file是套接字
yes
[root@localhost mnt]# sh file.sh -b   file不是块设备
no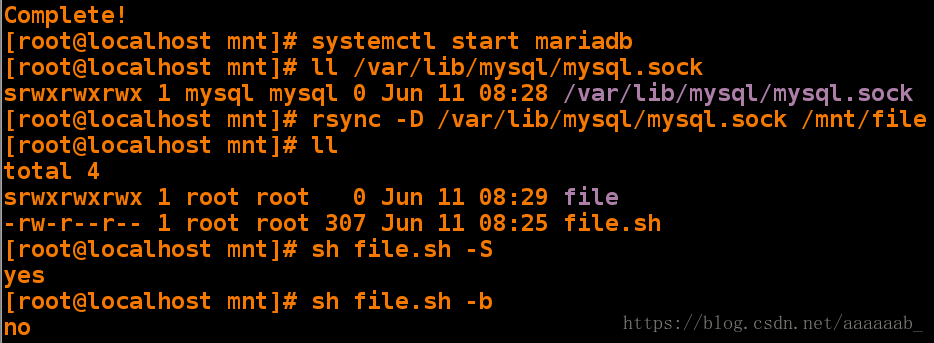
[root@localhost mnt]# ls
file  file.sh
[root@localhost mnt]# rm -fr file
[root@localhost mnt]# rsync -D /dev/vdb /mnt/file  远程传输块设备
[root@localhost mnt]# ll
total 4
brw-r----- 1 root root 253, 16 Jun 10 03:36 file
-rw-r--r-- 1 root root     300 Jun 10 03:29 file.sh
[root@localhost mnt]# sh file.sh -b  file  file是块设备
yes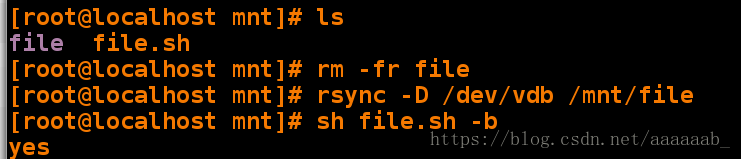
[root@localhost mnt]# rm -fr file
[root@localhost mnt]# mkdir /mnt/file  建立目录
[root@localhost mnt]# sh file.sh -b   file不是块设备
no
[root@localhost mnt]# sh file.sh -d   file是目录
yes
[root@localhost mnt]# sh file.sh -c   file不是字符设备
no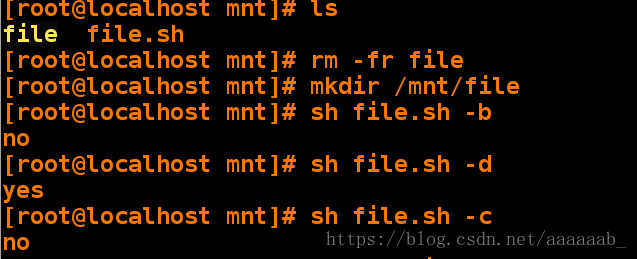
[root@localhost mnt]# rm -fr file
[root@localhost mnt]# rsync -D /dev/pts/1 /mnt/file  远程传输字符设备
[root@localhost mnt]# ll
total 4
crw------- 1 root root 136, 1 Jun 10 03:38 file
-rw-r--r-- 1 root root    300 Jun 10 03:29 file.sh
[root@localhost mnt]# sh file.sh -c  file为字符设备
yes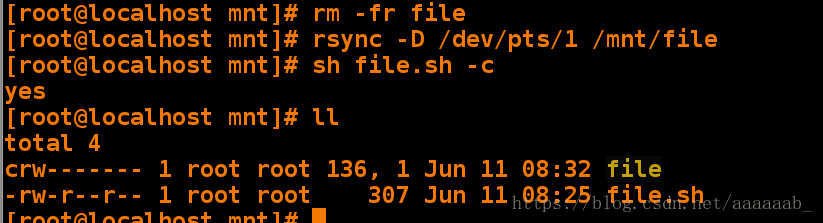
编辑一个脚本检测/mnt/file的文件类型:
[root@localhost mnt]# vim file_check.sh 编写脚本测试文件类型,就相当于把上面的命令依次测试一遍罢了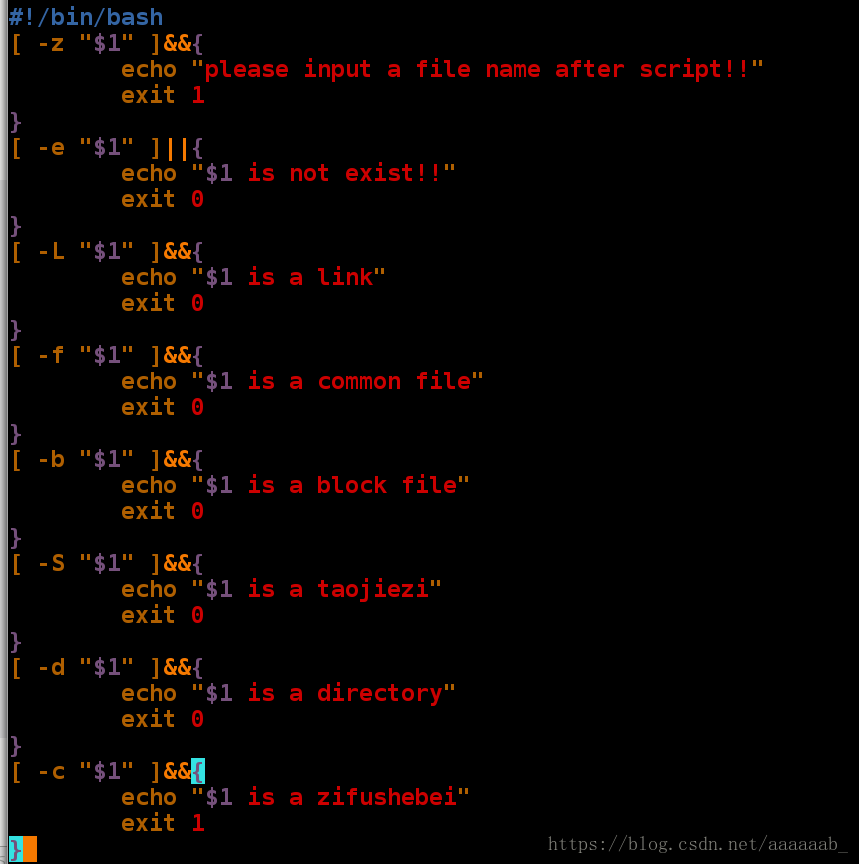
[root@localhost mnt]# sh file_check.sh   调用脚本查看类型
please input a file name after script!!
[root@localhost mnt]# sh file_check.sh /var/lib/mysql/mysql.sock
/var/lib/mysql/mysql.sock is a taojiezi
[root@localhost mnt]# sh file_check.sh /dev/vdb
/dev/vdb is a block file
[root@localhost mnt]# sh file_check.sh /dev/pts/1
/dev/pts/1 is a zifushebei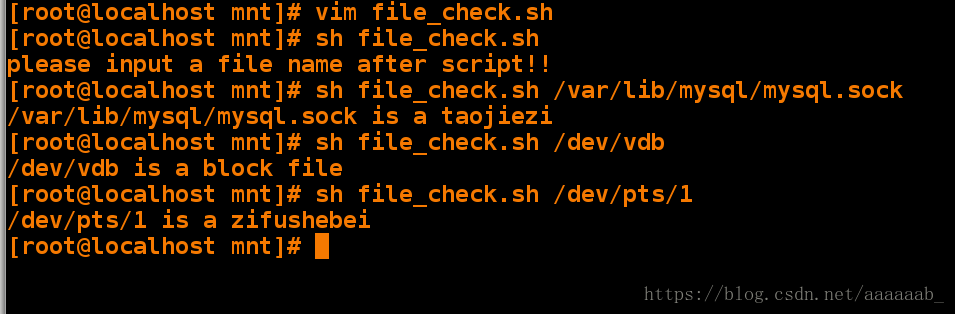
tr命令转换字符大小写:
[root@localhost mnt]# ls
[root@localhost mnt]# vim test.sh  区分大小写脚本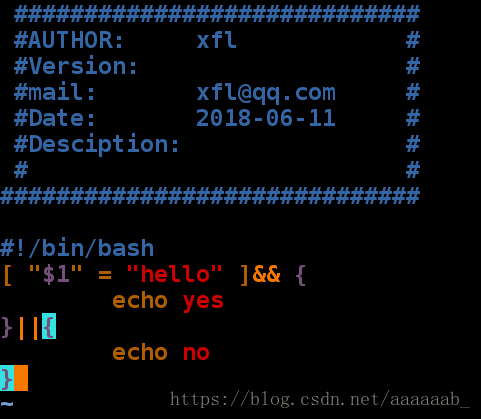
[root@localhost mnt]# sh test.sh
no
[root@localhost mnt]# sh test.sh hello  调用脚本测试
yes
[root@localhost mnt]# sh test.sh HELLO
no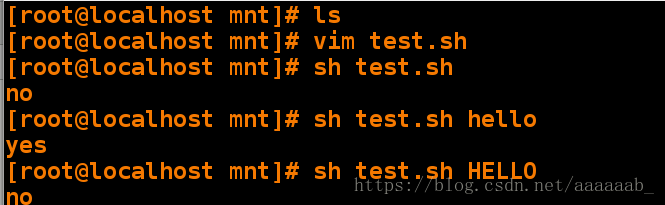
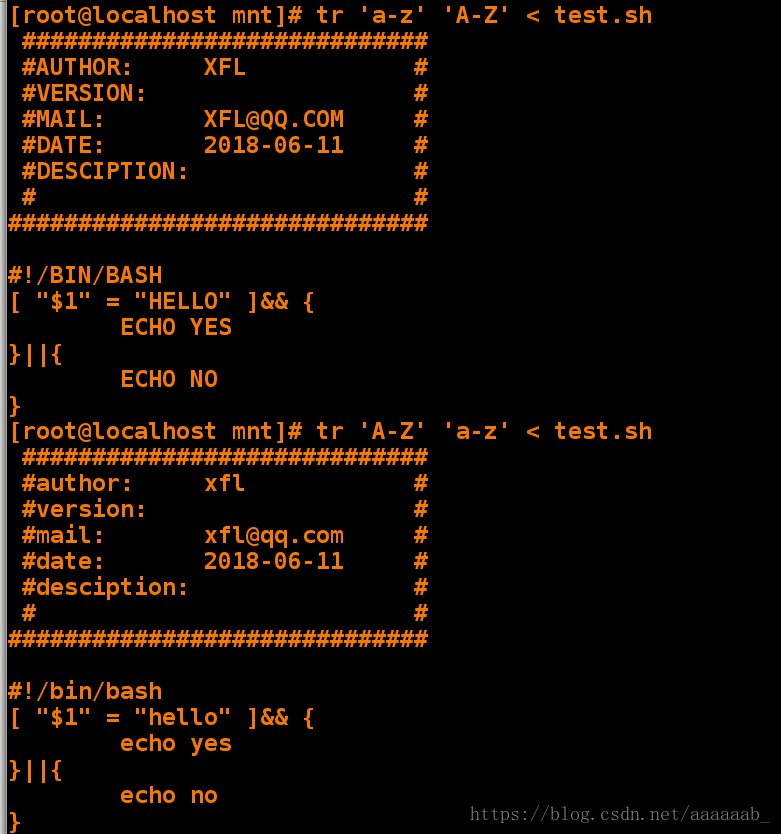
[root@localhost mnt]# tr 'a-z' 'A-Z' < test.sh  小写转换到大写
#############################
#AUTHOR:     XFL            #
#VERSION:                   #
#MAIL:       [email protected]     #
#DATE:       2018-06-10     #
#DESCIPTION:                #
#                           #
#############################

#!/BIN/BASH
[ "$1" = "HELLO" ]&& {
    ECHO YES
}||{
    ECHO NO
}
[root@localhost mnt]# tr 'A-Z' 'a-z' < test.sh 大写转换到小写
#############################
#author:     xfl            #
#version:                   #
#mail:       [email protected]     #
#date:       2018-06-10     #
#desciption:                #
#                           #
#############################

#!/bin/bash
[ "$1" = "hello" ]&& {
    echo yes
}||{
    echo no
}
[root@localhost mnt]# vim test.sh 不区分大小写脚本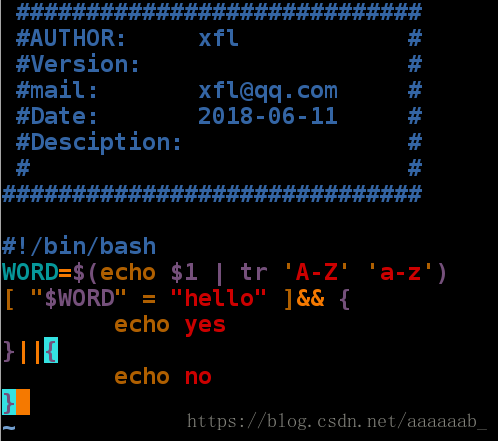
[root@localhost mnt]# sh test.sh hello     调用脚本测试
yes
[root@localhost mnt]# sh test.sh HELLO
yes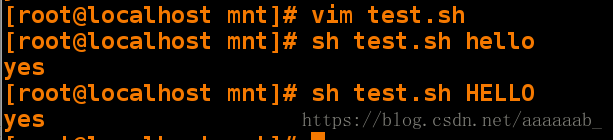
用脚本建立一个用户user1,密码为123,存在的话返回用户已经存在:
脚本1:
[root@localhost mnt]# vim user_create.sh 建立脚本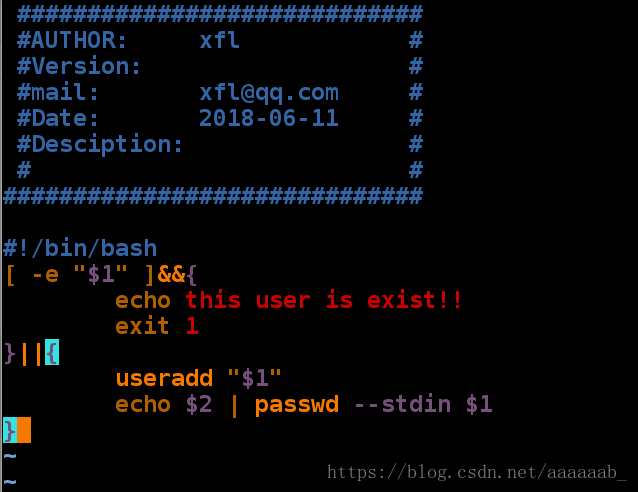
[root@localhost mnt]# sh user_create.sh xixi 123  调用脚本测试
useradd: user 'xixi' already exists
Changing password for user xixi.
passwd: all authentication tokens updated successfully.
脚本2:
[root@localhost mnt]# vim user1_create.sh  建立脚本
[root@localhost mnt]# cat user1_create.sh
#############################
#AUTHOR:     xfl            #
#Version:                   #
#mail:       [email protected]     #
#Date:       2018-06-10     #
#Desciption:                #
#                           #
#############################

#!/bin/bash   检测是否有两串字符
[ "$#" -eq "2" ]||{
    echo "please input username and password"
    exit 1
}

check_user=`getent passwd $1`  检测是否为用户
[ -n "$check_user" ]&&{
    echo $1 is exist!!
    exit 1
}

useradd $1   建立用户赋予密码
echo $2 | passwd --stdin $1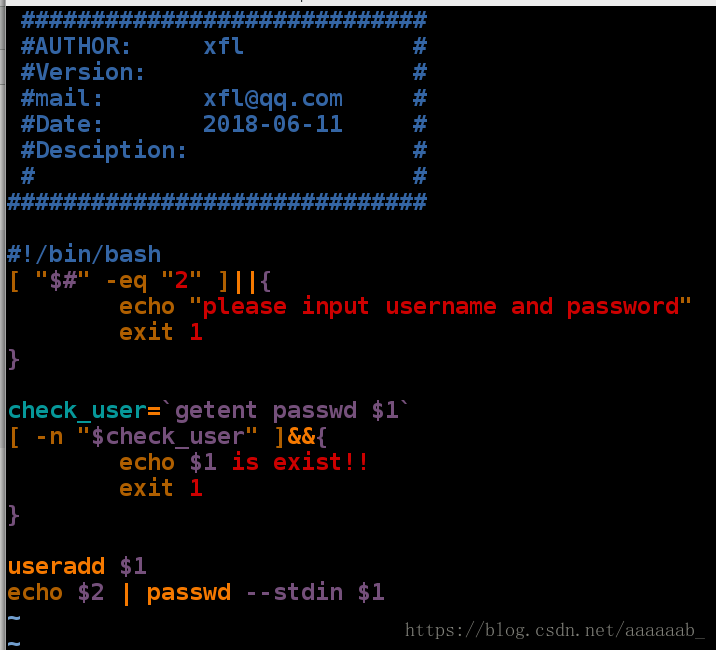
[root@localhost mnt]# sh user1_create.sh lalla 123  调用脚本
Changing password for user lalla.
passwd: all authentication tokens updated successfully.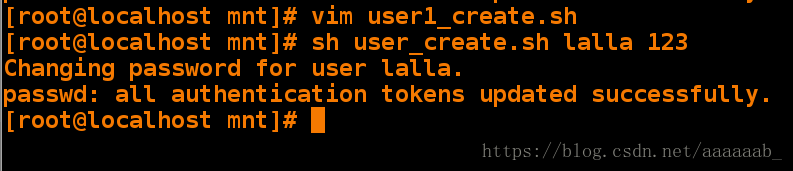
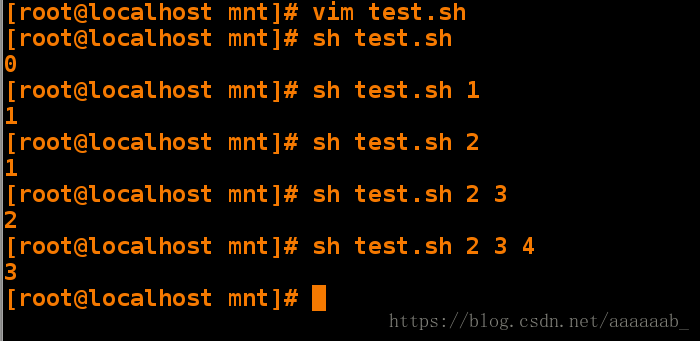
$#的用法,直接写入脚本测试:
[root@localhost mnt]# vim test.sh 写入$#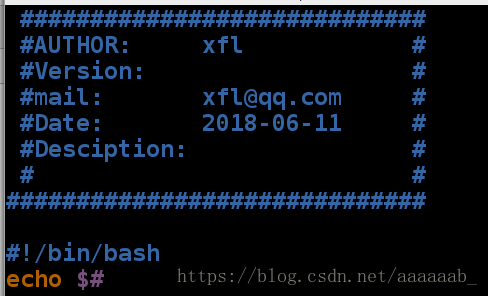
[root@localhost mnt]# sh test.sh    调用测试
0
[root@localhost mnt]# sh test.sh 1
1
[root@localhost mnt]# sh test.sh 2
1
[root@localhost mnt]# sh test.sh 2 3
2
[root@localhost mnt]# sh test.sh 2 3 4  由测试可知$#的用法是后面有几个参数返回几
3