你好!这里是风筝的博客,
欢迎和我一起交流。
我们知道,
Linux 内核驱动可以都是遵循一个逐层抽象的架构:
最上层的抽象层便于系统软件的访问,
中间层的实现硬件协议细节,同时提供上下两层连接的接口,
对于最下层的 driver 来说就是要定义底层驱动要实现的接口和实际的设备控制,
由于 Linux 内核各类驱动的框架支持,driver 可以更加关注设备本身的特性。
ASOC也不例外、
在嵌入式系统里面的声卡驱动为ASOC(ALSA System on Chip) ,它是在ALSA (Advanced Linux Sound Architecture)驱动程序上封装的一层,驱动中的各模块抽象为三部分:Platform、Codec和Machine。
(1)machine:单板相关内容,开发板所用的主芯片(Platform是指Soc)、编解码芯片(codec)是哪一个。主芯片里的IIS接口(DAI(全称Digital Audio Interface)接口)接到哪里去.CPU DAI是哪一个,codec DAI是哪一个,DMA是哪个
(2)platform:平台相关内容。IIS(DAI)(设置接口)和DMA(传输数据)
(3)codec:编解码芯片驱动, DAI和控制接口(控制音量)
本章介绍Machine部分:
它把cpu_dai、codec_dai、modem_dai各个音频接口通过定义dai_link链结起来,然后注册snd_soc_card,形成完整的音频通路。和Platform、CODEC两个不一样,Platform和CODEC驱动一般是可以重用的,而Machine有它特定的硬件特性,几乎是不可重用的。所谓的硬件特性指:DAIs之间的链结;通过某个GPIO打开Amplifier;通过某个GPIO检测耳机插拔;使用某个时钟如MCLK/External OSC作为I2S、CODEC模块的基准时钟源等等。
我们以uda1341驱动为例,在Linux4.8.17下分析S3C24xx下的asoc:
先放一张总体的流程图:
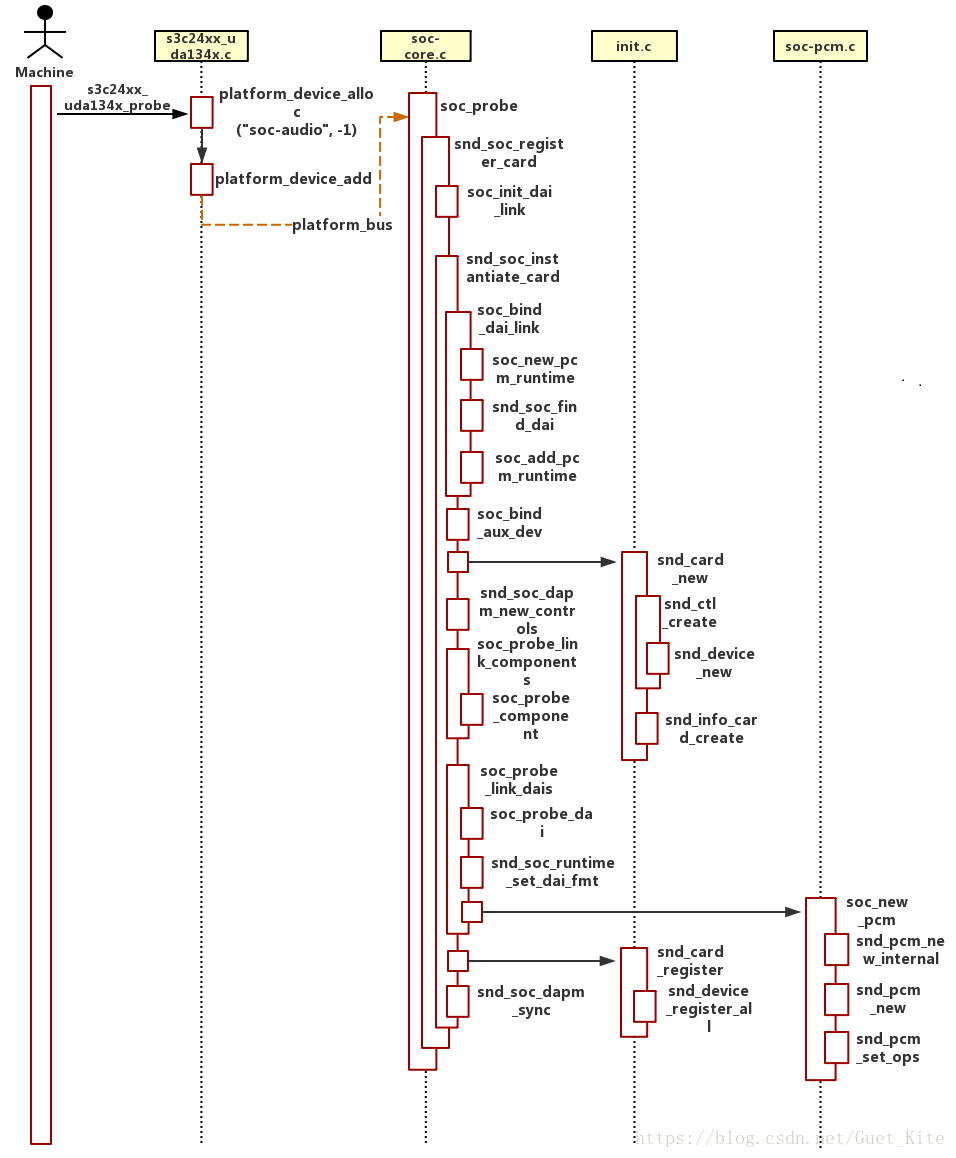
S3c24xx_uda134x.c文件:
static struct platform_driver s3c24xx_uda134x_driver = {
    .probe  = s3c24xx_uda134x_probe,
    .remove = s3c24xx_uda134x_remove,
    .driver = {
        .name = "s3c24xx_uda134x",
    },
};
module_platform_driver(s3c24xx_uda134x_driver);
platform总线被触发时,调用probe回调函数:
static int s3c24xx_uda134x_probe(struct platform_device *pdev)
{
    s3c24xx_uda134x_l3_pins = pdev->dev.platform_data;
    ......
    s3c24xx_uda134x_snd_device = platform_device_alloc("soc-audio", -1);//soc-core.c 2149行
    ......
    platform_set_drvdata(s3c24xx_uda134x_snd_device,&snd_soc_s3c24xx_uda134x);
    platform_device_add_data(s3c24xx_uda134x_snd_device, &s3c24xx_uda134x, sizeof(s3c24xx_uda134x));
    ret = platform_device_add(s3c24xx_uda134x_snd_device);
}
可以看出,我们的probe做的内容:
1)取出平台数据、
2)分配一个名为”soc-audio”的平台设备空间,
3)这个这个平台设备添加到总线上。
注意snd_soc_s3c24xx_uda134x这个结构体:
static struct snd_soc_card snd_soc_s3c24xx_uda134x = {
    .name = "S3C24XX_UDA134X",
    .owner = THIS_MODULE,
    .dai_link = &s3c24xx_uda134x_dai_link,//snd_soc_dai_link结构体
    .num_links = 1,
};
这是一个snd_soc_card结构体,很关键。
其中,snd_soc_dai_link中,指定了Platform、Codec、codec_dai、cpu_dai的名字,
稍后Machine驱动将会利用这些名字去匹配已经在系统中注册的platform,codec,dai,
这些注册的部件都是在另外相应的Platform驱动和Codec驱动的代码文件中定义的。
static struct snd_soc_dai_link s3c24xx_uda134x_dai_link = {
    .name = "UDA134X",
    .stream_name = "UDA134X",
    .codec_name = "uda134x-codec",
    .codec_dai_name = "uda134x-hifi",
    .cpu_dai_name = "s3c24xx-iis",
    .dai_fmt = SND_SOC_DAIFMT_I2S | SND_SOC_DAIFMT_NB_NF |
           SND_SOC_DAIFMT_CBS_CFS,
    .ops = &s3c24xx_uda134x_ops,
    .platform_name  = "s3c24xx-iis",
};
这样,probe的使命就完成了。可想而知,我们下一步的重心必定是在”soc-audio”的平台驱动上。
我们搜索一下源码,即可发现soc-core.c文件:
/* ASoC platform driver */
static struct platform_driver soc_driver = {
    .driver     = {
        .name       = "soc-audio",
        .pm     = &snd_soc_pm_ops,
    },
    .probe      = soc_probe,
    .remove     = soc_remove,
};
看下probe函数:
/* probes a new socdev */
static int soc_probe(struct platform_device *pdev)
{
    struct snd_soc_card *card = platform_get_drvdata(pdev);
    .......
    return snd_soc_register_card(card);
}这里,platform_get_drvdata函数就会得到之前那个snd_soc_card结构体,从而进入snd_soc_register_card进行声卡注册:
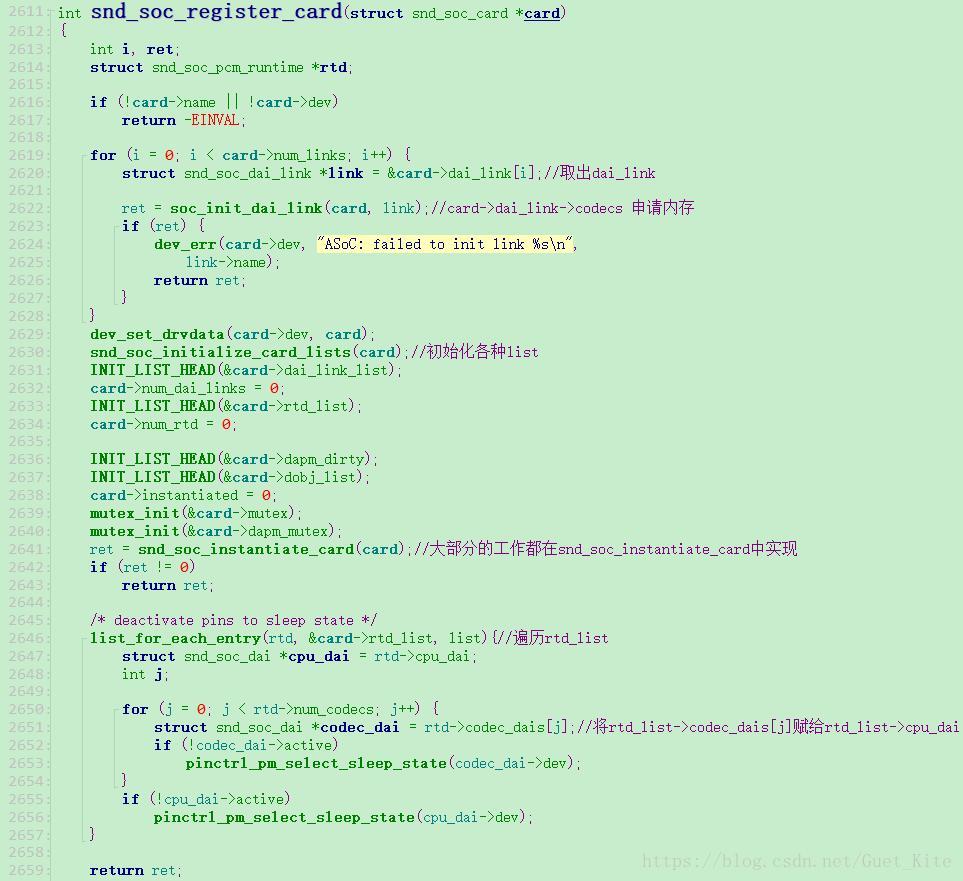
注释如图,核心函数在snd_soc_instantiate_card里,这个很重要,实例化snd_soc_card:
static int snd_soc_instantiate_card(struct snd_soc_card *card)//实例化snd_soc_card
{
    /* bind DAIs */
    for (i = 0; i < card->num_links; i++) {
        ret = soc_bind_dai_link(card, &card->dai_link[i]);//【1】
    }
    /* bind aux_devs too */
    for (i = 0; i < card->num_aux_devs; i++) {
        ret = soc_bind_aux_dev(card, i);//同理,绑定到card->aux_comp_list
    }
    /* add predefined DAI links to the list */
    for (i = 0; i < card->num_links; i++)
        snd_soc_add_dai_link(card, card->dai_link+i);//【2】添加card->dai_link+i->list到card->dai_link_list
    /* initialize the register cache for each available codec */
    list_for_each_entry(codec, &codec_list, list) {//【3】codec_list结构体
        if (codec->cache_init)
            continue;
        ret = snd_soc_init_codec_cache(codec);//为codec申请空间
        if (ret < 0)
            goto base_error;
    }
    ......
    /* card bind complete so register a sound card *///旧版的snd_card_create
    ret = snd_card_new(card->dev, SNDRV_DEFAULT_IDX1, SNDRV_DEFAULT_STR1,
            card->owner, 0, &card->snd_card);//【4】标准的alsa函数创建声卡实例
    /* initialise the sound card only once */
    if (card->probe) {
        ret = card->probe(card);//【5】如果有的话,调用card的probe
    }
    /* probe all components used by DAI links on this card */
    for (order = SND_SOC_COMP_ORDER_FIRST; order <= SND_SOC_COMP_ORDER_LAST;
            order++) {
        list_for_each_entry(rtd, &card->rtd_list, list) {
            ret = soc_probe_link_components(card, rtd, order);//【6】componentpro->probe
        }
    }
    ......
    /* probe all DAI links on this card */
    for (order = SND_SOC_COMP_ORDER_FIRST; order <= SND_SOC_COMP_ORDER_LAST;order++) {
        list_for_each_entry(rtd, &card->rtd_list, list) {//挨个调用了codec,dai和platform驱动的probe函数
            ret = soc_probe_link_dais(card, rtd, order);//【7】soc_probe_dai_link()函数中做了比较多的事情,其中有soc_new_pcm
        }
    }
    ......
    ret = snd_card_register(card->snd_card);//【8】最后则是调用标准alsa驱动的声卡注册函数对声卡进行注册
    card->instantiated = 1;
}
里面大概做了如下事情:
【1】把相应的codec,dai和platform实例赋值到card->rtd[]中,再添加到card->rtd_list链表中,rtd也就是一个snd_soc_pcm_runtime结构体。
【2】添加card->dai_link+i->list到card->dai_link_list
【3】遍历这个全局codec_list结构体,为codec申请空间
【4】标准的alsa函数创建声卡实例
【5】如果有的话,调用card的probe:card->probe(card),当然,我们这里snd_soc_s3c24xx_uda134x这snd_soc_card结构体是没设置有probe的
【6】扫描card->rtd_list链表,调用cpu_dai、codec_dais、platform的component->probe。不是很清楚这个是拿来干啥的,我看了下,没发现component->probe是在哪填充的……
【7】扫描card->rtd_list链表 ,调用各个子结构(cpu_dai、codec_dais、platform)的probe函数,还通过soc_new_pcm函数创建了pcm逻辑设备。
【8】最后则是调用标准alsa驱动的声卡注册函数对声卡进行注册。
大概就是这么个操作,我们来一个个看下他的函数内部实现:
【1】:soc_bind_dai_link(card, &card->dai_link[i])

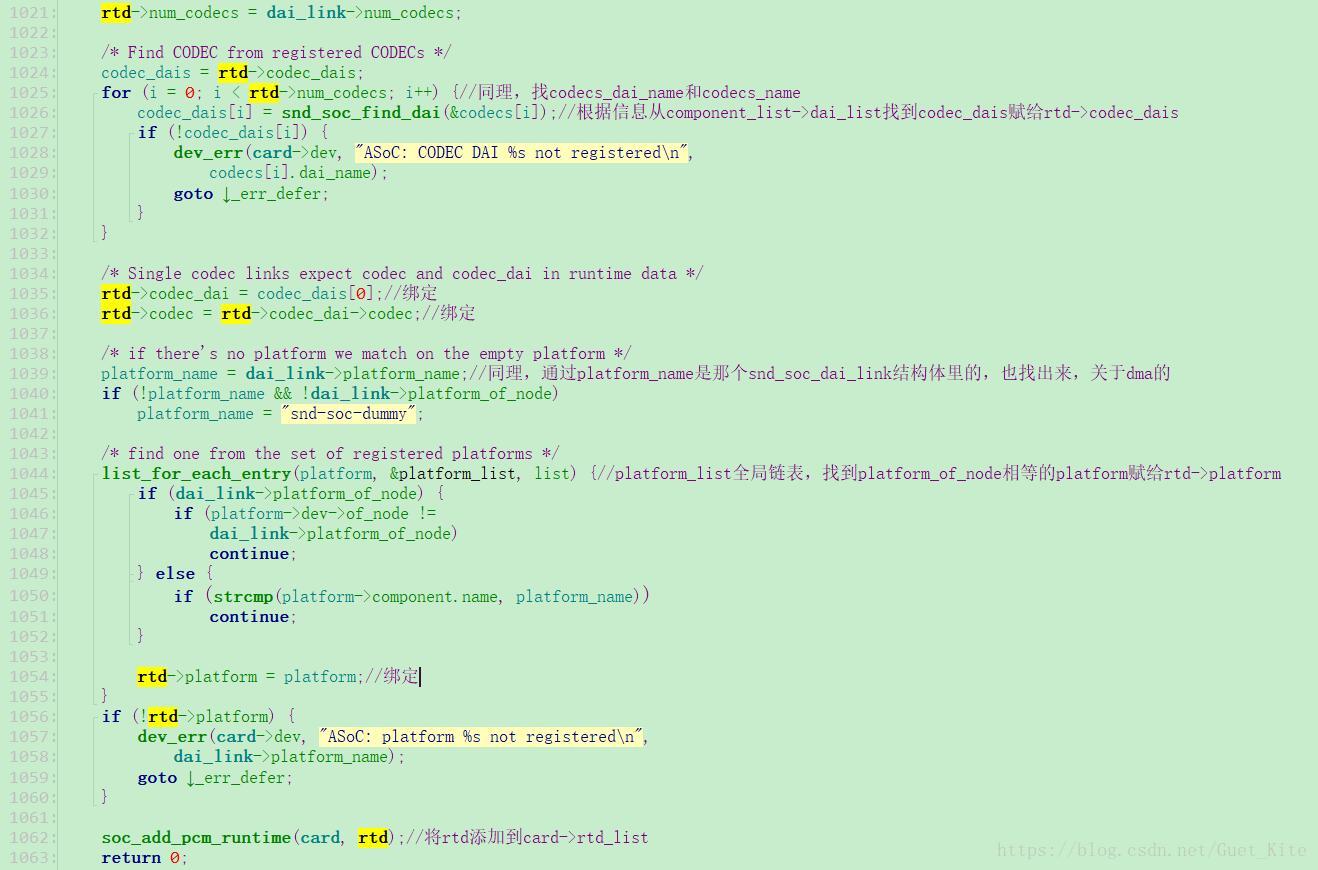
注释如图,绑定cpu_dai、codec_dais、platform到rtl这个snd_soc_pcm_runtime结构体中,经过这个过程后,snd_soc_pcm_runtime:(card->rtd)中保存了本Machine中使用的Codec,DAI和Platform驱动的信息。
【4】snd_card_new
int snd_card_new(struct device *parent, int idx, const char *xid,
            struct module *module, int extra_size,
            struct snd_card **card_ret)
{
    ......
    device_initialize(&card->card_dev);
    card->card_dev.parent = parent;
    card->card_dev.class = sound_class;//类
    card->card_dev.release = release_card_device;
    card->card_dev.groups = card->dev_groups;
    card->dev_groups[0] = &card_dev_attr_group;
    err = kobject_set_name(&card->card_dev.kobj, "card%d", idx);
    ......
    err = snd_ctl_create(card);
    ......
    err = snd_info_card_create(card);//建立proc文件中的info节点:通常就是/proc/asound/card0
}
【7】soc_probe_link_dais
static int soc_probe_link_dais(struct snd_soc_card *card,
        struct snd_soc_pcm_runtime *rtd, int order)
{
    ......
    ret = soc_probe_dai(cpu_dai, order);//调用cpu_dai probe
    ......
    /* probe the CODEC DAI */
    for (i = 0; i < rtd->num_codecs; i++) {
        ret = soc_probe_dai(rtd->codec_dais[i], order);//调用codec_dais probe
    }
    ......
    if (dai_link->dai_fmt)
        snd_soc_runtime_set_dai_fmt(rtd, dai_link->dai_fmt);//设置格式
    ......
    /* create the pcm */
    ret = soc_new_pcm(rtd, rtd->num);//用于创建标准alsa驱动的pcm逻辑设备,非常重要
}
调用完各个probe后,直接调用soc_new_pcm创建pcm:
int soc_new_pcm(struct snd_soc_pcm_runtime *rtd, int num)
{
    ......
    ret = snd_pcm_new(rtd->card->snd_card, new_name, num, playback,capture, &pcm);//创建声卡的pcm实例
    ......
    rtd->pcm = pcm;
    pcm->private_data = rtd;//pcm的private_data字段设置为该runtime变量rtd
    ......
    /* ASoC PCM operations */
    if (rtd->dai_link->dynamic) {//初始化snd_soc_runtime中的snd_pcm_ops字段,也就是rtd->ops中的部分成员
        rtd->ops.open       = dpcm_fe_dai_open;
        rtd->ops.hw_params  = dpcm_fe_dai_hw_params;
        rtd->ops.prepare    = dpcm_fe_dai_prepare;
        rtd->ops.trigger    = dpcm_fe_dai_trigger;
        rtd->ops.hw_free    = dpcm_fe_dai_hw_free;
        rtd->ops.close      = dpcm_fe_dai_close;
        rtd->ops.pointer    = soc_pcm_pointer;
        rtd->ops.ioctl      = soc_pcm_ioctl;
    } else {
        rtd->ops.open       = soc_pcm_open;
        rtd->ops.hw_params  = soc_pcm_hw_params;
        rtd->ops.prepare    = soc_pcm_prepare;
        rtd->ops.trigger    = soc_pcm_trigger;
        rtd->ops.hw_free    = soc_pcm_hw_free;
        rtd->ops.close      = soc_pcm_close;
        rtd->ops.pointer    = soc_pcm_pointer;
        rtd->ops.ioctl      = soc_pcm_ioctl;
    }

    if (platform->driver->ops) {
        rtd->ops.ack        = platform->driver->ops->ack;
        rtd->ops.copy       = platform->driver->ops->copy;
        rtd->ops.silence    = platform->driver->ops->silence;
        rtd->ops.page       = platform->driver->ops->page;
        rtd->ops.mmap       = platform->driver->ops->mmap;
    }
    if (playback)
        snd_pcm_set_ops(pcm, SNDRV_PCM_STREAM_PLAYBACK, &rtd->ops);//设置操作该pcm的控制/操作接口函数,参数中的snd_pcm_ops结构中的函数通常就是我们驱动要实现的函数
    if (capture)
        snd_pcm_set_ops(pcm, SNDRV_PCM_STREAM_CAPTURE, &rtd->ops);//设置操作该pcm的控制/操作接口函数,参数中的snd_pcm_ops结构中的函数通常就是我们驱动要实现的函数
    if (platform->driver->pcm_new) {
        ret = platform->driver->pcm_new(rtd);//该回调实现该platform下的dma内存申请和dma初始化等相关工作。到这里,声卡和他的pcm实例创建完成。
    }
}
这里面除了填充 控制/操作接口ops函数并设置之外,最终要的就是snd_pcm_new函数了,它是创建声卡的pcm实例
static int _snd_pcm_new(struct snd_card *card, const char *id, int device,
        int playback_count, int capture_count, bool internal,
        struct snd_pcm **rpcm)
{
    static struct snd_device_ops ops = {
        .dev_free = snd_pcm_dev_free,
        .dev_register = snd_pcm_dev_register,
        .dev_disconnect = snd_pcm_dev_disconnect,
    };
    ......
    if ((err = snd_pcm_new_stream(pcm, SNDRV_PCM_STREAM_PLAYBACK, playback_count)) < 0) {//建立playback stream
        snd_pcm_free(pcm);
        return err;
    }
    if ((err = snd_pcm_new_stream(pcm, SNDRV_PCM_STREAM_CAPTURE, capture_count)) < 0) {//建立capture stream
        snd_pcm_free(pcm);
        return err;
    }
    if ((err = snd_device_new(card, SNDRV_DEV_PCM, pcm, &ops)) < 0) {//snd_device_new()把该pcm挂到声卡中
        snd_pcm_free(pcm);
}在这里,注意snd_device_ops 结构体ops 的dev_register 字段的回调函数:snd_pcm_dev_register,待会会用到,记得。
接着是snd_pcm_new_stream创建 capture 、playback stream、
最后snd_device_new函数为给定的数据指针创建一个新的设备组件:
int snd_device_new(struct snd_card *card, enum snd_device_type type,
           void *device_data, struct snd_device_ops *ops)
{
    struct snd_device *dev;
    struct list_head *p;
    dev = kzalloc(sizeof(*dev), GFP_KERNEL);

    INIT_LIST_HEAD(&dev->list);
    dev->card = card;
    dev->type = type;
    dev->state = SNDRV_DEV_BUILD;
    dev->device_data = device_data;
    dev->ops = ops;
    /* insert the entry in an incrementally sorted list */
    list_for_each_prev(p, &card->devices) {
        struct snd_device *pdev = list_entry(p, struct snd_device, list);
        if ((unsigned int)pdev->type <= (unsigned int)type)
            break;
    }
    list_add(&dev->list, p);

}
这里实参&ops就会被传进card->devices链表的dev->ops了。
【8】snd_card_register
注册声卡,在这个阶段会遍历声卡下的所有逻辑设备,并且调用各设备的注册回调函数.
int snd_card_register(struct snd_card *card)
{
    if (!card->registered) {
        err = device_add(&card->card_dev);// 创建sysfs设备,声卡的class将会出现在/sys/class/sound/下面
        card->registered = true;
    }
    if ((err = snd_device_register_all(card)) < 0)
    snd_cards[card->number] = card;// 把该声卡实例保存到snd_cards全局数组中
    init_info_for_card(card);
}
重点在我们snd_device_register_all函数下:
int snd_device_register_all(struct snd_card *card)
{
    struct snd_device *dev;
    list_for_each_entry(dev, &card->devices, list) {
        err = __snd_device_register(dev);//里面是:dev->ops->dev_register(dev);
        if (err < 0)
            return err;
    }
    return 0;
}
遍历挂在该声卡的所有逻辑设备,回调各snd_device的ops->dev_register字段被调用。
记得之前说过的 snd_device_ops 结构体ops 的dev_register 字段的回调函数 snd_pcm_dev_register吗,就会在这里被调用到了:
static int snd_pcm_dev_register(struct snd_device *device)
{
    pcm = device->device_data;
    err = snd_pcm_add(pcm);

    for (cidx = 0; cidx < 2; cidx++) {//对于一个pcm设备,可以生成两个设备文件,一个用于playback,一个用于capture,
        int devtype = -1;
        if (pcm->streams[cidx].substream == NULL)
            continue;
        switch (cidx) {
        case SNDRV_PCM_STREAM_PLAYBACK:
            devtype = SNDRV_DEVICE_TYPE_PCM_PLAYBACK;//playback  --  pcmCxDxp,通常系统中只有一各声卡和一个pcm,它就是pcmC0D0p
            break;
        case SNDRV_PCM_STREAM_CAPTURE:
            devtype = SNDRV_DEVICE_TYPE_PCM_CAPTURE;//capture  --  pcmCxDxc,通常系统中只有一各声卡和一个pcm,它就是pcmC0D0c
            break;
        }
        /* register pcm */
        err = snd_register_device(devtype, pcm->card, pcm->device,
                      &snd_pcm_f_ops[cidx], pcm,//重要,snd_pcm_f_ops记录在snd_minors[minor]中的字段f_ops中
                      &pcm->streams[cidx].dev);
        if (err < 0) {
            list_del_init(&pcm->list);
            goto unlock;
        }

        for (substream = pcm->streams[cidx].substream; substream; substream = substream->next)
            snd_pcm_timer_init(substream);
    }
}
详细内容见注释、我们可以看下snd_register_device函数书如何注册pcm设备的:snd_register_device( devtype, pcm->card, pcm->device,&snd_pcm_f_ops[cidx], pcm,&pcm->streams[cidx].dev);
snd_pcm_f_ops是个file_operations结构体,当用户空间 open、read、write时就会被调用到,那么,他们是怎么联系起来的呢?就靠snd_register_device函数里操作snd_minors这个全局数组了:
int snd_register_device(int type, struct snd_card *card, int dev,
            const struct file_operations *f_ops,
            void *private_data, struct device *device)
{
    struct snd_minor *preg;

    preg = kmalloc(sizeof *preg, GFP_KERNEL);//为snd_minor申请空间
    preg->type = type;//playback还是capture
    preg->card = card ? card->number : -1;
    preg->device = dev;//pcm实例的编号,大多数情况为0
    preg->f_ops = f_ops;
    preg->private_data = private_data;//指向该pcm的实例
    preg->card_ptr = card;
    mutex_lock(&sound_mutex);
    minor = snd_find_free_minor(type, card, dev);//根据type,card和pcm的编号,确定数组的索引值minor,minor也作为pcm设备的此设备号

    preg->dev = device;
    device->devt = MKDEV(major, minor);
    err = device_add(device);//将设备加入到Linux设备模型

    snd_minors[minor] = preg;
}
就是这里了。把snd_pcm_f_ops这个file_operations结构体放到preg->f_ops中,然后 把该snd_minor结构的地址放入全局数组snd_minors[minor]中。
最后的最后,用户空间是怎么操作到这个snd_pcm_f_ops的呢????
我们来看看:
sound.c文件:
static int __init alsa_sound_init(void)
{
    snd_major = major;
    snd_ecards_limit = cards_limit;
    if (register_chrdev(major, "alsa", &snd_fops)) {
        pr_err("ALSA core: unable to register native major device number %d\n", major);
        return -EIO;
    }
    if (snd_info_init() < 0) {
        unregister_chrdev(major, "alsa");
        return -ENOMEM;
    }
#ifndef MODULE
    pr_info("Advanced Linux Sound Architecture Driver Initialized.\n");
#endif
    return 0;
}
这里注册字符设备alsa时的file_operations是snd_fops:
static const struct file_operations snd_fops =
{
    .owner =    THIS_MODULE,
    .open =     snd_open,
    .llseek =   noop_llseek,
};
static int snd_open(struct inode *inode, struct file *file)
{
unsigned int minor = iminor(inode);
struct snd_minor *mptr = NULL;
const struct file_operations *new_fops;
int err = 0;
if (minor >= ARRAY_SIZE(snd_minors))
return -ENODEV;
mutex_lock(&sound_mutex);
mptr = snd_minors[minor];//从snd_minors全局数组中取出我们所需的结构体
if (mptr == NULL) {
mptr = autoload_device(minor);
if (!mptr) {
mutex_unlock(&sound_mutex);
return -ENODEV;
}
}
new_fops = fops_get(mptr->f_ops);//得到file_operations
mutex_unlock(&sound_mutex);
if (!new_fops)
return -ENODEV;
replace_fops(file, new_fops);//取代现在的file_operations
if (file->f_op->open)
err = file->f_op->open(inode, file);//执行open操作
return err;
}这样,我们用户空间操作时就会操作到替换的、新的file_operations 了,也就是snd_pcm_f_ops这个结构体。
所以,Machine驱动的设备初始化代码就是选择合适Platform和Codec以及dai,
用他们填充以上几个数据结构,然后注册Platform设备即可。当然还要实现连接Platform和Codec的dai_link对应的ops实现
参考:https://blog.csdn.net/azloong/article/details/14105023
参考:https://blog.csdn.net/droidphone/article/details/7231605