

目录
Ajax 实战
创建项目
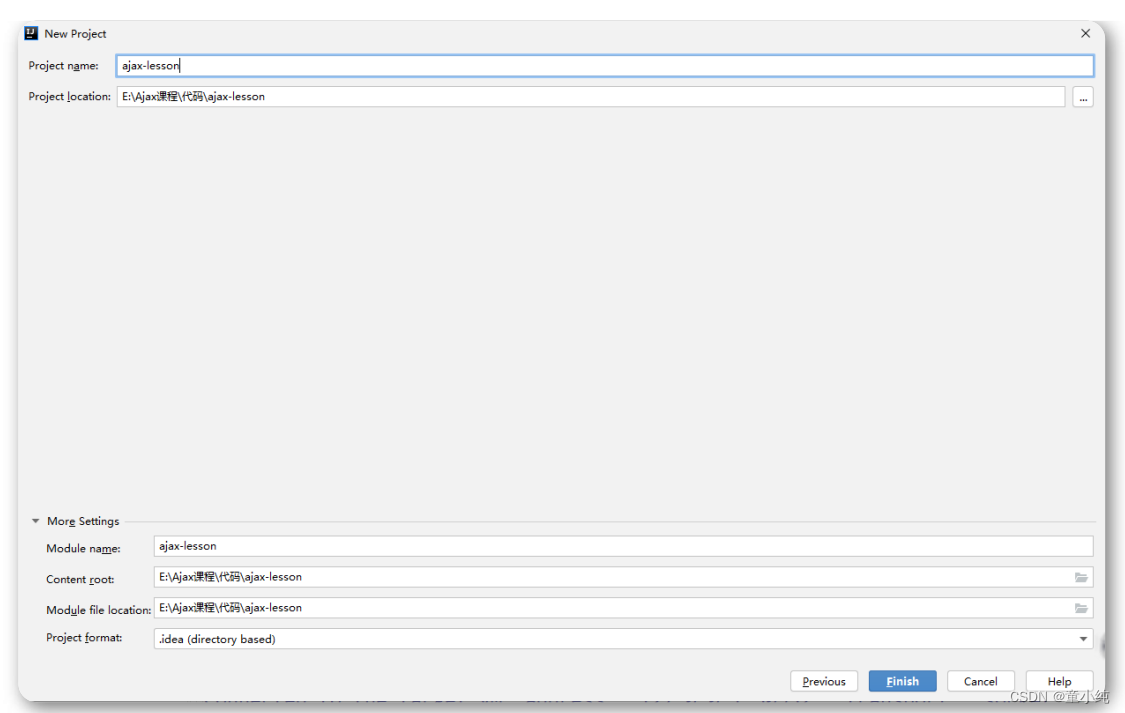
创建Java项目
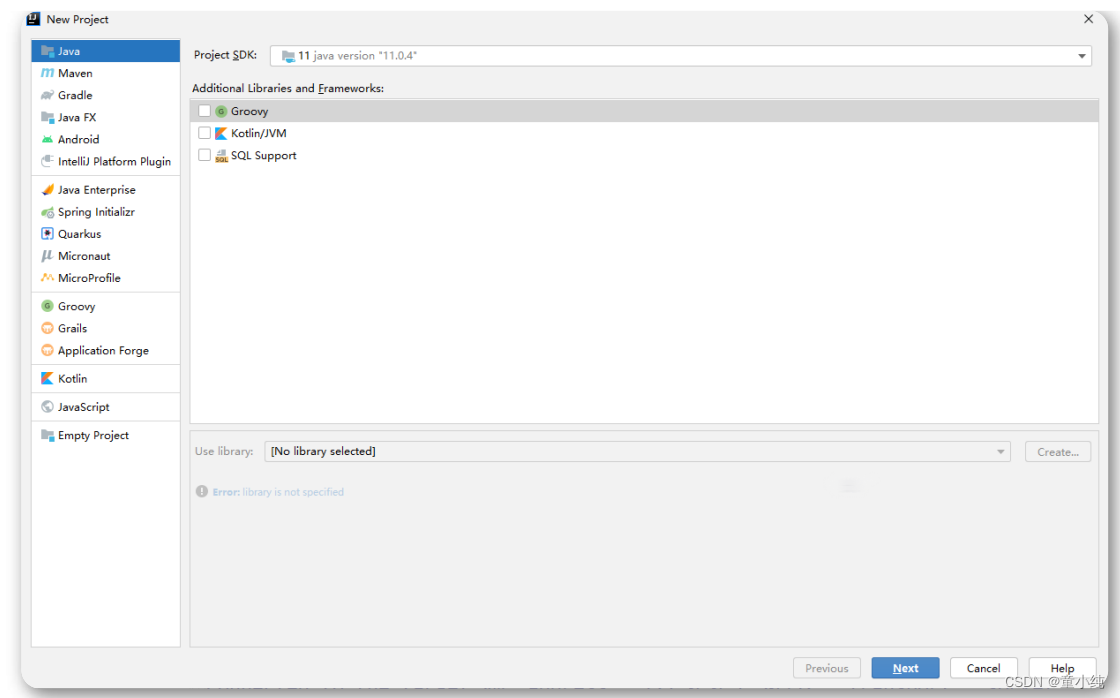

点击finish完成项目创建,然后右键选择"add Framework Support..."
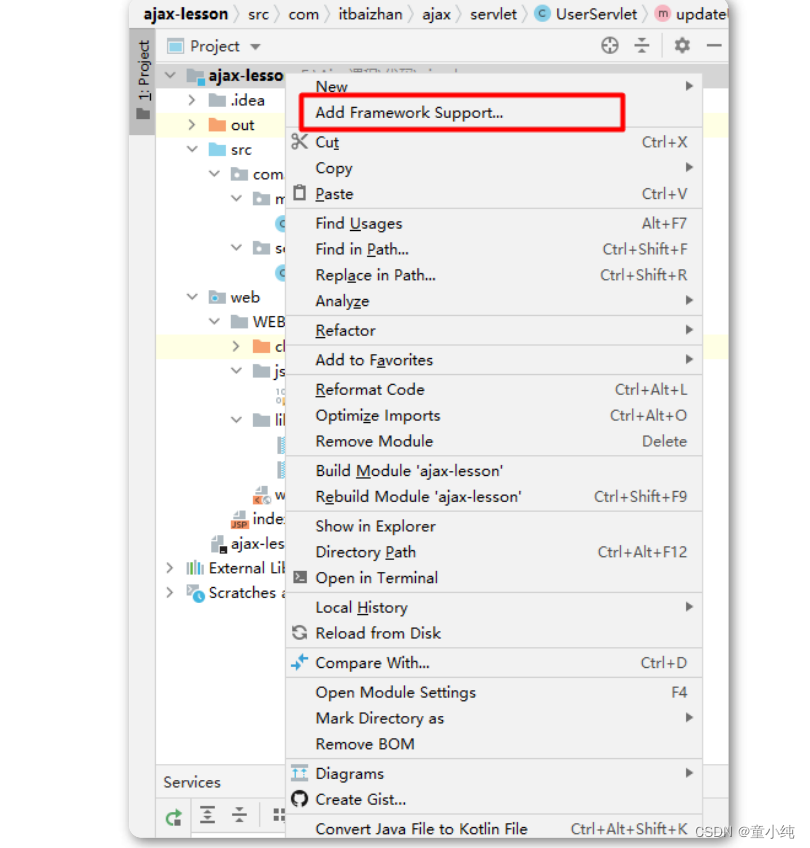
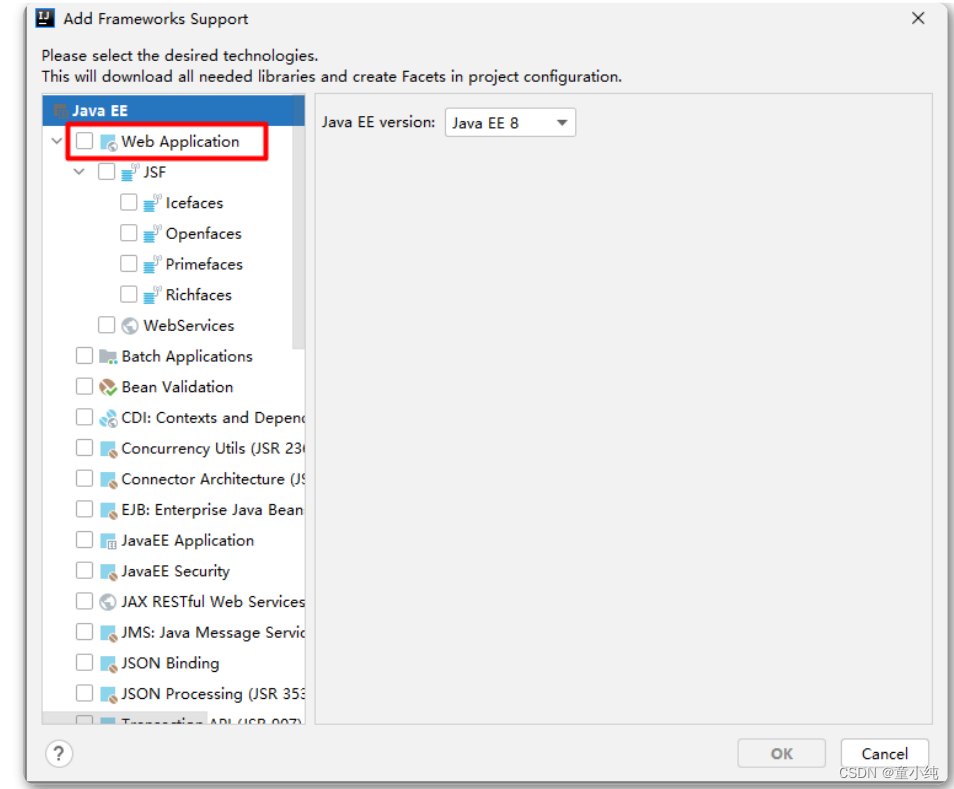
勾选红框中的选项,点击"OK",完成后项目下出现web文件夹
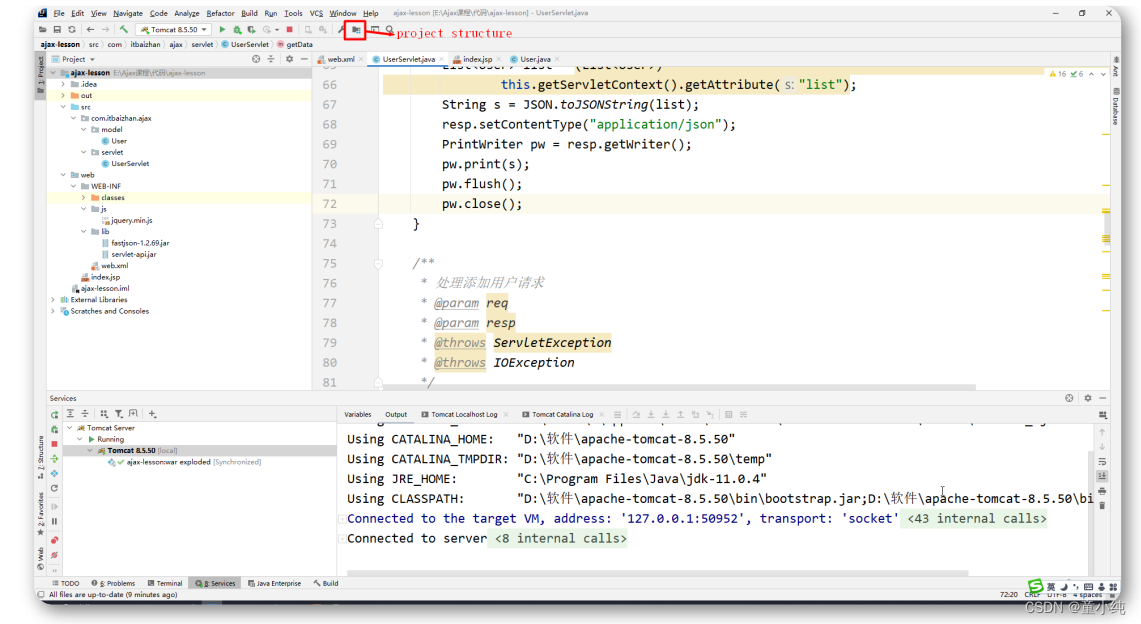
点击"project structure"

点击Modules,选择"Web"模块,再按图示点击"+",按默认路径, 再点击"OK"

配置tomcat服务器
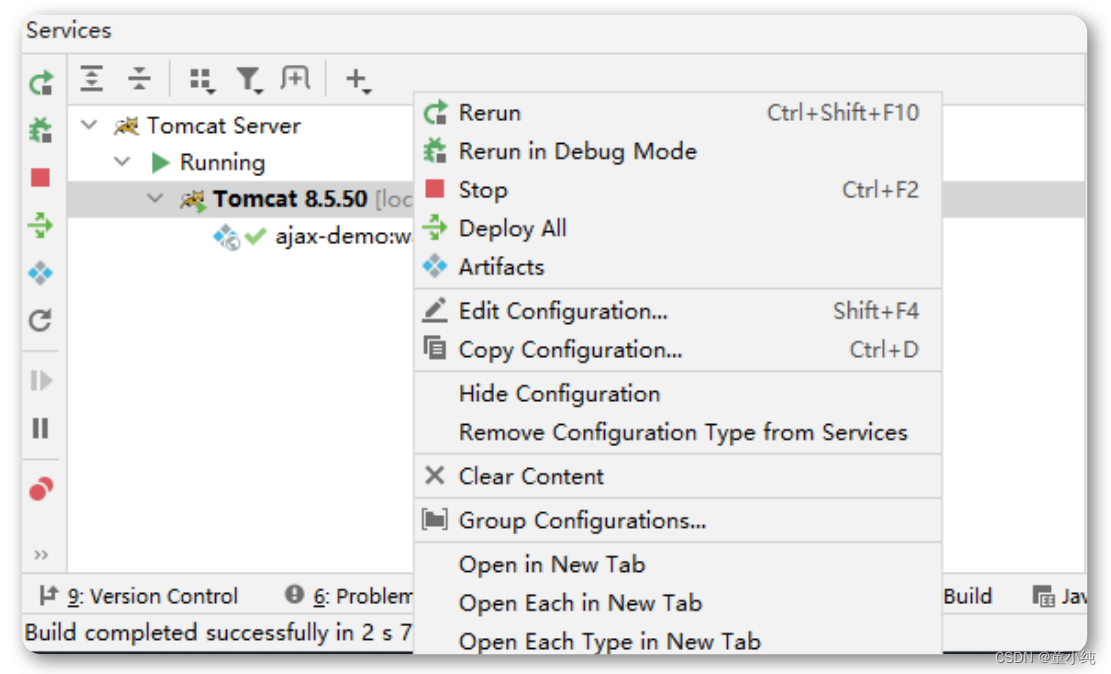
选择Edit Configuration...
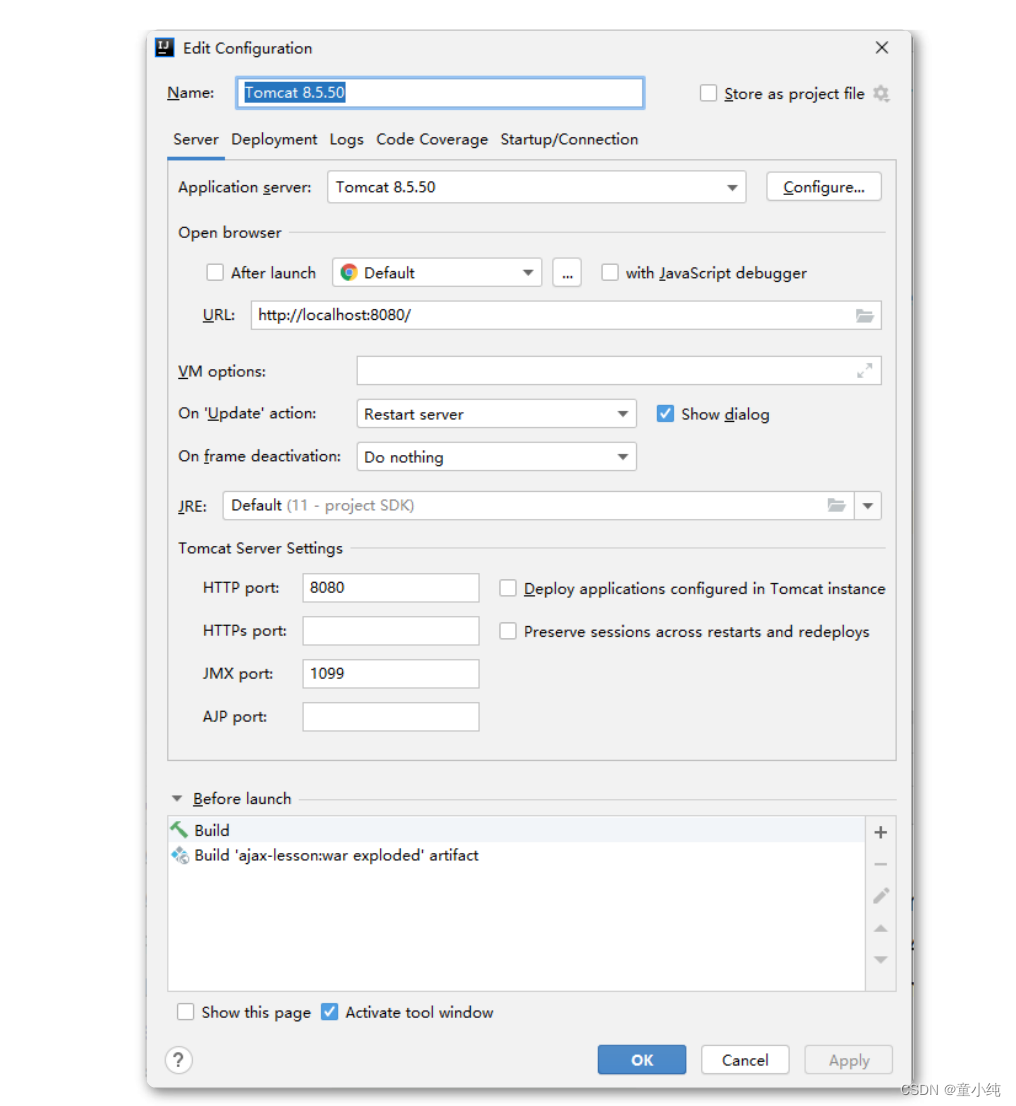
选择Deployment标签,点击右侧"+",选择要部署的项目,按默认就可以

添加要部署的war文件,Application context设置为"/",点击ok。
添加依赖包
在"dependencies"标签中,点击右侧"+",选择Library...,添加 Tomcat

根据实际情况继续添加其它必要的依赖,如fastjson,commonslang等。

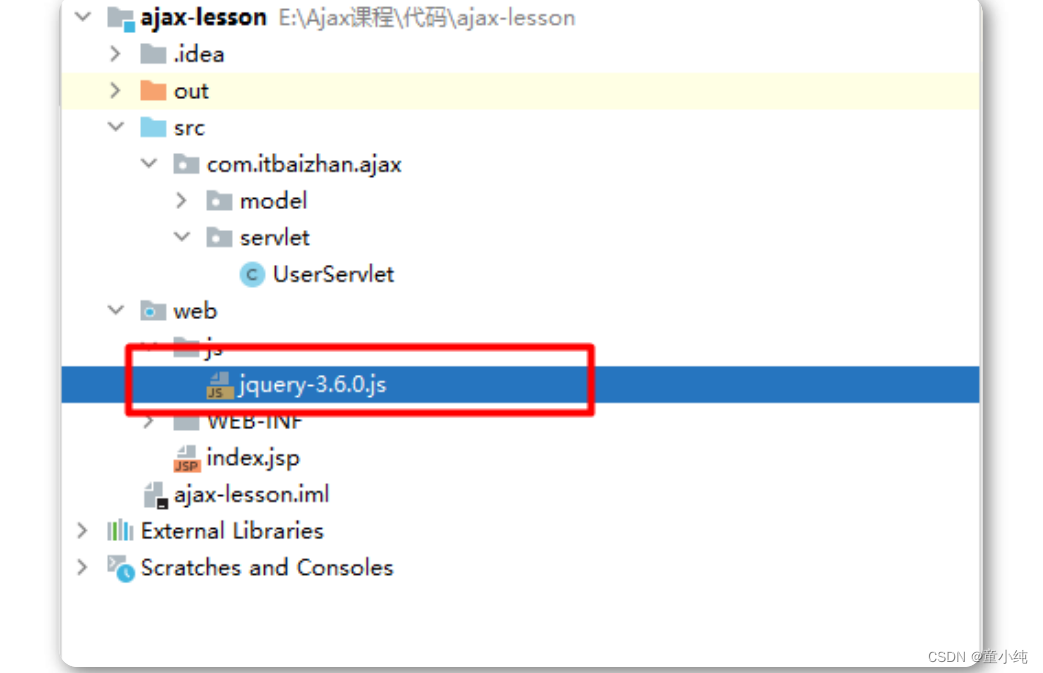
导入jquery包
在web目录下,创建js文件夹,把jquery-3.6.0.js放到js目录下
创建实体类User
package com.itbaizhan.ajax.pojo;
public class User {
    private Integer id;
    private String username;
    private String password;
    private Double salary;
    private String birthday;
    public Integer getId() {
        return id;
   }
    public void setId(Integer id) {
        this.id = id;
   }
    public String getUsername() {
        return username;
   }
    public void setUsername(String username)
   {
        this.username = username;
   }
    public String getPassword() {
        return password;
   }
    public void setPassword(String password)
   {
        this.password = password;
   }
    public Double getSalary() {
        return salary;
   }
    public void setSalary(Double salary) {
        this.salary = salary;
   }
    public String getBirthday() {
        return birthday;
   }
    public void setBirthday(String birthday)
   {
        this.birthday = birthday;
 }
    public User(Integer id, String username,
    String password, Double salary, String birthday) {
        this.id = id;
        this.username = username;
        this.password = password;
        this.salary = salary;
        this.birthday = birthday;
   }
    public User() {
   }
}
创建页面
创建index.jsp中的静态部分
<body>
    <div>
        <table align="center" width="60%" border="1">
            <tr>
                <td>ID:</td>
                <td><input type="text" name="id" id="id"/></td>
                <td>姓名:</td>
                <td><input type="text" name="username" id="username"/></td>
                <td>密码:</td>
                <td><input type="text" name="password" id="password"/></td>
            </tr>
            <tr>
                <td>收入:</td>
                <td><input type="text" name="salary" id="salary"/></td>
                <td>出生日期:</td>
                <td><input type="text" name="birthday" id="birthday"/></td>
                <td colspan="2"></td>
            </tr>
            <tr align="center">
                <td colspan="6">
                    <input type="button" value="添加用户" id="add" />
                    <input type="button" value="更新用户" id="update"/>
                </td>
            </tr>
        </table> <hr/>
        <table align="center" width="60%" bgcolor="" border="1" id="myTable">
            <thead>
            <tr align="center">
                <td>ID</td>
                <td>姓名</td>
                <td>密码</td>
                <td>收入</td>
                <td>生日</td>
                <td>操作</td>
            </tr>
        </thead>
            <tbody id="tBody"></tbody>
        </table>
    </div>
</body>
创建UserServlet
@WebServlet("/user.do")
public class UserServlet extends HttpServlet
{
 @Override
    public void init() throws ServletException {
   }

    @Override
    protected void doGet(HttpServletRequest req, HttpServletResponse resp) throws ServletException, IOException {
        this.doPost(req, resp);
   }

     @Override
    protected void doPost(HttpServletRequest req, HttpServletResponse resp) throws ServletException, IOException {
   }
}
配置web.xml
<servlet>
     <servlet-name>UserServlet</servlet-name>
     <servlet-class>
        com.itbaizhan.ajax.servlet.UserServlet
     </servlet-class>
</servlet>
<servlet-mapping>
    <servlet-name>UserServlet</servlet-name>
    <url-pattern>/</url-pattern>
</servlet-mapping>
查询用户列表
页面相关
$(function () {
//初始化用户数据
getData();
});
// 获取页面初始化数据
function getData(){
$.getJSON("user.do", {flag:"getData"},function (result) {
listUser(result);
});
}
// 遍历数据生成数据
function listUser(obj){
var str ="";
$.each(obj,function(){
str+= "<tr align='center'>" +
"<td id='"+this.id+"'>"+this.id +"</td>"+
"<td>"+this.username+"</td>" +
"<td>"+this.password+"</td>" +
"<td>"+this.salary+"</td>" +
"<td>"+this.birthday+"</td>" +
"<td><a href='#' onclick='preUpdateUser("+this.id+")'>更新
</a> <a href='#' onclick='deleteUser("+this.id+")'>删除 </a>
</td></tr>"
});
$("#tBody").prepend(str);
}servlet相关
@Override
public void init() throws ServletException {
    ArrayList<User> list = new ArrayList<>();
    User user1 = new User(1,"zhangsan","123",2000d,"1997-09-01");
    User user2 = new User(2,"lisi","123",3000d,"1998-08-23");
    User user3 = new User(3,"zhaoliu","123",2500d,"1996-05-16");
    User user4 = new User(4,"wangwu","123",2080d,"1995-10-12");
    User user5 = new User(5,"zhengsan","123",3200d,"1999-12-20");
    User user6 = new User(6,"liugang","123",4200d,"1994-04-10");
    list.add(user1);
    list.add(user2);
    list.add(user3);
    list.add(user4);
    list.add(user5);
    list.add(user6);
    ServletContext servletContext = this.getServletContext();
    servletContext.setAttribute("list",list);
}
// 获取页面初始化数据
private void getData(HttpServletRequest req, HttpServletResponse resp) throws IOException
{
    List<User> list = (List<User>)
      this.getServletContext().getAttribute("list");
      String s = JSON.toJSONString(list);
      resp.setContentType("application/json");
      PrintWriter pw = resp.getWriter();
      pw.print(s);
      pw.flush();
      pw.close();
}
@Override
protected void doPost(HttpServletRequest req, HttpServletResponse resp) throws
ServletException, IOException {
    String flag = req.getParameter("flag");
    if("getData".equals(flag)){
        this.getData(req,resp);
   }
}
添加用户
页面相关
//添加按钮绑定点击事件
$("#add").click(function(){
    addOrUpdateUser("addUser");
});
// 用户添加或者用户更新
function addOrUpdateUser(flag){
    // 从页面中获取数据
    var userid = $("#id").val();
    var username = $("#username").val();
    var password = $("#password").val();
    var salary = $("#salary").val();
    var birthday = $("#birthday").val();
    var data = {
        userid:userid,
        username:username,
        password:password,
        salary:salary,
        birthday:birthday,
        flag:flag
   }
    $.get("user.do",data,function(result){
        alert(result);
        location.reload();
   });
}
servlet相关
/**
     * 处理添加用户请求
     * @param req
     * @param resp
     * @throws ServletException
     * @throws IOException
     */
private void addUser(HttpServletRequest req, HttpServletResponse resp) throws IOException
{
    User user = this.createUser(req);
    ServletContext servletContext = this.getServletContext();
    List<User> list = (List<User>)servletContext.getAttribute("list");
    list.add(user);
    resp.setContentType("text/plain;charset=utf-8");
    PrintWriter pw = resp.getWriter();
    pw.print("添加成功");
    pw.flush();
    pw.close();
}
@Override
protected void doPost(HttpServletRequest req, HttpServletResponse resp) throws
ServletException, IOException {
    String flag = req.getParameter("flag");
    if("getData".equals(flag)){
        this.getData(req,resp);
   }else if("addUser".equals(flag)){
        this.addUser(req,resp);
   }
}
// 获取请求数据
private User createUser(HttpServletRequest
req){
    String userid = req.getParameter("userid");
    String username = req.getParameter("username");
    String password = req.getParameter("password");
    String salary = req.getParameter("salary");
    String birthday = req.getParameter("birthday");
    User user = new User();
    user.setId(Integer.parseInt(userid));
    user.setUsername(username);
    user.setPassword(password);
    user.setSalary(Double.valueOf(salary));
    user.setBirthday(birthday);
    return user;
}
更新用户
页面相关
// 更新之前的数据选择
function preUpdateUser(userid){
    var arr = new Array();
$("#"+userid).closest("tr").children().each(
function(index,ele){
        if(index <=4){
            arr[index]= ele.innerText
       }
   });
    $("#id").val(arr[0]);
    $("#id").attr("readonly",true);
    $("#username").val(arr[1]);
    $("#password").val(arr[2]);
    $("#salary").val(arr[3]);
    $("#birthday").val(arr[4]);
}
//更新按钮绑定点击事件
$("#update").click(function(){
 addOrUpdateUser("updateUser");
});
// 用户添加或者用户更新
function addOrUpdateUser(flag){
    // 从页面中获取数据
    var userid = $("#id").val();
    var username = $("#username").val();
    var password = $("#password").val();
    var salary = $("#salary").val();
    var birthday = $("#birthday").val();
    var data = {
        userid:userid,
        username:username,
        password:password,
        salary:salary,
        birthday:birthday,
        flag:flag
   }
    $.get("user.do",data,function(result){
       alert(result);
       location.reload();
   });
}
servlet相关
/**
     * 处理更新用户请求
     * @param req
     * @param resp
     * @throws IOException
     */
private void updateUser(HttpServletRequest req,
                        HttpServletResponse resp) throws IOException{
    User user = this.createUser(req);
    ServletContext servletContext = this.getServletContext();
    List<User> userList = (List<User>) servletContext.getAttribute("list");
    //list转map
    Map<Integer, User> userMap = userList.stream().collect(Collectors.toMap(User::getId, Function.identity()));
    //根据id获取user
    User user1 = userMap.get(user.getId());
    //删除指定的user
    userList.remove(user1);
    //添加新的user
    userList.add(user);
    //按id排序
    userList.sort(new Comparator<User>() {
        @Override
        public int compare(User o1, User o2)
         {
            return o1.getId() - o2.getId();
       }
   });
    //输出至页面
    resp.setContentType("text/plain;charset=utf-8");
    PrintWriter pw = resp.getWriter();
    pw.print("更新成功");
    pw.flush();
    pw.close();
}
@Override
protected void doPost(HttpServletRequest req, HttpServletResponse resp) throws
ServletException, IOException {
    String flag = req.getParameter("flag");
    if("getData".equals(flag)){
        this.getData(req,resp);
   }else if("addUser".equals(flag)){
        this.addUser(req,resp);
   }else if("updateUser".equals(flag)){
        this.updateUser(req,resp);
   }
}
删除用户
页面相关
// 删除用户
function deleteUser(userid){
    $("#"+userid).closest("tr").remove();
 $.post("user.do", {userid:userid,flag:"delete"},function(result){
        alert(result)
   })
}
servlet相关
@Override
protected void doPost(HttpServletRequest req, HttpServletResponse resp) throws
ServletException, IOException {
    String flag = req.getParameter("flag");
    if("getData".equals(flag)){
        this.getData(req,resp);
   }else if("addUser".equals(flag)){
        this.addUser(req,resp);
   }else if("updateUser".equals(flag)){
        this.updateUser(req,resp);
   }else if("delete".equals(flag)){
        this.deleteUser(req,resp);
   }
}
/**
     * 处理删除用户请求
     * @param req
     * @param resp
     * @throws ServletException
     * @throws IOException
     */
private void deleteUser(HttpServletRequest req,
                        HttpServletResponse resp) throws ServletException, IOException{
    ServletContext servletContext = this.getServletContext();
    List<User> userList = (List<User>)servletContext.getAttribute("list");
    String userid = req.getParameter("userid");
    //list转map
    Map<Integer, User> userMap = userList.stream().collect(Collectors.toMap(User::getId, Function.identity()));
    //根据id获取user
    if(StringUtils.isNotEmpty(userid)){
        User user1 = userMap.get(Integer.parseInt(userid));
        //删除指定的user
        userList.remove(user1);
        resp.setContentType("text/plain;charset=utf-8");
        PrintWriter pw = resp.getWriter();
        pw.print("删除成功");
        pw.flush();
        pw.close();
   }else{
        resp.setContentType("text/plain;charset=utf-8");
        PrintWriter pw = resp.getWriter();
        pw.print("删除失败");
        pw.flush();
        pw.close();
   }
}
运行效果

复习:
Java对象的序列化和反序列化

序列化和反序列化是什么
当两个进程远程通信时,彼此可以发送各种类型的数据。 无论是何 种类型的数据,都会以二进制序列的形式在网络上传送。比如,我 们可以通过http协议发送字符串信息;我们也可以在网络上直接发 送Java对象。发送方需要把这个Java对象转换为字节序列,才能在 网络上传送;接收方则需要把字节序列再恢复为Java对象才能正常 读取。 把Java对象转换为字节序列的过程称为对象的序列化。把字节序列 恢复为Java对象的过程称为对象的反序列化。
序列化涉及的类和接口
ObjectOutputStream代表对象输出流,它的writeObject(Object obj)方法可对参数指定的obj对象进行序列化,把得到的字节序列写 到一个目标输出流中。
ObjectInputStream代表对象输入流,它的readObject()方法从一个 源输入流中读取字节序列,再把它们反序列化为一个对象,并将其 返回。 只有实现了Serializable接口的类的对象才能被序列化。 Serializable接口是一个空接口,只起到标记作用。
将对象序列化到文件

ObjectOutputStream可以将一个内存中的Java对象通过序列化的方 式写入到磁盘的文件中。被序列化的对象必须要实现Serializable序 列化接口,否则会抛出异常。
创建对象
public class Users implements Serializable {
    private int userid;
    private String username;
    private String userage;
    public Users(int userid, String username, String userage) {
        this.userid = userid;
        this.username = username;
        this.userage = userage;
    }
    public Users() { }
    public int getUserid() {
        return userid;
   }
    public void setUserid(int userid) {
        this.userid = userid;
   }
    public String getUsername() {
        return username;
   }
    public void setUsername(String username)
   {
        this.username = username;
   }
    public String getUserage() {
        return userage;
   }
    public void setUserage(String userage) {
        this.userage = userage;
   }
    @Override
    public String toString() {
 return "Users{" +
                "userid=" + userid +
                ", username='" + username + '\'' +
                ", userage='" + userage + '\'' +
                '}';
   }
序列化对象
public class TestObjectOutputStream {
    public static void main(String[] args) {
        //创建对象输出字节流与文件输出字节流对象
        try(ObjectOutputStream oos = new ObjectOutputStream(new FileOutputStream("d:/data3"))){
            //创建Users对象
            Users users = new Users(1,"Oldlu","18");
            //将对象序列化到文件中
            oos.writeObject(users);
            //刷新
            oos.flush();
       }catch(IOException e){
            e.printStackTrace();
       }
   }
}
将对象反序列化到内存中

public class TestObjectInputStream {
    public static void main(String[] args) {
        //创建对象输入字节流与文件字节输入流对象
        try(ObjectInputStream ois = new ObjectInputStream(new FileInputStream("d:/data3")))
       {
            //将对象反序列化到内存中
            Users users = (Users) ois.readObject();
            System.out.println(users);
       }catch(Exception e){
            e.printStackTrace();
       }
   }
}
File类在IO中的作用

当以文件作为数据源或目标时,除了可以使用字符串作为文件以及 位置的指定以外,我们也可以使用File类指定。
public class TestFile {
    public static void main(String[] args) {
        //创建字符缓冲流与文件字符输入流对象
        try(BufferedReader br =  new BufferedReader(new FileReader(new File("d:/sxt.txt")));
            //创建字符输出流对象
            PrintWriter pw = new PrintWriter(new File("d:/sxt8.txt"))){
            //操作流
            String temp = "";
            int i=1;
            while((temp = br.readLine()) != null){
                pw.println(i+","+temp);
                i++;
}
            pw.flush();
       }catch(IOException e){
            e.printStackTrace();
       }
   }
}
装饰器模式构建IO流体系
装饰器模式简介
装饰器模式是GOF23种设计模式中较为常用的一种模式。它可以实 现对原有类的包装和装饰,使新的类具有更强的功能。

装饰器模式
class Iphone {
 private String name;
 public Iphone(String name) {
     this.name = name;
}
 public void show() {
    System.out.println("我是" + name + ",可以在屏幕上显示");
  }
}
class TouyingPhone {
    public Iphone phone;
    public TouyingPhone(Iphone p) {
        this.phone = p;
 }
 // 功能更强的方法
 public void show() {
     phone.show();
     System.out.println("还可以投影,在墙壁上显示");
 }
}
public class TestDecoration {
 public static void main(String[] args) {
     Iphone phone = new Iphone("iphone30");
     phone.show();
     System.out.println("===============装饰后");
     TouyingPhone typhone = newTouyingPhone(phone);
     typhone.show();
 }
}
IO流体系中的装饰器模式
IO流体系中大量使用了装饰器模式,让流具有更强的功能、更强的 灵活性。比如:
FileInputStream  fis = new FileInputStream(src);
BufferedInputStream  bis = new BufferedInputStream(fis);
显然BufferedInputStream装饰了原有的FileInputStream,让普通 的FileInputStream也具备了缓存功能,提高了效率。