原文链接:https://geniuspeng.github.io/2018/02/07/vue-compile/
之前整理了vue的响应式原理,在这里有一点是一直很模糊的,就是何时去new一个watcher,当data变化时又如何通知视图去进行怎样的更新…这里面涉及到了模板渲染和虚拟DOM的diff以及更新操作。其实模板渲染过程在实际使用vue的过程可能并不需要太深理解,但就vue来说,这些底层思想可以更好地让我们理解这个框架,以及了解为什么Vue的API要如此设计…
上一次也提过,vue2+与vue1+的模板渲染过程完全不同,vue1使用的是DocumentFragment API,具体就不介绍了(可以直接跳到MDN去了解),而vue2开始则使用了Virtual DOM,基于Virtual DOM,vue2支持了服务端渲染SSR,以及JSX语法。介绍渲染流程之前,先说明两个数据结构:抽象语法树AST,以及VNode。
AST数据结构
AST 的全称是 Abstract Syntax Tree(抽象语法树),是源代码的抽象语法结构的树状表现形式,计算机学科中编译原理的概念。而vue就是将模板代码映射为AST数据结构,进行语法解析。这里采用了flow的语法,flow是一个JS静态类型检查工具。
首先看一下 Vue 2.0 源码中 AST 数据结构 的定义:
1 2 3 4 5 6 7 8 9 10 11 12 13 14 15 16 17 18 19 20 21 22 23 24 25 26 27 |
declare type ASTNode = ASTElement | ASTText | ASTExpression declare type ASTElement = { // 有关元素的一些定义 type: 1; tag: string; attrsList: Array<{ name: string; value: string }>; attrsMap: { [key: string]: string | null }; parent: ASTElement | void; children: Array<ASTNode>; //...... } declare type ASTExpression = { type: 2; expression: string; text: string; tokens: Array<string | Object>; static?: boolean; // 2.4 ssr optimization ssrOptimizability?: number; }; declare type ASTText = { type: 3; text: string; static?: boolean; isComment?: boolean; // 2.4 ssr optimization ssrOptimizability?: number; }; |
VNODE数据结构
VNODE就是vue中的虚拟dom节点,VNODE 数据结构 如下:
1 2 3 4 5 6 7 8 9 10 11 12 13 14 15 16 17 18 19 20 21 22 23 24 25 26 27 28 29 30 31 32 33 34 |
constructor ( tag?: string, data?: VNodeData, children?: ?Array<VNode>, text?: string, elm?: Node, context?: Component, componentOptions?: VNodeComponentOptions, asyncFactory?: Function ) { this.tag = tag this.data = data this.children = children this.text = text this.elm = elm this.ns = undefined this.context = context this.fnContext = undefined this.fnOptions = undefined this.fnScopeId = undefined this.key = data && data.key this.componentOptions = componentOptions this.componentInstance = undefined this.parent = undefined this.raw = false this.isStatic = false this.isRootInsert = true this.isComment = false this.isCloned = false this.isOnce = false this.asyncFactory = asyncFactory this.asyncMeta = undefined this.isAsyncPlaceholder = false } |
真实DOM存在什么问题,为什么要用虚拟DOM
我们为什么不直接使用原生 DOM 元素,而是使用真实 DOM 元素的简化版 VNode,最大的原因就是 document.createElement 这个方法创建的真实 DOM 元素会带来性能上的损失。我们来看一个 document.createElement 方法的例子
1 2 3 4 |
let div = document.createElement('div'); for(let k in div) { console.log(k); } |
打开 console 运行一下上面的代码,会发现打印出来的属性多达 228 个,而这些属性有 90% 多对我们来说都是无用的。VNode 就是简化版的真实 DOM 元素,关联着真实的dom,比如属性elm,只包括我们需要的属性,并新增了一些在 diff 过程中需要使用的属性,例如 isStatic。
模板渲染流程
先来一张图: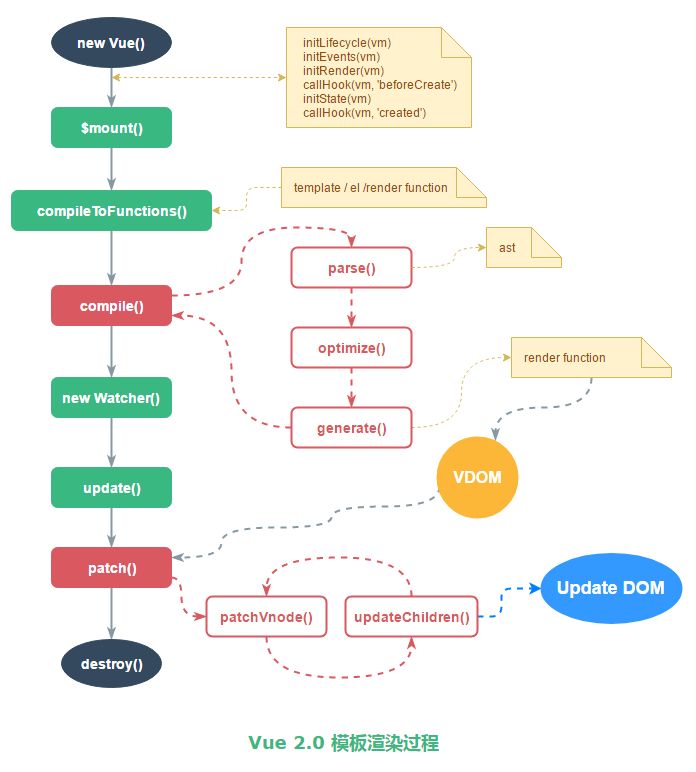
首先从$mount开始,可以看到,mount其实就是拿到了html模板作为template,然后将这个template通过compileToFunctions方法编译成render函数:
1 2 3 4 5 6 7 8 9 10 11 12 13 14 15 16 17 18 19 20 21 |
if (template) { /* istanbul ignore if */ if (process.env.NODE_ENV !== 'production' && config.performance && mark) { mark('compile') } const { render, staticRenderFns } = compileToFunctions(template, { //对获取到的template进行编译 shouldDecodeNewlines, shouldDecodeNewlinesForHref, delimiters: options.delimiters, comments: options.comments }, this) options.render = render options.staticRenderFns = staticRenderFns /* istanbul ignore if */ if (process.env.NODE_ENV !== 'production' && config.performance && mark) { mark('compile end') measure(`vue ${this._name} compile`, 'compile', 'compile end') } } |
那么这个compileToFunctions做了什么呢?主要将 template 编译成 render 函数。首先读缓存,没有缓存就调用 compile 方法拿到 render 函数 的字符串形式,再通过 new Function 的方式生成 render 函数。
1 2 3 4 5 6 7 8 9 10 11 12 13 14 15 16 17 18 |
// 有缓存的话就直接在缓存里面拿 const key = options && options.delimiters ? String(options.delimiters) + template : template if (cache[key]) { return cache[key] } const res = {} const compiled = compile(template, options) // compile 后面会详细讲 res.render = makeFunction(compiled.render) //通过 new Function 的方式生成 render 函数并缓存 const l = compiled.staticRenderFns.length res.staticRenderFns = new Array(l) for (let i = 0; i < l; i++) { res.staticRenderFns[i] = makeFunction(compiled.staticRenderFns[i]) } ...... } return (cache[key] = res) // 记录至缓存中 |
现在我们具体看一下compile方法,上文中提到 compile 方法就是将 template 编译成 render 函数 的字符串形式。
1 2 3 4 5 6 7 8 9 10 11 12 13 |
export function compile ( template: string, options: CompilerOptions ): CompiledResult { const AST = parse(template.trim(), options) //1. parse optimize(AST, options) //2.optimize const code = generate(AST, options) //3.generate return { AST, render: code.render, staticRenderFns: code.staticRenderFns } } |
这个函数主要有三个步骤组成:parse,optimize 和 generate,分别输出一个包含 AST,staticRenderFns 的对象和 render函数 的字符串。
parse 函数,主要功能是将 template字符串解析成 AST,采用了 jQuery 作者 John Resig 的 HTML Parser。前面定义了ASTElement的数据结构,parse 函数就是将template里的结构(指令,属性,标签等)转换为AST形式存进ASTElement中,最后解析生成AST。
optimize 函数(src/compiler/optimizer.js)主要功能就是标记静态节点,为后面 patch 过程中对比新旧 VNode 树形结构做优化。被标记为 static 的节点在后面的 diff 算法中会被直接忽略,不做详细的比较。
generate 函数(src/compiler/codegen/index.js)主要功能就是根据 AST 结构拼接生成 render 函数的字符串。
1 2 3 4 5 6 7 8 9 10 11 |
export function generate ( ast: ASTElement | void, options: CompilerOptions ): CodegenResult { const state = new CodegenState(options) const code = ast ? genElement(ast, state) : '_c("div")' return { render: `with(this){return ${code}}`, staticRenderFns: state.staticRenderFns } } |
其中 genElement 函数(src/compiler/codegen/index.js)是会根据 AST 的属性调用不同的方法生成字符串返回。
1 2 3 4 5 6 7 8 9 10 11 12 13 14 15 16 17 18 19 20 21 22 23 24 25 26 27 28 29 30 31 32 33 34 35 |
export function genElement (el: ASTElement, state: CodegenState): string { if (el.staticRoot && !el.staticProcessed) { return genStatic(el, state) } else if (el.once && !el.onceProcessed) { return genOnce(el, state) } else if (el.for && !el.forProcessed) { return genFor(el, state) } else if (el.if && !el.ifProcessed) { return genIf(el, state) } else if (el.tag === 'template' && !el.slotTarget) { return genChildren(el, state) || 'void 0' } else if (el.tag === 'slot') { return genSlot(el, state) } else { // component or element let code if (el.component) { code = genComponent(el.component, el, state) } else { const data = el.plain ? undefined : genData(el, state) const children = el.inlineTemplate ? null : genChildren(el, state, true) code = `_c('${el.tag}'${ data ? `,${data}` : '' // data }${ children ? `,${children}` : '' // children })` } // module transforms for (let i = 0; i < state.transforms.length; i++) { code = state.transforms[i](el, code) } return code } } |
以上就是 compile 函数中三个核心步骤的介绍,compile 之后我们得到了 render 函数 的字符串形式,后面通过 new Function 得到真正的渲染函数。数据发现变化后,会执行 Watcher 中的 _update 函数(src/core/instance/lifecycle.js),_update 函数会执行这个渲染函数,输出一个新的 VNode 树形结构的数据。然后在调用 patch 函数,拿这个新的 VNode 与旧的 VNode 进行对比,只有发生了变化的节点才会被更新到真实 DOM 树上。
mount后续
通过compile生成render方法之后,会进一步执行mount方法,在$mount中可以看到最后一句话:return mount.call(this, el, hydrating),这个mount实际上就是runtime中的mount,执行的就是lifecycle中的mountComponent方法,看一下基本逻辑:
1 2 3 4 5 6 7 8 9 10 11 12 13 14 15 16 17 18 19 20 21 22 23 24 25 26 27 28 29 30 31 32 33 34 35 36 37 38 39 40 41 42 |
// 触发 beforeMount 生命周期钩子 callHook(vm, 'beforeMount') let updateComponent //updateComponent是watcher更新时的回调,用于更新视图操作 /* istanbul ignore if */ if (process.env.NODE_ENV !== 'production' && config.performance && mark) { updateComponent = () => { const name = vm._name const id = vm._uid const startTag = `vue-perf-start:${id}` const endTag = `vue-perf-end:${id}` mark(startTag) const vnode = vm._render() mark(endTag) measure(`vue ${name} render`, startTag, endTag) mark(startTag) vm._update(vnode, hydrating) mark(endTag) measure(`vue ${name} patch`, startTag, endTag) } } else { updateComponent = () => { vm._update(vm._render(), hydrating) } } // 以前是直接new Watch赋值给vm._watcher,现在这一步放到了watcher的构造函数中 // we set this to vm._watcher inside the watcher's constructor // since the watcher's initial patch may call $forceUpdate (e.g. inside child // component's mounted hook), which relies on vm._watcher being already defined new Watcher(vm, updateComponent, noop, null, true /* isRenderWatcher */) hydrating = false // manually mounted instance, call mounted on self // mounted is called for render-created child components in its inserted hook if (vm.$vnode == null) { vm._isMounted = true callHook(vm, 'mounted') } return vm |
首先会new一个watcher对象(主要是将模板与数据建立联系),在watcher对象创建后,会运行传入的方法 vm._update(vm._render(), hydrating) 。其中的vm._render()主要作用就是运行前面compiler生成的render方法,并返回一个vNode对象。vm.update() 则会对比新的 vdom 和当前 vdom,并把差异的部分渲染到真正的 DOM 树上。
patch
patch.js 就是新旧 VNode 对比的 diff 函数,主要是为了优化dom,通过算法使操作dom的行为降到最低,diff 算法来源于 snabbdom,是 VDOM 思想的核心。snabbdom 的算法为了 DOM 操作跨层级增删节点较少的这一目标进行优化,它只会在同层级进行, 不会跨层级比较。
文末福利:
福利一:前端,Java,产品经理,微信小程序,Python等10G资源合集大放送:https://www.jianshu.com/p/e8197d4d9880
福利二:微信小程序入门与实战全套详细视频教程。
【领取方法】
关注 【编程微刊】微信公众号:
回复【小程序demo】一键领取130个微信小程序源码demo资源。
回复【领取资源】一键领取前端,Java,产品经理,微信小程序,Python等资源合集10G资源大放送。