讲解关于slam一系列文章汇总链接:史上最全slam从零开始,针对于本栏目讲解(02)Cartographer源码无死角解析-链接如下:
(02)Cartographer源码无死角解析- (00)目录_最新无死角讲解:https://blog.csdn.net/weixin_43013761/article/details/127350885
文末正下方中心提供了本人 联系方式, 点击本人照片即可显示 W X → 官方认证 {\color{blue}{文末正下方中心}提供了本人 \color{red} 联系方式,\color{blue}点击本人照片即可显示WX→官方认证} 文末正下方中心提供了本人联系方式,点击本人照片即可显示WX→官方认证
一、前言
通过前几篇博客,了解到 ROS 是如何发布 Cartographer 计算出来的 3D点云地图、子图位姿、Landmark、2D点云数据、tf、机器人tracking frame轨迹发布等。但是却没有讲解2D栅格地图是如何发发布到 Rviz 进行展示的。
这是因为 2D栅格地图 并不是通过话题的方式进行发布的,而是有一个自己的服务。在 node.cc 构造函数中,可以看到其有创建很多的服务:
	// Step: 2 声明发布对应名字的ROS服务, 并将服务的发布器放入到vector容器中
	service_servers_.push_back(node_handle_.advertiseService(kSubmapQueryServiceName, &Node::HandleSubmapQuery, this))
......
	service_servers_.push_back(node_handle_.advertiseService(kReadMetricsServiceName, &Node::HandleReadMetrics, this));
这些服务实际上就是执行对应的回调函数,从命名可以知道,关于子图的服务对应的回调函数就是 Node::HandleSubmapQuery(),其他的服务这里就暂时不进行讲解了。
该函数主要完成子图的发送,但是很明显,这里都是子图,而不是全局地图,那么全局地图又在哪里获取呢?如本人运行的 src/cartographer_ros/cartographer_ros/launch/demo_backpack_2d.launch 文件,其包含了 backpack_2d.launch,而 backpack_2d.launch 存在如下内容:
  <node name="cartographer_occupancy_grid_node" pkg="cartographer_ros"
      type="cartographer_occupancy_grid_node" args="-resolution 0.05" />
可知,其运行了一个 cartographer_occupancy_grid_node 的可执行文件,且与栅格占用地图有关,其对应的源码位于 src/cartographer_ros/cartographer_ros/cartographer_ros/occupancy_grid_node_main.cc 文件中,后面会重点对该文件进行分析。当然,第一步是先分析 Node::HandleSubmapQuery()。
二、Node::HandleSubmapQuery()
/**
 * @brief 获取对应id轨迹的 索引为submap_index 的submap
 *
 * @param[in] request 获取submap的请求
 * @param[out] response 服务的回应
 * @return true: ROS的service只能返回true, 返回false程序会中断
 */
bool Node::HandleSubmapQuery(
    ::cartographer_ros_msgs::SubmapQuery::Request& request,
    ::cartographer_ros_msgs::SubmapQuery::Response& response) {


  absl::MutexLock lock(&mutex_);
  map_builder_bridge_.HandleSubmapQuery(request, response);
  return true;
}
该函数就不做过多解释了,其就是上锁然后调用 MapBuilderBridge::HandleSubmapQuery() 这个函数,其就是一个子图查询服务。
三、HandleSubmapQuery()-整体注释
代码不是很复杂,这里先给出整体注释:
/**
 * @brief 获取对应id轨迹的 索引为 submap_index 的地图的栅格值及其他信息
 *
 * @param[in] request 轨迹id与submap的index
 * @param[in] response 是否成功
 */
void MapBuilderBridge::HandleSubmapQuery(
    cartographer_ros_msgs::SubmapQuery::Request& request,
    cartographer_ros_msgs::SubmapQuery::Response& response) {


  cartographer::mapping::proto::SubmapQuery::Response response_proto;
  cartographer::mapping::SubmapId submap_id{

    request.trajectory_id,
                                            request.submap_index};
  // 获取压缩后的地图数据
  const std::string error =
      map_builder_->SubmapToProto(submap_id, &response_proto);
  if (!error.empty()) {


    LOG(ERROR) << error;
    response.status.code = cartographer_ros_msgs::StatusCode::NOT_FOUND;
    response.status.message = error;
    return;
  }

  response.submap_version = response_proto.submap_version();

  // 将response_proto中的地图栅格值存入到response中
  for (const auto& texture_proto : response_proto.textures()) {


    response.textures.emplace_back();
    // 获取response中存储地图变量的引用
    auto& texture = response.textures.back();
    // 对引用的变量进行赋值
    texture.cells.insert(texture.cells.begin(), texture_proto.cells().begin(),
                         texture_proto.cells().end());
    texture.width = texture_proto.width();
    texture.height = texture_proto.height();
    texture.resolution = texture_proto.resolution();
    texture.slice_pose = ToGeometryMsgPose(
        cartographer::transform::ToRigid3(texture_proto.slice_pose()));
  }
  response.status.message = "Success.";
  response.status.code = cartographer_ros_msgs::StatusCode::OK;
}
四、MapBuilder::SubmapToProto()
该函数具体实现如下:
// 返回压缩后的地图数据
std::string MapBuilder::SubmapToProto(
    const SubmapId& submap_id, proto::SubmapQuery::Response* const response) {


  // 进行id的检查
  if (submap_id.trajectory_id < 0 ||
      submap_id.trajectory_id >= num_trajectory_builders()) {


    return "Requested submap from trajectory " +
           std::to_string(submap_id.trajectory_id) + " but there are only " +
           std::to_string(num_trajectory_builders()) + " trajectories.";
  }

  // 获取地图数据
  const auto submap_data = pose_graph_->GetSubmapData(submap_id);
  if (submap_data.submap == nullptr) {


    return "Requested submap " + std::to_string(submap_id.submap_index) +
           " from trajectory " + std::to_string(submap_id.trajectory_id) +
           " but it does not exist: maybe it has been trimmed.";
  }

  // 将压缩后的地图数据放入response
  submap_data.submap->ToResponseProto(submap_data.pose, response);
  return "";
}
首先检测输入的子图id是否正常,不正常则报错,其告知只能选择那些轨迹的子图。接着就是调用 pose_graph_->GetSubmapData() 从后端获取数据,子图数据存储于后端优化 PoseGraph2D::data::submap_data 这个变量之中。然后进行数据压缩,也就是调用 submap_data.submap->ToResponseProto() 这个函数,其会把压缩之后的数据存放在 response 之中。
五、ProbabilityGrid::DrawToSubmapTexture()-子图压缩
进入到 Submap2D::ToResponseProto 函数之后,可以看到其调用了函数代码 grid()->DrawToSubmapTexture(),该函数实现于 src/cartographer/cartographer/mapping/2d/probability_grid.cc 文件中,来看看该函数的实现。
首先子图在构建的时候会扩张,扩展的地图可能存在很多未知区域,也就是栅格值为 0.5,其是没有太大意义的,所以只需要根据 ProbabilityGrid::known_cells_box_ 把探索过的区域剪裁下来就可以了,然后再进行图像数据的压缩。先看一下该函数的的整体注释,然后再进行细节分析:
// 获取压缩后的地图栅格数据
bool ProbabilityGrid::DrawToSubmapTexture(
    proto::SubmapQuery::Response::SubmapTexture* const texture,
    transform::Rigid3d local_pose) const {


  Eigen::Array2i offset;
  CellLimits cell_limits;
  // 根据bounding_box对栅格地图进行裁剪
  ComputeCroppedLimits(&offset, &cell_limits);

  std::string cells;
  // 遍历地图, 将栅格数据存入cells
  for (const Eigen::Array2i& xy_index : XYIndexRangeIterator(cell_limits)) {


    if (!IsKnown(xy_index + offset)) {


      cells.push_back(0 /* unknown log odds value */);
      cells.push_back(0 /* alpha */);
      continue;
    }
    // We would like to add 'delta' but this is not possible using a value and
    // alpha. We use premultiplied alpha, so when 'delta' is positive we can
    // add it by setting 'alpha' to zero. If it is negative, we set 'value' to
    // zero, and use 'alpha' to subtract. This is only correct when the pixel
    // is currently white, so walls will look too gray. This should be hard to
    // detect visually for the user, though.
    // 我们想添加 'delta',但使用值和 alpha 是不可能的
    // 我们使用预乘 alpha,因此当 'delta' 为正时,我们可以通过将 'alpha' 设置为零来添加它。
    // 如果它是负数,我们将 'value' 设置为零,并使用 'alpha' 进行减法。 这仅在像素当前为白色时才正确,因此墙壁看起来太灰。
    // 但是,这对于用户来说应该很难在视觉上检测到。

    // delta处于[-127, 127]
    const int delta =
        128 - ProbabilityToLogOddsInteger(GetProbability(xy_index + offset));
    const uint8 alpha = delta > 0 ? 0 : -delta;
    const uint8 value = delta > 0 ? delta : 0;
    // 存数据时存了2个值, 一个是栅格值value, 另一个是alpha透明度
    cells.push_back(value);
    cells.push_back((value || alpha) ? alpha : 1);
  }

  // 保存地图栅格数据时进行压缩
  common::FastGzipString(cells, texture->mutable_cells());

  // 填充地图描述信息
  texture->set_width(cell_limits.num_x_cells);
  texture->set_height(cell_limits.num_y_cells);
  const double resolution = limits().resolution();
  texture->set_resolution(resolution);
  const double max_x = limits().max().x() - resolution * offset.y();
  const double max_y = limits().max().y() - resolution * offset.x();
  *texture->mutable_slice_pose() = transform::ToProto(
      local_pose.inverse() *
      transform::Rigid3d::Translation(Eigen::Vector3d(max_x, max_y, 0.)));

  return true;
}
( 1 ) \color{blue}(1) (1) 首先调用 ComputeCroppedLimits() 求得已知区域的 offset 平移与大小 cell_limits。
( 2 ) \color{blue}(2) (2) 创建一个 std::string cells 实例,用于存储剪切之后的地图,源码中对 XYIndexRangeIterator(cell_limits) 进行迭代,可以理解为 xy_index 就剪切之后(新子图)中像素坐标,xy_index + offset 就是未剪切之前子图(旧子图)中像素坐标。
( 3 ) \color{blue}(3) (3) 判断一下新子图像素对应与旧子图中的位置,是否被探索过,如果没有,则 log odds(栅格值) 与透明度都设置为 0,添加到新地图 cells中。
( 4 ) \color{blue}(4) (4) 如果被探索过,先把其被占用的概率赋值给缩放到 [-127, 127],赋值给 delta,该数值越大,说明被占用的几率越大。
( 5 ) \color{blue}(5) (5) 对于一个像素的描述,使用两个 uint8来描述,也就是 16 个字节。
第一个为像素值 value,第二个为透明度 alpha。总的来说,最后的效果如下:
1.当 delta 大于 0 时,表示需要添加一个正数值。此时,value 被设置为 delta,而 alpha 被设置为 0。也就是说,value 表示要添加的正数值,而 alpha 表示透明度为 0,即完全不透明。
2.当 delta 小于等于 0 时,表示需要减去一个负数值或者不进行任何操作。此时,value 被设置为 0,而 alpha 被设置为 -delta。也就是说,value 为 0 表示不进行任何操作,而 alpha 表示透明度为 -delta,即根据需要减去的负数值的大小确定透明度。
根据这些设定,value 和 alpha 的取值情况如下:
当 delta 大于 0 时,value 大于 0,alpha 为 0。
当 delta 小于等于 0 时,value 为 0,alpha 大于等于 0。
对于占用率比较高的,不透明。对于占用率低,约低则约透明。
( 6 ) \color{blue}(6) (6) 设置号像素值与透明度之后调用 common::FastGzipString() 进行压缩,其内部压缩核心操作为 boost::iostreams::gzip_compressor。
( 7 ) \color{blue}(7) (7) 对剪切之后的地图重新进行描述,如高宽的设置(像素为单位),分辨率,以及世界坐标系下x,y 轴的最大值。且为其设置了位姿,也就是下面这句代码:
  const double max_x = limits().max().x() - resolution * offset.y();
  const double max_y = limits().max().y() - resolution * offset.x();
  *texture->mutable_slice_pose() = transform::ToProto(
      local_pose.inverse() *
      transform::Rigid3d::Translation(Eigen::Vector3d(max_x, max_y, 0.)));
这个地方需要注意,首先子图的初始位姿时基于local系的,其与 max_x, max_y 都是世界物理单位。另外,local 系 +x 轴为机器人起始位置正前方,+y 轴为机器人起始位置正左方,本人绘制图像如下:
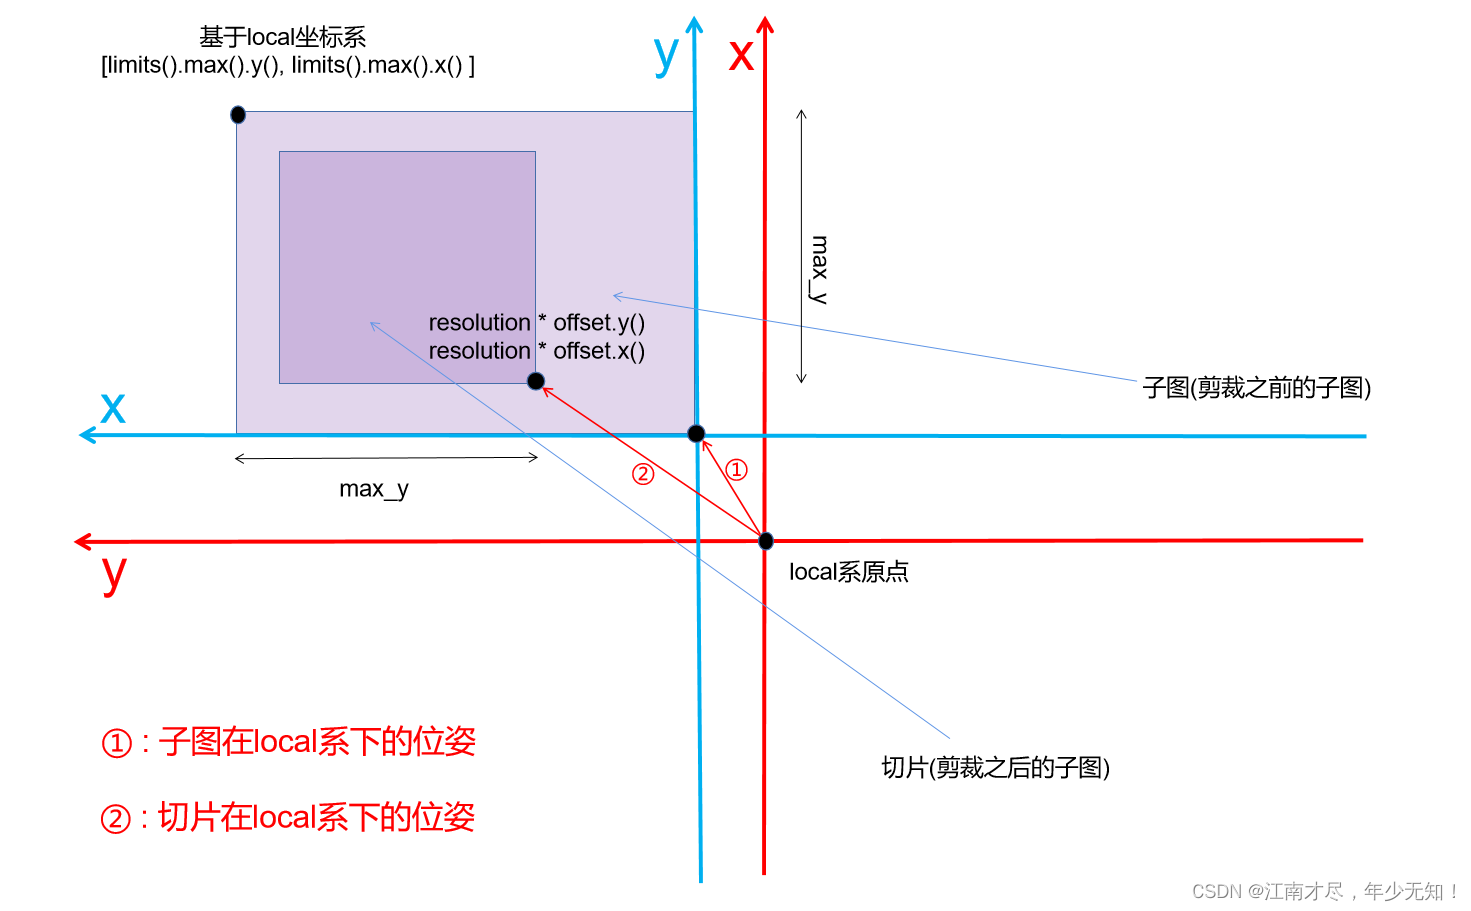
红色坐标系为local系,蓝色坐标系为submap系,①表示子图在local系下的位姿,也就是源码中的 local_pose, ②表示切片在local系下的位姿,切片的原点应该是对应于代码中的[resolutionoffset.y(), resolutionoffset.y()],本人也没有理解 *texture->mutable_slice_pose() 最终的结果是什么,从命名来看可能是切片相对于子图的位姿,但是什么求解过程涉及到 limits().max() 与 max_x、max_y。感觉最终获得的结果,不知道是个啥玩意。这里先记录一下,为 疑问 1 \color{red}疑问1 疑问1
六、结语
ProbabilityGrid::DrawToSubmapTexture() 函数会返回到 Submap2D::ToResponseProto() 再返回到 MapBuilder::SubmapToProto() 再到 MapBuilderBridge::HandleSubmapQuery()。回到该函数,可以知道这样就获得了地图压缩之后的结果 response_proto,对于 response_proto 来说其可以存储多个 texture 对象,不过这里只存储了一个。把 response_proto 根式的数据转换成 response 之久,该函数结束,然后 Node::HandleSubmapQuery() 且执行结束。
到这里,大致明白了子图压缩压缩过程,首先把子图中已经探索过的区域剪切下来,然后再进行压缩。但是遗留下了一个疑问。
疑问 1 : \color{red}疑问1: 疑问1: src/cartographer/cartographer/mapping/2d/probability_grid.cc 文件中的 ProbabilityGrid::DrawToSubmapTexture 函数的 proto::SubmapQuery::Response::SubmapTexture* 示例对象 texture 中texture->mutable_slice_pose() 的含义具体是什么。