Binlog
Binlog 介绍
TiDB Binlog 工具可以手机TiDB数据库的日志(Binlog),并且提供数据同步和准实时备份功能。
架构与原理
binlog格式
与MySQL Binlog的Row格式类似(按事务提交的顺序记录,并且只记增删改,记录每一行的改变)。
以每一行数据的变更为最小单位进行记录。
只有被提交的事务才会被记录,且记录的是完整事务。
在Binlog中会记录主键和开始的时间戳以及提交的时间戳
#注意事项
在导出数据之前要部署好Pump组件和开启Binlog。
commit_ts通过dumpling导出数据的目录的metadata获取。
部署完毕查看Pump、Drainer运行状态和checkpoint。
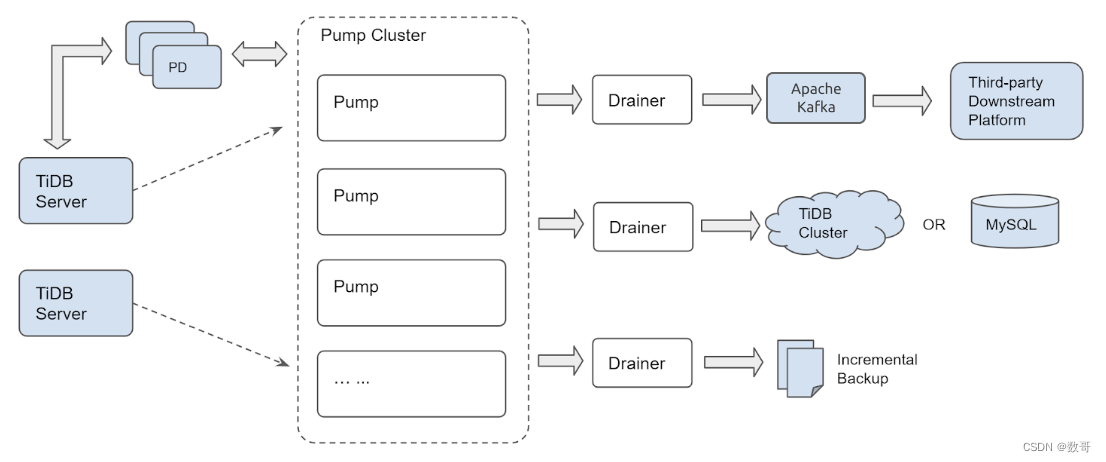
Pump
多个 Pump 形成一个集群,可以水平扩容,各个 Pump 可以均匀地承担业务的压力。
TiDB 通过内置的 Pump Client 将 binlog 分发到各个 Pump,即使有部分 Pump 出现故障也不影响 TiDB 的业务。
Pump 内部实现了简单的 kv 来存储 binlog,方便对 binlog 数据的管理。
原来 Drainer 的 binlog 排序逻辑移到了 Pump 来做,而 Pump 是可扩展的,这样就能提高整体的同步性能。
Drainer 不再需要像原来一样读取一批 binlog 到内存里进行堆排序,只需要依次读取各个 Pump 的 binlog 进行归并排序,这样可以大大节省内存的使用,同时也更容易做内存控制。
Drainer
Drianer负责各个Pump的Binlog,归并排序后发送到下游。
Drainer支持relay log功能,通过relay log保证下游集群的一致性状态。
Drainer支持将Binlog同步到MySQL TiDB Kafka或者本地文件
binlogctl
获取TiDB集群当前的TSO。
查看Pump/Drainer状态。
修改Pump/Drainer状态。
暂停/下线Pump/Drainer
适用TiUP 部署TiDB Binlog
如果适用TiUP部署,则需要在TiUP拓扑结构中增加TiDB Binlog拓扑架构,关键参数如下:
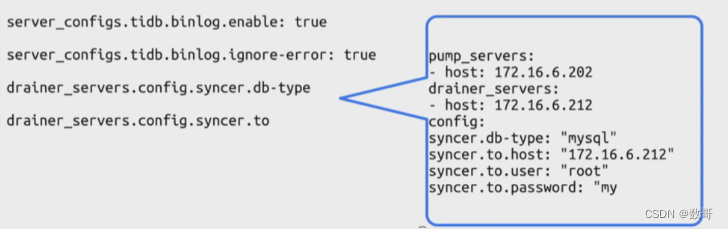
server_configs.tidb.binlog.enable: true	# 开启 TiDB Binlog 服务,默认为 false。

server_configs.tidb.binlog.ignore-error: true
高可用场景建议开启,如果设置为 true,发生错误时,TiDB 会停止写入 TiDB Binlog,并且在监控项 tidb_server_critical_error_total 上计数加 1;如果设置为 false,一旦写入 TiDB Binlog 失败,会停止整个 TiDB 的服务。

drainer_servers.config.syncer.db-type
TiDB Binlog 的下游类型,目前支持 mysql、tidb、kafka 和 file。

drainer_servers.config.syncer.to
TiDB Binlog 的下游配置。根据 db-type 的不同,该选项可配置下游数据库的连接参数、Kafka 的连接参数、文件保存路径。
binlogctl
binlogctl 支持如下这些功能:
查看 Pump/Drainer 状态
暂停/下线 Pump/Drainer
Pump/Drainer 异常状态处理
使用 binlogctl 的场景:
同步出现故障/检查运行情况,需要查看 Pump/Drainer 的状态
维护集群,需要暂停/下线 Pump/Drainer
Pump/Drainer 异常退出,状态没有更新,或者状态不符合预期,对业务造成影响
命令示例:
查询所有的 Pump/Drainer 的状态:
设置 cmd 为 pumps 或者 drainers 来查看所有 Pump 或者 Drainer 的状态。例如:
bin/binlogctl -pd-urls=http://127.0.0.1:2379 -cmd pumps
[2019/04/28 09:29:59.016 +00:00] [INFO] [nodes.go:48] ["query node"] [type=pump] [node="{NodeID: 1.1.1.1:8250, Addr: pump:8250, State: online, MaxCommitTS: 408012403141509121, UpdateTime: 2019-04-28 09:29:57 +0000 UTC}"]
bin/binlogctl -pd-urls=http://127.0.0.1:2379 -cmd drainers
[2019/04/28 09:29:59.016 +00:00] [INFO] [nodes.go:48] ["query node"] [type=drainer] [node="{NodeID: 1.1.1.1:8249, Addr: 1.1.1.1:8249, State: online, MaxCommitTS: 408012403141509121, UpdateTime: 2019-04-28 09:29:57 +0000 UTC}"]
binlogctl 提供以下命令暂停/下线服务:
| cmd | 说明 | 示例 |
|---|---|---|
| pause-pump | 暂停 Pump | bin/binlogctl -pd-urls=http://127.0.0.1:2379 -cmd pause-pump -node-id ip-127-0-0-1:8250 |
| pause-drainer | 暂停 Drainer | bin/binlogctl -pd-urls=http://127.0.0.1:2379 -cmd pause-drainer -node-id ip-127-0-0-1:8249 |
| offline-pump | 下线 Pump | bin/binlogctl -pd-urls=http://127.0.0.1:2379 -cmd offline-pump -node-id ip-127-0-0-1:8250 |
| offline-drainer | 下线 Drainer | bin/binlogctl -pd-urls=http://127.0.0.1:2379 -cmd offline-drainer -node-id ip-127-0-0-1:8249 |
binlogctl 会发送 HTTP 请求给 Pump/Drainer,Pump/Drainer 收到命令后会主动执行对应的退出流程。
异常情况下修改 Pump/Drainer 的状态
在服务正常运行以及符合流程的暂停、下线过程中,Pump/Drainer 的状态都是可以正确的。但是在一些异常情况下 Pump/Drainer 无法正确维护自己的状态,可能会影响数据同步任务,在这种情况下需要使用 binlogctl 修复状态信息。
设置 cmd 为 update-pump 或者 update-drainer 来更新 Pump 或者 Drainer 的状态。Pump 和 Drainer 的状态可以为 paused 或者 offline。例如:
bin/binlogctl -pd-urls=http://127.0.0.1:2379 -cmd update-pump -node-id ip-12
Binlog集群监控
监控指标
Pump
| metric 名称 | 说明 |
|---|---|
| Storage Size | 记录磁盘的总空间大小 (capacity),以及可用磁盘空间大小 (available) |
| Metadata | 记录每个 Pump 的可删除 binlog 的最大 tso (gc_tso),以及保存的 binlog 的最大的 commit tso (max_commit_tso)。 |
| Write Binlog QPS by Instance | 每个 Pump 接收到的写 binlog 请求的 QPS |
| Write Binlog Latency | 记录每个 Pump 写 binlog 的延迟时间 |
| Storage Write Binlog Size | Pump 写 binlog 数据的大小 |
| Storage Write Binlog Latency | Pump 中的 storage 模块写 binlog 数据的延迟 |
| Pump Storage Error By Type | Pump 遇到的 error 数量,按照 error 的类型进行统计 |
| Query TiKV | Pump 通过 TiKV 查询事务状态的次数 |
Drainer
| metric 名称 | 说明 |
|---|---|
| Checkpoint TSO | Drainer 已经同步到下游的 binlog 的最大 TSO 对应的时间。可以通过该指标估算同步延迟时间 |
| Pump Handle TSO | 记录 Drainer 从各个 Pump 获取到的 binlog 的最大 TSO 对应的时间 |
| Pull Binlog QPS by Pump NodeID | Drainer 从每个 Pump 获取 binlog 的 QPS |
| 95% Binlog Reach Duration By Pump | 记录 binlog 从写入 Pump 到被 Drainer 获取到这个过程的延迟时间 |
| Error By Type | Drainer 遇到的 error 数量,按照 error 的类型进行统计 |
| SQL Query Time | Drainer 在下游执行 SQL 的耗时 |
| Drainer Event | 各种类型 event 的数量,event 包括 ddl、insert、delete、update、flush、savepoint |
| Execute Time | 写入 binlog 到同步下游模块所消耗的时间 |
| 95% Binlog Size | Drainer 从各个 Pump 获取到 binlog 数据的大小 |
| DDL Job Count | Drainer 处理的 DDL 的数量 |
| Queue Size | Drainer 内部工作队列大小 |
实验1_TiDB同步到MySQL
- 拓扑架构

2、创建用户(下游目标端)
mysql> create user 'pumper'@'192.168.16.10' identified with mysql_native_password  by 'Aa123ab!';
Query OK, 0 rows affected (0.12 sec)

mysql> grant all privileges on *.* to 'pumper'@'192.168.16.10';
Query OK, 0 rows affected (0.02 sec)
3、添加pump和Drainer
[root@tiup ~]# more scale-out-pumper.yaml  # 注意缩进
pump_servers:
- host: 192.168.16.10
  port: 8250
  deploy_dir: "/data/tidb/pumper/developy"
  data_dir: "/data/tidb/pumper/data"
  log_dir: "/data/tidb/pumper/log"
  arch: "x86_64"
  os: "linux"

drainer_servers:
- host: 192.168.16.10
  port: 8249
  deploy_dir: "/data/tidb/drainer/developy"
  data_dir: "/data/tidb/drainer/data"
  log_dir: "/data/tidb/drainer/log"
  config:
   syncer.db-type: "mysql"
   syncer.to.host: "192.168.16.10"
   syncer.to.user: "pumper"
   syncer.to.password: "Aa123ab!"
   syncer.to.port: 3306
  arch: "x86_64"
  os: "linux"
[root@tiup ~]# tiup cluster scale-out tidb-test ./scale-out-pumper.yaml
tiup is checking updates for component cluster ...
Starting component `cluster`: /root/.tiup/components/cluster/v1.12.3/tiup-cluster scale-out tidb-test ./scale-out-pumper.yaml
Please confirm your topology:
Cluster type:    tidb
Cluster name:    tidb-test
Cluster version: v6.1.6
Role     Host           Ports  OS/Arch       Directories
----     ----           -----  -------       -----------
pump     192.168.16.10  8250   linux/x86_64  /data/tidb/pumper/developy,/data/tidb/pumper/data
drainer  192.168.16.10  8249   linux/x86_64  /data/tidb/drainer/developy,/data/tidb/drainer/data
....
4、扩容后,查看集群状态
[root@tiup ~]# tiup cluster display tidb-test
tiup is checking updates for component cluster ...
Starting component `cluster`: /root/.tiup/components/cluster/v1.12.3/tiup-cluster display tidb-test
Cluster type:       tidb
Cluster name:       tidb-test
Cluster version:    v6.1.6
Deploy user:        root
SSH type:           builtin
Dashboard URL:      http://192.168.16.10:2379/dashboard
Grafana URL:        http://192.168.16.10:3000
ID                   Role          Host           Ports        OS/Arch       Status   Data Dir                      Deploy Dir
--                   ----          ----           -----        -------       ------   --------                      ----------
192.168.16.10:9093   alertmanager  192.168.16.10  9093/9094    linux/x86_64  Up       /tidb-data/alertmanager-9093  /tidb-deploy/alertmanager-9093
192.168.16.10:8249   drainer       192.168.16.10  8249         linux/x86_64  Up       /data/tidb/drainer/data       /data/tidb/drainer/developy
192.168.16.10:3000   grafana       192.168.16.10  3000         linux/x86_64  Up       -                             /tidb-deploy/grafana-3000
192.168.16.10:2379   pd            192.168.16.10  2379/2380    linux/x86_64  Up|L|UI  /tidb-data/pd-2379            /tidb-deploy/pd-2379
192.168.16.10:9090   prometheus    192.168.16.10  9090/12020   linux/x86_64  Up       /tidb-data/prometheus-9090    /tidb-deploy/prometheus-9090
192.168.16.10:8250   pump          192.168.16.10  8250         linux/x86_64  Up       /data/tidb/pumper/data        /data/tidb/pumper/developy
192.168.16.10:4000   tidb          192.168.16.10  4000/10080   linux/x86_64  Up       -                             /tidb-deploy/tidb-4000
192.168.16.10:20160  tikv          192.168.16.10  20160/20180  linux/x86_64  Up       /tidb-data/tikv-20160         /tidb-deploy/tikv-20160
Total nodes: 8
5、开启binlog
注意一定是先安装pump,再开启binlog
- 编辑参数
tiup cluster edit-config tidb-test
global:
  user: root
  ssh_port: 22
  ssh_type: builtin
  deploy_dir: /tidb-deploy
  data_dir: /tidb-data
  os: linux
server_configs:
  tidb:
    binlog.enable: true
    binlog.ignore-error: true
- 重新加载,生效参数
[root@tiup ~]# tiup cluster reload tidb-test
- 查看binlog是否已开启
mysql> show variables like 'log_bin';
+---------------+-------+
| Variable_name | Value |
+---------------+-------+
| log_bin       | ON    |
+---------------+-------+
1 row in set (0.00 sec)
6、查看pump和drainer状态
可以看到状态都为online
mysql> show pump status;
+--------------------+--------------------+--------+--------------------+---------------------+
| NodeID             | Address            | State  | Max_Commit_Ts      | Update_Time         |
+--------------------+--------------------+--------+--------------------+---------------------+
| 192.168.16.10:8250 | 192.168.16.10:8250 | online | 442505740284854274 | 2023-06-29 03:57:18 |
+--------------------+--------------------+--------+--------------------+---------------------+
1 row in set (0.00 sec)

show drainer status
7、数据验证
上游(TiDB)DML操作
下游(MySQL) 同步到数据变更
实验2_binlogctl
使用binlogctl来管理TiDB Binlog的复制,需要预先下载binlogctl工具,方法如下:
1、下载tidb-toolkit,里面自带了这个工具
[root@tiup tidb-toolkit]# ls binlogctl
binlogctl
2、查看pump节点状态
[root@tiup tidb-toolkit]# ./binlogctl -pd-urls=http://192.168.16.10:2379 -cmd pumps
[2023/06/29 04:11:57.445 -04:00] [INFO] [nodes.go:53] ["query node"] [type=pump] [node="{NodeID: 192.168.16.10:8250, Addr: 192.168.16.10:8250, State: online, MaxCommitTS: 442505970413207553, UpdateTime: 2023-06-29 04:11:56 -0400 EDT}"]
3、查看drainer节点状态
[root@tiup tidb-toolkit]# ./binlogctl -pd-urls=http://192.168.16.10:2379 -cmd drainers
[2023/06/29 04:12:04.885 -04:00] [INFO] [nodes.go:53] ["query node"] [type=drainer] [node="{NodeID: 192.168.16.10:8249, Addr: 192.168.16.10:8249, State: paused, MaxCommitTS: 442505507304898561, UpdateTime: 2023-06-29 03:50:26 -0400 EDT}"]
4、暂停drainer节点
- 暂停
[root@tiup tidb-toolkit]# ./binlogctl -pd-urls=http://192.168.16.10:2379 -cmd pause-drainer -node-id 192.168.16.10:8249
- 数据已停止同步
5、重启drainer 节点
- 进入到drainer节点的目录
cd /data/tidb/drainer/developy/bin
- 启动drainer节点
./drainer -pd-urls=http://192.168.16.10:2379 -config ../conf/drainer.toml
- 数据恢复同步
使用 Binary 部署 TiDB Binlog
当然推荐还是使用TiUP部署TiDB Binlog
-
下载 TiDB Binlog 安装包
TiDB Binlog 安装包位于 TiDB 离线工具包中。 -
使用样例
假设有三个 PD,一个 TiDB,另外有两台机器用于部署 Pump,一台机器用于部署 Drainer。各个节点信息如下:
TiDB="192.168.0.10"
PD1="192.168.0.16"
PD2="192.168.0.15"
PD3="192.168.0.14"
Pump="192.168.0.11"
Pump="192.168.0.12"
Drainer="192.168.0.13"
下面以此为例,说明 Pump/Drainer 的使用。
使用 binary 部署 Pump
- Pump 命令行参数说明(以在 “192.168.0.11” 上部署为例)
Usage of Pump:
-L string
    日志输出信息等级设置:debug,info,warn,error,fatal (默认 "info")
-V
    打印版本信息
-addr string
    Pump 提供服务的 RPC 地址(-addr="192.168.0.11:8250")
-advertise-addr string
    Pump 对外提供服务的 RPC 地址(-advertise-addr="192.168.0.11:8250")
-config string
    配置文件路径,如果你指定了配置文件,Pump 会首先读取配置文件的配置;
    如果对应的配置在命令行参数里面也存在,Pump 就会使用命令行参数的配置来覆盖配置文件里的配置。
-data-dir string
    Pump 数据存储位置路径
-gc int
    Pump 只保留多少天以内的数据 (默认 7)
-heartbeat-interval int
    Pump 向 PD 发送心跳间隔 (单位 秒)
-log-file string
    log 文件路径
-log-rotate string
    log 文件切换频率,hour/day
-metrics-addr string
    Prometheus Pushgateway 地址,不设置则禁止上报监控信息
-metrics-interval int
    监控信息上报频率 (默认 15,单位 秒)
-node-id string
    Pump 节点的唯一识别 ID,如果不指定,程序会根据主机名和监听端口自动生成
-pd-urls string
    PD 集群节点的地址 (-pd-urls="http://192.168.0.16:2379,http://192.168.0.15:2379,http://192.168.0.14:2379")
-fake-binlog-interval int
    Pump 节点生成 fake binlog 的频率 (默认 3,单位 秒)
- Pump 配置文件(以在 “192.168.0.11” 上部署为例)
# Pump Configuration

# Pump 绑定的地址
addr = "192.168.0.11:8250"

# Pump 对外提供服务的地址
advertise-addr = "192.168.0.11:8250"

# Pump 只保留多少天以内的数据 (默认 7)
gc = 7

# Pump 数据存储位置路径
data-dir = "data.pump"

# Pump 向 PD 发送心跳的间隔 (单位 秒)
heartbeat-interval = 2

# PD 集群节点的地址 (英文逗号分割,中间不加空格)
pd-urls = "http://192.168.0.16:2379,http://192.168.0.15:2379,http://192.168.0.14:2379"

# [security]
# 如无特殊安全设置需要,该部分一般都注解掉
# 包含与集群连接的受信任 SSL CA 列表的文件路径
# ssl-ca = "/path/to/ca.pem"
# 包含与集群连接的 PEM 形式的 X509 certificate 的路径
# ssl-cert = "/path/to/drainer.pem"
# 包含与集群链接的 PEM 形式的 X509 key 的路径
# ssl-key = "/path/to/drainer-key.pem"

# [storage]
# 设置为 true(默认值)来保证可靠性,确保 binlog 数据刷新到磁盘
# sync-log = true

# 当可用磁盘容量小于该设置值时,Pump 将停止写入数据
# 42 MB -> 42000000, 42 mib -> 44040192
# default: 10 gib
# stop-write-at-available-space = "10 gib"

# Pump 内嵌的 LSM DB 设置,除非对该部分很了解,否则一般注解掉
# [storage.kv]
# block-cache-capacity = 8388608
# block-restart-interval = 16
# block-size = 4096
# compaction-L0-trigger = 8
# compaction-table-size = 67108864
# compaction-total-size = 536870912
# compaction-total-size-multiplier = 8.0
# write-buffer = 67108864
# write-L0-pause-trigger = 24
# write-L0-slowdown-trigger = 17
- 启动示例
./pump -config pump.toml
使用 binary 部署 Drainer
- Drainer 命令行参数说明(以在 “192.168.0.13” 上部署为例)
Usage of Drainer
-L string
    日志输出信息等级设置:debug,info,warn,error,fatal (默认 "info")
-V
    打印版本信息
-addr string
    Drainer 提供服务的地址(-addr="192.168.0.13:8249")
-c int
    同步下游的并发数,该值设置越高同步的吞吐性能越好 (default 1)
-cache-binlog-count int
    缓存中的 binlog 数目限制(默认 8)
    如果上游的单个 binlog 较大导致 Drainer 出现 OOM 时,可尝试调小该值减少内存使用
-config string
    配置文件路径,Drainer 会首先读取配置文件的配置;
    如果对应的配置在命令行参数里面也存在,Drainer 就会使用命令行参数的配置来覆盖配置文件里面的配置
-data-dir string
    Drainer 数据存储位置路径 (默认 "data.drainer")
-dest-db-type string
    Drainer 下游服务类型 (默认为 mysql,支持 tidb、kafka、file)
-detect-interval int
    向 PD 查询在线 Pump 的时间间隔 (默认 10,单位 秒)
-disable-detect
    是否禁用冲突监测
-disable-dispatch
    是否禁用拆分单个 binlog 的 SQL 的功能,如果设置为 true,则每个 binlog
    按顺序依次还原成单个事务进行同步(下游服务类型为 MySQL,该项设置为 False)
-ignore-schemas string
    db 过滤列表 (默认 "INFORMATION_SCHEMA,PERFORMANCE_SCHEMA,mysql,test"),
    不支持对 ignore schemas 的 table 进行 rename DDL 操作
-initial-commit-ts(默认为 `-1`)
    如果 Drainer 没有相关的断点信息,可以通过该项来设置相关的断点信息
    该参数值为 `-1` 时,Drainer 会自动从 PD 获取一个最新的时间戳
-log-file string
    log 文件路径
-log-rotate string
    log 文件切换频率,hour/day
-metrics-addr string
    Prometheus Pushgateway 地址,不设置则禁止上报监控信息
-metrics-interval int
    监控信息上报频率(默认 15,单位:秒)
-node-id string
    drainer 节点的唯一识别 ID,如果不指定,程序会根据主机名和监听端口自动生成
-pd-urls string
    PD 集群节点的地址 (-pd-urls="http://192.168.0.16:2379,http://192.168.0.15:2379,http://192.168.0.14:2379")
-safe-mode
    是否开启安全模式使得下游 MySQL/TiDB 可被重复写入
    即将 insert 语句换为 replace 语句,将 update 语句拆分为 delete + replace 语句
-txn-batch int
    输出到下游数据库一个事务的 SQL 数量(默认 1)
- Drainer 配置文件(以在 “192.168.0.13” 上部署为例)
# Drainer Configuration.

# Drainer 提供服务的地址("192.168.0.13:8249")
addr = "192.168.0.13:8249"

# Drainer 对外提供服务的地址
advertise-addr = "192.168.0.13:8249"

# 向 PD 查询在线 Pump 的时间间隔 (默认 10,单位 秒)
detect-interval = 10

# Drainer 数据存储位置路径 (默认 "data.drainer")
data-dir = "data.drainer"

# PD 集群节点的地址 (英文逗号分割,中间不加空格)
pd-urls = "http://192.168.0.16:2379,http://192.168.0.15:2379,http://192.168.0.14:2379"

# log 文件路径
log-file = "drainer.log"

# Drainer 从 Pump 获取 binlog 时对数据进行压缩,值可以为 "gzip",如果不配置则不进行压缩
# compressor = "gzip"

# [security]
# 如无特殊安全设置需要,该部分一般都注解掉
# 包含与集群连接的受信任 SSL CA 列表的文件路径
# ssl-ca = "/path/to/ca.pem"
# 包含与集群连接的 PEM 形式的 X509 certificate 的路径
# ssl-cert = "/path/to/pump.pem"
# 包含与集群链接的 PEM 形式的 X509 key 的路径
# ssl-key = "/path/to/pump-key.pem"

# Syncer Configuration
[syncer]
# 如果设置了该项,会使用该 sql-mode 解析 DDL 语句,此时如果下游是 MySQL 或 TiDB 则
# 下游的 sql-mode 也会被设置为该值
# sql-mode = "STRICT_TRANS_TABLES,NO_ENGINE_SUBSTITUTION"

# 输出到下游数据库一个事务的 SQL 语句数量 (默认 20)
txn-batch = 20

# 同步下游的并发数,该值设置越高同步的吞吐性能越好 (默认 16)
worker-count = 16

# 是否禁用拆分单个 binlog 的 SQL 的功能,如果设置为 true,则按照每个 binlog
# 顺序依次还原成单个事务进行同步(下游服务类型为 MySQL, 该项设置为 False)
disable-dispatch = false

# safe mode 会使写下游 MySQL/TiDB 可被重复写入
# 会用 replace 替换 insert 语句,用 delete + replace 替换 update 语句
safe-mode = false

# Drainer 下游服务类型(默认为 mysql)
# 参数有效值为 "mysql","tidb","file","kafka"
db-type = "mysql"

# 事务的 commit ts 若在该列表中,则该事务将被过滤,不会同步至下游
ignore-txn-commit-ts = []

# db 过滤列表 (默认 "INFORMATION_SCHEMA,PERFORMANCE_SCHEMA,mysql,test"),
# 不支持对 ignore schemas 的 table 进行 rename DDL 操作
ignore-schemas = "INFORMATION_SCHEMA,PERFORMANCE_SCHEMA,mysql"

# replicate-do-db 配置的优先级高于 replicate-do-table。如果配置了相同的库名,支持使用正则表达式进行配置。
# 以 '~' 开始声明使用正则表达式

# replicate-do-db = ["~^b.*","s1"]

# [syncer.relay]
# 保存 relay log 的目录,空值表示不开启。
# 只有下游是 TiDB 或 MySQL 时该配置才生效。
# log-dir = ""
# 每个文件的大小上限
# max-file-size = 10485760

# [[syncer.replicate-do-table]]
# db-name ="test"
# tbl-name = "log"

# [[syncer.replicate-do-table]]
# db-name ="test"
# tbl-name = "~^a.*"

# 忽略同步某些表
# [[syncer.ignore-table]]
# db-name = "test"
# tbl-name = "log"

# db-type 设置为 mysql 时,下游数据库服务器参数
[syncer.to]
host = "192.168.0.13"
user = "root"
# 如果你不想在配置文件中写明文密码,则可以使用 `./binlogctl -cmd encrypt -text string` 生成加密的密码
# 如果配置了 encrypted_password 且非空,那么配置的 password 不生效。encrypted_password 和 password 无法同时生效。
password = ""
encrypted_password = ""
port = 3306

[syncer.to.checkpoint]
# 当 checkpoint type 是 mysql 或 tidb 时可以开启该选项,以改变保存 checkpoint 的数据库
# schema = "tidb_binlog"
# 目前只支持 mysql 或者 tidb 类型。可以去掉注释来控制 checkpoint 保存的位置。
# db-type 默认的 checkpoint 保存方式是:
# mysql/tidb -> 对应的下游 mysql/tidb
# file/kafka -> file in `data-dir`
# type = "mysql"
# host = "127.0.0.1"
# user = "root"
# password = ""
# 使用 `./binlogctl -cmd encrypt -text string` 加密的密码
# encrypted_password 非空时 password 会被忽略
# encrypted_password = ""
# port = 3306

# db-type 设置为 file 时,存放 binlog 文件的目录
# [syncer.to]
# dir = "data.drainer"

# db-type 设置为 kafka 时,Kafka 相关配置
# [syncer.to]
# kafka-addrs 和 zookeeper-addrs 只需要一个,两者都有时程序会优先用 zookeeper 中的 kafka 地址
# zookeeper-addrs = "127.0.0.1:2181"
# kafka-addrs = "127.0.0.1:9092"
# kafka-version = "0.8.2.0"
# 配置单条 broker request 中的最大 message 数(即 binlog 数),不配置或配置小于等于 0 时会使用默认值 1024
# kafka-max-messages = 1024
# 配置单条 broker request 的最大 size(单位为 Byte),默认为 1 GiB,最大可配置为 2 GiB
# kafka-max-message-size = 1073741824

# 保存 binlog 数据的 Kafka 集群的 topic 名称,默认值为 <cluster-id>_obinlog
# 如果运行多个 Drainer 同步数据到同一个 Kafka 集群,每个 Drainer 的 topic-name 需要设置不同的名称
# topic-name = ""
- 启动示例
注意: 如果下游为 MySQL/TiDB,为了保证数据的完整性,在 Drainer 初次启动前需要获取 initial-commit-ts 的值,并进行全量数据的备份与恢复。
初次启动时使用参数 initial-commit-ts, 命令如下:
./drainer -config drainer.toml -initial-commit-ts {

    initial-commit-ts}
-initial-commit-st: 为了保证下游数据库(mysql、tidb)的完整性,在初次启动的时候,需要获取这个时间戳(目标库从主库的什么时间点开始要这个日志),如果不写,则默认从当前执行这个命令的时间点拉取。