如何在angular中实现打印和预览pdf的功能, 使用print.js这个包就可实现这个功能
Print.js介绍
Print.js可以打印pdf文件,html元素,图片。官网 https://printjs.crabbly.com/
Print.js使用
首先新建一个angular项目,在项目里下载print.js
npm install print-js –save
下载好了之后在组件里引入它
import { Component } from '@angular/core';
import printJS from 'print-js';
先来试试打印和预览pdf文件
准备一个pdf文件,然后在ts文件里写下这些代码
import { Component } from '@angular/core';
import printJS from 'print-js';

@Component({
  selector: 'app-root',
  templateUrl: './app.component.html',
  styleUrls: ['./app.component.css']
})
export class AppComponent {
  onPrint() {
    printJS({
      // 文件的路径
      printable: 'assets/pdf/test.pdf',
      // 文件的类别
      type: 'pdf'
    })
  }
}
html文件
<div>
  <h1>打印预览pdf</h1>
  <button (click)="onPrint()">预览</button>
</div>
启动项目打开页面,点击按钮
成功了
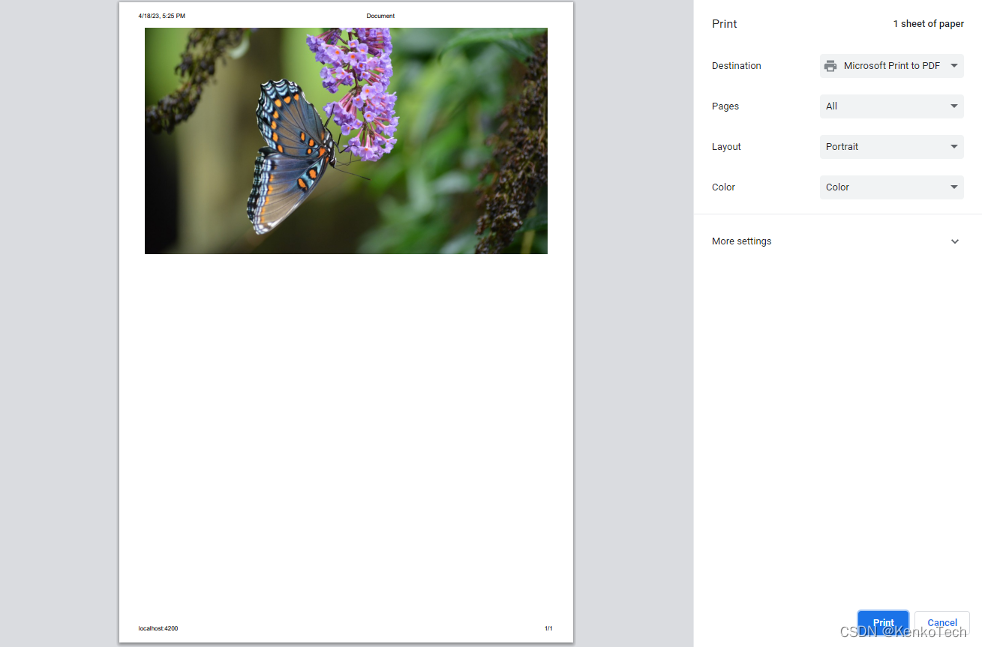
接下来打印预览一下图片
准备一张图片,在ts里写下这个代码
onPrint() {
    // 打印pdf文件
    // printJS({
    //   // 文件的路径
    //   printable: 'assets/pdf/test.pdf',
    //   // 文件的类别
    //   type: 'pdf'
    // })

    // 打印图片
    printJS({
      // 文件的路径
      printable: 'assets/img/d048a0bba045f6f2869e233bc46e0a76.jpg',
      // 文件的类别
      type: 'image'
    })
  }
然后到页面点击预览按钮
也完成了
最后是打印预览html元素
先在ts里写下这些代码
import { Component, ViewChild, ElementRef } from '@angular/core';
import printJS from 'print-js';

@Component({
  selector: 'app-root',
  templateUrl: './app.component.html',
  styleUrls: ['./app.component.css']
})
export class AppComponent {

  @ViewChild('tablelist') tablelist: ElementRef;
  data = [
    {
      name: '张三',
      age: '18',
      gender: '男'
    },
    {
      name: '李四',
      age: '19',
      gender: '男'
    },
    {
      name: '王五',
      age: '20',
      gender: '女'
    }
  ]
  onPrint() {
    // 打印html元素
    printJS({
      // 元素的id或者元素本身
      printable: 'list',
      // 类别
      type: 'html'
    })
  }
}
然后是html
<div>
  <h1>打印预览pdf</h1>
  <table id="list" #tablelist>
    <thead>
      <tr>
        <th>名字</th>
        <th>性别</th>
        <th>年龄</th>
      </tr>
    </thead>
    <tbody>
      <tr *ngFor="let item of data">
        <td>{

    { item.name }}</td>
        <td>{

    { item.gender }}</td>
        <td>{

    { item.age }}</td>
      </tr>
    </tbody>
  </table>
  <button (click)="onPrint()">预览</button>
</div>
最后是css
table {
  border-collapse: collapse;
  border-spacing: 0;
}
td,th {
  padding: 0;
}
table {
  border-collapse: collapse;
  border-spacing: 0;
  empty-cells: show;
  border: 1px solid #cbcbcb;
}
table caption {
  color: #000;
  font: italic 85%/1 arial,sans-serif;
  padding: 1em 0;
  text-align: center;
}
table td,table th {
  border-left: 1px solid #cbcbcb;
  border-width: 0 0 0 1px;
  font-size: inherit;
  margin: 0;
  overflow: visible;
  padding: .5em 1em;
}
table thead {
  background-color: #e0e0e0;
  color: #000;
  text-align: left;
  vertical-align: bottom;
}
table td {
  background-color: transparent;
}
打开页面看下效果
表格是这样的
预览一下
表格是成功出来的,但是样式丢失了,css的样式没有生效,这种情况下我们可以结合一个包解决 html2canvas
下载 npm install html2canvas
下载完了引入组件
import html2canvas from 'html2canvas';修改下ts代码
onPrint() {
    html2canvas(this.tablelist.nativeElement, {
      useCORS: true,
      width: this.tablelist.nativeElement.scrollWidth,
      height: this.tablelist.nativeElement.scrollHeight
    }).then((canvas) => {
      printJS({
        printable: canvas,
        type: 'html'
      })
    })
  }
打开页面预览一下
成功了


但是这种方法不能自定义样式,如果想要自定义样式的话,可以通过printjs里的css选项
先在src/assets文件夹下新建一个css文件夹,再在css文件夹下新建一个print.css文件,写下这些样式
* {

  -webkit-print-color-adjust: exact;
  print-color-adjust: exact;

}
table {
  border-collapse: collapse;
  border-spacing: 0;
}
td,th {
  padding: 0;
}
table {
  border-collapse: collapse;
  border-spacing: 0;
  empty-cells: show;
  border: 1px solid #cbcbcb;
}
table caption {
  color: #000;
  font: italic 85%/1 arial,sans-serif;
  padding: 1em 0;
  text-align: center;
}
table td,table th {
  border-left: 1px solid #cbcbcb;
  border-width: 0 0 0 1px;
  font-size: inherit;
  margin: 0;
  overflow: visible;
  padding: .5em 1em;
}
table thead {
  background-color: #0000ff;
  color: #000;
  text-align: left;
  vertical-align: bottom;
}
table td {
  background-color: transparent;
}
这些样式和之前表格的样式一样,只是把表头的背景颜色改成蓝色
修改下onPrint方法
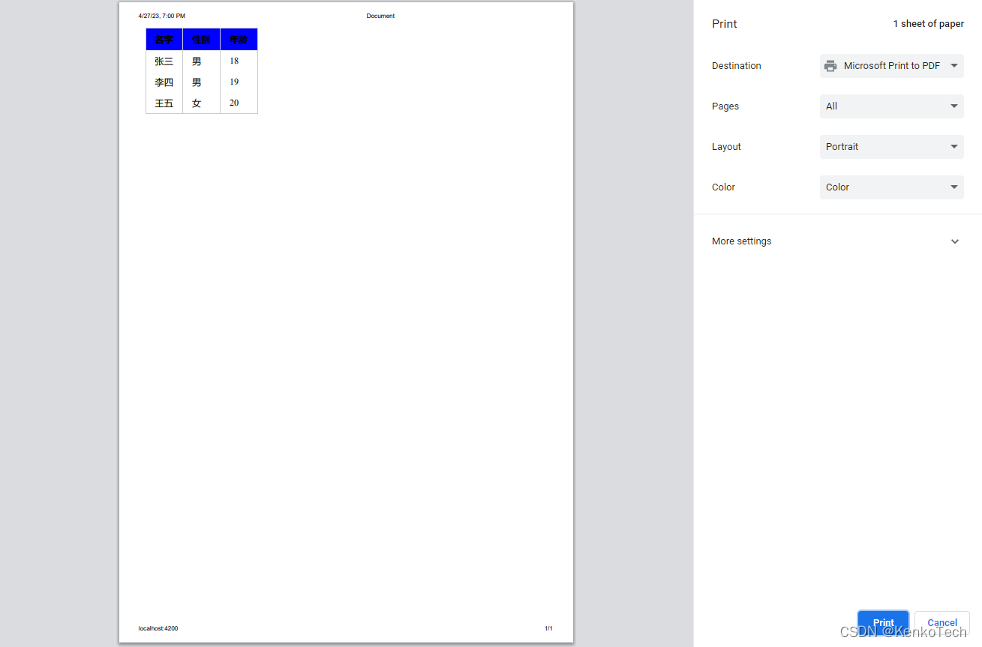
onPrint() {
    printJS({
      printable: 'list', // html元素的id
      type: 'html', // 类别
      css: '/assets/css/print.css' // css文件的路径
    })
  }
打开页面预览一下
成功 除了css这个选项,printjs还有style这个选项,这个选项就是直接把css样式写在style选项里,修改下onPrint 方法
onPrint() {
    printJS({
      printable: 'list', // html元素的id
      type: 'html', // 类别
      // css: '/assets/css/print.css' // css文件的路径
      style: `
        * {
        -webkit-print-color-adjust: exact;
        print-color-adjust: exact;

        }
        table {
          border-collapse: collapse;
          border-spacing: 0;
        }
        td,th {
          padding: 0;
        }
        table {
          border-collapse: collapse;
          border-spacing: 0;
          empty-cells: show;
          border: 1px solid #cbcbcb;
        }
        table caption {
          color: #000;
          font: italic 85%/1 arial,sans-serif;
          padding: 1em 0;
          text-align: center;
        }
        table td,table th {
          border-left: 1px solid #cbcbcb;
          border-width: 0 0 0 1px;
          font-size: inherit;
          margin: 0;
          overflow: visible;
          padding: .5em 1em;
        }
        table thead {
          background-color: #0000ff;
          color: #000;
          text-align: left;
          vertical-align: bottom;
        }
        table td {
          background-color: transparent;
        }
      `
    })
  }
打开页面预览一下
效果和css选项是一样的
这两个选项也能搭配使用
修改下onPrint方法
onPrint() {
    printJS({
      printable: 'list', // html元素的id
      type: 'html', // 类别
      css: '/assets/css/print.css', // css文件的路径
      style: `
        table thead {
          background-color: red;
        }
      `
    })
  }
在css里 表头的背景色是蓝色,然后在style里把它改成红色,预览下看下效果
生效了