目录
应用场景:
个人设置页面点击头像能选择头像,打开裁剪框,确定后上传给后端,再次点击重复之前操作。这里用的是el-upload的on-change,特此记录一下。
开发内容:
实现效果如下:
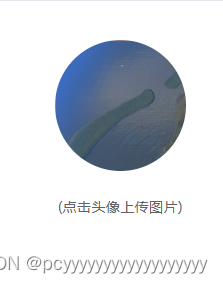
点击头像可以选择图片:

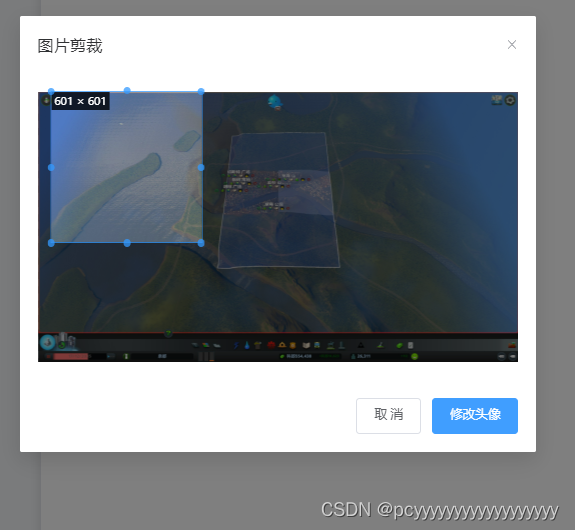
选择图片后出现裁剪弹窗:
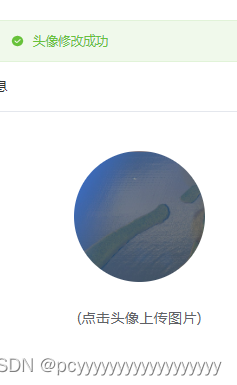
点击确定,上传图片:
详细代码:
上传图像是用的el-upload组件,而裁剪主要在dialog里面用vueCropper,具体如下:
 <el-upload
            ref="pic"
            style="padding: 1.6em"
            action=""
            list-type="picture"
            :limit="1"
            accept=".bmp, .jpg, .png, .jpeg, .swf"
            :auto-upload="false"
            :on-change="changeUpload"
            :show-file-list="false"
            @mouseenter="isShow()"
            @mouseleave="isShow()"
          >
            <div v-show="showMod" class="shade">
              <el-icon size="20" color="#fff">
                <edit />
              </el-icon>
            </div>
            <el-image v-if="circleUrl" v-loading="loading" :src="circleUrl" class="avatar"></el-image>
          </el-upload>
          <div class="el-upload__tip">(点击头像上传图片)</div>
          <el-dialog v-if="dialogVisible" v-model="dialogVisible" title="图片剪裁" width="40%">
            <div class="cropper" style="text-align: center">
              <vueCropper
                ref="cropper"
                :img="option.img"
                :output-size="option.size"
                :output-type="option.outputType"
                :info="true"
                :full="option.full"
                :can-move="option.canMove"
                :can-move-box="option.canMoveBox"
                :original="option.original"
                :auto-crop="option.autoCrop"
                :fixed="option.fixed"
                :fixed-number="option.fixedNumber"
                :center-box="option.centerBox"
                :info-true="option.infoTrue"
                :fixed-box="option.fixedBox"
              ></vueCropper>
            </div>
            <template #footer>
              <div class="dialog-footer">
                <el-button @click="dialogVisible = false">取 消</el-button>
                <el-button type="primary" @click="finish">修改头像</el-button>
              </div>
            </template>
          </el-dialog>
关于上传大家都很熟悉了,这里着重介绍裁剪。vueCropper的参数如下:
 option: {
        img: '', // 裁剪图片的地址
        info: true, // 裁剪框的大小信息
        outputSize: 1, // 裁剪生成图片的质量
        outputType: 'jpeg', // 裁剪生成图片的格式
        canScale: false, // 图片是否允许滚轮缩放
        autoCrop: true, // 是否默认生成截图框
        autoCropWidth: 200, // 默认生成截图框宽度
        autoCropHeight: 200, // 默认生成截图框高度
        fixedBox: false, // 固定截图框大小 不允许改变
        fixed: true, // 是否开启截图框宽高固定比例
        fixedNumber: [800, 800], // 截图框的宽高比例
        full: true, // 是否输出原图比例的截图
        canMoveBox: true, // 截图框能否拖动
        original: false, // 上传图片按照原始比例渲染
        centerBox: true, // 截图框是否被限制在图片里面
        infoTrue: true // true 为展示真实输出图片宽高 false 展示看到的截图框宽高
      },
//其他参数
      avatar: '',
      loading: true,
//上传的图片
      file: null
下面是设计上传和裁剪后的处理的js。
 isShow() {
      this.showMod = !this.showMod
    },
 // 上传按钮   限制图片大小
    changeUpload(file, fileList) {
      this.file = file
      // let testmsg = file.name.substring(file.name.lastIndexOf(".") + 1);
      // const isJPG = testmsg === "jpg";
      // const isPNG = testmsg === "png";
      const isLt2M = file.size / 1024 / 1024 < 1
      // if (!isJPG && !isPNG) {
      //   this.$message.error("上传头像图片只能是 JPG 或 PNG 格式!");
      //   return;
      // }

      if (!isLt2M) {
        this.$message.error('上传头像图片大小不能超过 1MB!')
        return
      }
      var reader = new FileReader()
      let data
      reader.onload = (e) => {
        let data
        if (typeof e.target.result === 'object') {
          // 把Array Buffer转化为blob 如果是base64不需要
          data = window.URL.createObjectURL(new Blob([e.target.result]))
        } else {
          data = e.target.result
        }
      }
      this.$nextTick(() => {
        this.option.img = file.url
        this.dialogVisible = true
      })
    },
    // 点击裁剪,这一步是可以拿到处理后的地址
    finish() {
      this.$refs.cropper.getCropBlob(async (data) => {
        let res = await blobToBase64(data)
        this.circleUrl = res
        await this.updUserInfo(res)
//这里是为了清空当前上传的缓存,避免下次调on-change的时候不起作用,这样每次点击都可以上传,然后替换原图片
        this.$refs.pic.handleRemove(this.file)
        this.dialogVisible = false
      })
    },
    async updUserInfo(url) {
      let data = {
        avatar: url,
        userId: this.userId
      }
//调接口
      let res = await updUserInfo(data)
      if (res) {
        if (res.data.status === 1) {
          this.$message.success('头像修改成功')
          this.option.img = ''
        } else {
          this.$message({
            message: res.data.message,
            type: 'warning',
            customClass: 'message-Z-index'
          })
        }
      } else {
        this.$message({
          message: '未知错误',
          type: 'warning',
          customClass: 'message-Z-index'
        })
      }
    },
以上就是主要的代码了。
总结/分析:
上传图片这个功能,一直有很多各种问题,这里记录一个我使用过的可行方案,下次遇到其他需求再补充。至于样式,看需求定。