一、异常错误
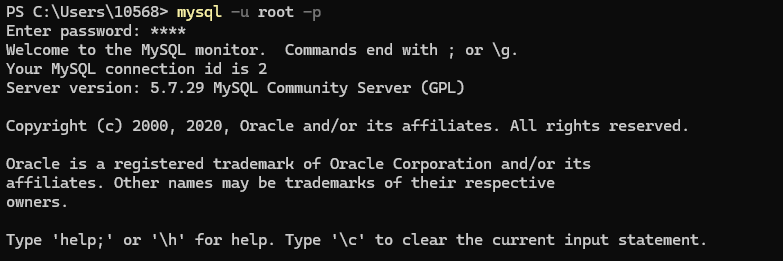
PS C:\Users\10568> mysql -u root -p
Enter password: ****
ERROR 1045 (28000): Access denied for user 'root'@'localhost' (using password: YES)
Access denied表示拒绝访问,using password:NO/YES是否输入了密码。

二、原因
其中一种原因是mysql自启动的bug,mysql的3306端口号被自己占用,需要关闭mysql服务,再重新启动,我目前这样做可以解决,当然,也可能是因为MySQL服务器上不存在的用户尝试访问数据库。可以参考stack overflow的问题去解决。
stack overflow的回答是在默认情况下,根MySQL用户设置为使用auth_socket插件进行身份验证,而不是使用密码进行身份验证。在许多情况下,这允许更高的安全性和可用性,但是当您需要允许外部程序(例如,phpMyAdmin)访问用户时,它也会使事情复杂化。为了使用密码以root身份连接到MySQL,您需要将其身份验证方法从auth_socket切换到mysql_native_password。
参考:Access Denied for User ‘root’@‘localhost’ (using password: YES) -No Privileges?:https://stackoverflow.com/questions/17975120/access-denied-for-user-rootlocalhost-using-password-yes-no-privileges
三、解决方法
查看3306端口情况,发现PID进程为5296
netstat -ano|findstr 3306

使用命令taskkill /PID 5964 -t -f将进程杀死,或者直接在任务管理器中结束任务
之后重新启动mysql
net start mysql
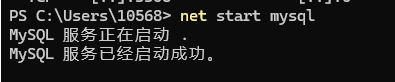
重新进入mysql即可
如果是Ubuntu系统可以参考以下回答:
MySQL Error: : 'Access denied for user ‘root’@‘localhost’:https://stackoverflow.com/questions/41645309/mysql-error-access-denied-for-user-rootlocalhost
In Ubuntu systems running MySQL 5.7 (and later versions), the root
MySQL user is set to authenticate using the auth_socket plugin by
default rather than with a password. This allows for some greater
security and usability in many cases, but it can also complicate
things when you need to allow an external program (e.g., phpMyAdmin)
to access the user.In order to use a password to connect to MySQL as root, you will need
to switch its authentication method from auth_socket to
mysql_native_password. To do this, open up the MySQL prompt from your
terminal:sudo mysql
Next, check which authentication method each of your MySQL user
accounts use with the following command:SELECT user,authentication_string,plugin,host FROM mysql.user;
Output
±-----------------±------------------------------------------±----------------------±----------+ | user | authentication_string |
plugin | host |
±-----------------±------------------------------------------±----------------------±----------+ | root | |
auth_socket | localhost | | mysql.session |
*THISISNOTAVALIDPASSWORDTHATCANBEUSEDHERE | mysql_native_password | localhost | | mysql.sys |
*THISISNOTAVALIDPASSWORDTHATCANBEUSEDHERE | mysql_native_password | localhost | | debian-sys-maint |
*CC744277A401A7D25BE1CA89AFF17BF607F876FF | mysql_native_password | localhost |
±-----------------±------------------------------------------±----------------------±----------+ 4 rows in set (0.00 sec) In this example, you can see that the root
user does in fact authenticate using the auth_socket plugin. To
configure the root account to authenticate with a password, run the
following ALTER USER command. Be sure to change password to a strong
password of your choosing, and note that this command will change the
root password you set in Step 2:ALTER USER ‘root’@‘localhost’ IDENTIFIED WITH mysql_native_password BY
‘password’;Then, run FLUSH PRIVILEGES which tells the server to reload the grant
tables and put your new changes into effect:FLUSH PRIVILEGES;
Check the authentication methods employed by each of your users again
to confirm that root no longer authenticates using the auth_socket
plugin:SELECT user,authentication_string,plugin,host FROM mysql.user;
Output
±-----------------±------------------------------------------±----------------------±----------+ | user | authentication_string |
plugin | host |
±-----------------±------------------------------------------±----------------------±----------+ | root | *3636DACC8616D997782ADD0839F92C1571D6D78F |
mysql_native_password | localhost | | mysql.session |
*THISISNOTAVALIDPASSWORDTHATCANBEUSEDHERE | mysql_native_password | localhost | | mysql.sys |
*THISISNOTAVALIDPASSWORDTHATCANBEUSEDHERE | mysql_native_password | localhost | | debian-sys-maint |
*CC744277A401A7D25BE1CA89AFF17BF607F876FF | mysql_native_password | localhost |
±-----------------±------------------------------------------±----------------------±----------+ 4 rows in set (0.00 sec) You can see in this example output that the
root MySQL user now authenticates using a password. Once you confirm
this on your own server, you can exit the MySQL shell:exit