1、权限接口说明
官方权限说明
部分接口需要经过用户授权统一才能调用。我们把这些接口按使用范围分成多个scope,用户选择对scope进行授权,当授权给一个scope之后,其对应的所有接口都可以直接使用。
此类接口调用时:
- 如果用户未接受或拒绝过此权限,会弹窗询问用户,用户点击同意后方可调用接口;
- 如果用户已授权,可以直接调用接口;
- 如果用户已拒绝授权,则不会出现弹窗,而是直接进入接口 fail 回调。请开发者兼容用户拒绝授权的场景。
获取用户授权设置
开发者可以使用 wx.getSetting 获取用户当前的授权状态。
打开设置界面
用户可以在小程序设置界面(「右上角」 - 「关于」 - 「右上角」 - 「设置」)中控制对该小程序的授权状态。
开发者可以调用 wx.openSetting 打开设置界面,引导用户开启授权。
提前发起授权请求
开发者可以使用 wx.authorize 在调用需授权 API 之前,提前向用户发起授权请求。
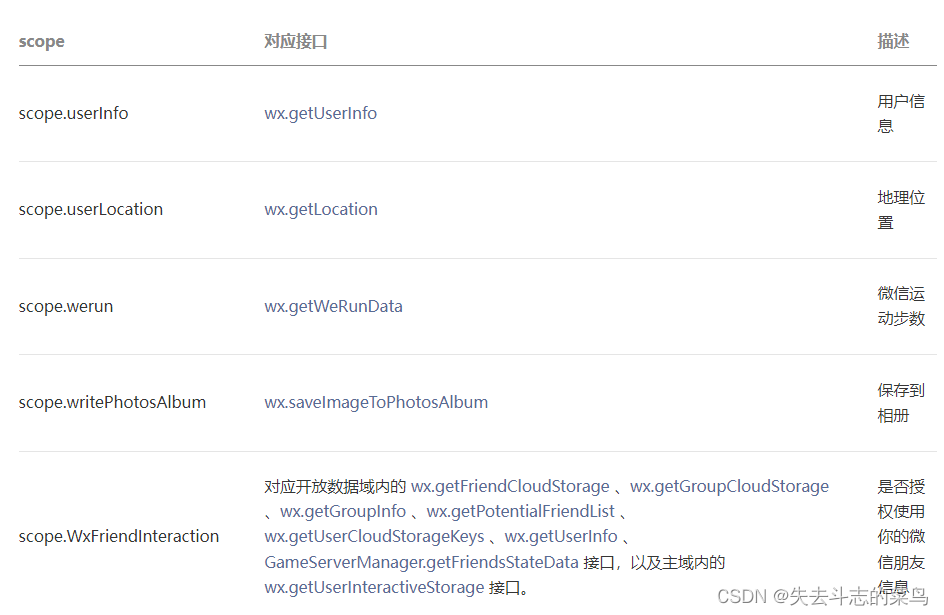
scope 列表
授权有效期
一旦用户明确同意或拒绝过授权,其授权关系会记录在后台,直到用户主动删除小程序。
最佳实践
在真正需要使用授权接口时,才向用户发起授权申请,并在授权申请中说明清楚要使用该功能的理由。
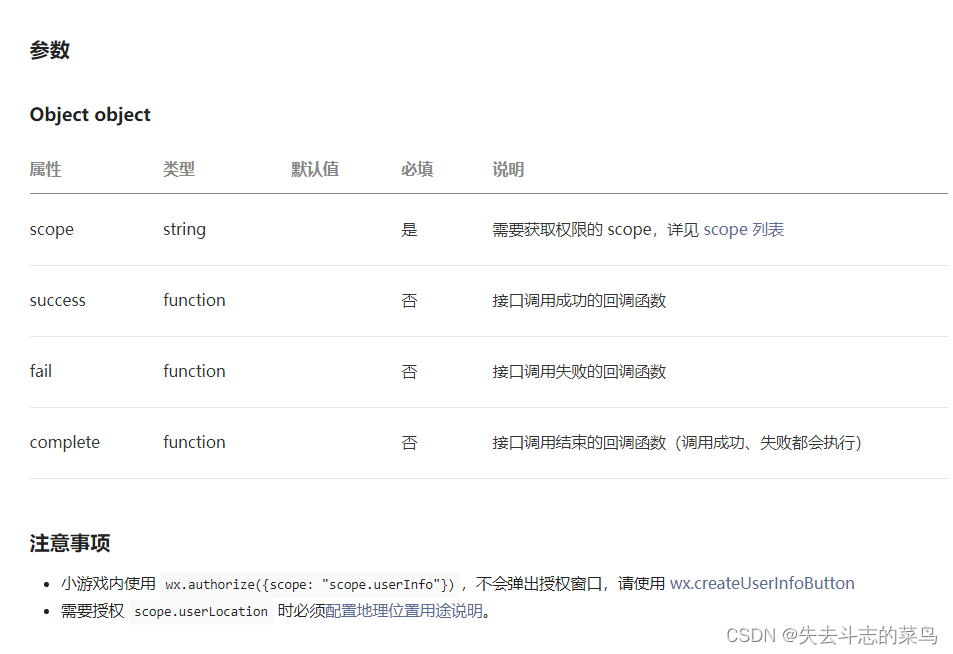
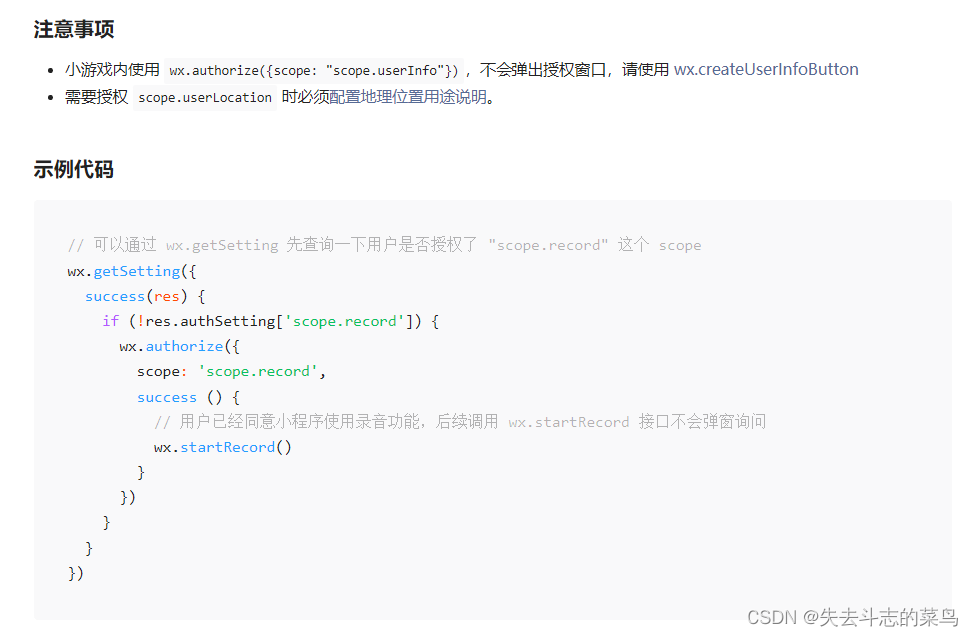
注意事项
wx.authorize({scope: “scope.userInfo”}),不会弹出授权窗口,请使用 wx.createUserInfoButton
需要授权 scope.userLocation 时必须配置地理位置用途说明。
2、具体权限接口介绍
2.1 wx.authorize()
官方说明 wx.authorize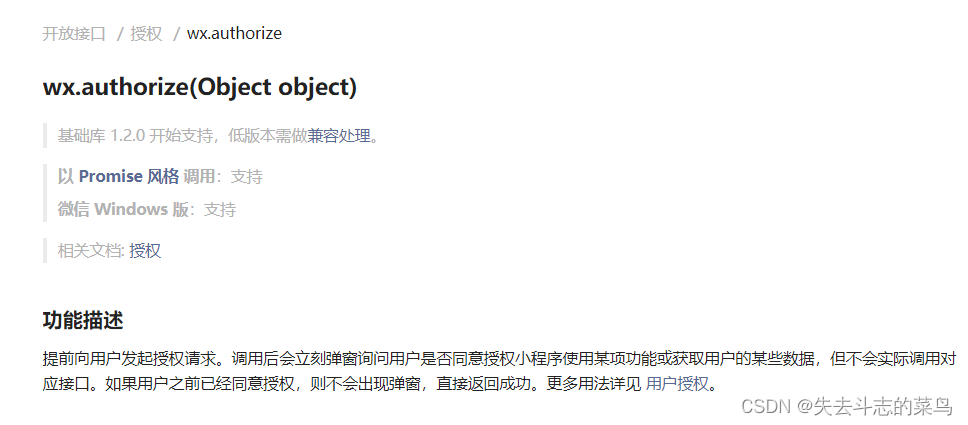
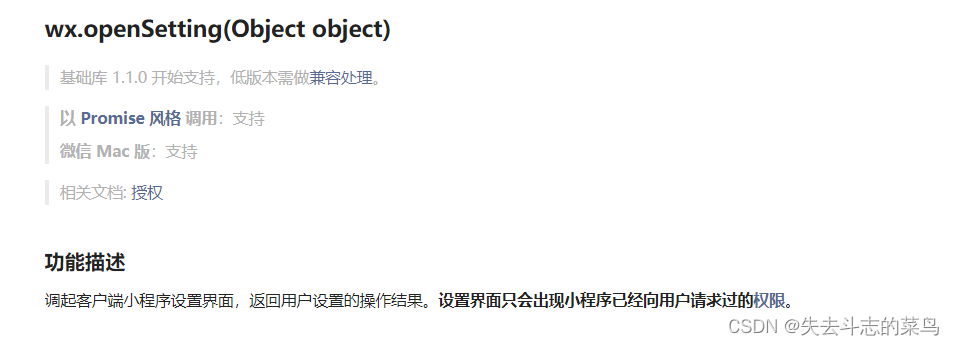
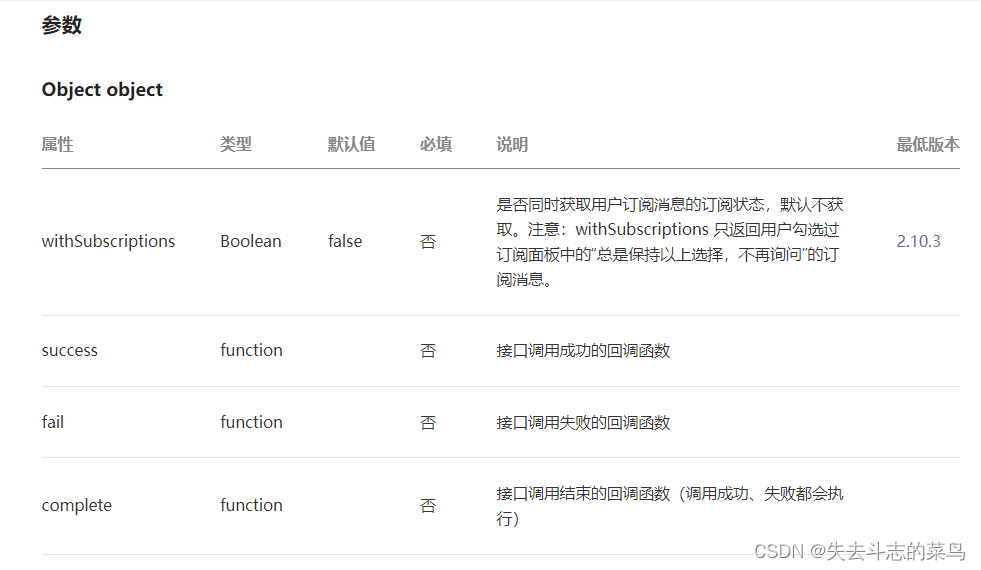
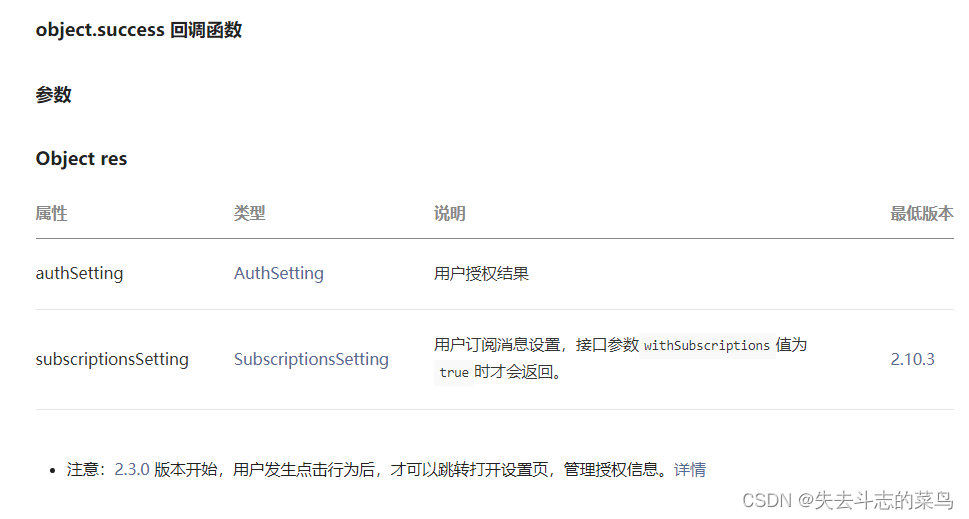
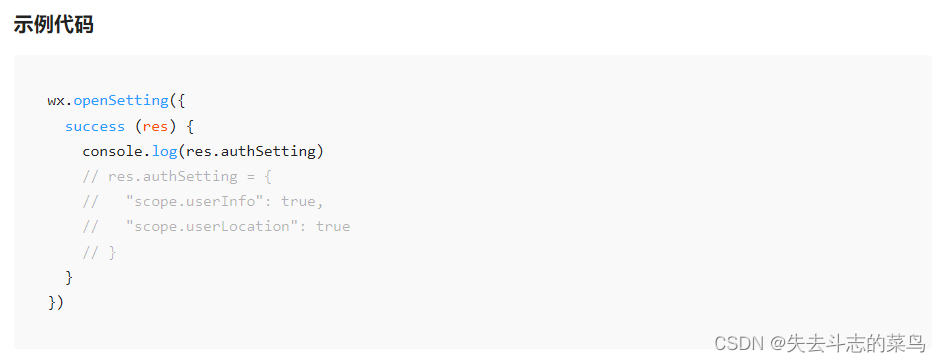
2.2 wx.openSetting()
官方说明 wx.openSetting()
3 、权限申请方式
- 通过 button 的 open-type 方式来获取相应的权限及信息。
- 通过 wx.authorize()和wx.openSetting() 两个接口来申请相应的权限。
特别注意的是:需要授权 scope.userLocation、scope.userLocationBackground 时必须配置地理位置用途说明
通过button申请权限
通过button获取权限对于开发者来说相对简单一些,开发者只需要绑定相应的回调函数即可,权限申请的成功和失败都可以在回调函数中处理。
其实我们可以把通过button申请权限的方式当作普通的信息获取接口,只不过这个接口必须通过button组件来调用而已。
通过wx.authorize()来申请权限
通过wx.authorize()来申请权限的方式是比较繁琐的。因为它的状态比较多,大致可分为:
- 如果用户未接受或拒绝过此权限,会弹窗询问用户,用户点击同意后方可调用接口;
- 如果用户已授权,可以直接调用接口;
- 如果用户已拒绝授权,则不会出现弹窗,而是直接进入接口 fail 回调。请开发者兼容用户拒绝授权的场景
针对这三种状态,开发者的处理方式也有所不同。
-
用户未接受或拒绝过此权限,会弹窗询问用户,用户点击同意 —— 可调用相应接口。
-
用户未接受或拒绝过此权限,会弹窗询问用户,用户点击拒绝 —— 打开设置页面。
-
如果用户已授权 —— 可调用相应接口。
-
用户已拒绝授权 —— 打开设置页面。
上述情况的2/4是需要开发者结合 wx.openSetting() 来帮助用户进行二次授权的。
就是这个 openSetting 打开设置页面的过程让开发者比较抓狂。
2.3.0 版本开始,用户发生点击行为后,才可以跳转打开设置页。
也就是说 openSetting 只能通过 button 组件和点击(bindtap)的回调函数里来调用。
然而我们在申请权限的时候无法保证用户一定会在第一次申请的时候同意,所以一定是需要配合openSetting来使用的。
那我们在每个调用openSetting的地方都加一个button也是很不别扭的。
当下来说我们最好的处理方案就是把wx.authorize()和wx.openSetting()结合起来使用,并把他们放在一个bindtap/catchtap(或其他手势事件)的回调函数里。
接下来我们重点来整合一下这种方式的权限处理。
4、权限申请整合代码
4.1 参考工具类代码
以下是整合的工具类代码,我们暂时命名其为 authorizer.js,可直接复制使用。
const authsName = {


  "scope.userInfo": "用户信息",// 请用button获取该信息
  "scope.userLocation": "地理位置",
  "scope.userLocationBackground": "后台定位",
  "scope.address": "通讯地址",
  "scope.invoiceTitle": "发票抬头",
  "scope.invoice": "获取发票",
  "scope.werun": "微信运动步数",
  "scope.record": "录音功能",
  "scope.writePhotosAlbum": "保存到相册",
  "scope.camera": "摄像头",
}


var scope = null;
var success = null;
var fail = null;
var denyBack = null;
var deniedFun = null;

/**
 * 申请某个权限
 * _scope 权限名称
 * _success 成功回调
 * _fail 失败回调
 * _denyBack 申请权限时用户 拒绝 后的回调
 * _deniedFun 之前申请过该权限但被拒绝了,该情况下调用此函数
 */
function authorize(_scope, _success, _fail, _denyBack, _deniedFun) {


  resetData();

  scope = _scope;
  success = _success;
  fail = _fail;
  denyBack = _denyBack;
  deniedFun = _deniedFun;

  if (!scope) {


    return;
  }

  // 判断权限状态
  wx.getSetting({


    success: function(res) {


      let currentScope = res.authSetting[scope];

      if (currentScope == undefined || currentScope == null) {


        // 之前没有申请或该权限
        wx.authorize({


          scope: scope,
          success: function(res) {


            authSuccess(res);
          },

          fail: function(err) {


            authDeny();
          }
        });

      } else if (currentScope == false) {


        // 之前申请过该权限但被拒绝了, 如果配置 deniedFun 函数,则有执行 deniedFun 方法,
        // 由调用者决定改中情况下如何处理。
        if (authDenied()) {


          return;
        }

        // 如果没有配置 deniedFun 函数,走默认逻辑,打开设置界面
        wx.showModal({


          title: '权限申请',
          content: '点击 “确定” 按钮,打开 “' + authsName[scope] + '” 的权限设置界面',
          cancelText: '取消',
          confirmText: '确定',
          success(res) {


            if (res.confirm) {


              wx.openSetting({


                success: function(res) {


                  let cScope = res.authSetting[scope];
                  if (cScope) {


                    authSuccess();
                  } else {


                    authFail();
                  }
                },

                fail: function(res) {


                  authFail();
                }
              });
            }
          }
        });

      } else {


        // 已经获得该权限
        authSuccess();
      }
    },

    fail: function() {


      authFail();
    }
  });
}


/**
 * 权限申请成功
 */
function authSuccess(res) {


  if (success && typeof success == 'function') {


    success(res);
  }

  resetData();
}

/**
 * 权限申请失败
 */
function authFail() {


  if (fail && typeof fail == 'function') {


    fail();
  }

  resetData();
}

/**
 * 拒绝使用该权限
 */
function authDeny() {


  if (denyBack && typeof denyBack == 'function') {


    denyBack();
  }

  resetData();
}


/**
 * 之前申请过该权限但被拒绝了
 */
function authDenied() {


  if (deniedFun && typeof deniedFun == 'function') {


    deniedFun();
    resetData();
    return true;
  } else {


    return false;
  }
}

/**
 * 重置参数
 */
function resetData() {


  scope = null;
  success = null;
  fail = null;
  denyBack = null;
  deniedFun = null;
}


module.exports = {


  authorize: authorize,
}
工具类的使用
wxml代码:
<view bindtap="authApply">权限申请</view>
js代码:
/**
 * 权限申请--微信步数
 */
authApply(e) {


  authorizer.authorize("scope.werun", function(res) {


    console.log('success', res);
    wx.getWeRunData({

    success: function(res){


      console.log('WeRunData', res)
    }});
  }, function(err) {


    console.log('denyback', err);
  }, function(err) {


    console.log('deniedBack', err);
  });
},
4.2 实际代码实现
data:{


authScope:"scope.werun",//要申请的权限
    },
  /**
   * 申请权限
   * _scope 权限名称
   * _authSuccess 成功回调
   * _authFail 失败回调
   * _authDeny 申请权限时用户 拒绝 后的回调
   * _authDenied 之前申请过该权限但被拒绝了,该情况下调用此函数
   */

 //授权成功
  authSuccess(){


      let that = this
      console.log("授权成功")
      that.setData({


          hasWerun:true
      })
      that.getUserRun()
  },

  //授权失败
  authFail(){


      console.log("授权失败")
      wx.showToast({


          title: '授权失败',
          icon: 'none',
          duration: 1000
      })
  },
  //拒绝授权
authDeny(){


      console.log("authorize调用失败,引导重新吊起")
      wx.showToast({


          title: '您未授权微信运动 请点击右上角设置 进入列表手动授权',
          icon: 'none',
          duration: 3000
      })
  },
  //已被拒绝授权过的权限,重新吊起
authDenied(){


      console.log("currentScope == false 已被拒绝授权过的权限,引导重新吊起")
      wx.showToast({


          title: '您未授权微信运动 请点击右上角设置 进入列表重新授权',
          icon: 'none',
          duration: 3000
      })
  },

  authApply:function(){


      let that = this
      let scope = that.data.authScope
      if (!scope) {


        return;
      }
      // 判断权限状态
      wx.getSetting({


        success: function(res) {


          console.log("当前权限列表")
          console.log(res)
          let currentScope = res.authSetting[scope];
          if (currentScope == undefined || currentScope == null) {


            // 之前没有申请或该权限
            console.log("之前没有申请或该权限")
            wx.authorize({


              scope: scope,
              success: function() {


                that.authSuccess();
              },
              fail: function(err) {


                that.authDeny();
              }
            });
          } else if (currentScope == false) {


            // 之前申请过该权限但被拒绝了
              that.authDenied()
              return;
          } else {


            // 已经获得该权限
            that.authSuccess();
          }
        },
        fail: function() {


          that.authFail();
        }
      });
  },
  //设置按钮绑定权限列表
  getOpenSetting: function () {


      let that = this
      wx.openSetting({


      success(res) {


          if (res.authSetting[that.data.authScope]) {


          // 用户在设置页面开启权限后,重新授权成功
          // 可以调用相应的 API 接口
          that.setData({


              hasWerun:true
          })
          console.log("openSetting已获取到授权")
          that.authSuccess()
          } else {


          // 用户在设置页面未开启权限,授权失败
          that.authFail()
          }
      },
      fail() {


          console.log("openSetting拉起失败")
          // 调用 wx.openSetting 接口失败
          that.authFail()
      }
      })
  },
wxml
<text class="info-text" bindtap="getOpenSetting">权限</text>
总结
微信小程序的权限申请有两种方式;
分析了一下wx.authorize这种方式发生的几种情况以及相应的处理;
整理了一份wx.authorize使用的通用方法,且此方法须在某个手势事件的回调函数中。