SpringBoot 官方文档:https://docs.spring.io/spring-boot/docs/2.7.12/reference/htmlsingle
SpringBoot 底层依赖
Spring Boot 对所有内部日志记录使用 Commons Logging,但使底层日志实现保持为打开状态。 为 Java Util Logging、Log4J2 和 Logback 提供了默认配置。默认情况下,Logback、 Java Util Logging、Commons Logging、Log4J 或 SLF4J 都能正常工作。而 Spring Boot 中使用了 SLF4J + Logback 作为默认的日志框架,因此我们不需要更改日志记录依赖项,Spring 引导默认值就可以正常工作。SpringBoot 底层日志依赖关系如图所示:
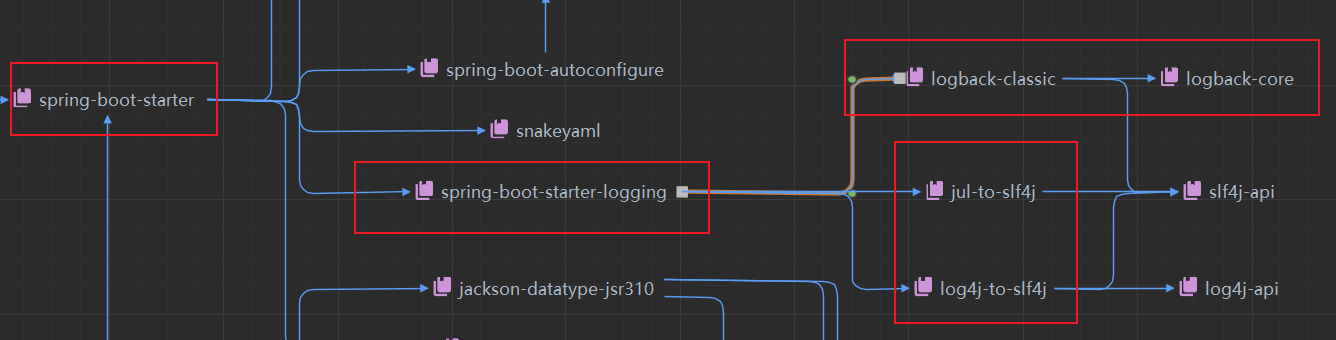
在 spring-boot-starter 依赖下有 spring-boot-starter-logging 日志依赖,后续的 logback-core、logback-core 依赖即使用 Logback 记录日志,而 jul-to-slf4j、log4j-to-slf4j 即将 JUL 和 Log4j 日志框架转为 Slf4j 日志框架,即所谓的桥接器。
日志组
我们也可以将相关的日志记录器组合在一起,以便可以同时配置它们。例如,可能经常更改所有与 Tomcat 相关的记录器的日志记录级别,我们可以在 YAML 配置文件中将与 Tomcat 相关的包添加成一个组,之后再对组设置日志输出的级别:
logging:
  group:
    # 自定义组名,设置当前组中所包含的包
    tomcat: org.apache.catalina,org.apache.coyote,org.apache.tomcat
SpringBoot 包括以下预定义的日志记录组:
| Name | Loggers |
| web | org.springframework.core.codec org.springframework.http org.springframework.web org.springframework.boot.actuate.endpoint.web org.springframework.boot.web.servlet.ServletContextInitializerBeans org.springframework.core.codec org.springframework.http org.springframework.web org.springframework.boot.actuate.endpoint.web org.springframework.boot.web.servlet.ServletContextInitializerBeans |
| sql | org.springframework.jdbc.core org.hibernate.SQL org.jooq.tools.LoggerListener org.springframework.jdbc.core org.jooq.tools.LoggerListener |
日志级别
在SpringBoot 中,日志的级别默认分为7个级别:TRACE(跟踪)、DEBUG(调试)、 INFO(信息)、WARN(警告)、ERROR(错误)、FATAL(致命)、OFF(关闭)。
我们可以根据需要设置不同的日志级别,在 SpringBoot 的 YAML 配置文件中对所有的日志框架输出的日志级别进行设置。我们可以对全局或者指定分组以及指定包分别设置日志的输出级别:
logging:
  level:
    # 设置root根节点级别,即整体应用日志级别,输出 WARN 级别及以上的日志信息
    root: warn
    # 为对应组设置日志级别,输出 TRACE 级别及以上的日志信息
    tomcat: trace
    # 为对包设置日志级别,输出 DEBUG 级别及以上的日志信息
    com.example.logging: debug
日志格式
在配置文件中设置日志的输出格式:
# 设置日志输出格式
logging:
  pattern:
    console: "%d{yyyy-MM-dd HH:mm:ss.SSS} [%thread] %-5level [%logger{36}] - %msg%n"
SpringBoot 的默认日志输出格式如下:
输出格式如下:
| 输出项 | 描述 |
|---|---|
| Date and Time | 日期和时间:毫秒级精度,易于排序 |
| Log Level | 日志级别:ERROR WARN INFO DEBUG TRACE |
| Process ID | 进程 Id |
--- |
用于区分实际日志消息开头的分隔符 |
| Thread name | 线程名,括在方括号中(对于控制台输出,可能会被截断) |
| Logger name | 记录器名称:通常是源类名称(通常缩写) |
| message | 日志消息 |
常用占位符如下:
| 占位符 | 描述 |
|---|---|
%d |
表示输出到毫秒的时间,例如%d{yyyy-MM-dd HH:mm:ss.SSS} |
%-5level |
输出日志级别,-5表示左对齐并且固定输出5个字符,如果不足在右边补0 |
%n |
输出换行符 |
%thread |
输出日志的线程名称,例如:main |
%logger |
输出日志记录器名称,例如:com.example.MyClass |
%msg |
输出日志的消息内容 |
%X |
输出 MDC(Mapped Diagnostic Context)中的键值对,例如:%X{user} |
%class |
输出日志的类名,例如:com.example.MyClass |
%method |
输出日志的方法名,例如:doSomething |
%file |
输出日志的文件名,例如:MyClass.java |
%line |
例如:10 |
| %color() | 颜色:%black、%shired、%green、%yellow、%blue、%magenta、%cyan、%white、%gray、%boldRed、%boldGreen、%boldYellow、%boldBlue、%boldMagenta、%boldCyan、%boldWhite、%highlight |
以上是一些常用的占位符,可以根据需要自行组合使用。
Spring Boot使用Logback作为默认的日志框架,可以通过在application.properties或application.yml文件中设置日志级别和日志输出格式。
以下是application.yml中常用的日志配置选项:
# 设置日志输出文件的路径和名称
logging:
  file:
    name: myapp.log
    path: /var/log/myapp/
以上示例中,logging.level 设置日志级别,logging.pattern设置日志输出格式,logging.file.name和logging.file.path设置日志输出文件的路径和名称。需要注意的是,如果同时设置了logging.file和logging.path选项,则logging.file选项将覆盖logging.path选项。
文件输出
SpringBoot 默认会将日志输出到控制台,并不会写入日志文件。 如果我们需要将日志写入日志文件,则需要在 application.yml 中进行相关配置:
# 设置日志输出文件的路径和名称
logging:
  file:
    name: myapp.log
    path: /var/log/myapp/
logging.file.name |
logging.file.path |
样例 | 描述 |
|---|---|---|---|
| (无) | (无) | 仅控制台日志记录。 | |
| 特定文件 | (无) | my.log |
写入指定的日志文件。 名称可以是确切的位置,也可以是相对于当前目录的位置。 |
| (无) | 特定目录 | /var/log |
写入指定的目录。 名称可以是确切的位置,也可以是相对于当前目录的位置。spring.log |
Tip
logging.file.name 和 logging.file.path 设置日志输出文件的路径和名称。需要注意的是,如果同时设置了logging.file 和 logging.path 选项,则 logging.file 选项将覆盖 logging.path 选项。
自定义日志配置
在 SpringBoot 中,我们除了使用默认的配置外,还可以通过在 src/main/resources 目录下添加自定义日志配置文件来自定义日志输出的格式、级别、以及日志文件的位置等信息。
方式1:限定文件名
通过 SpringBoot 指定限定名的方式:项目启动时会自动进行加载:
| 日志框架 | 配置文件名 |
|---|---|
| Logback | logback-spring.xml、logback.xml |
| Log4j2 | log4j2-spring.xml、log4j2.xml |
| Log4j | log4j.properties |
| JDK (Java Util Logging) | logging.properties |
使用该方式,Spring 官方推荐建议您我们使用 *-spring.xml 的限定名,这样可以交由 SpringBoot 控制日志,我们也可以对其中的配置进行更加细化的设置:
<springProfile name="dev">
    <!-- 配置项在 spring.profiles.active=dev 的环境下启动 -->
</springProfile>
<springProfile name="!dev">
    <!-- 配置项在 spring.profiles.active!=dev 的环境下启动 -->
</springProfile>
方式2:自定义文件名
以下是自定义日志文件名的步骤:
- 在 src/main/resources 目录下创建一个名为 logback-dev.xml 的文件,这个文件名称可以自定义。
- 在配置文件中指定日志配置文件:
logging.config=classpath:logging-config.xml
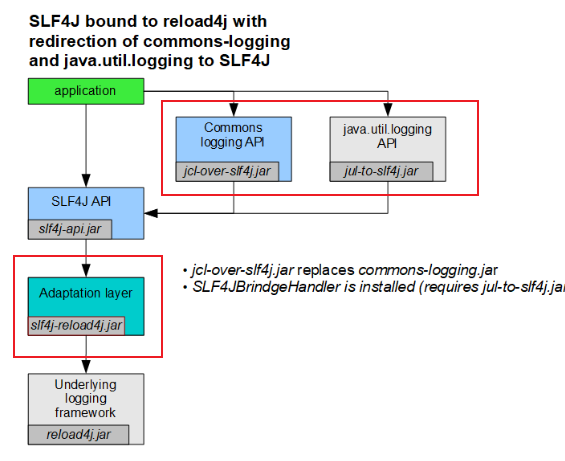
日志框架切换
Logback To Log4j
原理图如右图:
方式1
我们需要将对应 logback 框架的依赖进行移除,添加 slf4j-log4j12 的适配器即可。

-
移除日志框架
logback的依赖:<dependency> <groupId>org.springframework.boot</groupId> <artifactId>spring-boot-starter-web</artifactId> <exclusions> <exclusion> <groupId>ch.qos.logback</groupId> <artifactId>logback-classic</artifactId> </exclusion> </exclusions> </dependency> -
引入适配器
slf4j-log4j12和log4j的依赖<dependency> <groupId>org.slf4j</groupId> <artifactId>slf4j-log4j12</artifactId> </dependency>
方式2
-
移除
spring-boot-starter-logging依赖:<dependency> <groupId>org.springframework.boot</groupId> <artifactId>spring-boot-starter-web</artifactId> <exclusions> <exclusion> <groupId>org.springframework.boot</groupId> <artifactId>spring-boot-starter-logging</artifactId> </exclusion> </exclusions> </dependency> -
添加
spring-boot-starter-log4j依赖:<!-- https://mvnrepository.com/artifact/org.springframework.boot/spring-boot-starter-log4j --> <dependency> <groupId>org.springframework.boot</groupId> <artifactId>spring-boot-starter-log4j</artifactId> <version>1.3.8.RELEASE</version> </dependency>
添加 log4j.properties 配置文件
log4j 不提供默认配置,因为输出到控制台或者文件系统在某些环境中可能是被禁止的。所以需要在 resources 目录下手动添加配置文件,配置文件名为 log4j.properties。
Logback To Log4j2
同理,我们需要排除原有的依赖,替换新的依赖即可:
-
移除依赖
<dependency> <groupId>org.springframework.boot</groupId> <artifactId>spring-boot-starter-web</artifactId> <exclusions> <exclusion> <groupId>org.springframework.boot</groupId> <artifactId>spring-boot-starter-logging</artifactId> </exclusion> </exclusions> </dependency> -
添加依赖
<dependency> <groupId>org.springframework.boot</groupId> <artifactId>spring-boot-starter-log4j2</artifactId> </dependency> -
需要异步
<!--开启异步时需要导入依赖-->
<dependency>
  <groupId>com.lmax</groupId>
  <artifactId>disruptor</artifactId>
  <version>3.4.2</version>
</dependency>