文中若有代码、术语等错误,欢迎指正
前言
-
此节目的
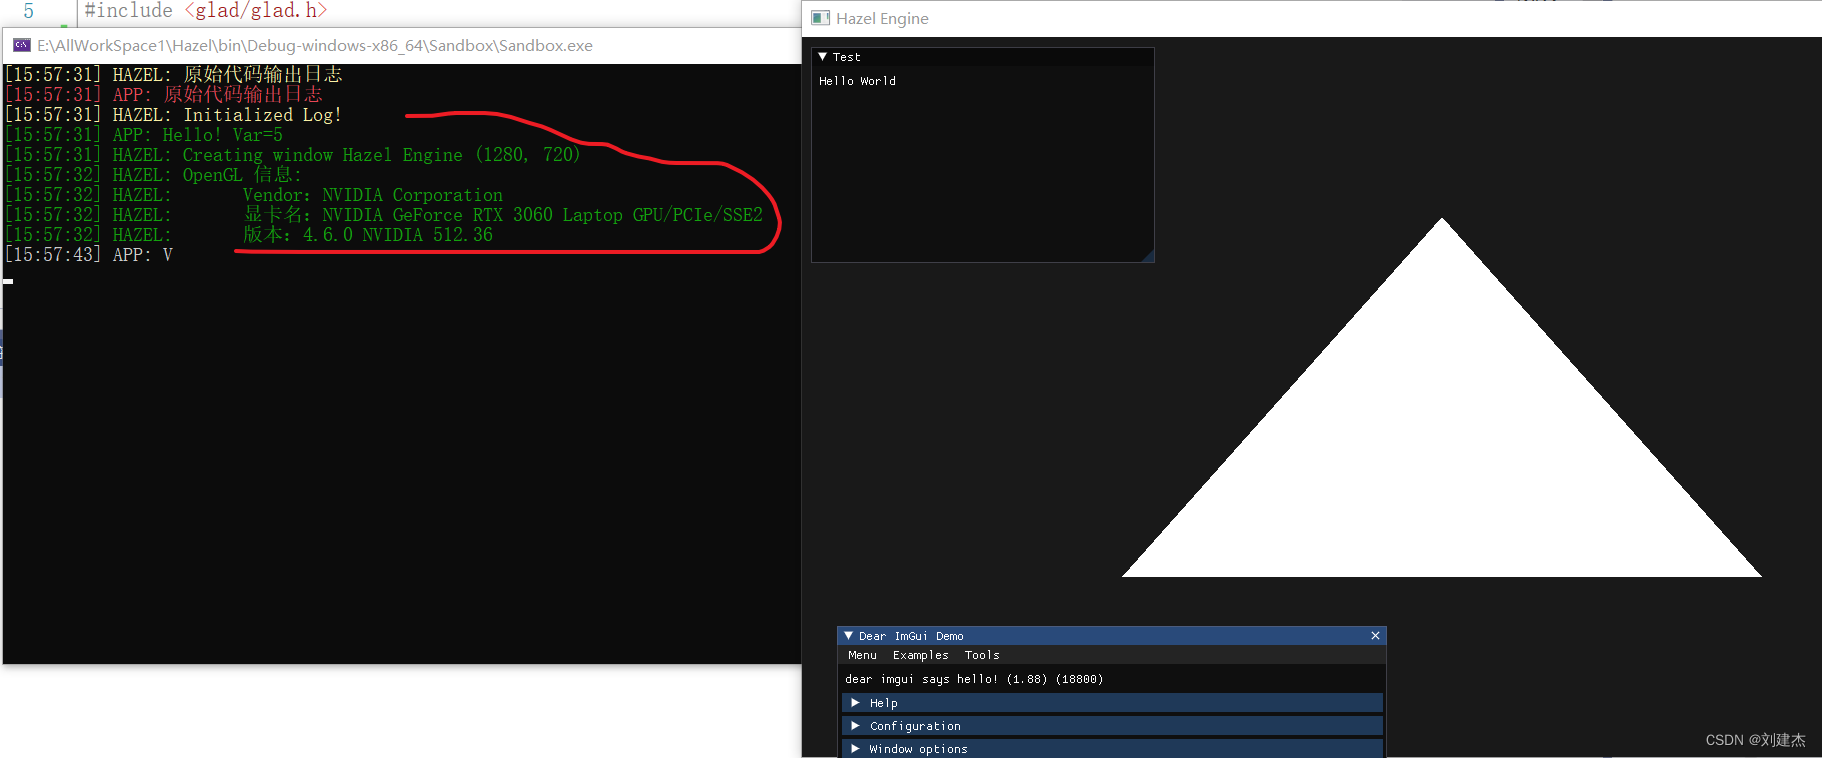
为了在屏幕上用OpenGL的函数显示一个三角形,以及显示显卡信息。
-
更多讨论
此节渲染三角形,是直接调用OpenGL图形API,并没有抽象类来封装这些API,此节先让我们了解知道有哪些API,后面才慢慢封装成一个个抽象类
014节以添加了Glad库,所以可以使用OpenGL函数
项目相关
代码改变
-
Application
#include <glad/glad.h> .... Application::Application() { HZ_CORE_ASSERT(!s_Instance, "引用已经存在"); s_Instance = this; // 1.1Application创建窗口 m_Window = std::unique_ptr<Window>(Window::Create()); // 1.2Application设置窗口事件的回调函数 m_Window->SetEventCallback(BIND_EVENT_FN(OnEvent)); // 将ImGui层放在最后 m_ImGuiLayer = new ImGuiLayer(); PushOverlay(m_ImGuiLayer); // 使用OpenGL函数渲染一个三角形 // 顶点数据 float vertices[3 * 3] = { -0.5f, -0.5f, 0.0f, 0.5f, -0.5f, 0.0f, 0.0f, 0.5f, 0.0f }; unsigned int indices[3] = { 0, 1, 2 }; // 索引数据 // 0.生成顶点数组对象VAO、顶点缓冲对象VBO、索引缓冲对象EBO glGenVertexArrays(1, &m_VertexArray); glGenBuffers(1, &m_VertexBuffer); glGenBuffers(1, &m_IndexBuffer); // 1. 绑定顶点数组对象 glBindVertexArray(m_VertexArray); // 2. 把我们的CPU的顶点数据复制到GPU顶点缓冲中,供OpenGL使用 glBindBuffer(GL_ARRAY_BUFFER, m_VertexBuffer); glBufferData(GL_ARRAY_BUFFER, sizeof(vertices), vertices, GL_STATIC_DRAW); // 3. 复制我们的CPU的索引数据到GPU索引缓冲中,供OpenGL使用 glBindBuffer(GL_ELEMENT_ARRAY_BUFFER, m_IndexBuffer); glBufferData(GL_ELEMENT_ARRAY_BUFFER, sizeof(indices), indices, GL_STATIC_DRAW); // 4. 设定顶点属性指针,来解释顶点缓冲中的顶点属性布局 glEnableVertexAttribArray(0);// 开启glsl的layout = 0输入 glVertexAttribPointer(0, 3, GL_FLOAT, GL_FALSE, 3 * sizeof(float), nullptr); } void Application::Run(){ ...... while (m_Running){ glClearColor(0.1f, 0.1f, 0.1f, 1); glClear(GL_COLOR_BUFFER_BIT); // 5.绑定顶点数组对象,并绘制-不需要绑定着色器,默认一个白色的着色器 glBindVertexArray(m_VertexArray); glDrawElements(GL_TRIANGLES, 3, GL_UNSIGNED_INT, nullptr); // 从前往后顺序更新层 -
OpenGLContext
void OpenGLContext::Init()
{


    // 将我们窗口的上下文设置为当前线程的主上下文
    glfwMakeContextCurrent(m_WindowHandle);
    // 获取显卡OpenGL函数定义的地址
    int status = gladLoadGLLoader((GLADloadproc)glfwGetProcAddress);
    HZ_CORE_ASSERT(status, "Failed to initialize Glad!");

    HZ_CORE_INFO("OpenGL 信息:");
    HZ_CORE_INFO("	Vendor:{0}", (const char*)glGetString(GL_VENDOR));
    HZ_CORE_INFO("	显卡名:{0}", (const char*)glGetString(GL_RENDERER));
    HZ_CORE_INFO("	版本:{0}", (const char*)glGetString(GL_VERSION));
}
效果
可以在显卡控制面板,更改程序选择的显卡
